fedora14 64位上安装openvas,以gvm-10为例子
首先需要更新依赖
设置/etc/ld.so.conf
添加/usr/lib64
1.cmake 3.0以上
下载地址https://cmake.org/files/cmake-3.9.2-Linux-x86_64.tar.gz
创建/usr/bin/cmake 到解压包的软连接
ln -s xxxxx /usr/bin/cmake
2.glib更新
本机2.26.0---->2.42以上
本机2.26.0时
[root@banel64 gvm-libs-10.0.1]# pkg-config --cflags --libs glib-2.0
-I/usr/include/glib-2.0 -I/usr/lib64/glib-2.0/include -lglib-2.0
安装2.42.1步骤:
rm -rf /usr/include/glib-2.0/
mkdir /usr/include/glib-2.0/
configure --prefix=/usr/ --libdir=/usr/lib64
make
make install
安装完之后
[root@banel64 ~]# pkg-config --cflags --libs glib-2.0
-I/usr/include/glib-2.0 -I/usr/lib64/glib-2.0/include -lglib-2.0

3.zlib更新
本机1.2.5----->1.2.8以上
本机1.2.5时
[root@banel64 gvm-libs-10.0.1]# rpm -qa|grep zlib
zlib-1.2.5-2.fc14.x86_64
zlib-devel-1.2.5-2.fc14.x86_64
下载源码更新
wget https://www.zlib.net/zlib-1.2.11.tar.gz
安装步骤:
./configure --prefix=/usr/ --libdir=/usr/lib64
make
make install
安装完成之后
对比一下/usr/lib64库文件 /usr/lib64/pkgconfig/*.pc文件 /usr/include/zlib.h 版本和修改日期
最后发现这个命令还可以加版本号
[root@banel64 tools]# pkg-config --cflags --libs "zlib >= 1.2.11"
-lz
4.安装libgmp
假如libgmp之前未安装或者安装的版本太低,导致nettle安装之后libhogweed.so未安装。gnutls ./configure配置依然出错。
之前安装的gmp版本及库
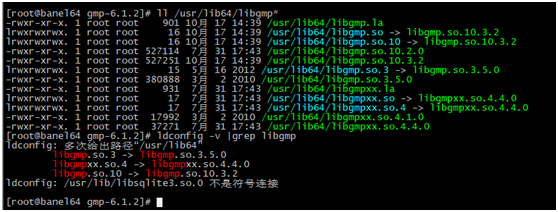
[root@banel64 ~]# rpm -qa|grep gmp
gmp-4.3.1-7.fc14.x86_64
gmp-devel-4.3.1-7.fc14.x86_64
[root@banel64 ~]# ll /usr/lib64/libgmp*
lrwxrwxrwx. 1 root root 15 5月 16 2012 /usr/lib64/libgmp.so -> libgmp.so.3.5.0
lrwxrwxrwx. 1 root root 15 5月 16 2012 /usr/lib64/libgmp.so.3 -> libgmp.so.3.5.0
-rwxr-xr-x. 1 root root 380888 3月 2 2010 /usr/lib64/libgmp.so.3.5.0
lrwxrwxrwx. 1 root root 13 5月 16 2012 /usr/lib64/libgmpxx.so -> libgmpxx.so.4
lrwxrwxrwx. 1 root root 17 5月 16 2012 /usr/lib64/libgmpxx.so.4 -> libgmpxx.so.4.1.0
-rwxr-xr-x. 1 root root 17992 3月 2 2010 /usr/lib64/libgmpxx.so.4.1.0
下载源码
wget https://gmplib.org/download/gmp/gmp-6.0.0.tar.xz
安装步骤:
xz -d gmp-6.0.0.tar.xz
tar -xvf gmp-6.0.0.tar
cd gmp-6.0.0
./configure --prefix=/usr --libdir=/usr/lib64 --disable-static --enable-cxx
make
make check
make install
安装之后
[root@banel64 ~]# ll /usr/lib64/libgmp*
-rwxr-xr-x. 1 root root 902 7月 31 17:43 /usr/lib64/libgmp.la
lrwxrwxrwx. 1 root root 16 7月 31 17:43 /usr/lib64/libgmp.so -> libgmp.so.10.2.0
lrwxrwxrwx. 1 root root 16 7月 31 17:43 /usr/lib64/libgmp.so.10 -> libgmp.so.10.2.0
-rwxr-xr-x. 1 root root 524610 7月 31 17:43 /usr/lib64/libgmp.so.10.2.0
lrwxrwxrwx. 1 root root 15 5月 16 2012 /usr/lib64/libgmp.so.3 -> libgmp.so.3.5.0
-rwxr-xr-x. 1 root root 380888 3月 2 2010 /usr/lib64/libgmp.so.3.5.0
-rwxr-xr-x. 1 root root 931 7月 31 17:43 /usr/lib64/libgmpxx.la
lrwxrwxrwx. 1 root root 17 7月 31 17:43 /usr/lib64/libgmpxx.so -> libgmpxx.so.4.4.0
lrwxrwxrwx. 1 root root 17 7月 31 17:43 /usr/lib64/libgmpxx.so.4 -> libgmpxx.so.4.4.0
-rwxr-xr-x. 1 root root 17992 3月 2 2010 /usr/lib64/libgmpxx.so.4.1.0
-rwxr-xr-x. 1 root root 34567 7月 31 17:43 /usr/lib64/libgmpxx.so.4.4.0
5.安装nettle
nettle依赖pmg
安装gnutls需要先安装nettle
下载地址
wget https://ftp.gnu.org/gnu/nettle/nettle-3.4.tar.gz
./configure --prefix=/usr/ --libdir=/usr/lib64
在config.log文件中出现
configure:6218: WARNING: GNU MP not found, or too old. GMP-6.0 or later is needed, see https://gmplib.org/.
Support for public key algorithms will be unavailable.
表明系统之前安装的libgmp版本太低,需要更新libgmp,要6.0版本以上,跑到步骤4
make
make install
安装之后
[root@banel64 nettle-3.4]# pkg-config --cflags --libs nettle
-lnettle
[root@banel64 nettle-3.4]# pkg-config --cflags --libs hogweed
-lhogweed
[root@banel64 nettle-3.4]# ^C
[root@banel64 nettle-3.4]# ll /usr/lib64/libnettle*
-rw-r--r--. 1 root root 4801850 7月 31 17:53 /usr/lib64/libnettle.a
lrwxrwxrwx. 1 root root 16 7月 31 17:53 /usr/lib64/libnettle.so -> libnettle.so.6.4
lrwxrwxrwx. 1 root root 16 7月 31 17:53 /usr/lib64/libnettle.so.6 -> libnettle.so.6.4
-rw-r--r--. 1 root root 4079456 7月 31 17:53 /usr/lib64/libnettle.so.6.4
[root@banel64 nettle-3.4]# ll /usr/lib64/libhogweed*
-rw-r--r--. 1 root root 6105568 7月 31 17:53 /usr/lib64/libhogweed.a
lrwxrwxrwx. 1 root root 17 7月 31 17:53 /usr/lib64/libhogweed.so -> libhogweed.so.4.4
lrwxrwxrwx. 1 root root 17 7月 31 17:53 /usr/lib64/libhogweed.so.4 -> libhogweed.so.4.4
-rw-r--r--. 1 root root 5470297 7月 31 17:53 /usr/lib64/libhogweed.so.4.4
发现libnettle.so和libhogweed.so都安装了,假如libhogweed.so没安装,等会gnutls的.configure命令还会报错。
6.安装libtasn1
安装好nettle之后,继续gnutls的./configure,出现如下错误:
configure: error:
***
*** Libtasn1 4.9 was not found. To use the included one, use --with-included-libtasn1
[root@banel64 gnutls-3.6.9]# rpm -qa|grep tasn1
libtasn1-devel-2.7-1.fc14.x86_64
libtasn1-2.7-1.fc14.x86_64
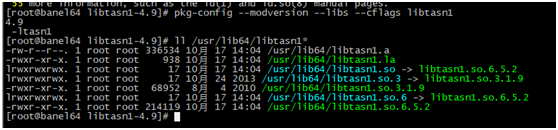
[root@banel64 gnutls-3.6.9]# pkg-config --modversion libtasn1
2.7
本地装了libtasn1虽然版本不够,但是也可以让gnutls 的
./configure --prefix=/usr/ --libdir=/usr/lib64 --with-included-libtasn1不再报libtasn1的错误,就没再更新libtasn1.
由于跟踪问题,所以最后这个库还是安装了。
libtasn1-4.9.tar.gz
./configure --prefix=/usr/ --libdir=/usr/lib64
make
make install
sz /usr/lib64/libtasn1.so.6.5.2
安装之后:
7.安装unbound
gnutls
./configure --prefix=/usr/ --libdir=/usr/lib64 --with-included-libtasn1 --with-included-unistring --without-p11-kit 时,最后没有unbound产生的key文件
yum info unbound
yum install unbound
8.gnutls更新
安装gnutls需要许多依赖,依次安装各个依赖,需要发费一些功夫。
gnutls我下载的3.6.4版本,nettle下载的3.4版本。
最后make guntls 需要修改源码,不过问题不大,可以接受。
刚开始下的3.6.9,编译一堆烂七八糟的问题。
gnutls依赖nettle、libtasn1、
本机2.8.6------>3.6.4
本机2.8.6时
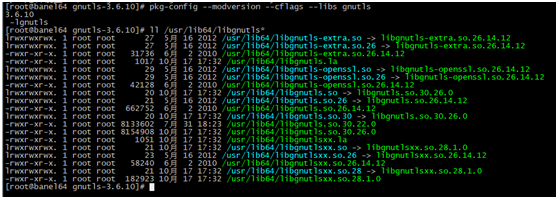
[root@banel64 tools]# pkg-config --cflags --libs gnutls
-lgnutls
[root@banel64 tools]# ll /usr/lib64/libgnu*
lrwxrwxrwx. 1 root root 27 5月 16 2012 /usr/lib64/libgnutls-extra.so -> libgnutls-extra.so.26.14.12
lrwxrwxrwx. 1 root root 27 5月 16 2012 /usr/lib64/libgnutls-extra.so.26 -> libgnutls-extra.so.26.14.12
-rwxr-xr-x. 1 root root 31736 6月 2 2010 /usr/lib64/libgnutls-extra.so.26.14.12
lrwxrwxrwx. 1 root root 29 5月 16 2012 /usr/lib64/libgnutls-openssl.so -> libgnutls-openssl.so.26.14.12
lrwxrwxrwx. 1 root root 29 5月 16 2012 /usr/lib64/libgnutls-openssl.so.26 -> libgnutls-openssl.so.26.14.12
-rwxr-xr-x. 1 root root 42128 6月 2 2010 /usr/lib64/libgnutls-openssl.so.26.14.12
lrwxrwxrwx. 1 root root 21 5月 16 2012 /usr/lib64/libgnutls.so -> libgnutls.so.26.14.12
lrwxrwxrwx. 1 root root 21 5月 16 2012 /usr/lib64/libgnutls.so.26 -> libgnutls.so.26.14.12
-rwxr-xr-x. 1 root root 662752 6月 2 2010 /usr/lib64/libgnutls.so.26.14.12
lrwxrwxrwx. 1 root root 23 5月 16 2012 /usr/lib64/libgnutlsxx.so -> libgnutlsxx.so.26.14.12
lrwxrwxrwx. 1 root root 23 5月 16 2012 /usr/lib64/libgnutlsxx.so.26 -> libgnutlsxx.so.26.14.12
-rwxr-xr-x. 1 root root 58240 6月 2 2010 /usr/lib64/libgnutlsxx.so.26.14.12
下载3.6.4版本
wget https://www.gnupg.org/ftp/gcrypt/gnutls/v3.6/gnutls-3.6.4.tar.xz
./configure --prefix=/usr/ --libdir=/usr/lib64 --with-included-libtasn1 --with-included-unistring --without-p11-kit
make
make install
make时会出现一些编译错误和警告,警告忽略,错误都是一些小错误,通过修改源码就可以解决。
最后终于编译出so库了,不容易啊,吐糟一下gnutls,发布了还存在编译错误!
[root@banel64 gnutls-3.6.4]# pkg-config --modversion gnutls
3.6.4
[root@banel64 gnutls-3.6.4]# ll /usr/lib64/libgnutls*
lrwxrwxrwx. 1 root root 27 5月 16 2012 /usr/lib64/libgnutls-extra.so -> libgnutls-extra.so.26.14.12
lrwxrwxrwx. 1 root root 27 5月 16 2012 /usr/lib64/libgnutls-extra.so.26 -> libgnutls-extra.so.26.14.12
-rwxr-xr-x. 1 root root 31736 6月 2 2010 /usr/lib64/libgnutls-extra.so.26.14.12
-rwxr-xr-x. 1 root root 994 7月 31 18:23 /usr/lib64/libgnutls.la
lrwxrwxrwx. 1 root root 29 5月 16 2012 /usr/lib64/libgnutls-openssl.so -> libgnutls-openssl.so.26.14.12
lrwxrwxrwx. 1 root root 29 5月 16 2012 /usr/lib64/libgnutls-openssl.so.26 -> libgnutls-openssl.so.26.14.12
-rwxr-xr-x. 1 root root 42128 6月 2 2010 /usr/lib64/libgnutls-openssl.so.26.14.12
lrwxrwxrwx. 1 root root 20 7月 31 18:23 /usr/lib64/libgnutls.so -> libgnutls.so.30.22.0
lrwxrwxrwx. 1 root root 21 5月 16 2012 /usr/lib64/libgnutls.so.26 -> libgnutls.so.26.14.12
-rwxr-xr-x. 1 root root 662752 6月 2 2010 /usr/lib64/libgnutls.so.26.14.12
lrwxrwxrwx. 1 root root 20 7月 31 18:23 /usr/lib64/libgnutls.so.30 -> libgnutls.so.30.22.0
-rwxr-xr-x. 1 root root 8130154 7月 31 18:23 /usr/lib64/libgnutls.so.30.22.0
-rwxr-xr-x. 1 root root 1028 7月 31 18:23 /usr/lib64/libgnutlsxx.la
lrwxrwxrwx. 1 root root 21 7月 31 18:23 /usr/lib64/libgnutlsxx.so -> libgnutlsxx.so.28.1.0
lrwxrwxrwx. 1 root root 23 5月 16 2012 /usr/lib64/libgnutlsxx.so.26 -> libgnutlsxx.so.26.14.12
-rwxr-xr-x. 1 root root 58240 6月 2 2010 /usr/lib64/libgnutlsxx.so.26.14.12
lrwxrwxrwx. 1 root root 21 7月 31 18:23 /usr/lib64/libgnutlsxx.so.28 -> libgnutlsxx.so.28.1.0
-rwxr-xr-x. 1 root root 182491 7月 31 18:23 /usr/lib64/libgnutlsxx.so.28.1.0
9.安装libuuid 2.25.0
之前系统装的2.18版本
[root@banel64 gnutls-3.6.4]# pkg-config --modversion uuid
2.18.0
[root@banel64 gnutls-3.6.4]# ll /usr/lib64/libuuid*
lrwxrwxrwx. 1 root root 28 10月 24 2013 /usr/lib64/libuuid.so -> ../../lib64/libuuid.so.1.3.0
因为找不到安装包,所以将uuild.pc文件的版本修改为2.25.0以后有问题再说。
Version: 2.18.0 =》 Version:2.25.0
10.安装libssh 0.7.4
下载网址https://www.libssh.org/files/
xz -d libssh-0.7.4.tar.xz
tar -xvf libssh-0.7.4.tar
mkdir build
cd build
cmake -DCMAKE_INSTALL_PREFIX=/usr -DLIB_INSTALL_DIR=/usr/lib64 ..
make
make install
安装成功
[root@banel64 build]# pkg-config --modversion libssh
0.7.4
11. 安装libhiredis
下载0.10.1版本
https://github.com/redis/hiredis/releases/tag/v0.10.1
这个版本没有pc文件,需要自己写pc文件。
就换了个包, hiredis-master.zip
mkdir build
cd build
cmake -DCMAKE_INSTALL_PREFIX=/usr -DCMAKE_INSTALL_LIBDIR=/usr/lib64 ..
最后修改一下.pc文件
[root@banel64 build]# cat /usr/lib64/pkgconfig/hiredis.pc
prefix=/usr
exec_prefix=${prefix}
libdir=/usr/lib64
includedir=${prefix}/include
pkgincludedir=${libdir}/pkgconfig
Name: hiredis
Description: Minimalistic C client library for Redis.
Version: 0.14.0
Libs: -L${libdir} -lhiredis
Cflags: -I${includedir} -D_FILE_OFFSET_BITS=64
12.安装libgpgme-error
gpgme依赖libgpgme-eror
##https://www.gnupg.org/ftp/gcrypt/libgpg-error/
https://gnupg.org/ftp/gcrypt/libgpg-error/libgpg-error-1.36.tar.bz2
##下载libgpg-error-1.24.tar.bz2
下载libgpg-error-1.36.tar.bz2
./configure --prefix=/usr/ --libdir=/usr/lib64
make
make install
13.安装libassuan
gpgme依赖libassuan
https://www.gnupg.org/ftp/gcrypt/libassuan/
下载libassuan-2.5.3.tar.bz2
./configure --prefix=/usr/ --libdir=/usr/lib64
make
make install
14.安装gpgme
我系统上装了gpgme 的1.2.0版本,但是缺pc文件
[root@banel64 build]# rpm -qa|grep gpgme
gpgme-1.2.0-3.fc14.x86_64
pygpgme-0.1-21.20101027bzr69.fc14.x86_64
后来发现还缺头文件,就把devel包装了
yun install gpgme-devel
回头更新gpgme,下载gpgme-1.13.1.tar.bz2和libassuan-2.5.3.tar.bz2
cd gpgme-1.13.1
./configure --prefix=/usr/ --libdir=/usr/lib64
make
make install
15. 安装libldap2
系统已经装了。
16.安装gvm-libs
下载gvm-libs-10.0.1.tar.gz
安装步骤:
mkdir build
cd build
cmake -DCMAKE_INSTALL_PREFIX=/usr ..
make
编译出错,提示gpgmeutils.c有问题,有类型未定义。
更新gpgme 1.13.1之后,再make install
gvm-libs安装成功,仅仅表示openvas的基本库都装完了。
万里长城的一小段完成了。
17.安装libical
gvm依赖libical1.0.0以上,本机版本0.46太低。
wget https://github.com/libical/libical/releases/download/v1.0.1/libical-1.0.1.tar.gz
mkdir build
cd build
我要装到/usr/lib64,
cmake -DCMAKE_INSTALL_PREFIX=/usr -DLIB_SUFFIX=64 -DSHARED_ONLY=True ..
make && make install
18.安装sqlite3.8.3
本机sqlite 3.6.23.1版本不够,需要升级。
官网下载最新版本sqlite-autoconf-3290000.tar.gz,
./configure --prefix=/usr/ --libdir=/usr/lib64
make
make install
17.安装GVM-8.0.1
下载gvmd-8.0.1.tar.gz
安装步骤
cmake -DCMAKE_INSTALL_PREFIX=/usr ..
make
make install
18.安装libgcrypt
libgcrypt1.6版本
wget https://gnupg.org/ftp/gcrypt/libgcrypt/libgcrypt-1.8.4.tar.bz2
./configure --prefix=/usr/ --libdir=/usr/lib64
依赖libgpg-error-1.36,回头更新libgpg-error
make
make install
19.安装ksba
https://gnupg.org/ftp/gcrypt/libksba/libksba-1.3.5.tar.bz2
./configure --prefix=/usr/ --libdir=/usr/lib64
make
make install
19.安装bison2.5
下载http://alpha.gnu.org/gnu/bison/bison-2.5_rc1.tar.gz
./configure --prefix=/usr/ --libdir=/usr/lib64
make
make install
20.安装openvas-6.0.1
cmake -DCMAKE_INSTALL_PREFIX=/usr ..
make
make install
21.安装redis
下载redis4.0.14.tar.gz
make
make PREFIX=/usr install
22.安装node
node-v10.16.2-linux-x64.tar.xz
下载的包,直接解压,建立/usr/bin/node和/usr/bin/npm的软连接即可。
23.安装yarn
ln -s /root/GATEWAY/Openvas/tools/yarn-v1.13.0/bin/yarn /usr/bin/yarn
24.安装libmicrohttpd
下载libmicrohttpd-0.9.59.tar.gz
./configure --prefix=/usr/ --libdir=/usr/lib64
make
make install
25.安装gsa-8.0.1
安装gsa之前需要安装node,yarn,libmicrohttpd
cmake -DCMAKE_INSTALL_PREFIX=/usr ..
make
make install
26.升级openssl
参考这篇文章 https://www.cnblogs.com/blueyunchao0618/p/11419615.html
升级1.1.0g版本
注:需要升级openssl,curl等,支持TLS1.2协议。
27.安装python3.7.4
需要pip工具,python2.7.9以上才有。
下载https://www.python.org/ftp/python/3.5.6/Python-3.5.6.tgz
./configure --prefix=/usr/ --libdir=/usr/lib64 --enable-shared
make
make install
因为安装到/usr/lib64/下,好多modules找不到,需要建个软连接。
建个软连接ln -s /usr/lib64/python3.5/lib-dynload/ /usr/lib/python3.5/lib-dynload
--------------------------------------------------------------------------------------------------------------------
因为3.5.6不能引用openssl1.1.0g版本,所以下载了3.7.4版本。
安装命令一样。
./configure --prefix=/usr/ --libdir=/usr/lib64 --enable-shared
make
make install
因为安装到/usr/lib64/下,好多modules找不到,需要建个软连接。
建个软连接ln -s /usr/lib64/python3.7/lib-dynload/ /usr/lib/python3.7/lib-dynload
28.安装gvm-tools
现有版本是
gvm-tools(v2.0.0.beta1),
python-gvm(1.0.0.beta3),
都是beta版本。
gvm-tools-2.0.0.beta1.tar.gz和python-gvm-1.0.0.beta3.tar.gz.
gvm-tools里面不包含gvm-script脚本。
方法一、
升级了pip3之后,
可以直接用pip3 install gvm-tools 从PYPI源上安装,
安装之后只有gvm-cli和gvm-pyshell,没有gvm-script.
如果安装gvm-script,需要从git上安装最新的。
pip3 install -e ./gvm-tools #gvm-tools是git下载的代码目录
安装之后,
不能用root执行gvm-cli,
我把gvmtools/helper.py的do_not_run_as_root()函数的代码注释掉了,函数体换成return.
重新执行pip3 install -e ./gvm-tools,就ok了。
发现发行版和git上的脚本的参数顺序有些变化,变化不大,可以接受。
方法二、
git clone https://github.com/greenbone/python-gvm.git
git clone https://github.com/greenbone/gvm-tools.git
pip3 install ./
pip3 install ./
-----------------------------------------------------分割线-----------------------------------------------------------
10月中旬 向设备上移植了 openvassd gvmd gsad后,发现openvass发布了新的正式版。
在2019年9月18号,发布了python-gvm 1.0.0 正式版 python-gvm-1.0.0.tar.gz
在2019年9月19号,发布了gvm-tools 2.0.0正式版 gvm-tools-2.0.0.tar.gz
在2019年10月11号,发布了gvm-libs v11.0新版本 gvm-libs-11.0.0.tar.gz(gvm-libs-10.0.1.tar.gz)
在2019年10月11号,发布了openvas v7.0.0新版本 openvas-7.0.0.tar.gz (openvas-6.0.1.tar.gz)
在2019年10月14号,发布了gvmd v9.0.0新版本 gvmd-9.0.0.tar.gz(gvmd-8.0.1.tar.gz)
在2019年10月14号,发布了gsa 9.0.0 新版本 gsa-9.0.0.tar.gz(gsa-8.0.1.tar.gz)
下载了新版本,还未开始安装。
期初:用以下命令安装,发现库还在本地目录,但是sys.path加入了本地目录。
为了以后便于移植到设备,使用pypi安装方式。
pip3 install --upgrade pip #升级pip3 到19.3.1版本
pip3 install - e ./python-gvm
#使用本地安装,库没有安装到/usr/lib/python3.7/site-package下
pip3 install gvm-tools
所以最后使用
<<都是通过pypi安装的,
pip3 install python-gvm
pip3 install gvm-tools>>
pip3 install --upgrade pip #升级pip3 到19.3.1版本
pip3 install python-gvm #使用pypi安装库
pip3 install gvm-tools安装 #使用pypi安装命令行
安装之后,
不能用root执行gvm-cli,
我把/usr/lib/python3.7/site-packages/gvmtools/helper.py的do_not_run_as_root()函数的代码注释掉了,函数体换成return.
29.注意 升级库
因为gnutls编译出来的certtool工具,移植到设备上不能运行,出现illegal instruction。
尝试很多方法,修改configure的配置选项,依然无法解决问题。
跟踪代码,gnutls调用nettle,nettle调用gmplib库。
gmplib编译时在mpn/x86_64位下,有几个子目录。
最后尝试了mini-gmp,mini-nettle选项,依然无法解决问题。
最后将三个库都换成最新版本,移植到设备上发现可以运行。
编译gnutls禁止硬件加速。
以下为新的库编译步骤:
gmp-6.1.2.tar.xz
nettle-3.5.1.tar.gz
gnutls-3.6.10.tar.xz
分别解压三个库,
cd gmp-6.1.2
./configure --prefix=/usr --libdir=/usr/lib64 --disable-static --enable-cxx #弃用
./configure --prefix=/usr --libdir=/usr/lib64 --disable-static
make
make check
make install
sz .libs/libgmp.so.10.3.2 (libgmp.so.10.2.0)
cd nettle-3.5.1
./configure --prefix=/usr/ --libdir=/usr/lib64
make
make check
make install
sz /usr/lib64/libnettle.so.7.0 (libnettle.so.6.4)
sz /usr/lib64/libhogweed.so.5.0 (libhogweed.so.4.4)

cd gnutls-3.6.10
./configure --prefix=/usr/ --libdir=/usr/lib64 --with-included-libtasn1 --with-included-unistring --without-p11-kit #弃用
./configure --prefix=/usr/ --libdir=/usr/lib64 --with-included-libtasn1 --with-included-unistring --without-p11-kit --disable-hardware-acceleration #为了编译通过,禁止硬件加速
make
make check
make install
sz /usr/lib64/libgnutls.so.30.26.0(libgnutls.so.30.22.0) 移植库
sz /usr/bin/certtool 移植命令
因为libnettle和libhogweed库的主版本号变了,所以依赖这两个库的程序都需要重新编译。
但是最后发现,只有gnutls依赖两个库,其他的例如openvassd都是依赖gnutls,然后通过gnutls依赖nettle和hogweed。
至此,所有组件安装完毕,
运行的话,见下一篇文章。