1、Exploit开发
发现漏洞只是一个开始,在你完成利用程序之前,还有很长一段路要走。不过Immunity专门为了这项任务做了许多专门设计,相信能帮你减少不少痛苦。接下来我们开发一些PyCommands以加速exploit的开发。
这些PyCommands要完成的功能包括:找到特定的指令将执行权限转移到shellcode,当编码shellcode的时候判断是否有需要过滤有害的字符。我们还将用PyCommand命令!findantidep绕过DEP(软件执行保护)。
2、找到友好的利用指令
在获得EIP的控制器之后,你就要将执行权限转移到shellcode。典型的方式就是,你用一个寄存器指向你的shellcode。你的工作就是在执行的代码里或者在加载的模块里找到跳转到寄存器的代码。
Immunity提供的搜索接口使这项工作变得很简单,它将贯穿整个程序寻找需要的代码。
#findinstruction.py(测试了下有问题,自己可以按照pycommands里面search.py可以参考修改)

from immlib import *
def main(args):
    imm = Debugger()
    search_code = " ".join(args)
    search_bytes = imm.Assemble(search_code)
    search_results = imm.Search(search_bytes)
    for hit in search_results:
        #Retrieve the memory page where this hit exists
        #and make sure it's executable
        code_page = imm.getMemoryPagebyAddress(hit)
        access = code_page.getAccess(human=True)
        if "execute" in access.lower():
            imm.log("[*] Found: %s (0x%08x)" % (search_code,hit), address=hit)
    return "[*] Finished search for instructions, check the Log window."
我们先转化要搜索的代码(记得内存中可是没有汇编指令),然后同Search方法在真个程序的内存空间中包含这个指令的地址。在返回的地址列表中,找到每个地址所属的页。接着确认页面时可执行的。每找到一个符合上面条件的就打印到记录窗口。在调试器的命令栏里执行如下格式的命令:
!findinstruction <instruction to search for> : ----> !findinstruction jmp esp
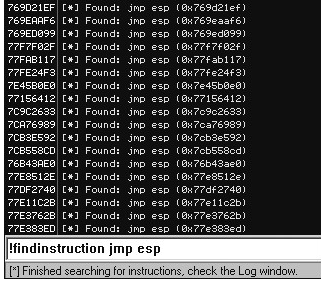
现在我们已经有了一个地址列表,这些地址都能使我们的shellcode运行起来(前提是你的shellcode地址放在ESP中)。
每个利用程序都有些许的差别,但是我们现在已经有了一个能够快速寻找指令地址的工具。
3、过滤有害字符
当你发送一段漏洞利用代码到目标系统,由于字符关系,shellcode也许没有办法执行。例如,如果我们从yi一个strcpy()调用中发现了缓冲区溢出,我们的利用代码就不能包含NULL字符(0x00)。因为strcpy()一遇到NULL字符就会停止拷贝数据。因此,就需要将shellcode编码,在目标内存执行后再解码。然而,始终有各种原因导致exploit编写失败。比如程序中有多重的字符编码,或者被漏洞程序进行了各种意想不到的处理。
一般情况下,如果获得了EIP的控制权限,然后shellcode抛出访问违例或者crash目标,接着完成自己的伟大使命(反弹后门),最重要的事就是确认shellcode被准确的复制到内存。Immunity使得这项工作更容易。

Figure 5-3: 溢出之后 Immunity 栈窗口
如你所见,EIP 当前的值和 ESP 的一样。4 个字节的 0xCC 将使调试器简单的停止工作, 就像设置了在这里设置了断点( 0xCC 和 INT3 的指令一样)。紧接着 4 个 INT3 指令,在 ESP+0x4 是 shellcode 的开始。我们将 shellcode 进行简单的 ASCII 编码,然后一个字节一个 字节的比较内存中的 shellcode 和我们发送 shellcode 有无差别,如果有一个字符不一样,说 明它没有通过软件的过滤。在之后的攻击总就必须将这个有害的字符加入 shellcode 编码中。
你能够从 CANVAS,Metasploit,或者你自己的制造的 shellcode。新建 badchar.py 文件, 输入以下代码。
#badchar.py
from immlib import *
def main(args):
    imm = Debugger()
    bad_char_found = False
    # First argument is the address to begin our search
    address = int(args[0],16)
    # Shellcode to verify
    shellcode = "<<COPY AND PASTE YOUR SHELLCODE HERE>>"
    shellcode_length = len(shellcode)
    debug_shellcode = imm.readMemory( address, shellcode_length ) debug_shellcode = debug_shellcode.encode("HEX")
    imm.log("Address: 0x%08x" % address)
    imm.log("Shellcode Length : %d" % length)
    imm.log("Attack Shellcode: %s" % canvas_shellcode[:512])
    imm.log("In Memory Shellcode: %s" % id_shellcode[:512])
    # Begin a byte-by-byte comparison of the two shellcode buffers
    count = 0
    while count <= shellcode_length:
        if debug_shellcode[count] != shellcode[count]:
            imm.log("Bad Char Detected at offset %d" % count)
            bad_char_found = True
            break
        count += 1
    if bad_char_found:
        imm.log("[***** | |] ")
        imm.log("Bad character found: %s" % debug_shellcode[count])
        imm.log("Bad character original: %s" % shellcode[count])
        imm.log("[***** | |] ")
    return "[*] !badchar finished, check Log window."
在这个脚本中,我们只是从 Immunity 库中调用了 readMemory()函数。剩下的脚本只是 简单的字符串比较。现在你需要将你的 shellcode 做 ASCII 编码(如果你有字节 0xEB 0x09, 编码后后你的字符串将看着像 EB09),将代码贴入脚本,并且如下运行:
!badchar <Address to Begin Search>
在我们前面的例子中,我们将从 ESP+0x4 地址 (0x00AEFD4C) 寻找,所以要在 PyCommand 执行如下命令:
!badchar 0x00AEFD4c
我们的脚本在发现危险字符串的时候将立刻发出警戒,由此大大减少花在调试 shellcode 崩溃时间。