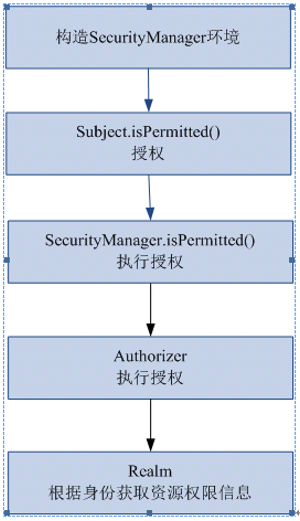
一、授权流程
二、三种授权方式
2.1、编程式:通过写if/else 授权代码块完成:
Subject subject = SecurityUtils.getSubject();
if(subject.hasRole(“admin”)) {
    //有权限
} else {
    //无权限
}
2.2、注解式:通过在执行的Java方法上放置相应的注解完成:
@RequiresRoles("admin")
public void hello() {
    //有权限
}
2.3、JSP/GSP 标签:在JSP/GSP 页面通过相应的标签完成:
<shiro:hasRole name="admin">
<!— 有权限—>
</shiro:hasRole>
三、建立权限配置
shiro-permission.ini里边的内容相当于在数据库
#用户
[users]
#用户zhang的密码是123,此用户具有role1和role2两个角色
zhang=123,role1,role2
wang=123,role2

#权限
[roles]
#角色role1对资源user拥有create、update权限
role1=user:create,user:update
#角色role2对资源user拥有create、delete权限
role2=user:create,user:delete
#角色role3对资源user拥有create权限
role3=user:create
权限标识符号规则【中间使用半角:分隔】:资源:操作:实例
user:create:01 表示对用户资源的01实例进行create操作。
user:create 表示对用户资源进行create操作,相当于user:create:*,对所有用户资源实例进行create操作。
user:*:01 表示对用户资源实例01进行所有操作。
四、代码开发
4.1、测试ini程序


// 角色授权、资源授权测试
    @Test
    public void testAuthorization() {

        // 创建SecurityManager工厂
        Factory<SecurityManager> factory = new IniSecurityManagerFactory("classpath:shiro-permission.ini");

        // 创建SecurityManager
        SecurityManager securityManager = factory.getInstance();

        // 将SecurityManager设置到系统运行环境,和spring后将SecurityManager配置spring容器中,一般单例管理
        SecurityUtils.setSecurityManager(securityManager);

        // 创建subject
        Subject subject = SecurityUtils.getSubject();

        // 创建token令牌
        UsernamePasswordToken token = new UsernamePasswordToken("zhangsan", "123");

        // 执行认证
        try {
            subject.login(token);
        } catch (AuthenticationException e) {
            // TODO Auto-generated catch block
            e.printStackTrace();
        }

        System.out.println("认证状态:" + subject.isAuthenticated());
        // 认证通过后执行授权

        // 基于角色的授权
        // hasRole传入角色标识
        boolean ishasRole = subject.hasRole("role1");
        System.out.println("单个角色判断" + ishasRole);
        // hasAllRoles是否拥有多个角色
        boolean hasAllRoles = subject.hasAllRoles(Arrays.asList("role1", "role2", "role3"));
        System.out.println("多个角色判断" + hasAllRoles);

        // 使用check方法进行授权,如果授权不通过会抛出异常
        // subject.checkRole("role13");

        // 基于资源的授权
        // isPermitted传入权限标识符
        boolean isPermitted = subject.isPermitted("user:create:1");
        System.out.println("单个权限判断" + isPermitted);

        boolean isPermittedAll = subject.isPermittedAll("user:create:1", "user:delete");
        System.out.println("多个权限判断" + isPermittedAll);

        // 使用check方法进行授权,如果授权不通过会抛出异常
        subject.checkPermission("items:create:1");

    }
4.2、自定义realm
上边的程序通过shiro-permission.ini对权限信息进行静态配置,实际开发中从数据库中获取权限数据。就需要自定义realm,由realm从数据库查询权限数据。
realm根据用户身份查询权限数据,将权限数据返回给authorizer(授权器)。
4.2.1、realm编写,结合上节完善写法
在原来自定义的realm中,修改doGetAuthorizationInfo方法。
package com.lhx.shiro.realm;

import java.util.ArrayList;
import java.util.List;

import org.apache.shiro.authc.AuthenticationException;
import org.apache.shiro.authc.AuthenticationInfo;
import org.apache.shiro.authc.AuthenticationToken;
import org.apache.shiro.authc.SimpleAuthenticationInfo;
import org.apache.shiro.authz.AuthorizationInfo;
import org.apache.shiro.authz.SimpleAuthorizationInfo;
import org.apache.shiro.realm.AuthorizingRealm;
import org.apache.shiro.subject.PrincipalCollection;

/**
 *
 * <p>
 * Title: CustomRealm
 * </p>
 * <p>
 * Description:自定义realm
 * </p>
 * @version 1.0
 */
public class CustomRealm extends AuthorizingRealm {

    // 设置realm的名称
    @Override
    public void setName(String name) {
        super.setName("customRealm");
    }

    // 用于认证
    @Override
    protected AuthenticationInfo doGetAuthenticationInfo(
            AuthenticationToken token) throws AuthenticationException {

        // token是用户输入的
        // 第一步从token中取出身份信息
        String userCode = (String) token.getPrincipal();

        // 第二步:根据用户输入的userCode从数据库查询
        // ....


        // 如果查询不到返回null
        //数据库中用户账号是zhangsansan
        /*if(!userCode.equals("zhangsansan")){//
            return null;
        }*/


        // 模拟从数据库查询到密码
        String password = "111111";

        // 如果查询到返回认证信息AuthenticationInfo

        SimpleAuthenticationInfo simpleAuthenticationInfo = new SimpleAuthenticationInfo(
                userCode, password, this.getName());

        return simpleAuthenticationInfo;
    }

    // 用于授权
    @Override
    protected AuthorizationInfo doGetAuthorizationInfo(
            PrincipalCollection principals) {

        //从 principals获取主身份信息
        //将getPrimaryPrincipal方法返回值转为真实身份类型(在上边的doGetAuthenticationInfo认证通过填充到SimpleAuthenticationInfo中身份类型),
        String userCode =  (String) principals.getPrimaryPrincipal();

        //根据身份信息获取权限信息
        //连接数据库...
        //模拟从数据库获取到数据
        List<String> permissions = new ArrayList<String>();
        permissions.add("user:create");//用户的创建
        permissions.add("items:add");//商品添加权限
        //....

        //查到权限数据,返回授权信息(要包括 上边的permissions)
        SimpleAuthorizationInfo simpleAuthorizationInfo = new SimpleAuthorizationInfo();
        //将上边查询到授权信息填充到simpleAuthorizationInfo对象中
        simpleAuthorizationInfo.addStringPermissions(permissions);

        return simpleAuthorizationInfo;
    }

}
4.2.2、在shiro-realm.ini中配置自定义的realm,将realm设置到securityManager中
[main]
#自定义 realm
customRealm=com.lhx.shiro.realm.CustomRealm
#将realm设置到securityManager相当于spring中注入
securityManager.realms=$customRealm
4.2.3、测试程序
    // 自定义realm进行资源授权测试
    @Test
    public void testAuthorizationCustomRealm() {

        // 创建SecurityManager工厂
        Factory<SecurityManager> factory = new IniSecurityManagerFactory("classpath:shiro-realm.ini");

        // 创建SecurityManager
        SecurityManager securityManager = factory.getInstance();

        // 将SecurityManager设置到系统运行环境,和spring后将SecurityManager配置spring容器中,一般单例管理
        SecurityUtils.setSecurityManager(securityManager);

        // 创建subject
        Subject subject = SecurityUtils.getSubject();

        // 创建token令牌
        UsernamePasswordToken token = new UsernamePasswordToken("zhangsan", "111111");

        // 执行认证
        try {
            subject.login(token);
        } catch (AuthenticationException e) {
            // TODO Auto-generated catch block
            e.printStackTrace();
        }

        System.out.println("认证状态:" + subject.isAuthenticated());
        // 认证通过后执行授权

        // 基于资源的授权,调用isPermitted方法会调用CustomRealm从数据库查询正确权限数据
        // isPermitted传入权限标识符,判断user:create:1是否在CustomRealm查询到权限数据之内
        boolean isPermitted = subject.isPermitted("user:create:1");
        System.out.println("单个权限判断" + isPermitted);

        boolean isPermittedAll = subject.isPermittedAll("user:create:1", "user:create");
        System.out.println("多个权限判断" + isPermittedAll);

        // 使用check方法进行授权,如果授权不通过会抛出异常
        subject.checkPermission("items:add:1");

    }
4.3、授权流程
1、对subject进行授权,调用方法isPermitted("permission串")
2、SecurityManager执行授权,通过ModularRealmAuthorizer执行授权
3、ModularRealmAuthorizer执行realm(自定义的CustomRealm)从数据库查询权限数据
调用realm的授权方法:doGetAuthorizationInfo
4、realm从数据库查询权限数据,返回ModularRealmAuthorizer
5、ModularRealmAuthorizer调用PermissionResolver进行权限串比对
6、如果比对后,isPermitted中"permission串"在realm查询到权限数据中,说明用户访问permission串有权限,否则 没有权限,抛出异常。
小结:以上004-006即是shiro基础权限认证,后续将编写结合spring,cache等文章