环境准备
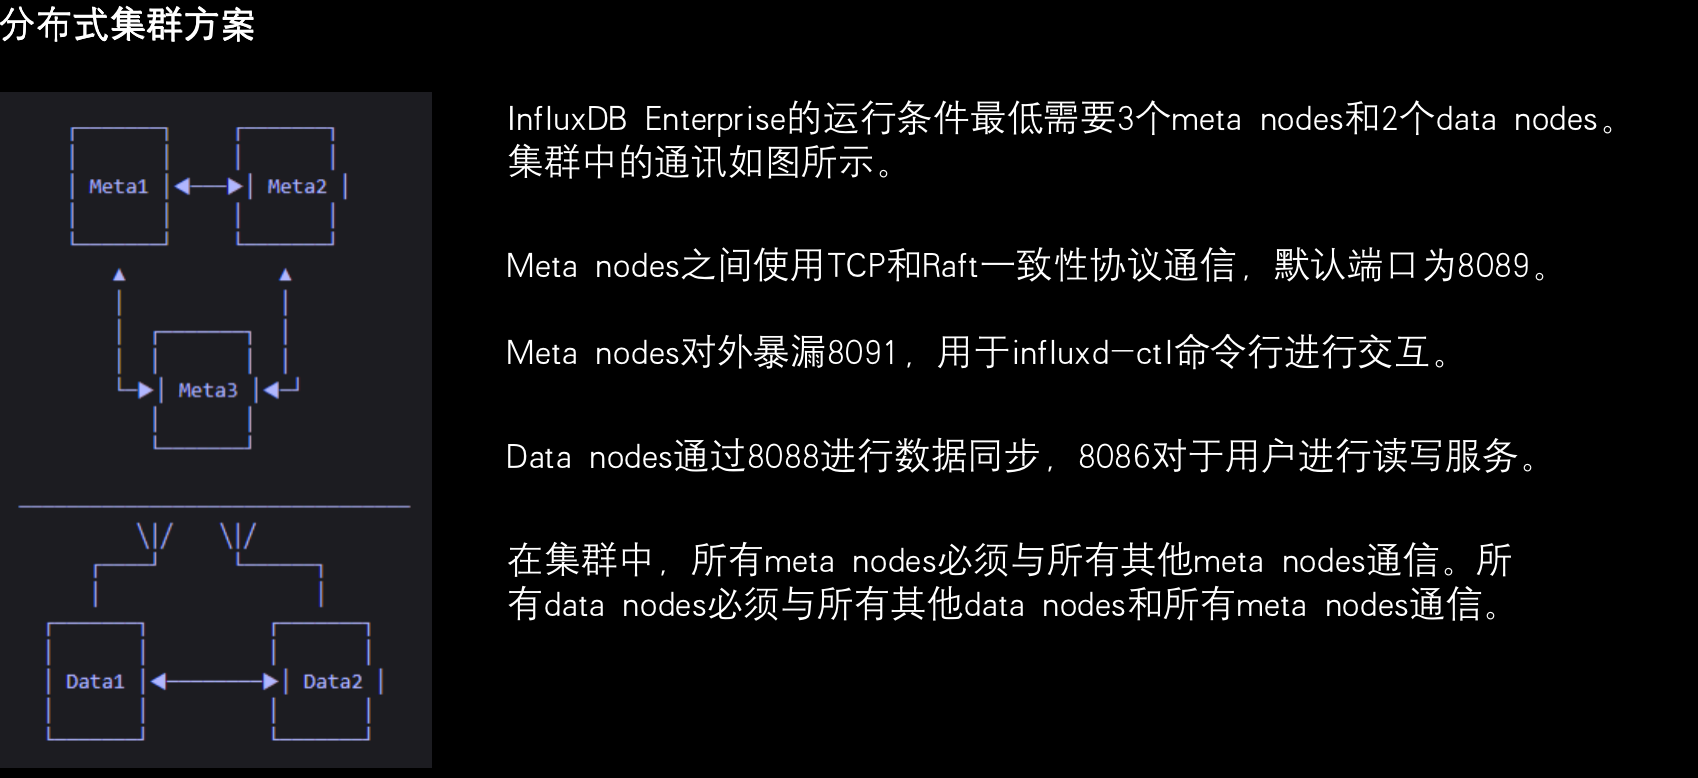
influxdb enterprise运行条件最低需要三个meta nodes节点以及两个data nodes
Meta nodes之间使用TCP和Raft一致性协议通信,默认端口为8089
Meta nodes对外暴露8091,用于influxd-ctl命令进行交互
Data nodes通过8088进行数据同步,8086对于用户进行读写服务
在集群中,所有meta nodes节点必须要与data nodes节点保持通信。
mata nodes主要保存以下所有的元数据信息
- 集群中所有的节点以及角色
- 集群中所有存在的数据库和保留策略(retention policy)
- 保存所有分片和分片组信息
- 保存集群用户权限
data node保存所有原始时序数据以及元数据,包括
- measurement(数据表)
- tag key和value
- field key和value;

#wget https://dl.influxdata.com/enterprise/releases/influxdb-meta_1.7.8-c1.7.8_amd64.deb
# dpkg -i influxdb-meta_1.7.8-c1.7.8_amd64.deb
influxdb-meda01
# egrep -v "#|^$" /etc/influxdb/influxdb-meta.conf
hostname = "enterprise-meta-01"
[enterprise]
license-key = "224bca5e-514d-441e-b2c2-31b29dd79811"
[meta]
dir = "/var/lib/influxdb/meta"
internal-shared-secret = "123.com"
influxdb-meda02
# egrep -v "#|^$" /etc/influxdb/influxdb-meta.conf
hostname = "enterprise-meta-02"
[enterprise]
license-key = "224bca5e-514d-441e-b2c2-31b29dd79811"
[meta]
 dir = "/var/lib/influxdb/meta"
internal-shared-secret = "123.com"
influxdb-meda03
# egrep -v "#|^$" /etc/influxdb/influxdb-meta.conf
hostname = "enterprise-meta-03"
[enterprise]
  license-key = "224bca5e-514d-441e-b2c2-31b29dd79811"
[meta]
  dir = "/var/lib/influxdb/meta"
   internal-shared-secret = "123.com"
# systemctl start influxdb-meta
# systemctl enable influxdb-meta
将meta node节点加入集群
#influxd-ctl add-meta enterprise-meta-02:8091
#influxd-ctl add-meta enterprise-meta-03:8091
【部署influxdb-node节点】
#wget https://dl.influxdata.com/enterprise/releases/influxdb-data-1.8.2_c1.8.2.x86_64.rpm
#dpkg -i influxdb-data_1.8.2-c1.8.2_amd64.deb
#egrep -v "#|^$" /etc/influxdb/influxdb.conf
 bind-address = "0.0.0.0:8088"
hostname = "enterprise-data-01"
[enterprise]
  license-key = "224bca5e-514d-441e-b2c2-31b29dd79811"
[meta]
  dir = "/var/lib/influxdb/meta"
   meta-internal-shared-secret = "123.com"
[data]
  dir = "/var/lib/influxdb/data"
  wal-dir = "/var/lib/influxdb/wal"
   cache-max-memory-size = "1g"
   cache-snapshot-memory-size = "25m"
   cache-snapshot-write-cold-duration = "10m"
  max-series-per-database = 0
   max-values-per-tag = 0
   max-index-log-file-size = "128k"
[cluster]
[hinted-handoff]
  dir = "/var/lib/influxdb/hh"
[anti-entropy]
[retention]
[shard-precreation]
[monitor]
   store-enabled = false
    [http]
       log-enabled = true

[logging]
[subscriber]
[[graphite]]
[[collectd]]
[[opentsdb]]
[[udp]]
[continuous_queries]
[tls]
# egrep -v "#|^$" /etc/influxdb/influxdb.conf
bind-address = "0.0.0.0:8088"
 hostname = "enterprise-data-02"
[enterprise]
  license-key = "224bca5e-514d-441e-b2c2-31b29dd79811"
[meta]
  dir = "/var/lib/influxdb/meta"
   meta-internal-shared-secret = "123.com"
[data]
  dir = "/var/lib/influxdb/data"
  wal-dir = "/var/lib/influxdb/wal"
   cache-max-memory-size = "1g"
   cache-snapshot-memory-size = "25m"
   cache-snapshot-write-cold-duration = "10m"
   max-series-per-database = 0
   max-values-per-tag = 0
   max-index-log-file-size = "128k"
[cluster]
[hinted-handoff]
  dir = "/var/lib/influxdb/hh"
[anti-entropy]
[retention]
[shard-precreation]
[monitor]
   store-enabled = true
[http]

[logging]
[subscriber]
[[graphite]]
[[collectd]]
[[opentsdb]]
[[udp]]
[continuous_queries]
   log-enabled = true
[tls]
#systemctl start influxd
#systemctl enable influxd
#将date node加入集群
#influxd-ctl add-data enterprise-data-01:8088
#influxd-ctl add-data enterprise-data-02:8088
最后我们在influxdb-meta节点上执行 influxd-ctl show查看集群节点状态

截止目前influxdb集群部署完毕!END
【部署Telegrat】
Telegrat是一个用golang写的开源数据库收集agent,基于插件驱动,本身提供的输入和输出的插件非常丰富,当然有需求也可以自行编写,Telegraf是influxdbdb公司的时间序列平台TICK技术栈中的“T”,主要就是数据采集,用于主机性能数据,包括主机CPU,内存,io,进程状态,服务状态;
# yum install wget;wget https://dl.influxdata.com/kapacitor/releases/kapacitor-1.5.6-1.x86_64.rpm
# yum localinstall -y kapacitor-1.5.6-1.x86_64.rpm
# wget https://dl.influxdata.com/chronograf/releases/chronograf-1.8.7.x86_64.rpm
# yum localinstall -y chronograf-1.8.7.x86_64.rpm
#yum install -y telegraf
#vim /etc/telegraf/telegraf.conf
[global_tags]
[agent]
  interval = "10s"
  round_interval = true
  metric_batch_size = 1000
  metric_buffer_limit = 10000
  collection_jitter = "0s"
  flush_interval = "10s"
  flush_jitter = "0s"
  precision = ""
  hostname = ""
  omit_hostname = false
[[outputs.influxdb]]
  urls = ["http://192.168.60.101:8086"]
  database = "telegraf"
  retention_policy = ""
  timeout = "5s"
  username = "admin"
  password = "admin"
[[inputs.cpu]]
  percpu = true
  totalcpu = true
  collect_cpu_time = false
  report_active = false
[[inputs.disk]]
  ignore_fs = ["tmpfs", "devtmpfs", "devfs", "iso9660", "overlay", "aufs", "squashfs"]
[[inputs.diskio]]
[[inputs.kernel]]
[[inputs.mem]]
[[inputs.processes]]
[[inputs.swap]]
[[inputs.system]]
#systemctl restart telegraf
#systemctl enable telegraf
# telegraf --config /etc/telegraf/telegraf.conf --input-filter cpu:mem --output-filter influxdb #生成具有特定输入和输出的配置文件,可以使用--input-filter和--output-filter标志

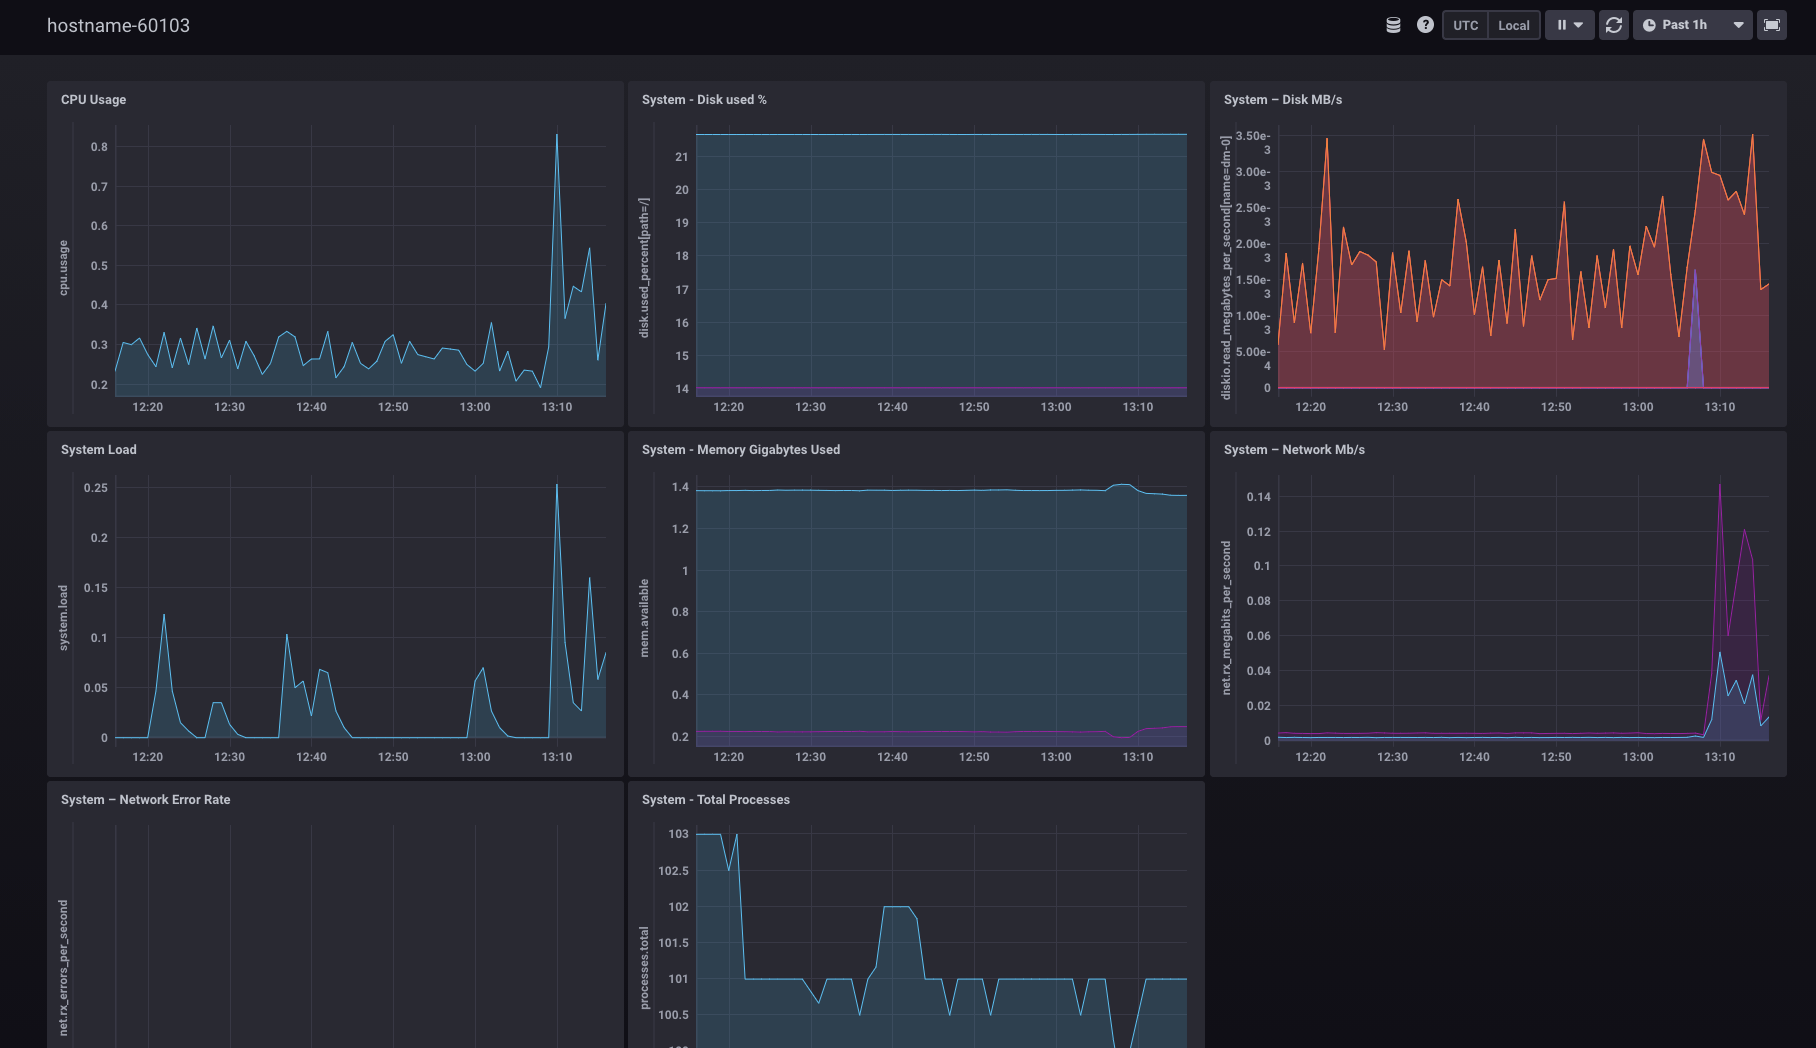
此时我们可以去192.168.60.101上的influxdb数据库中查看一下是否已经生成相应的库文件

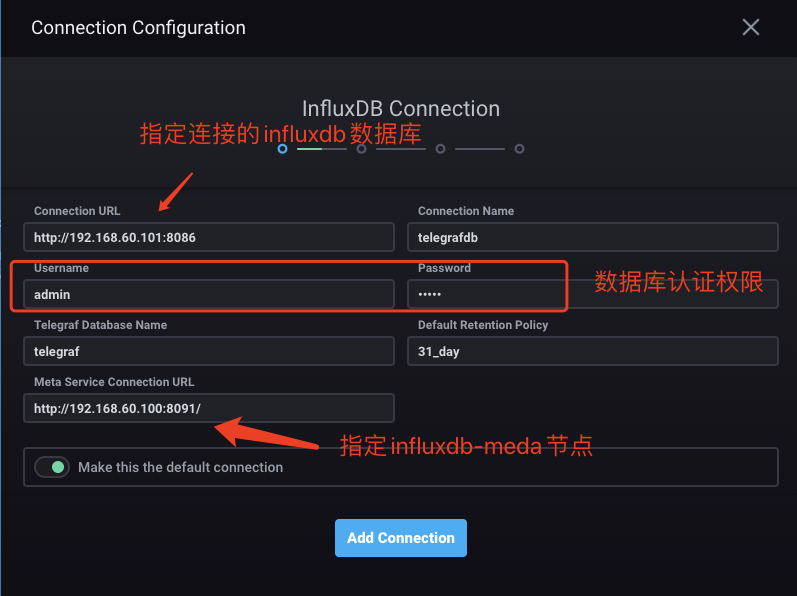
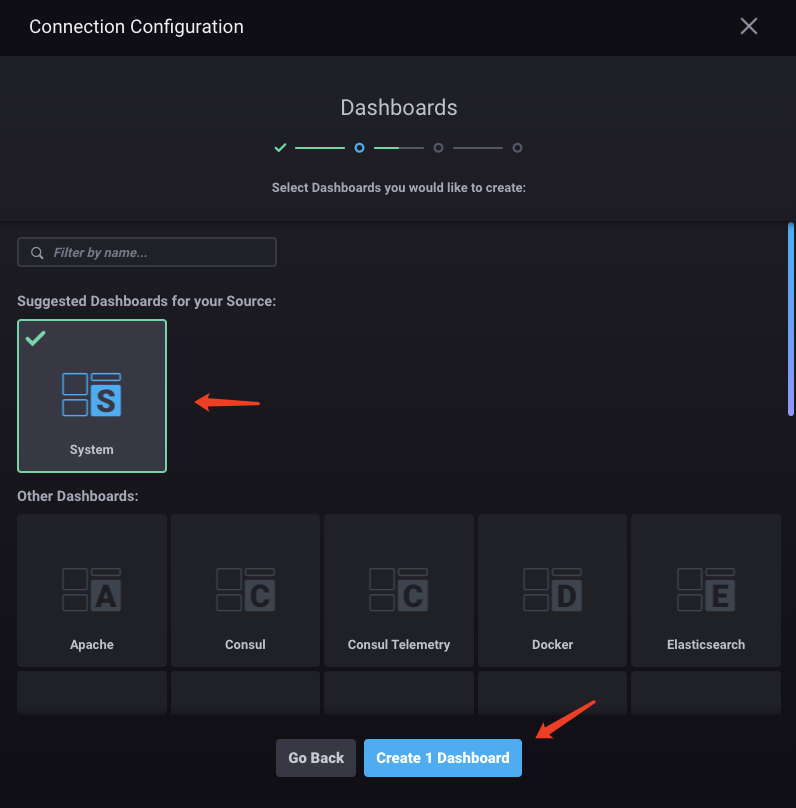
接下来我们可配置Chronograf的数据源,让chronorag连接influxdb数据库,并进行数据可视化展示
浏览器访问chronnoragweb界面:192.168.60.103:8888
Configuration===>+Add Connection==>