linux 常用命令(三)SSH
一、SSH 安装及免密登陆
(1) SSH 安装并配置
CentOS 默认已安装了 SSH client、SSH server,打开终端执行如下命令进行检验
rpm -qa | grep ssh
如果返回的结果如下图所示,包含了 SSH client 跟 SSH server,则不需要再安装
若需要安装,则可以通过 yum 进行安装:
yum -y install openssh-clients openssh-server openssh
注:sshd 在 openssh-server,ssh 在 openssh-clients,ssh-keygen 在 openssh 中。
接着执行如下命令测试一下 SSH 是否可用:
ssh localhost
此时会有如下提示(SSH 首次登陆提示),输入 yes 。然后按提示输入密码,这样就登陆到本机了。
[root@master home]# ssh localhost
The authenticity of host 'localhost (::1)' can't be established.
ECDSA key fingerprint is bd:66:a8:94:98:d5:0b:f3:bc:e9:5c:41:4c:ca:b3:d4.
Are you sure you want to continue connecting (yes/no)? yes
Warning: Permanently added 'localhost' (ECDSA) to the list of known hosts.
root@localhost's password:
Last login: Fri Apr 20 07:07:31 2018 from 192.168.2.1
但这样登陆是需要每次输入密码的,我们需要配置成 SSH 无密码登陆比较方便。
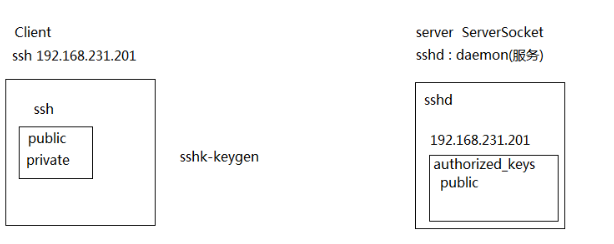
(2) SSH 免密登陆
首先在 client 端用 ssh-keygen 生成公私秘钥对,并将公钥追加到 server 端的 ~/.ssh/authorized_keys 文件中:
rm ./id_rsa*                   # 删除之前生成的公匙(如果有)
ssh-keygen -t rsa              # 会有提示,都按回车就可以
ssh-keygen -t rsa -P '' -f ~/.ssh/id_rsa

scp ~/.ssh/id_rsa.pub hadoop@192.168.2.110:/home/hadoop/.ssh   # 将生成的公钥拷贝到远程服务器上
cat id_rsa.pub >> authorized_keys   # 加入授权
chmod 600 ./authorized_keys         # 修改文件权限,否则无法登陆,亲测

ssh-copy-id hadoop@192.168.2.110    # 或直接远程授权,不需要拷贝
注意: 一定要 chmod 来一下,不然无法起作用。此时 client 再次 ssh server 就无需输入密码就可以直接登陆了。
1. sshd 在 openssh-server
2. ssh 在 openssh-clients
3. ssh-keygen 在 openssh
(3) SSH 配制
scp 是 secure copy 的简写,用于在 Linux 下进行远程拷贝文件,类似于 cp 命令,不过 cp 只能在本机中拷贝。执行 scp 时会要求输入 slave1 上 hadoop 用户的密码(hadoop)。
sudo vim /etc/ssh/sshd_config

RSAAuthentication yes       # 启用 RSA 认证
PubkeyAuthentication yes    # 启用公钥私钥配对认证方式
二、常用命令
scp ~/.ssh/id_rsa.pub hadoop@slave1:/home/hadoop/                  # 远程拷贝
scp /home/hadoop/hadoop-2.7.6.tar.gz hadoop@slave1:`pwd`     # 远程拷贝
ssh root@sdw2 'chown -R hadoop:hadoop  /usr/local/hadoop'      # 远程执行命令
三、踩过的坑
问题 1 :Authentication refused: bad ownership or modes for directory /home/oracle
/var/log/secure 日志看到是权限问题:Dec 21 14:54:55 SHLT-TB-ORACLEBAK sshd[12347]: Authentication refused: bad ownership or modes for directory /home/oracle (tailf /var/log/secure)
ssh -vvv 192.168.2.101 # 查看详细日志,用于排错
sshd为了安全,对属主的目录和文件权限有所要求。如果权限不对,则 ssh 的免密码登陆不生效。
用户目录权限为 755
rsa_id.pub 及authorized_keys权限一般为644
rsa_id权限必须为600。
四、互信脚本 - expect
用脚本实现 SSH 互信,依赖 expect 服务
yum install -y tcl tclx tcl-devel expect
4.1 expect 语法
vi ssh.sh

#!/usr/bin/expect
set timeout 30
spawn ssh test@192.168.140.111      # 执行 shell 命令
expect "password:"
send "pwd
"
interact                # 执行完成后保持交互状态,而不是退出远程终端
(1) [#!/usr/bin/expect] 注意:这一行需要在脚本的第一行。
(2) [set timeout 30] 单位:s。
(3) [spawn ssh test@192.168.140.111] spawn 用来传递交互指令。
(4) [expect "password:"] 判断上次输出结果里是否包含“password:”的字符串。
(5) [send "pwd
"] 执行交互动作。
(6) [interact] 执行完成后保持交互状态,而不是退出远程终端。
useradd test
echo pwd | passwd --stdin test
执行 expect ssh.sh 后会登陆到 192.168.140.111 上。
4.2 ssh 互信脚本
#!/bin/expect

# 循环 1000 台机器的IP地址,生成密钥文件 authorized_keys

for ip in {cat ip.list}
do
    ssh user@$ip ssh-keygen -t rsa  &>/dev/null
    expect{
        "yes/no" { send "yes
";exp_continue}
        "password:"{send "$passwd
";exp_continue}
    }
    cat ~/.ssh/id_rsa.pub > ~/.ssh/authorized_keys &> /dev/null
    exit
    if [ !-f ~/.ssh/authorized_keys ]; then
       touch ~/.ssh/authorized_keys
    fi
    ssh user@$ip cat ~/.ssh/authorized_keys >> ~/.ssh/authorized_keys  &> /dev/null
    expect {
        "yes/no" { send "yes
";exp_continue}
        "password:"{send "$passwd
";exp_continue}
    }
done

# scp authorized_keys 文件到各台机器上面。
for ip in {cat ip.list}
do
    scp ~/.ssh/authorized_keys user@$ip:~/.ssh/
    expect {
        "yes/no" { send "yes
";exp_continue}
        "password:"{send "$passwd
";exp_continue}
    }
done
每天用心记录一点点。内容也许不重要,但习惯很重要!