PropertyPlaceholderConfigurer

Spirng在生命周期里关于Bean的处理大概可以分为下面几步:
- 加载 Bean 定义(从xml或者从@Import等)
- 处理 BeanFactoryPostProcessor
- 实例化 Bean
- 处理 Bean 的 property 注入
- 处理 BeanPostProcessor
而当我们在声明了
<context:property-placeholder location="classpath:config.properties"/>
标签之后,即声明了一个配置型 bean 交给 Spring 容器进行管理,即 PropertyPlaceholderConfigurer 类。我们先看一下这个类的继承结构。
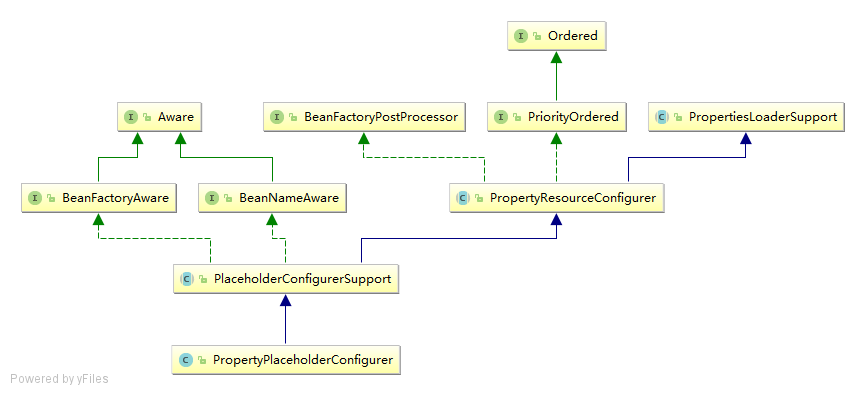
这里 PrepertyPlaceholderConfigurer 实现了 BeanFactoryPostProcesser 接口,并实现了 postProcessBeanFactory() 方法,即当 Spring 容器的 BeanFactory 被构造成功之后会调用这个方法。这时,我们先看父类的 PropertyResourceConfigurer 方法 postProcessBeanFactory。因为这个类继承了 Spring 的 BeanFactoryPostProcesser 接口,所以这个方法一定是操作 BeanFactory 的。
org.springframework.beans.factory.config.PropertyResourceConfigurer
public void postProcessBeanFactory(ConfigurableListableBeanFactory beanFactory) throws BeansException {
    try {
    //1. 获取当前容器配置的所有Properties文件,可能由多个文件merge而来
        Properties mergedProps = mergeProperties();

        //2. 如果需要的话,将Properties文件的内容进行转化,因为默认的Preperties都是String的key-value形式。
        //   Spring提供的默认方式是不转化,保持String,String的key-value
        convertProperties(mergedProps);

        //3. 由子类继承,对容器与Properties进行操作,即value注入。
        processProperties(beanFactory, mergedProps);
    }
    catch (IOException ex) {
        throw new BeanInitializationException("Could not load properties", ex);
    }
}
这里最重要的第一步就是获得 Properties 文件即 mergeProperties 方法,这是解析资源文件最基本的方法,所以这个方法一定存在于当前功能的最基类中,即 PropertiesLoaderSupport。由于xml中是这样配置的:
<context:property-placeholder location="classpath:config.properties"/>
这里声明了一个 PropertyPlaceholderConfigurer 对象,显然是调用了 setLocation 方法,而这个方法同样存在于该功能模块的最基本父类 PropertiesLoaderSupport 中。
org.springframework.core.io.support.PropertiesLoaderSupport
public abstract class PropertiesLoaderSupport {
    private Resource[] locations;

    public void setLocation(Resource location) {
        this.locations = new Resource[] {location};
    }

    //注意:后声明的文件覆盖先声明的文件,以最后一个文件为准
    public void setLocations(Resource... locations) {
        this.locations = locations;
    }
}
mergeProperties 方法中进行了配置化管理,将从 this.locations 中加载的 Properties 与 localProperties 合并,localOverride 控制覆盖顺序:
protected Properties mergeProperties() throws IOException {
    Properties result = new Properties();

    if (this.localOverride) {
        // Load properties from file upfront, to let local properties override.
        loadProperties(result);
    }

    if (this.localProperties != null) {
        for (Properties localProp : this.localProperties) {
            CollectionUtils.mergePropertiesIntoMap(localProp, result);
        }
    }

    if (!this.localOverride) {
        // Load properties from file afterwards, to let those properties override.
        loadProperties(result);
    }

    return result;
}

// 加载配制文件到 Properties 中
protected void loadProperties(Properties props) throws IOException {
    if (this.locations != null) {
    //1.遍历声明的Resource文件地址
        for (Resource location : this.locations) {
            if (logger.isInfoEnabled()) {
                logger.info("Loading properties file from " + location);
            }
            try {
        //2.获得Resource文件流,并加载内容到Properties对象中
                PropertiesLoaderUtils.fillProperties(
                        props, new EncodedResource(location, this.fileEncoding), this.propertiesPersister);
            }
            catch (IOException ex) {
                if (this.ignoreResourceNotFound) {
                    if (logger.isWarnEnabled()) {
                        logger.warn("Could not load properties from " + location + ": " + ex.getMessage());
                    }
                }
                else {
                    throw ex;
                }
            }
        }
    }
}
回想 PropertyResourceConfigurer 主流程中的三个方法,第一步已经执行完毕,加载了配置的 properties 文件,第二步是 spring 自己的默认实现,将非空的 key 对应的 value 放入 Properties 中,第三步则该由子类各自实现了,将 BeanFactory 与 Properties 进行统一操作。这时候我们看我们直接声明的派生类 PropertyPlaceholderConfigurer。
protected void processProperties(ConfigurableListableBeanFactory beanFactoryToProcess, Properties props)
            throws BeansException {
    //1.声明一个支持value为String类型的Resolver
    StringValueResolver valueResolver = new PlaceholderResolvingStringValueResolver(props);
    //2.将key-value注入到BeanFactory的某些bean中
    doProcessProperties(beanFactoryToProcess, valueResolver);
}
接下来就是真正的 value 注入环节了
protected void doProcessProperties(ConfigurableListableBeanFactory beanFactoryToProcess,
            StringValueResolver valueResolver) {

    //1. 将key-value内容声明为BeanDefinitionVisitor对象,用来根据BeanDefinition修改即将生成的对应的Bean内容
    BeanDefinitionVisitor visitor = new BeanDefinitionVisitor(valueResolver);

    String[] beanNames = beanFactoryToProcess.getBeanDefinitionNames();
    for (String curName : beanNames) {
        //2. 只有同一个容器内的才可以进行value注入,同时应该避免掉操作本身,避免进入循环递归
        if (!(curName.equals(this.beanName) && beanFactoryToProcess.equals(this.beanFactory))) {
            BeanDefinition bd = beanFactoryToProcess.getBeanDefinition(curName);
            try {
                visitor.visitBeanDefinition(bd);
            }
            catch (Exception ex) {
                throw new BeanDefinitionStoreException(bd.getResourceDescription(), curName,
                    ex.getMessage(), ex);
            }
        }
    }

    //3.处理一些拥有别名的类
    beanFactoryToProcess.resolveAliases(valueResolver);

    //4.New in Spring 3.0: resolve placeholders in embedded values such as annotation attributes.(这一步有些不懂,以后再修正)
     beanFactoryToProcess.addEmbeddedValueResolver(valueResolver);
}
在上述代码中,第2步已经修改了原始的 BeanDefinition,我们一路跟进去看,原来核心的替换功能在 PropertyPlaceholderHelper 中:
protected String parseStringValue(
        String strVal, PlaceholderResolver placeholderResolver, Set<String> visitedPlaceholders) {
    //1. 对每一个key进行处理
    StringBuilder result = new StringBuilder(strVal);
    //2. 首先考虑有占位符的情况,默认是${}
    int startIndex = strVal.indexOf(this.placeholderPrefix);
    while (startIndex != -1) {
        // 考虑 key 占位符嵌套 ${${${}}},先查找外层 ${} 成对出现的最后一个 '}'
        int endIndex = findPlaceholderEndIndex(result, startIndex);
        if (endIndex != -1) {
            String placeholder = result.substring(startIndex + this.placeholderPrefix.length(), endIndex);
            String originalPlaceholder = placeholder;
            if (!visitedPlaceholders.add(originalPlaceholder)) {
                throw new IllegalArgumentException(
                        "Circular placeholder reference '" + originalPlaceholder + "' in property definitions");
            }
            //3. 如果 key 有占位符,即 key=${abc},则递归调用本方法查找 key 的真实值
            placeholder = parseStringValue(placeholder, placeholderResolver, visitedPlaceholders);
            //4. 真正的从 key-value 集合中获得 key 对应的真实值
            String propVal = placeholderResolver.resolvePlaceholder(placeholder);
            //5. 如果没有找到,则试图按照 ${key:default} 的形式解析
            if (propVal == null && this.valueSeparator != null) {
                int separatorIndex = placeholder.indexOf(this.valueSeparator);
                if (separatorIndex != -1) {
                    //5.1 获得:之前的内容,即真正的key
                    String actualPlaceholder = placeholder.substring(0, separatorIndex);
                    //5.2 获得:之后的内容,即默认值
                    String defaultValue = placeholder.substring(separatorIndex + this.valueSeparator.length());
                    //5.3 再次尝试从key-value集合中获得内容,因为如果真的是key-value的形式,按照全名是肯定找不到的
                    propVal = placeholderResolver.resolvePlaceholder(actualPlaceholder);
                    //5.4 如果找到了就按照配置的走,如果没有找到则附上默认值
                    if (propVal == null) {
                        propVal = defaultValue;
                    }
                }
            }
            //6. 如果最终解析到 propVal,则还要判断 propVal 是否有占位符,即 propVal=${} 的情况
            if (propVal != null) {
                //6.1 如果找到了这个value,则再次递归调用自己,避免value也是占位符的情况
                propVal = parseStringValue(propVal, placeholderResolver, visitedPlaceholders);
                //6.2 将获得的结果替换掉
                result.replace(startIndex, endIndex + this.placeholderSuffix.length(), propVal);
                if (logger.isTraceEnabled()) {
                    logger.trace("Resolved placeholder '" + placeholder + "'");
                }
                startIndex = result.indexOf(this.placeholderPrefix, startIndex + propVal.length());
            }
            else if (this.ignoreUnresolvablePlaceholders) {
                // Proceed with unprocessed value.
                startIndex = result.indexOf(this.placeholderPrefix, endIndex + this.placeholderSuffix.length());
            }
            else {
                throw new IllegalArgumentException("Could not resolve placeholder '" +
                        placeholder + "'" + " in string value "" + strVal + """);
            }
            visitedPlaceholders.remove(originalPlaceholder);
        }
        else {
            startIndex = -1;
        }
    }

    return result.toString();
}
参考: