任务调度(02)Spring Schedule
Spring 3.0 提供两种任务调度方式:一是定时任务调度;二是异步任务调度。这两种任务调度方式都是基于 JUC 实现的,是一种非常轻量级的任务调度方式。同时在 spring-context-support 中也整合了 Quartz,文本重点关注 Spring 提供了原生任务调度方式 - @EnableScheduling 和 @EnableAsync。
- 定时任务调度和异步任务调度的基本使用方法。
- 定时任务调度的源码分析。ScheduledAnnotationBeanPostProcessor 会扫描标注有 @Scheduled 注解的方法,将其注册到 ScheduledTaskRegistrar 中,真正调度任务的类是 ScheduledTaskRegistrar 中的TaskScheduler。TaskScheduler 实现类最底层是 ScheduledExecutorService,由 JUC 提供。
- 异步任务调度的源码分析。异步执行和定时执行的最大区别是异步执行可能需要返回执行结果,所以需要对标注有 @Async 的类进行代理。异步任务有两种执行模式:代理 或 Aspectj,无论那种方法都是以 Spring AOP 作为支撑。AsyncAnnotationBeanPostProcessor 首先创建 AsyncAnnotationAdvisor,如果类或方法上标注有 @Async 注解,则使用 proxyFactory 生成代理对象。
1. 基本用法
1.1 定时调度 - 基于xml
<?xml version="1.0" encoding="UTF-8"?>
<beans xmlns="http://www.springframework.org/schema/beans"
       xmlns:xsi="http://www.w3.org/2001/XMLSchema-instance" xmlns:task="http://www.springframework.org/schema/task"
       xsi:schemaLocation="http://www.springframework.org/schema/beans http://www.springframework.org/schema/beans/spring-beans.xsd http://www.springframework.org/schema/task http://www.springframework.org/schema/task/spring-task.xsd">
    <bean id="scheduledXmlTest" class="ScheduledXmlTest"/>

    <!--定时调度@Scheduled-->
    <task:scheduler id="taskScheduler" pool-size="2"/>
    <task:scheduled-tasks scheduler="taskScheduler">
        <task:scheduled ref="scheduledXmlTest" method="fixedDelay" fixed-delay="2000"/>
        <task:scheduled ref="scheduledXmlTest" method="fixedRate" fixed-rate="2000"/>
        <task:scheduled ref="scheduledXmlTest" method="cron" cron="0/2 * * * * *"/>
    </task:scheduled-tasks>

    <!--异步调度@Async-->
    <task:executor id="executor" pool-size="2"/>
    <!--启动注解驱动-->
    <task:annotation-driven executor="executor" scheduler="taskScheduler"/>
</beans>
总结: Spring 任务调度总共有 4 个标签:
task:scheduler:配置调度器,实现了 org.springframework.scheduling.TaskScheduler 接口,默认是 org.springframework.scheduling.TaskScheduler。task:scheduled-tasks:配置任务,如果不指定 scheduler 属性,那么所有的任务都会在一个线程上执行,可能会造成线程阻塞。task:executor:异步任务调度的执行线程,实现 Executor 接口。task:annotation-driven:开启注解驱动,包括 @Scheduled 和 @Async。其中 executor 为异步调度的执行线程池,scheduler 为定时调度的执行线程池。同样不配置的话,所有的 @Scheduled 任务都是一个线程上执行。
1.2 定时调度 - 注解驱动
@EnableScheduling
public class ScheduledTest {
    private Logger logger = LoggerFactory.getLogger(ScheduledTest.class);
    public static void main(String[] args) {
        SpringApplication.run(ScheduledTest.class);
    }

    @Scheduled(fixedDelay = 2000)
    public void fixedDelay() {
        logger.info("fixedDelay");
    }

    @Scheduled(fixedRate = 2000)
    public void fixedRate() {
        logger.info("fixedRate");
    }

    @Scheduled(cron = "0/2 * * * * *")
    public void cron() {
        logger.info("cron");
    }
}
总结: fixedDelay、fixedRate、cron 都是定时的任务调度,那它们有什么区别呢?
fixedDelay:上一个任务执行结束和下一个任务开始的时间间隔。总时间间隔=方法执行时间 + fixedDelay。fixedRate:上一个任务执行开始和下一个任务开始的时间间隔。cron:类似 Linux crontab,如果任务执行时间太长,就会忽略过期的任务。
1.3 异步调度 - 注解驱动
@Async 可以标注在类或方法上,如果标注在类上则表示这个类的所有方法都是异步执行的。
@EnableAsync
//@EnableAsync(proxyTargetClass = false, mode = AdviceMode.PROXY)
public class AsyncTest {
    private static final Logger logger = LoggerFactory.getLogger(AsyncTest.class);
    public static void main(String[] args) {
        ConfigurableApplicationContext context = SpringApplication.run(AsyncTest.class);

        AsyncTest asyncTest = context.getBean(AsyncTest.class);
        asyncTest.async();
        logger.info("main method");
    }

    @Async
    public void async() {
        logger.info("async method");
    }
}
日志如下:
INFO 2516 --- [           main] AsyncTest                                : main method
INFO 2516 --- [cTaskExecutor-1] AsyncTest                                : async method
总结: 可以发现这两条日志输出的线程不一致,而且是 main 线程先输出日志,也就是 @Async 注解后,方法是异步执行的。
注意: @Async 标注在类上,则这类的所有方法都是异常执行。
接下来进行源码分析。Spring 任务调度的源码位于 spring-context 工程的 scheduling 包中,其目录如下:
scheduling
	|- annotation	# @Scheduled和@Async注解支持
	|- concurrent	# juc扩展
	|- config		# 传统的xml解析支持
	|- support		# cron解析支持
2. @EnableScheduling 源码分析
总结: 上述的步骤,有两个重要的入口:
- 实现
BeanPostProcessor#postProcessAfterInitialization接口,在每个 bean 实例化完成后,扫描 @Scheduled 注解,注册到 ScheduledTaskRegistrar 中。 - 监听 Spring 的容器初始化事件
onApplicationEvent(ContextRefreshedEvent event)事件,回调 finishRegistration 方法设置 ScheduledTaskRegistrar 的 TaskScheduler。在配置 ScheduledTaskRegistrar 后,调用其 scheduleTasks 方法触发任务调度。 - 真正调度任务的类是 TaskScheduler 实现类中的 ScheduledExecutorService,由 JUC 提供。
- 查找 TaskScheduler 的实现类实例默认是通过类型查找,若有多个实现则会查找名字为 "taskScheduler" 的实现 Bean,若没有找到则在 ScheduledTaskRegistrar 调度任务的时候会创建一个 newSingleThreadScheduledExecutor , 将 TaskScheduler 的实现类实例设置到 ScheduledTaskRegistrar 属性中。
2.1 @Scheduled 注解扫描
@Scheduled 注解的处理分两步:一是 MethodIntrospector.selectMethods 扫描该 bean 的所有 @@Scheduled和@Schedules注解的方法;二是 processScheduled 方法处理有 @Scheduled 注解的方法。
(1)@Scheduled 扫描
@Override
public Object postProcessAfterInitialization(Object bean, String beanName) {
    if (bean instanceof AopInfrastructureBean || bean instanceof TaskScheduler ||
        bean instanceof ScheduledExecutorService) {
        return bean;
    }

    Class<?> targetClass = AopProxyUtils.ultimateTargetClass(bean);
    if (!this.nonAnnotatedClasses.contains(targetClass)) {
        // 1. 扫描每个方法上的@Scheduled和@Schedules注解
        Map<Method, Set<Scheduled>> annotatedMethods =
            MethodIntrospector.selectMethods(targetClass, (MethodIntrospector.MetadataLookup<Set<Scheduled>>)
                method -> {
                    Set<Scheduled> scheduledMethods = AnnotatedElementUtils.getMergedRepeatableAnnotations(
                        method, Scheduled.class, Schedules.class);
                    return (!scheduledMethods.isEmpty() ? scheduledMethods : null);
    	       });
        // 2. 调用processScheduled处理所有的@Scheduled注解的方法
        if (annotatedMethods.isEmpty()) {
            this.nonAnnotatedClasses.add(targetClass);
        } else {
            annotatedMethods.forEach((method, scheduledMethods) -> scheduledMethods.forEach(scheduled ->
                            processScheduled(scheduled, method, bean)));
        }
    }
    return bean;
}
总结: 核心步骤就两步:第一步是 MethodIntrospector.selectMethods 扫描所有方法的 @Scheduled 和@Schedules注解。至于第二步,最核心的处理则委托给了 processScheduled 方法处理。
(2)processScheduled
processScheduled 分别处理 @Scheduled 中的三种情况:cron、fixedDelay、fixedRate 三种场景,将其分别包装成 CronTask、FixedDelayTask、FixedRateTask 后,注册到 ScheduledTaskRegistrar 上,当调用其 scheduleTasks 方法触发任务调度。
protected void processScheduled(Scheduled scheduled, Method method, Object bean) {
    try {
        Runnable runnable = createRunnable(bean, method);
        Set<ScheduledTask> tasks = new LinkedHashSet<>(4);
        // Determine initial delay
        long initialDelay = scheduled.initialDelay();
        ...

        // 1. Check cron expression
        String cron = scheduled.cron();
        if (StringUtils.hasText(cron)) {
            String zone = scheduled.zone();
            if (StringUtils.hasLength(cron)) {
                if (!Scheduled.CRON_DISABLED.equals(cron)) {
                    tasks.add(this.registrar.scheduleCronTask(new CronTask(runnable, new CronTrigger(cron, timeZone))));
                }
            }
        }

        // 2. Check fixed delay
        long fixedDelay = scheduled.fixedDelay();
        if (fixedDelay >= 0) {
            tasks.add(this.registrar.scheduleFixedDelayTask(new FixedDelayTask(runnable, fixedDelay, initialDelay)));
        }

        // 3. Check fixed rate
        long fixedRate = scheduled.fixedRate();
        if (fixedRate >= 0) {
            tasks.add(this.registrar.scheduleFixedRateTask(new FixedRateTask(runnable, fixedRate, initialDelay)));
        }

        // 4. Finally register the scheduled tasks
        synchronized (this.scheduledTasks) {
            Set<ScheduledTask> regTasks = this.scheduledTasks.computeIfAbsent(bean, key -> new LinkedHashSet<>(4));
            regTasks.addAll(tasks);
        }
    } catch (IllegalArgumentException ex) {
        throw new IllegalStateException();
    }
}
总结: processScheduled 代码有删减,只保留了核心的逻辑。processScheduled 代码很简单,接下来继续分析定时任务触发流程。
2.2 定时任务触发
ScheduledAnnotationBeanPostProcessor 会通过 onApplicationEvent(ContextRefreshedEvent event) 监听容器初始化事件。一旦容器初始化完成,就会试图从容器中获取 TaskScheduler。最终调用 scheduleTasks 触发定时任务调度。
@Override
public void onApplicationEvent(ContextRefreshedEvent event) {
    if (event.getApplicationContext() == this.applicationContext) {
        finishRegistration();
    }
}

private void finishRegistration() {
    // 1. 手动配置 TaskScheduler
    if (this.scheduler != null) {
        this.registrar.setScheduler(this.scheduler);
    }

    // 2. 自定义配置ScheduledTaskRegistrar。获取容器中的SchedulingConfigurer
    if (this.beanFactory instanceof ListableBeanFactory) {
        Map<String, SchedulingConfigurer> beans =
            ((ListableBeanFactory) this.beanFactory).getBeansOfType(SchedulingConfigurer.class);
        List<SchedulingConfigurer> configurers = new ArrayList<>(beans.values());
        AnnotationAwareOrderComparator.sort(configurers);
        for (SchedulingConfigurer configurer : configurers) {
            configurer.configureTasks(this.registrar);
        }
    }

    // 3. 如果没有配置TaskScheduler,则从Spring容器中查找。查找规则如下:
    //    1) 查找TaskScheduler,如果有多个则查找名称为"taskScheduler"
    //    2) 查找ScheduledExecutorService,如果有多个则查找名称为"taskScheduler"
    if (this.registrar.hasTasks() && this.registrar.getScheduler() == null) {
        try {
            // Search for TaskScheduler bean...
            this.registrar.setTaskScheduler(resolveSchedulerBean(this.beanFactory, TaskScheduler.class, false));
        } catch (NoUniqueBeanDefinitionException ex) {
            try {
                this.registrar.setTaskScheduler(resolveSchedulerBean(this.beanFactory, TaskScheduler.class, true));
            } catch (NoSuchBeanDefinitionException ex2) {
            }
        } catch (NoSuchBeanDefinitionException ex) {
            // Search for ScheduledExecutorService bean next...
            try {
                this.registrar.setScheduler(resolveSchedulerBean(this.beanFactory, ScheduledExecutorService.class, false));
            } catch (NoUniqueBeanDefinitionException ex2) {
                try {
                    this.registrar.setScheduler(resolveSchedulerBean(this.beanFactory, ScheduledExecutorService.class, true));
                } catch (NoSuchBeanDefinitionException ex3) {
                }
            } catch (NoSuchBeanDefinitionException ex2) {
            }
        }
    }

    // 4. 触发定时任务调度
    this.registrar.afterPropertiesSet();
}
总结: 一旦 Spring 容器初始化完成,就会触发定时任务的执行。在 finishRegistration 方法中,主要是配置定时任务执行器,并启动定时任务。
- TaskScheduler 配置:
手动配置scheduler->TaskScheduler->TaskScheduler("taskScheduler")->ScheduledExecutorService->ScheduledExecutorService("taskScheduler")。 - ScheduledTaskRegistrar 配置:自定义 SchedulingConfigurer。
- 触发定时任务调度:调用 ScheduledTaskRegistrar#scheduleTasks。
- TaskScheduler 是定时任务的最终执行器,底层的实现类是 ScheduledExecutorService,由 JUC 提供。可以看到所有的 @Scheduled 注解的定时任务都会在同一个 TaskScheduler 中执行,不像 xml 一样可以指定不同的 TaskScheduler。所以使用时要注意方法是否会阻塞,或将配置合适的 TaskScheduler 线程池大小。
2.3 TaskScheduler
TaskScheduler 是定时任务的最终执行器,底层的实现类是 ScheduledExecutorService,由 JUC 提供。
2.3.1 自定义 TaskScheduler
Spring Boot 自定义 TaskScheduler 如下:
@Bean("taskExecutor")
public Executor taskExecutor() {
    ThreadPoolTaskExecutor executor = new ThreadPoolTaskExecutor();
    // 核心线程数10:线程池创建时候初始化的线程数
    executor.setCorePoolSize(10);
    // 最大线程数20:线程池最大的线程数,只有在缓冲队列满了之后才会申请超过核心线程数的线程
    executor.setMaxPoolSize(20);
    // 缓冲队列200:用来缓冲执行任务的队列
    executor.setQueueCapacity(200);
    // 允许线程的空闲时间60秒:当超过了核心线程出之外的线程在空闲时间到达之后会被销毁
    executor.setKeepAliveSeconds(60);
    // 线程池名的前缀:设置好了之后可以方便我们定位处理任务所在的线程池
    executor.setThreadNamePrefix("taskExecutor-");
    // 线程池对拒绝任务的处理策略:这里采用了CallerRunsPolicy策略,
    // 当线程池没有处理能力的时候,该策略会直接在 execute 方法的调用线程中运行被拒绝的任务;
    // 如果执行程序已关闭,则会丢弃该任务
    executor.setRejectedExecutionHandler(new ThreadPoolExecutor.CallerRunsPolicy());
    return executor;
}
2.3.2 TaskScheduler接口
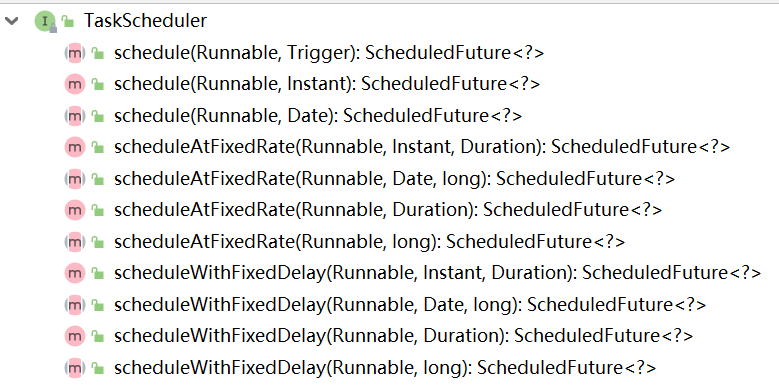
(1)schedule(Runnable task, Trigger trigger);
指定一个触发器执行定时任务。可以使用 CronTrigger 来指定 Cron 表达式,执行定时任务
CronTrigger t = new CronTrigger("0 0 10,14,16 * * ?");
taskScheduler.schedule(this, t);
(2)schedule(Runnable task, Date startTime);
指定一个具体时间点执行定时任务,可以动态的指定时间,开启任务。只执行一次。
(3)scheduleAtFixedRate(Runnable task, long period);
立即执行,循环任务,指定一个执行周期(毫秒计时)。
PS: 不管上一个周期是否执行完,到时间下个周期就开始执行。
(4)scheduleAtFixedRate(Runnable task, Date startTime, long period);
指定时间开始执行,循环任务,指定一个间隔周期(毫秒计时)。
PS: 不管上一个周期是否执行完,到时间下个周期就开始执行。
(5)scheduleWithFixedDelay(Runnable task, long delay);
立即执行,循环任务,指定一个间隔周期(毫秒计时)。
PS: 上一个周期执行完,等待delay时间,下个周期开始执行。
(6)scheduleWithFixedDelay(Runnable task, Date startTime, long delay);
指定时间开始执行,循环任务,指定一个间隔周期(毫秒计时)
2.3.3 TaskScheduler实现类

TaskScheduler 有三个实现类。
(1)ConcurrentTaskScheduler
ConcurrentTaskScheduler 如果不设置 ScheduledExecutorService,则默认通过 Executors.newSingleThreadScheduledExecutor() 创建单线程池执行。
private ConcurrentTaskScheduler taskScheduler = new ConcurrentTaskScheduler();
taskScheduler.schedule(task, new Date());
(2)DefaultManagedTaskScheduler
以当前线程执行任务,这是 ConcurrentTaskScheduler 的子类,添加了 JNDI 的支持。和ConcurrentTaskScheduler 一样的用法,需要使用 JNDI 可以单独设置
(3)ThreadPoolTaskScheduler
TaskScheduler 接口的默认实现类,多线程定时任务执行。可以设置执行线程池数(默认一个线程)。
3. @EnableAsync 源码分析
Spring 异步任务调度,使用了动态代理( JDK 或 CGLIB),依赖 Spring Aop,支持动态代理或 ASPECTJ 两种模式。
3.1 @EnableAsync
@EnableAsync 是注解驱动的入口,用于配置任务调度的模式。
@EnableAsync(proxyTargetClass = false, mode = AdviceMode.PROXY)
public class AsyncTest {
}
总结: @EnableAsync 注解有两个重要的属性:
mode:表示使用动态代理(PROXY时使用 JDK 或 CGLIB 代理)还是 ASPECTJ 方式(AdviceMode.ASPECTJ)。默认使用 AdviceMode.PROXY,也就是动态代理。如果使用 AdviceMode.ASPECTJ 模式需要引入 spring-aspectj 包。proxyTargetClass:表示使用 JDK 代理(false)还是CGLIB 代理(true)。默认使用 false,也就是 JDK 动态代理。annotation:表示自定义注解,默认 @Async。
3.2 @Async
@Async 可以标注在类或方法上,如果在类上,则表示这个类的所有方法都异步执行。
@Async("myExecuter")
public void async() {
    logger.info("async method");
}
总结: 和 @Scheduled 不同,@Async 可以指定执行的线程池,默认是执行器是 SimpleAsyncTaskExecutor,即每次执行时都会创建一个新的线程执行任务。可以从日志中看出不配置执行线程池的线程名称(线程名SimpleAsyncTaskExecutor,日志输出时线程名称有截断):
INFO 2516 --- [           main] AsyncTest                   : main method
INFO 2516 --- [cTaskExecutor-1] AsyncTest                   : async method
3.3 执行流程
@EnableAsync 通过 @Import 向 Spring 容器中注入 AsyncConfigurationSelector。上文提到 @EnableAsync 有两种执行模式:动态代理或 Aspectj,AsyncConfigurationSelector 会根据配置动态注入 ProxyAsyncConfiguration 或 AspectJAsyncConfiguration(需要引入 spring-aspectj 包)。
public class AsyncConfigurationSelector extends AdviceModeImportSelector<EnableAsync> {
    private static final String ASYNC_EXECUTION_ASPECT_CONFIGURATION_CLASS_NAME =
        "org.springframework.scheduling.aspectj.AspectJAsyncConfiguration";
    public String[] selectImports(AdviceMode adviceMode) {
		switch (adviceMode) {
			case PROXY:
				return new String[] {ProxyAsyncConfiguration.class.getName()};
			case ASPECTJ:
				return new String[] {ASYNC_EXECUTION_ASPECT_CONFIGURATION_CLASS_NAME};
			default:
				return null;
		}
	}
}
总结: Spring 默认为 PROXY 代理模式,即使用 ProxyAsyncConfiguration。下文的源码分析也是从 ProxyAsyncConfiguration 展开。
3.3.1 初始化流程
总结: Spring 异步任务调度最核心的步骤是生成切面 AsyncAnnotationAdvisor,至于其它的执行逻辑则是依靠 Spring AOP 实现的。主要的核心类如下:
ProxyAsyncConfiguration:配置类,向 Spring 容器中注入 AsyncConfigurer 和 AsyncAnnotationBeanPostProcessor。AsyncConfigurer:可以自定义异步执行的线程线程池(executor)和异常(exceptionHandler)处理机制。使用时,只需要将实现了 AsyncConfigurer 接口的类注入到容器中即可。AsyncAnnotationBeanPostProcessor:最核心类,主要完成两件事:一是 AsyncAnnotationBeanPostProcessor 初始化时,会执行 setBeanFactory 方法初始化 AsyncAnnotationAdvisor,二是在 bean 初始化完成后生成代理类。Spring 异步任务调度实际上是依赖 Spring AOP 机制。AsyncAnnotationAdvisor:最核心类,包含切入点(Pointcut)和通知(Advice)。AbstractAdvisingBeanPostProcessor(Spring AOP):在 bean 实现完成后,根据 ProxyFactory 生成代理类。ProxyFactory(Spring AOP):代理工厂。有两种代理方式:JdkDynamicAopProxy 或 ObjenesisCglibAopProxy。
3.3.2 AsyncAnnotationBeanPostProcessor
AsyncAnnotationBeanPostProcessor 主要的工作是初始化 AsyncAnnotationAdvisor,这是 Spring 异步执行的基石。AsyncAnnotationAdvisor 相当于 Spring AOP 的 @Aspect 注解,定义了切入点(Pointcut)和通知(Advice)。
public class AsyncAnnotationBeanPostProcessor extends AbstractBeanFactoryAwareAdvisingPostProcessor {
    @Override
    public void setBeanFactory(BeanFactory beanFactory) {
        super.setBeanFactory(beanFactory);

        AsyncAnnotationAdvisor advisor = new AsyncAnnotationAdvisor(this.executor, this.exceptionHandler);
        if (this.asyncAnnotationType != null) {
            advisor.setAsyncAnnotationType(this.asyncAnnotationType);
        }
        advisor.setBeanFactory(beanFactory);
        this.advisor = advisor;
    }
}
总结: Spring 异步任务调度除了 AsyncAnnotationAdvisor 不一样,其余的执行流程和 Spring AOP 一模一样。
@Override
public Object postProcessAfterInitialization(Object bean, String beanName) {
    if (this.advisor == null || bean instanceof AopInfrastructureBean) {
        return bean;
    }
    ...
	// 生成动态代理
    if (isEligible(bean, beanName)) {
        ProxyFactory proxyFactory = prepareProxyFactory(bean, beanName);
        if (!proxyFactory.isProxyTargetClass()) {
            evaluateProxyInterfaces(bean.getClass(), proxyFactory);
        }
        proxyFactory.addAdvisor(this.advisor);
        customizeProxyFactory(proxyFactory);
        return proxyFactory.getProxy(getProxyClassLoader());
    }
    return bean;	// No proxy needed.
}
总结: 首先判断是否需要进行动态代理,如果类或方法上标注有 @Async 注解,则使用 proxyFactory 生成代理对象。
protected boolean isEligible(Class<?> targetClass) {
    Boolean eligible = this.eligibleBeans.get(targetClass);
    if (eligible != null) {
        return eligible;
    }
    if (this.advisor == null) {
        return false;
    }
    // 最终使用 advisor.putcut 判断是否需要进行代理
    eligible = AopUtils.canApply(this.advisor, targetClass);
    this.eligibleBeans.put(targetClass, eligible);
    return eligible;
}
3.3.3 AsyncAnnotationAdvisor
AsyncAnnotationAdvisor 主要是定义了 AOP 执行的通知(Advice)和切入点(Pointcut)。
(1)构造器
public class AsyncAnnotationAdvisor extends AbstractPointcutAdvisor implements BeanFactoryAware {
	private Advice advice;
	private Pointcut pointcut;

    public AsyncAnnotationAdvisor(
			Supplier<Executor> executor, Supplier<AsyncUncaughtExceptionHandler> exceptionHandler) {

		Set<Class<? extends Annotation>> asyncAnnotationTypes = new LinkedHashSet<>(2);
		asyncAnnotationTypes.add(Async.class);
		try {
			asyncAnnotationTypes.add((Class<? extends Annotation>)
					ClassUtils.forName("javax.ejb.Asynchronous", AsyncAnnotationAdvisor.class.getClassLoader()));
		} catch (ClassNotFoundException ex) {
		}
		this.advice = buildAdvice(executor, exceptionHandler);
		this.pointcut = buildPointcut(asyncAnnotationTypes);
	}
}
总结: 从上也可以看出 Spring 除了支持 @Async 注解外,还支持 @Asynchronous 注解。另外就是创建通知(advice)和切面(pointcut)。
其实我们也大致可以猜到,AsyncAnnotationAdvisor 实际上将标注有 @Async 注解的方法丢到线程池中异步执行。pointcut 根据注解判断是否需要异步执行,advice 则是具体的执行逻辑。
(2)buildPointcut
buildPointcut 建立切入点,也就是判断是否需要异步执行。
protected Pointcut buildPointcut(Set<Class<? extends Annotation>> asyncAnnotationTypes) {
    ComposablePointcut result = null;
    for (Class<? extends Annotation> asyncAnnotationType : asyncAnnotationTypes) {
        // 匹配类上的注解
        Pointcut cpc = new AnnotationMatchingPointcut(asyncAnnotationType, true);
        // 匹配方法上的注解
        Pointcut mpc = new AnnotationMatchingPointcut(null, asyncAnnotationType, true);
        if (result == null) {
            result = new ComposablePointcut(cpc);
        } else {
            // union:表示所有的匹配规则只要有一个匹配上了就返回匹配成功
            result.union(cpc);
        }
        result = result.union(mpc);
    }
    return (result != null ? result : Pointcut.TRUE);
}
总结: buildPointcut 建立匹配规则,实际上就是只要类或方法上有一个匹配成功,就执行任务调度。
(3)buildAdvice
buildAdvice 方法包含异步执行的逻辑。
protected Advice buildAdvice(
    Supplier<Executor> executor, Supplier<AsyncUncaughtExceptionHandler> exceptionHandler) {
    AnnotationAsyncExecutionInterceptor interceptor = new AnnotationAsyncExecutionInterceptor(null);
    interceptor.configure(executor, exceptionHandler);
    return interceptor;
}
总结: buildAdvice 方法很简单,将异步执行的逻辑全部委托给了 AnnotationAsyncExecutionInterceptor 完成。
AnnotationAsyncExecutionInterceptor 继承自 AsyncExecutionInterceptor(Spring AOP),具体的执行逻辑由 Spring AOP 完成。至此容器初始化时,代理已经生成完毕。
3.3.4 执行流程
Spring 异步任务执行的入口是 AnnotationAsyncExecutionInterceptor,继承自 AsyncExecutionInterceptor。在 Spring AOP 执行时会回调其 invoke 方法。
@Override
public Object invoke(final MethodInvocation invocation) throws Throwable {
    // `1. 获取最原始的方法 userDeclaredMethod,去除代理,桥接
    Class<?> targetClass = (invocation.getThis() != null ? AopUtils.getTargetClass(invocation.getThis()) : null);
    Method specificMethod = ClassUtils.getMostSpecificMethod(invocation.getMethod(), targetClass);
    final Method userDeclaredMethod = BridgeMethodResolver.findBridgedMethod(specificMethod);

    // 2. 根据方法获取任务执行的线程池,@Async可以指定要执行的线程池名称
    AsyncTaskExecutor executor = determineAsyncExecutor(userDeclaredMethod);
    if (executor == null) {
        throw new IllegalStateException(");
    }

	// 3. 任务封装成 Callable
    Callable<Object> task = () -> {
        try {
            // 执行任务
            Object result = invocation.proceed();
            if (result instanceof Future) {
                return ((Future<?>) result).get();
            }
        } catch (ExecutionException ex) {
            handleError(ex.getCause(), userDeclaredMethod, invocation.getArguments());
        } catch (Throwable ex) {
            handleError(ex, userDeclaredMethod, invocation.getArguments());
        }
        return null;
    };

	// 4. 提交任务
    return doSubmit(task, executor, invocation.getMethod().getReturnType());
}
总结: invoke 方法首先要获取要异步执行的线程池,将任务封装成一个 Callable 后,丢到该线程池中执行。
- 获取任务执行的线程池:determineAsyncExecutor
- 任务执行并返回执行结果:doSubmit
(1)determineAsyncExecutor
determineAsyncExecutor 方法用于获取任务将要在哪个线程池上执行,默认是 SimpleAsyncTaskExecutor。
protected AsyncTaskExecutor determineAsyncExecutor(Method method) {
    // 1. 缓存中获取
    AsyncTaskExecutor executor = this.executors.get(method);
    if (executor == null) {
        Executor targetExecutor;
        // 2. @Async 注解指定执行线程池名称
        String qualifier = getExecutorQualifier(method);
        // 3. 如果指定了线程池名称,直接从 Spring 容器中获取
        if (StringUtils.hasLength(qualifier)) {
            targetExecutor = findQualifiedExecutor(this.beanFactory, qualifier);
        // 4. 获取默认的线程池
        } else {
            targetExecutor = this.defaultExecutor.get();
        }
        if (targetExecutor == null) {
            return null;
        }
        // 5. 包装成 AsyncListenableTaskExecutor
        executor = (targetExecutor instanceof AsyncListenableTaskExecutor ?
                    (AsyncListenableTaskExecutor) targetExecutor : new TaskExecutorAdapter(targetExecutor));
        this.executors.put(method, executor);
    }
    return executor;
}
总结: determineAsyncExecutor 的逻辑很清晰,如果指定了线程池名称,则直接从 Spring 容器中获取,如果没有指定,则获取默认的线程池。最后将其包装成 AsyncListenableTaskExecutor。
至于默认线程池的设置也很简单,如果 Spring 容器中设置了实现 TaskExecutor 接口的 bean,则直接返回;如果有多个,则返回名称为 ”taskExecutor“ 的 TaskExecutor ;如果容器中没有,则返回默认的 SimpleAsyncTaskExecutor。SimpleAsyncTaskExecutor 非常简单,每次执行时都会创建一个新的线程执行任务。代码如下:
// AsyncExecutionInterceptor
protected Executor getDefaultExecutor(@Nullable BeanFactory beanFactory) {
    // 1. 从Spring容器获取TaskExecutor类型的bean,如果有多个,则选择名称为"taskExecutor"
    Executor defaultExecutor = super.getDefaultExecutor(beanFactory);
    // 2. 如果没有定义,则选择默认的SimpleAsyncTaskExecutor。
    //    SimpleAsyncTaskExecutor很简单,每次执行时,都会创建一个新的线程执行任务
    return (defaultExecutor != null ? defaultExecutor : new SimpleAsyncTaskExecutor());
}
(2)doSubmit
doSubmit 处理结果的异步返回。
protected Object doSubmit(Callable<Object> task, AsyncTaskExecutor executor, Class<?> returnType) {
    // 1. 异步执行。jdk CompletableFuture
    if (CompletableFuture.class.isAssignableFrom(returnType)) {
        return CompletableFuture.supplyAsync(() -> {
            try {
                return task.call();
            }
            catch (Throwable ex) {
                throw new CompletionException(ex);
            }
        }, executor);
    // 2. 结果回调。ListenableFuture
    } else if (ListenableFuture.class.isAssignableFrom(returnType)) {
        return ((AsyncListenableTaskExecutor) executor).submitListenable(task);
    // 3. 同步返回。jdk Future
    } else if (Future.class.isAssignableFrom(returnType)) {
        return executor.submit(task);
    // 4. 不返回任务结果
    } else {
        executor.submit(task);
        return null;
    }
}
每天用心记录一点点。内容也许不重要,但习惯很重要!