https://blog.csdn.net/a67474506/article/details/52608855
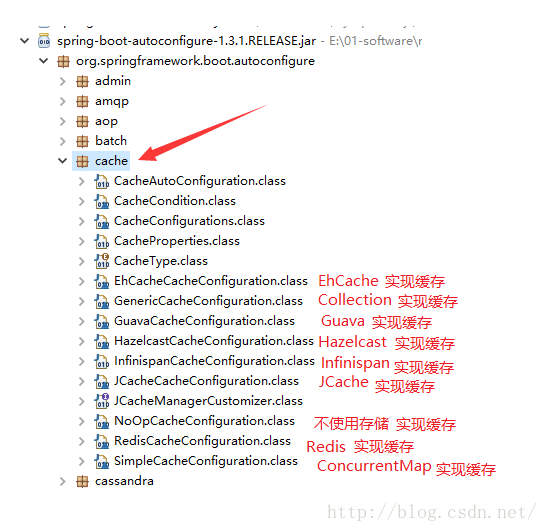
在不适用任何额外配置的情况下,默认使用SimpleCacheConfiguration
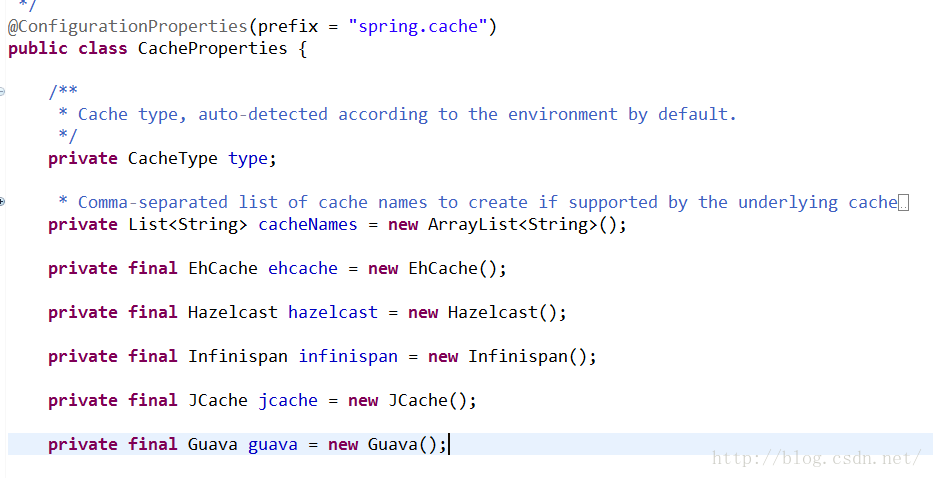
SpringBoot通过spring.cache为前缀来配置缓存

使用这些缓存实现的话,只需导入相关缓存的依赖,并在配置类中使用@EnableCaching开启缓存即可
Guava实现
这里简单介绍下使用Guava实现
引入的依赖
pom.xml
-
<project xmlns="http://maven.apache.org/POM/4.0.0" xmlns:xsi="http://www.w3.org/2001/XMLSchema-instance"
-
xsi:schemaLocation="http://maven.apache.org/POM/4.0.0 http://maven.apache.org/xsd/maven-4.0.0.xsd">
-
<modelVersion>4.0.0</modelVersion>
-
<groupId>com.ibigsea</groupId>
-
<artifactId>spirngboot-cache-demo</artifactId>
-
<version>0.0.1-SNAPSHOT</version>
-
-
-
<properties>
-
<project.build.sourceEncoding>UTF-8</project.build.sourceEncoding>
-
<boot.version>1.3.5.RELEASE</boot.version>
-
</properties>
-
-
<dependencies>
-
<dependency>
-
<groupId>org.springframework.boot</groupId>
-
<artifactId>spring-boot-starter-web</artifactId>
-
<version>${boot.version}</version>
-
</dependency>
-
<dependency>
-
<groupId>org.springframework.boot</groupId>
-
<artifactId>spring-boot-starter-test</artifactId>
-
<version>${boot.version}</version>
-
<scope>test</scope>
-
</dependency>
-
<dependency>
-
<groupId>org.springframework.boot</groupId>
-
<artifactId>spring-boot-starter-cache</artifactId>
-
<version>${boot.version}</version>
-
</dependency>
-
<dependency>
-
<groupId>com.google.guava</groupId>
-
<artifactId>guava</artifactId>
-
<version>19.0</version>
-
</dependency>
-
</dependencies>
-
</project>

dataCache.java
-
package com.ibigsea.springboot_cache_demo.cache;
-
-
import java.text.SimpleDateFormat;
-
import java.util.Date;
-
import java.util.HashMap;
-
import java.util.Map;
-
-
import javax.annotation.PostConstruct;
-
-
import org.springframework.cache.annotation.CacheConfig;
-
import org.springframework.cache.annotation.CacheEvict;
-
import org.springframework.cache.annotation.CachePut;
-
import org.springframework.cache.annotation.Cacheable;
-
import org.springframework.stereotype.Component;
-
-
-
public class DataCache {
-
-
private Map<Long, String> dataMap = new HashMap<>();
-
-
/**
-
* 初始化
-
*/
-
-
public void init() {
-
dataMap.put(1L, "张三");
-
dataMap.put(2L, "李四");
-
dataMap.put(3L, "王五");
-
}
-
-
/**
-
* 查询
-
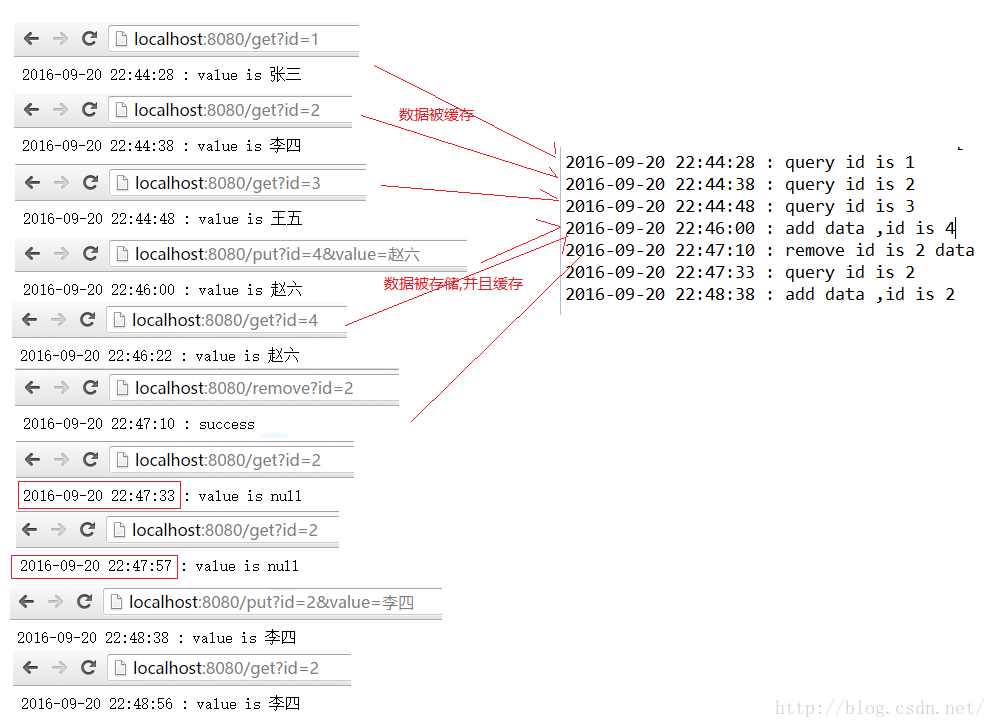
* 如果数据没有缓存,那么从dataMap里面获取,如果缓存了,
-
* 那么从guavaDemo里面获取
-
* 并且将缓存的数据存入到 guavaDemo里面
-
* 其中key 为 #id+dataMap
-
*/
-
-
public String query(Long id) {
-
SimpleDateFormat sdf = new SimpleDateFormat("yyyy-MM-dd HH:mm:ss");
-
System.out.println(sdf.format(new Date()) + " : query id is " + id);
-
return dataMap.get(id);
-
}
-
-
/**
-
* 插入 或者更新
-
* 插入或更新数据到dataMap中
-
* 并且缓存到 guavaDemo中
-
* 如果存在了那么更新缓存中的值
-
* 其中key 为 #id+dataMap
-
*/
-
-
public String put(Long id, String value) {
-
SimpleDateFormat sdf = new SimpleDateFormat("yyyy-MM-dd HH:mm:ss");
-
System.out.println(sdf.format(new Date()) + " : add data ,id is "+ id);
-
dataMap.put(id, value);
-
// data persistence
-
return value;
-
}
-
-
/**
-
* 删除
-
* 删除dataMap里面的数据
-
* 并且删除缓存guavaDemo中的数据
-
* 其中key 为 #id+dataMap
-
*/
-
-
public void remove(Long id) {
-
SimpleDateFormat sdf = new SimpleDateFormat("yyyy-MM-dd HH:mm:ss");
-
System.out.println(sdf.format(new Date()) + " : remove id is "+ id + " data");
-
dataMap.remove(id);
-
// data remove
-
}
-
-
-
}
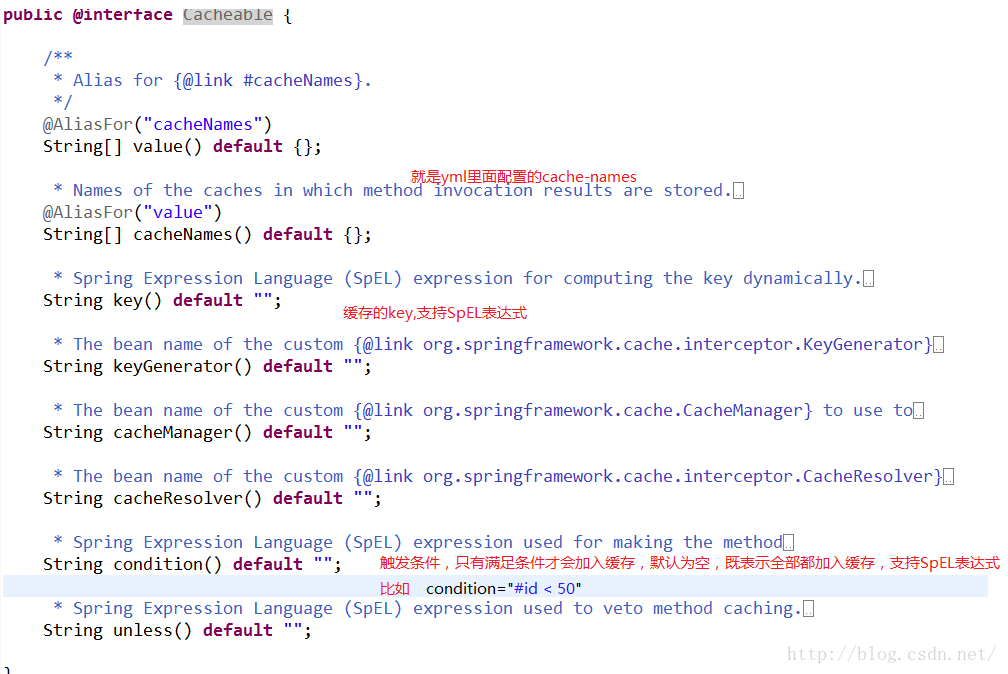
关于缓存注解中的value,就是配置文件中的cache-names
关于注解中的key这个值,如果不指定的话 ,那么会取方法参数当做Key
application.yml
-
spring:
-
cache:
-
#缓存名称
-
cache-names: guavaDemo
-
#缓存最大数量500条, 缓存失效时间 6个小时
-
guava.spec: maximumSize=500,expireAfterWrite=360m
App.java
-
package com.ibigsea.springboot_cache_demo;
-
-
import java.text.SimpleDateFormat;
-
import java.util.Date;
-
-
import org.springframework.beans.factory.annotation.Autowired;
-
import org.springframework.boot.SpringApplication;
-
import org.springframework.boot.autoconfigure.SpringBootApplication;
-
import org.springframework.cache.annotation.EnableCaching;
-
import org.springframework.web.bind.annotation.RequestMapping;
-
import org.springframework.web.bind.annotation.RestController;
-
-
import com.ibigsea.springboot_cache_demo.cache.DataCache;
-
-
/**
-
* 是Spring Boot项目的核心注解,主要是开启自动配置
-
*/
-
-
-
// 开启缓存
-
-
public class App {
-
-
-
private DataCache dataCache;
-
-
public static void main(String[] args) {
-
SpringApplication.run(App.class, args);
-
}
-
-
-
public String put(Long id, String value) {
-
SimpleDateFormat sdf = new SimpleDateFormat("yyyy-MM-dd HH:mm:ss");
-
return sdf.format(new Date()) + " : value is " + dataCache.put(id, value) ;
-
}
-
-
-
public String query(Long id){
-
SimpleDateFormat sdf = new SimpleDateFormat("yyyy-MM-dd HH:mm:ss");
-
return sdf.format(new Date()) + " : value is " +dataCache.query(id) ;
-
}
-
-
-
public String remove(Long id) {
-
SimpleDateFormat sdf = new SimpleDateFormat("yyyy-MM-dd HH:mm:ss");
-
dataCache.remove(id) ;
-
return sdf.format(new Date()) + " : success " ;
-
}
-
-
}
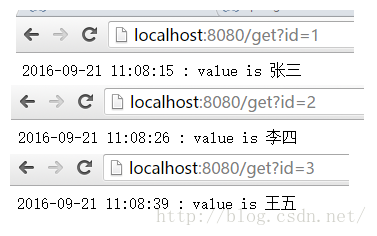
运行结果
关于注解配置:
@Cacheable
@CacheEvict
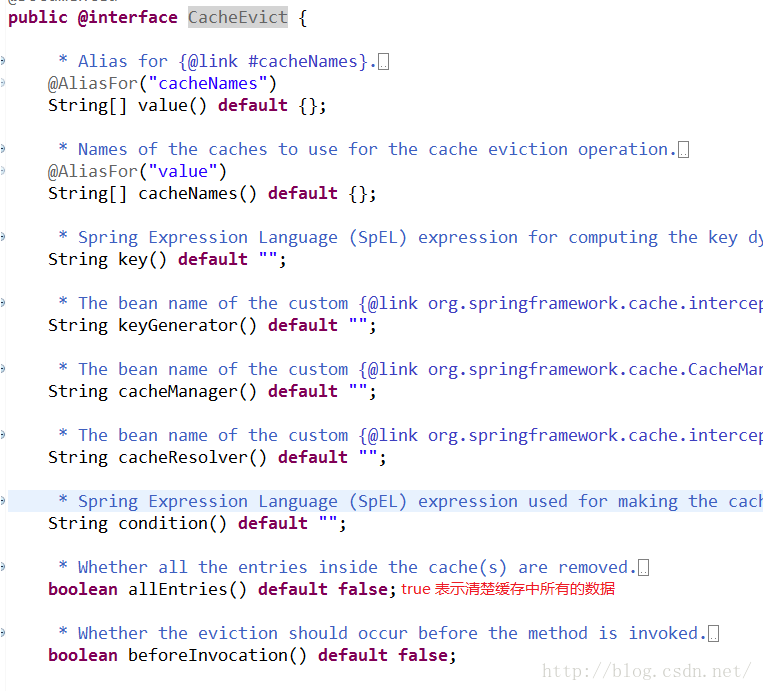
@CachePut
和上面的一样,只是这个注解是用来更新或者插入数据到缓存中的,
其中key自己定义,返回值会缓存
还有就是SpringBoot会根据你的类路径里面的依赖jar,来确定使用什么类型进行缓存,所以基本是我们是不用配置spring.cache.type这个属性的
Redis实现
Redis缓存:
如果是用redis作为缓存的话
我们只需要引入redis相关依赖,修改yml配置属性
-
<project xmlns="http://maven.apache.org/POM/4.0.0" xmlns:xsi="http://www.w3.org/2001/XMLSchema-instance"
-
xsi:schemaLocation="http://maven.apache.org/POM/4.0.0 http://maven.apache.org/xsd/maven-4.0.0.xsd">
-
<modelVersion>4.0.0</modelVersion>
-
<groupId>com.ibigsea</groupId>
-
<artifactId>spirngboot-cache-demo</artifactId>
-
<version>0.0.1-SNAPSHOT</version>
-
-
-
<properties>
-
<project.build.sourceEncoding>UTF-8</project.build.sourceEncoding>
-
<boot.version>1.3.5.RELEASE</boot.version>
-
</properties>
-
-
<dependencies>
-
<dependency>
-
<groupId>org.springframework.boot</groupId>
-
<artifactId>spring-boot-starter-web</artifactId>
-
<version>${boot.version}</version>
-
</dependency>
-
<dependency>
-
<groupId>org.springframework.boot</groupId>
-
<artifactId>spring-boot-starter-test</artifactId>
-
<version>${boot.version}</version>
-
<scope>test</scope>
-
</dependency>
-
<dependency>
-
<groupId>org.springframework.boot</groupId>
-
<artifactId>spring-boot-starter-cache</artifactId>
-
<version>${boot.version}</version>
-
</dependency>
-
<dependency>
-
<groupId>org.springframework.boot</groupId>
-
<artifactId>spring-boot-starter-redis</artifactId>
-
<version>${boot.version}</version>
-
</dependency>
-
<!-- <dependency> -->
-
<!-- <groupId>com.google.guava</groupId> -->
-
<!-- <artifactId>guava</artifactId> -->
-
<!-- <version>19.0</version> -->
-
<!-- </dependency> -->
-
</dependencies>
-
</project>
application.yml
-
spring:
-
cache:
-
#缓存名称
-
cache-names: guavaDemo
-
#缓存最大数量500条, 缓存失效时间 6个小时
-
#guava.spec: maximumSize=500,expireAfterWrite=360m
-
# REDIS (RedisProperties)
-
redis :
-
host : localhost # server host
-
port : 6379 # connection port
-
pool.max-idle : 8 # pool settings ...
-
pool.min-idle : 1
-
pool.max-active : 8
-
pool.max-wait : -1
就这样就OK了,代码什么的都是不用改变的,是不是很方便
测试结果
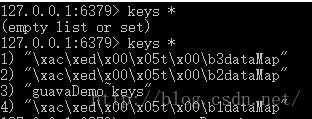
数据都会缓存到redis里面
其他的地方就不测试了 都是差不多的
使用其他实现导入对应的依赖,然后添加配置即可
注意:
如果使用guava缓存的时候 ,同时添加了redis的jar依赖,或者其他的依赖,可能会出现异常
这个时候加上 type: GUAVA 就可以

guava cache
缓存是提高性能的一把利器。
常用到的缓存技术有分布式缓存,像Redis、MC;也有本地缓存,像ehcache、guava cache等。这里说的是本地缓存guava cache。
guava cache刚开始接触,这就记录下来。。

    public static void main(String[] args) throws ExecutionException, InterruptedException{
        //缓存接口这里是LoadingCache,LoadingCache在缓存项不存在时可以自动加载缓存
        LoadingCache<Integer,Student> studentCache
                //CacheBuilder的构造函数是私有的,只能通过其静态方法newBuilder()来获得CacheBuilder的实例
                = CacheBuilder.newBuilder()
                //设置并发级别为8,并发级别是指可以同时写缓存的线程数
                .concurrencyLevel(8)
                //设置写缓存后8秒钟过期
                .expireAfterWrite(8, TimeUnit.SECONDS)
          //设置写缓存后1秒钟刷新
         .refreshAfterWrite(1, TimeUnit. SECONDS)
                //设置缓存容器的初始容量为10
                .initialCapacity(10)
                //设置缓存最大容量为100,超过100之后就会按照LRU最近虽少使用算法来移除缓存项
                .maximumSize(100)
                //设置要统计缓存的命中率
                .recordStats()
                //设置缓存的移除通知
                .removalListener(new RemovalListener<Object, Object>() {
                    @Override
                    public void onRemoval(RemovalNotification<Object, Object> notification) {
                        System.out.println(notification.getKey() + " was removed, cause is " + notification.getCause());
                    }
                })
                //build方法中可以指定CacheLoader,在缓存不存在时通过CacheLoader的实现自动加载缓存
                .build(
                        new CacheLoader<Integer, Student>() {
                            @Override
                            public Student load(Integer key) throws Exception {
                                System.out.println("load student " + key);
                                Student student = new Student();
                                student.setId(key);
                                student.setName("name " + key);
                                return student;
                            }
                        }
                );

        for (int i=0;i<20;i++) {
            //从缓存中得到数据,由于我们没有设置过缓存,所以需要通过CacheLoader加载缓存数据
            Student student = studentCache.get(1);
            System.out.println(student);
            //休眠1秒
            TimeUnit.SECONDS.sleep(1);
        }

        System.out.println("cache stats:");
        //最后打印缓存的命中率等 情况
        System.out.println(studentCache.stats().toString());
    }
还有另一种方法
package com;

import java.util.concurrent.Callable;
import java.util.concurrent.ExecutionException;
import java.util.concurrent.TimeUnit;

import com.google.common.cache.*;

/**
 * @author  作者 PZhang  E-mail:pzhang@rxhui.com
 * @date 创建时间:2017-2-15 上午9:58:00
 * @version 1.0
 * @parameter
 * @return
 */
public class CacheModel {
    public Student getStudent(Integer key){
        System.out.println("load student " + key);
        Student student = new Student();
        student.setId(key);
        student.setName("name " + key);
        return student;
    }
    //load Method
    public void loadCacheA() throws Exception{
         LoadingCache<Integer,Student> studentCache= CacheBuilder.newBuilder().concurrencyLevel(8).
                 expireAfterWrite(8, TimeUnit.SECONDS).refreshAfterWrite(1, TimeUnit. SECONDS).initialCapacity(10).maximumSize(100)
                 .recordStats().removalListener(new RemovalListener<Object, Object>() {
                     public void onRemoval(RemovalNotification<Object, Object> notification) {
                                 System.out.println(notification.getKey() + " was removed, cause is " + notification);}
                     }).build(
                    new CacheLoader<Integer, Student>() {
                        @Override
                        public Student load(Integer key) throws Exception {
                            return getStudent(key);
                           }
                        }
          );

         for (int i=0;i<20;i++) {
           Student student = studentCache.get(1);
           System.out.println(student);
           TimeUnit.SECONDS.sleep(1);
         }

         System.out.println("cache stats:");
         System.out.println(studentCache.stats().toString());

    }
    //call back Method
    public void loadCacheB(final Integer key) throws Exception{
         Cache<Integer, Student> cache = CacheBuilder.newBuilder().maximumSize(1000).recordStats().expireAfterWrite(8, TimeUnit.SECONDS).build();

         for (int i=0;i<20;i++) {
                System.out.println(cache.get(key, new Callable<Student>() {
                     public Student call() {
                        return getStudent(key);
                    }
                }));
                TimeUnit.SECONDS.sleep(1);
              }

              System.out.println("cache stats:");
              System.out.println(cache.stats().toString());
    }

    public static void main(String[] args) throws Exception {
        CacheModel cache = new CacheModel();
        cache.loadCacheB(2);
    }


}
guava Cache数据移除:
guava做cache时候数据的移除方式,在guava中数据的移除分为被动移除和主动移除两种。
被动移除数据的方式,guava默认提供了三种方式:
1.基于大小的移除:看字面意思就知道就是按照缓存的大小来移除,如果即将到达指定的大小,那就会把不常用的键值对从cache中移除。
定义的方式一般为 CacheBuilder.maximumSize(long),还有一种一种可以算权重的方法,个人认为实际使用中不太用到。就这个常用的来看有几个注意点,
其一,这个size指的是cache中的条目数,不是内存大小或是其他;
其二,并不是完全到了指定的size系统才开始移除不常用的数据的,而是接近这个size的时候系统就会开始做移除的动作;
其三,如果一个键值对已经从缓存中被移除了,你再次请求访问的时候,如果cachebuild是使用cacheloader方式的,那依然还是会从cacheloader中再取一次值,如果这样还没有,就会抛出异常
2.基于时间的移除:guava提供了两个基于时间移除的方法
expireAfterAccess(long, TimeUnit) 这个方法是根据某个键值对最后一次访问之后多少时间后移除
expireAfterWrite(long, TimeUnit) 这个方法是根据某个键值对被创建或值被替换后多少时间移除
3.基于引用的移除:
这种移除方式主要是基于java的垃圾回收机制,根据键或者值的引用关系决定移除
主动移除数据方式,主动移除有三种方法:
1.单独移除用 Cache.invalidate(key)
2.批量移除用 Cache.invalidateAll(keys)
3.移除所有用 Cache.invalidateAll()
如果需要在移除数据的时候有所动作还可以定义Removal Listener,但是有点需要注意的是默认Removal Listener中的行为是和移除动作同步执行的,如果需要改成异步形式,可以考虑使用RemovalListeners.asynchronous(RemovalListener, Executor)