mybatis集成ehcache
1、集成ehcache
2、集成redis
1. 为什么需要缓存
   拉高程序的性能


2. 什么样的数据需要缓存
   很少被修改或根本不改的数据

   业务场景比如:耗时较高的统计分析sql、电话账单查询sql等

3. ehcache是什么
   Ehcache 是现在最流行的纯Java开源缓存框架,配置简单、结构清晰、功能强大

   注1:本章介绍的是2.X版本,3.x的版本和2.x的版本API差异比较大


4. ehcache的特点
  4.1 够快
      Ehcache的发行有一段时长了,经过几年的努力和不计其数的性能测试,Ehcache终被设计于large, high concurrency systems.
  4.2 够简单
      开发者提供的接口非常简单明了,从Ehcache的搭建到运用运行仅仅需要的是你宝贵的几分钟。其实很多开发者都不知道自己用在用Ehcache,Ehcache被广泛的运用于其他的开源项目
  4.3 够袖珍
      关于这点的特性,官方给了一个很可爱的名字small foot print ,一般Ehcache的发布版本不会到2M,V 2.2.3 才 668KB。
  4.4 够轻量
      核心程序仅仅依赖slf4j这一个包,没有之一!
  4.5 好扩展
      Ehcache提供了对大数据的内存和硬盘的存储,最近版本允许多实例、保存对象高灵活性、提供LRU、LFU、FIFO淘汰算法,基础属性支持热配置、支持的插件多
  4.6 监听器
      缓存管理器监听器 (CacheManagerListener)和 缓存监听器(CacheEvenListener),做一些统计或数据一致性广播挺好用的
  4.7 分布式缓存
      从Ehcache 1.2开始,支持高性能的分布式缓存,兼具灵活性和扩展性
3、ehcache的使用
3.1 导入相关依赖
3.2 核心接口
CacheManager:缓存管理器
Cache:缓存对象,缓存管理器内可以放置若干cache,存放数据的实质,所有cache都实现了Ehcache接口
Element:单条缓存数据的组成单位
4. ssm中整合ehcache
4.1 导入相关依赖
<dependency>
    <groupId>org.springframework</groupId>
    <artifactId>spring-context-support</artifactId>
    <version>${spring.version}</version>
</dependency>

<!--mybatis与ehcache整合-->
<dependency>
    <groupId>org.mybatis.caches</groupId>
    <artifactId>mybatis-ehcache</artifactId>
    <version>1.1.0</version>
</dependency>

<!--ehcache依赖-->
<dependency>
    <groupId>net.sf.ehcache</groupId>
    <artifactId>ehcache</artifactId>
    <version>2.10.0</version>
</dependency>
4.2 修改日志配置,因为ehcache使用了Slf4j作为日志输出
日志我们使用slf4j,并用log4j来实现。SLF4J不同于其他日志类库,与其它有很大的不同。
SLF4J(Simple logging Facade for Java)不是一个真正的日志实现,而是一个抽象层( abstraction layer),
它允许你在后台使用任意一个日志类库。
<!-- log4j2日志配置相关依赖 -->
    <log4j2.version>2.9.1</log4j2.version>
    <log4j2.disruptor.version>3.2.0</log4j2.disruptor.version>
    <slf4j.version>1.7.13</slf4j.version>

<!-- log4j2日志相关依赖 -->
    <!-- log配置:Log4j2 + Slf4j -->
    <!-- slf4j核心包-->
    <dependency>
      <groupId>org.slf4j</groupId>
      <artifactId>slf4j-api</artifactId>
      <version>${slf4j.version}</version>
    </dependency>
    <dependency>
      <groupId>org.slf4j</groupId>
      <artifactId>jcl-over-slf4j</artifactId>
      <version>${slf4j.version}</version>
      <scope>runtime</scope>
    </dependency>

    <!--核心log4j2jar包-->
    <dependency>
      <groupId>org.apache.logging.log4j</groupId>
      <artifactId>log4j-api</artifactId>
      <version>${log4j2.version}</version>
    </dependency>
    <dependency>
      <groupId>org.apache.logging.log4j</groupId>
      <artifactId>log4j-core</artifactId>
      <version>${log4j2.version}</version>
    </dependency>
    <!--用于与slf4j保持桥接-->
    <dependency>
      <groupId>org.apache.logging.log4j</groupId>
      <artifactId>log4j-slf4j-impl</artifactId>
      <version>${log4j2.version}</version>
    </dependency>
    <!--web工程需要包含log4j-web,非web工程不需要-->
    <dependency>
      <groupId>org.apache.logging.log4j</groupId>
      <artifactId>log4j-web</artifactId>
      <version>${log4j2.version}</version>
      <scope>runtime</scope>
    </dependency>

    <!--需要使用log4j2的AsyncLogger需要包含disruptor-->
    <dependency>
      <groupId>com.lmax</groupId>
      <artifactId>disruptor</artifactId>
      <version>${log4j2.disruptor.version}</version>
    </dependency>
在Resource中添加一个ehcache.xml的配置文件
<?xml version="1.0" encoding="UTF-8"?>
<ehcache xmlns:xsi="http://www.w3.org/2001/XMLSchema-instance"
         xsi:noNamespaceSchemaLocation="http://ehcache.org/ehcache.xsd"
         updateCheck="false">
    <!--磁盘存储:将缓存中暂时不使用的对象,转移到硬盘,类似于Windows系统的虚拟内存-->
    <!--path:指定在硬盘上存储对象的路径-->
    <!--java.io.tmpdir 是默认的临时文件路径。 可以通过如下方式打印出具体的文件路径 System.out.println(System.getProperty("java.io.tmpdir"));-->
    <diskStore path="java.io.tmpdir"/>


    <!--defaultCache:默认的管理策略-->
    <!--eternal:设定缓存的elements是否永远不过期。如果为true,则缓存的数据始终有效,如果为false那么还要根据timeToIdleSeconds,timeToLiveSeconds判断-->
    <!--maxElementsInMemory:在内存中缓存的element的最大数目-->
    <!--overflowToDisk:如果内存中数据超过内存限制,是否要缓存到磁盘上-->
    <!--diskPersistent:是否在磁盘上持久化。指重启jvm后,数据是否有效。默认为false-->
    <!--timeToIdleSeconds:对象空闲时间(单位:秒),指对象在多长时间没有被访问就会失效。只对eternal为false的有效。默认值0,表示一直可以访问-->
    <!--timeToLiveSeconds:对象存活时间(单位:秒),指对象从创建到失效所需要的时间。只对eternal为false的有效。默认值0,表示一直可以访问-->
    <!--memoryStoreEvictionPolicy:缓存的3 种清空策略-->
    <!--FIFO:first in first out (先进先出)-->
    <!--LFU:Less Frequently Used (最少使用).意思是一直以来最少被使用的。缓存的元素有一个hit 属性,hit 值最小的将会被清出缓存-->
    <!--LRU:Least Recently Used(最近最少使用). (ehcache 默认值).缓存的元素有一个时间戳,当缓存容量满了,而又需要腾出地方来缓存新的元素的时候,那么现有缓存元素中时间戳离当前时间最远的元素将被清出缓存-->
    <defaultCache eternal="false" maxElementsInMemory="1000" overflowToDisk="false" diskPersistent="false"
                  timeToIdleSeconds="0" timeToLiveSeconds="600" memoryStoreEvictionPolicy="LRU"/>

    <!--name: Cache的名称,必须是唯一的(ehcache会把这个cache放到HashMap里)-->
    <!--<cache name="stuCache" eternal="false" maxElementsInMemory="100"-->
           <!--overflowToDisk="false" diskPersistent="false" timeToIdleSeconds="0"-->
           <!--timeToLiveSeconds="300" memoryStoreEvictionPolicy="LRU"/>-->
</ehcache>
在applicationContext.xml中加入chache配置
<?xml version="1.0" encoding="UTF-8"?>
<beans xmlns="http://www.springframework.org/schema/beans"
       xmlns:xsi="http://www.w3.org/2001/XMLSchema-instance"
       xsi:schemaLocation="http://www.springframework.org/schema/beans http://www.springframework.org/schema/beans/spring-beans.xsd">

    <!-- 使用ehcache缓存 -->
    <bean id="cacheManagerFactory" class="org.springframework.cache.ehcache.EhCacheManagerFactoryBean">
        <property name="configLocation" value="classpath:ehcache.xml"/>
        <property name="shared" value="true"></property>
    </bean>
    <!-- 默认是cacheManager -->
    <bean id="cacheManager" class="org.springframework.cache.ehcache.EhCacheCacheManager">
        <property name="cacheManager" ref="cacheManagerFactory"/>
    </bean>
</beans>
mybaits的二级缓存是mapper范围级别,除了在SqlMapConfig.xml设置二级缓存的总开关,还要在具体的mapper.xml中开启二级缓存
开启mybatis的二级缓存
applicationContext-mybatis.xml中添加
<!--设置mybaits对缓存的支持-->
    <property name="configurationProperties">
        <props>
            <!-- 全局映射器启用缓存 *主要将此属性设置完成即可-->
            <prop key="cacheEnabled">true</prop>
            <!-- 查询时,关闭关联对象即时加载以提高性能 -->
            <prop key="lazyLoadingEnabled">false</prop>
            <!-- 设置关联对象加载的形态,此处为按需加载字段(加载字段由SQL指 定),不会加载关联表的所有字段,以提高性能 -->
            <prop key="aggressiveLazyLoading">true</prop>
        </props>
    </property>
在XxxMapper.xml中配置cache
 <!-- 以下两个<cache>标签二选一,第一个可以输出日志,第二个不输出日志 -->
          <!--<cache type="org.mybatis.caches.ehcache.LoggingEhcache" />-->
          <!--<cache type="org.mybatis.caches.ehcache.EhcacheCache" />-->
          <!--eviction="FIFO"  回收策略为先进先出-->
          <!--flushInterval="60000" 自动刷新时间60s-->
          <!--size="512" 最多缓存512个引用对象-->
          <!--readOnly="true"  只读-->
          <cache type="org.mybatis.caches.ehcache.EhcacheCache">
            <property name="timeToIdleSeconds" value="3600"/>
            <property name="timeToLiveSeconds" value="3600"/>
            <property name="maxEntriesLocalHeap" value="1000"/>
            <property name="maxEntriesLocalDisk" value="10000000"/>
            <property name="memoryStoreEvictionPolicy" value="LRU"/>
          </cache>
可以通过select标签的useCache属性打开或关闭二级缓存
<select id="selectByPrimaryKey" resultMap="BaseResultMap" parameterType="java.lang.Long" useCache="false"></select>
注意有三:
1、mybatis默认使用的二级缓存框架就是ehcache(org.mybatis.caches.ehcache.EhcacheCache),无缝结合
2、Mybatis缓存开关一旦开启,可缓存单条记录,也可缓存多条,hibernate不能缓存多条。
3、Mapper接口上的所有方法上另外提供关闭缓存的属性
小结:
对于访问多的查询请求且用户对查询结果实时性要求不高,此时可采用mybatis二级缓存技术降低数据库访问量,提高访问速度,
实现方法如下:通过设置刷新间隔时间,由mybatis每隔一段时间自动清空缓存,根据数据变化频率设置缓存刷新间隔flushInterval,比如设置为30分钟、60分钟、24小时等,根据需求而定。
使用了缓存的截图:
Mybatis集成redis
1. redis常用类

  1.1 Jedis

      jedis就是集成了redis的一些命令操作,封装了redis的java客户端

  1.2 JedisPoolConfig

      Redis连接池

  1.3 ShardedJedis

      基于一致性哈希算法实现的分布式Redis集群客户端

   实现 mybatis 的二级缓存,一般来说有如下两种方式:

   1) 采用 mybatis 内置的 cache 机制。

   2) 采用三方 cache 框架, 比如ehcache, oscache 等等.
添加redis相关依赖
 <!-- redis与spring的整合依赖 -->
    <redis.version>2.9.0</redis.version>
    <redis.spring.version>1.7.1.RELEASE</redis.spring.version>

    <dependency>
      <groupId>redis.clients</groupId>
      <artifactId>jedis</artifactId>
      <version>${redis.version}</version>
    </dependency>
    <dependency>
      <groupId>org.springframework.data</groupId>
      <artifactId>spring-data-redis</artifactId>
      <version>${redis.spring.version}</version>
    </dependency>
版本冲突问题:
1. ClassNotFoundException : redis/client/util/geoUtils 说这个类找不到。
2. org.springframework.beans.factory.BeanCreationException: Error creating bean with name 'redisTemplate' defined in class path resource [applicationContext.xml]
说创建 redisTemplate bean 对象时失败了。
redis.client 2.9.0 ---- spring-data-redis 1.7.1.RELEASE
redis.client 2.9.0 ---- spring-data-redis 1.7.2.RELEASE 这两个是可以使用的
log4j2配置
jackson
<!-- jackson -->
    <jackson.version>2.9.3</jackson.version>

<!-- jackson -->
    <dependency>
      <groupId>com.fasterxml.jackson.core</groupId>
      <artifactId>jackson-databind</artifactId>
      <version>${jackson.version}</version>
    </dependency>
    <dependency>
      <groupId>com.fasterxml.jackson.core</groupId>
      <artifactId>jackson-core</artifactId>
      <version>${jackson.version}</version>
    </dependency>
    <dependency>
      <groupId>com.fasterxml.jackson.core</groupId>
      <artifactId>jackson-annotations</artifactId>
      <version>${jackson.version}</version>
    </dependency>
spring + redis 集成实现缓存功能(与mybatis无关)
添加两个redis的配置文件,并将redis.properties和applicationContext-redis.xml配置到applicationContext.xml文件中
redis.properties
redis.hostName=192.168.188.130
redis.port=6379
redis.password=123456
redis.timeout=10000
redis.maxIdle=300
redis.maxTotal=1000
redis.maxWaitMillis=1000
redis.minEvictableIdleTimeMillis=300000
redis.numTestsPerEvictionRun=1024
redis.timeBetweenEvictionRunsMillis=30000
redis.testOnBorrow=true
redis.testWhileIdle=true
applicationContext-redis.xml
<?xml version="1.0" encoding="UTF-8"?>
<beans xmlns="http://www.springframework.org/schema/beans"
       xmlns:xsi="http://www.w3.org/2001/XMLSchema-instance"
       xmlns:context="http://www.springframework.org/schema/context"
       xsi:schemaLocation="http://www.springframework.org/schema/beans http://www.springframework.org/schema/beans/spring-beans.xsd http://www.springframework.org/schema/context http://www.springframework.org/schema/context/spring-context.xsd">

    <!-- 1. 引入properties配置文件 -->
    <!--<context:property-placeholder location="classpath:redis.properties" />-->

    <!-- 2. redis连接池配置-->
    <bean id="poolConfig" class="redis.clients.jedis.JedisPoolConfig">
        <!--最大空闲数-->
        <property name="maxIdle" value="${redis.maxIdle}"/>
        <!--连接池的最大数据库连接数  -->
        <property name="maxTotal" value="${redis.maxTotal}"/>
        <!--最大建立连接等待时间-->
        <property name="maxWaitMillis" value="${redis.maxWaitMillis}"/>
        <!--逐出连接的最小空闲时间 默认1800000毫秒(30分钟)-->
        <property name="minEvictableIdleTimeMillis" value="${redis.minEvictableIdleTimeMillis}"/>
        <!--每次逐出检查时 逐出的最大数目 如果为负数就是 : 1/abs(n), 默认3-->
        <property name="numTestsPerEvictionRun" value="${redis.numTestsPerEvictionRun}"/>
        <!--逐出扫描的时间间隔(毫秒) 如果为负数,则不运行逐出线程, 默认-1-->
        <property name="timeBetweenEvictionRunsMillis" value="${redis.timeBetweenEvictionRunsMillis}"/>
        <!--是否在从池中取出连接前进行检验,如果检验失败,则从池中去除连接并尝试取出另一个-->
        <property name="testOnBorrow" value="${redis.testOnBorrow}"/>
        <!--在空闲时检查有效性, 默认false  -->
        <property name="testWhileIdle" value="${redis.testWhileIdle}"/>
    </bean>

    <!-- 3. redis连接工厂 -->
    <bean id="connectionFactory" class="org.springframework.data.redis.connection.jedis.JedisConnectionFactory"
          destroy-method="destroy">
        <property name="poolConfig" ref="poolConfig"/>
        <!--IP地址 -->
        <property name="hostName" value="${redis.hostName}"/>
        <!--端口号  -->
        <property name="port" value="${redis.port}"/>
        <!--如果Redis设置有密码  -->
        <property name="password" value="${redis.password}"/>
        <!--客户端超时时间单位是毫秒  -->
        <property name="timeout" value="${redis.timeout}"/>
    </bean>

    <!-- 4. redis操作模板,使用该对象可以操作redis  -->
    <bean id="redisTemplate" class="org.springframework.data.redis.core.RedisTemplate">
        <property name="connectionFactory" ref="connectionFactory"/>
        <!--如果不配置Serializer,那么存储的时候缺省使用String,如果用User类型存储,那么会提示错误User can't cast to String!!  -->
        <property name="keySerializer">
            <bean class="org.springframework.data.redis.serializer.StringRedisSerializer"/>
        </property>
        <property name="valueSerializer">
            <bean class="org.springframework.data.redis.serializer.GenericJackson2JsonRedisSerializer"/>
        </property>
        <property name="hashKeySerializer">
            <bean class="org.springframework.data.redis.serializer.StringRedisSerializer"/>
        </property>
        <property name="hashValueSerializer">
            <bean class="org.springframework.data.redis.serializer.GenericJackson2JsonRedisSerializer"/>
        </property>
        <!--开启事务  -->
        <property name="enableTransactionSupport" value="true"/>
    </bean>

    <!-- 5.使用中间类解决RedisCache.RedisTemplate的静态注入,从而使MyBatis实现第三方缓存 -->
    <bean id="redisCacheTransfer" class="com.huang.utils.RedisCacheTransfer">
        <property name="redisTemplate" ref="redisTemplate"/>
    </bean>
</beans>
applicationContext.xml
<?xml version="1.0" encoding="UTF-8"?>
<beans xmlns="http://www.springframework.org/schema/beans"
       xmlns:xsi="http://www.w3.org/2001/XMLSchema-instance"
       xmlns:context="http://www.springframework.org/schema/context"
       xsi:schemaLocation="http://www.springframework.org/schema/beans http://www.springframework.org/schema/beans/spring-beans.xsd http://www.springframework.org/schema/context http://www.springframework.org/schema/context/spring-context.xsd">


<context:property-placeholder location="classpath:jdbc.properties,classpath:redis.properties"/>
    <import resource="applicationContext-mybatis.xml"></import>
    <import resource="applicationContext-redis.xml"></import>
</beans>
注1:将redis.properties导入到applicationContext.xml文件中
spring中引入第二个属性文件会出现“找不到某个配置项”错误,这是因为spring只允许有一个<context:property-placeholder/>
<!--引入一个属性文件的写法-->
<context:property-placeholder ignore-unresolvable="true" location="classpath:jdbc.properties" />
<!--引入两个或多个属性文件的写法-->
<context:property-placeholder ignore-unresolvable="true" location="classpath:jdbc.properties,classpath:redis.properties" />
注2:通过import标签将applicationContext-redis.xml导入到applicationContext.xml文件中
<!--导入redis配置-->
<import resource="applicationContext-redis.xml"/>
将redis缓存引入到mybatis中
创建mybatis的自定义缓存类“RedisCache”,必须实现org.apache.ibatis.cache.Cache接口
RedisCache.java
package com.huang.utils;


import org.apache.ibatis.cache.Cache;
import org.slf4j.Logger;
import org.slf4j.LoggerFactory;
import org.springframework.dao.DataAccessException;
import org.springframework.data.redis.connection.RedisConnection;
import org.springframework.data.redis.core.RedisCallback;
import org.springframework.data.redis.core.RedisTemplate;

import java.util.concurrent.TimeUnit;
import java.util.concurrent.locks.ReadWriteLock;
import java.util.concurrent.locks.ReentrantReadWriteLock;

public class RedisCache implements Cache //实现类
{
    private static final Logger logger = LoggerFactory.getLogger(RedisCache.class);

    private static RedisTemplate<String,Object> redisTemplate;

    private final String id;

    /**
     * The {@code ReadWriteLock}.
     */
    private final ReadWriteLock readWriteLock = new ReentrantReadWriteLock();

    @Override
    public ReadWriteLock getReadWriteLock()
    {
        return this.readWriteLock;
    }

    public static void setRedisTemplate(RedisTemplate redisTemplate) {
        RedisCache.redisTemplate = redisTemplate;
    }

    public RedisCache(final String id) {
        if (id == null) {
            throw new IllegalArgumentException("Cache instances require an ID");
        }
        logger.debug("MybatisRedisCache:id=" + id);
        this.id = id;
    }

    @Override
    public String getId() {
        return this.id;
    }

    @Override
    public void putObject(Object key, Object value) {
        try{
            logger.info(">>>>>>>>>>>>>>>>>>>>>>>>putObject: key="+key+",value="+value);
            if(null!=value)
                redisTemplate.opsForValue().set(key.toString(),value,60, TimeUnit.SECONDS);
        }catch (Exception e){
            e.printStackTrace();
            logger.error("redis保存数据异常!");
        }
    }

    @Override
    public Object getObject(Object key) {
        try{
            logger.info(">>>>>>>>>>>>>>>>>>>>>>>>getObject: key="+key);
            if(null!=key)
                return redisTemplate.opsForValue().get(key.toString());
        }catch (Exception e){
            e.printStackTrace();
            logger.error("redis获取数据异常!");
        }
        return null;
    }

    @Override
    public Object removeObject(Object key) {
        try{
            if(null!=key)
                return redisTemplate.expire(key.toString(),1,TimeUnit.DAYS);
        }catch (Exception e){
            e.printStackTrace();
            logger.error("redis获取数据异常!");
        }
        return null;
    }

    @Override
    public void clear() {
        Long size=redisTemplate.execute(new RedisCallback<Long>() {
            @Override
            public Long doInRedis(RedisConnection redisConnection) throws DataAccessException {
                Long size = redisConnection.dbSize();
                //连接清除数据
                redisConnection.flushDb();
                redisConnection.flushAll();
                return size;
            }
        });
        logger.info(">>>>>>>>>>>>>>>>>>>>>>>>clear: 清除了" + size + "个对象");
    }

    @Override
    public int getSize() {
        Long size = redisTemplate.execute(new RedisCallback<Long>() {
            @Override
            public Long doInRedis(RedisConnection connection)
                    throws DataAccessException {
                return connection.dbSize();
            }
        });
        return size.intValue();
    }
}
静态注入中间类“RedisCacheTransfer”,解决RedisCache中RedisTemplate的静态注入,从而使MyBatis实现第三方缓存
RedisCacheTransfer.java
package com.huang.utils;

import org.springframework.beans.factory.annotation.Autowired;
import org.springframework.data.redis.core.RedisTemplate;

public class RedisCacheTransfer {
    @Autowired
    public void setRedisTemplate(RedisTemplate redisTemplate) {
        RedisCache.setRedisTemplate(redisTemplate);
    }
}
spring与mybatis整合文件中开发二级缓存
<!--设置mybaits对缓存的支持-->
<property name="configurationProperties">
    <props>
        <!-- 全局映射器启用缓存 *主要将此属性设置完成即可-->
        <prop key="cacheEnabled">true</prop>
        <!-- 查询时,关闭关联对象即时加载以提高性能 -->
        <prop key="lazyLoadingEnabled">false</prop>
        <!-- 设置关联对象加载的形态,此处为按需加载字段(加载字段由SQL指 定),不会加载关联表的所有字段,以提高性能 -->
        <prop key="aggressiveLazyLoading">true</prop>
    </props>
</property>
在XxxMapper.xml中添加自定义cache功能
<cache type="com.huang.utils.RedisCache"
       eviction="LRU"
       flushInterval="6000000"
       size="1024"
       readOnly="false"></cache>
type:指定redis的二级缓存类的全路径名
eviction:二级缓存算法(FIFO/LRU/SOFT/WEAK)
flushInterval:刷新间隔,间隔多长时间清空缓存,被动触发非定时器轮询
size:缓存大小。每个缓存可以存储 1024 个列表或对象的引用
readOnly:缓存将作为“读/写”缓存,意味着获取的对象不是共享的且对调用者是安全的。不会有其它的调用者或线程潜在修改。
注意: pom对properties文件的加载!!!
资料:
MyBatis内置的二级缓存算法
Mybatis的所有Cache算法都是基于装饰器模式对PerpetualCache扩展增加功能。
1)FIFO:先入先出,基于LinkedList实现;
2)LRU:最近最少使用,基于LinkedHashMap实现,在put的时候,自动移除最少使用缓存对象;
3)SOFT:对Cache的value进行SoftReference包装;当缓存对象是Soft reference可达时,gc会向系统申请更多内存,而不是直接回收它,当内存不足的时候才回收它;
4)WEAK:对Cache的value进行WeakReference包装;WeakReference不会强制对象保存在内存中。它拥有比较短暂的生命周期,允许你使用垃圾回收器的能力去权衡一个对象的可达性。在垃圾回收器扫描它所管辖的内存区域过程中,一旦gc发现对象是weakReference可达,就会把它放到ReferenceQueue中,等下次gc时回收它。
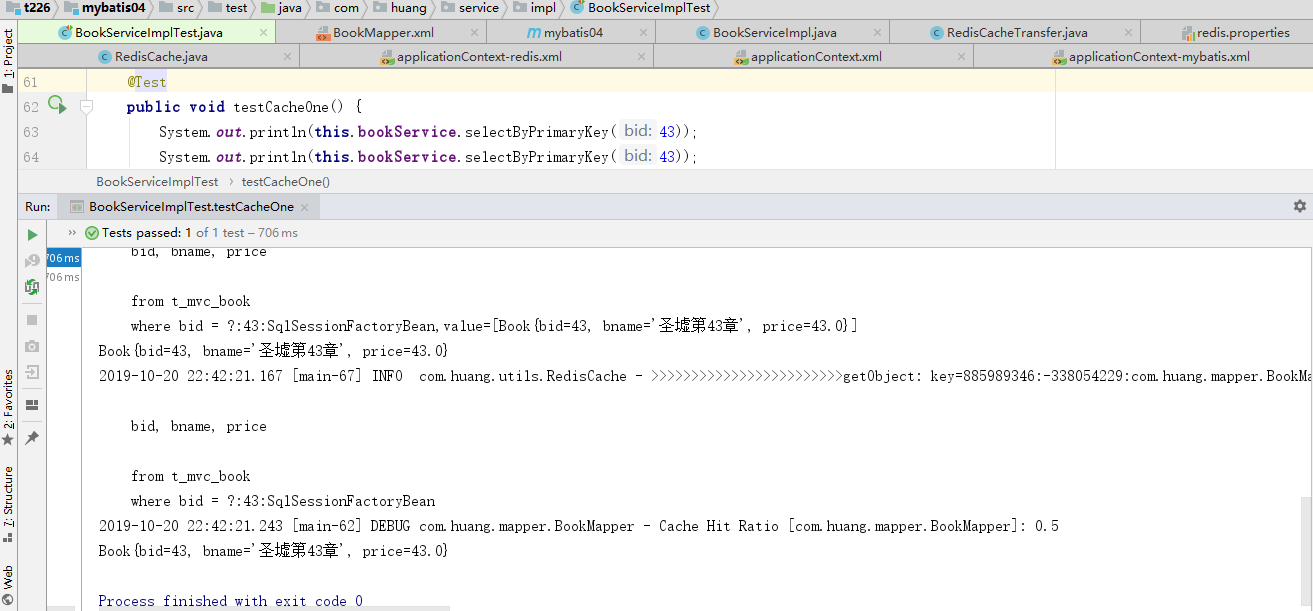
测试
 @Test
    public void testCacheOne() {
        System.out.println(this.bookService.selectByPrimaryKey(43));
        System.out.println(this.bookService.selectByPrimaryKey(43));
    }

    @Test
    public void testCacheMary() {
        Map map=new HashMap();
        map.put("bname", StringUtils.toLikeStr("圣"));
//        pageBean.setPage(4);
        List<Map> abcd=this.bookService.listPager(map,pageBean);
        for (Map m : abcd) {
            System.out.println(m);
        }
        List<Map> abcd2=this.bookService.listPager(map,pageBean);
        for (Map m : abcd) {
            System.out.println(m);


        }
testCacheOne方法

testCacheMary方法


