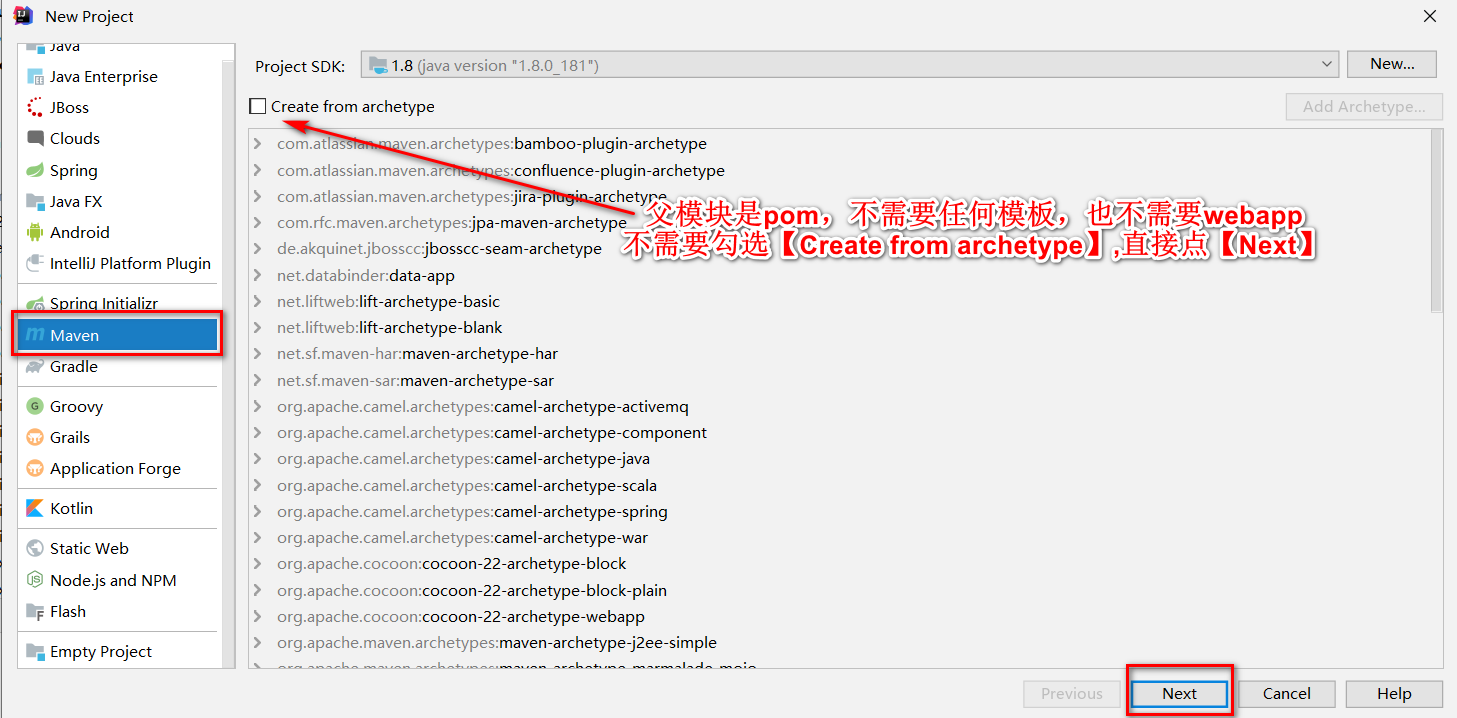
采用Maven 聚合工程搭建 Spring Cloud
使用工具:
IntelliJ IDEA 版本: 2019.2.2
maven 版本: 3.6.0
JDK 版本:1.8.0_181
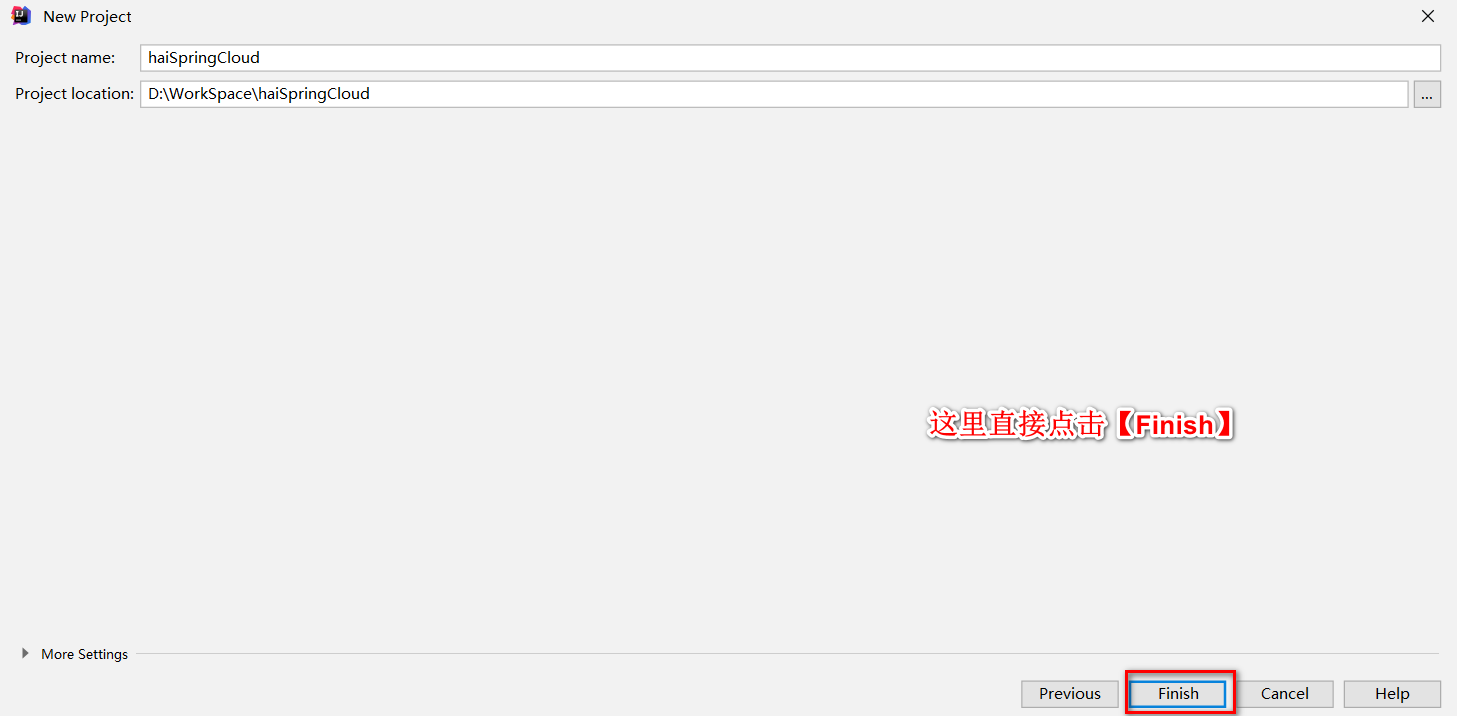
1、搭建聚合工程的父模块

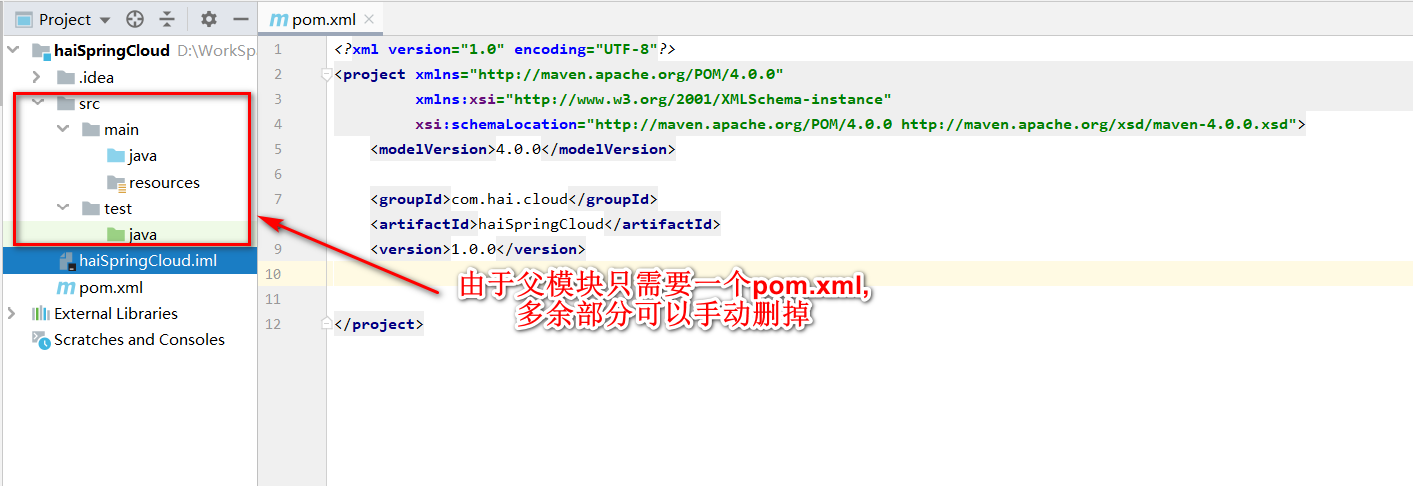
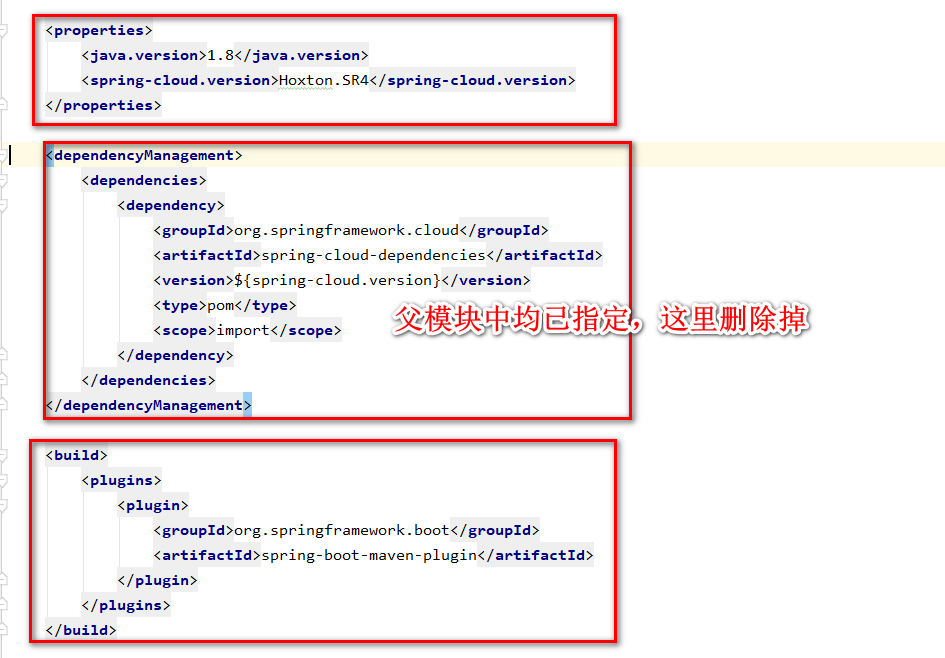
2、配置父模块POM
<?xml version="1.0" encoding="UTF-8"?>
<project xmlns="http://maven.apache.org/POM/4.0.0"
         xmlns:xsi="http://www.w3.org/2001/XMLSchema-instance"
         xsi:schemaLocation="http://maven.apache.org/POM/4.0.0 http://maven.apache.org/xsd/maven-4.0.0.xsd">
    <modelVersion>4.0.0</modelVersion>

    <groupId>com.hai.cloud</groupId>
    <artifactId>haiSpringCloud</artifactId>
    <description>this project is haiSpringCloud</description>
    <name>haiSpringCloud</name>
    <version>1.0.0</version>
    <packaging>pom</packaging><!-- 父类型都为pom类型   父模块是用于 子模块继承, 一处声明,多处使用,因此packaging是pom -->


    <parent>
        <groupId>org.springframework.boot</groupId>
        <artifactId>spring-boot-starter-parent</artifactId>
        <version>2.2.0.RELEASE</version>
        <relativePath/>
    </parent>

    <properties>
        <java.version>1.8</java.version>
        <project.build.soutceEncoding>UTF-8</project.build.soutceEncoding>
        <project.reporting.outputEncoding>UTF-8</project.reporting.outputEncoding>
        <spring-cloud.version>Hoxton.SR4</spring-cloud.version>
    </properties>

    <!-- 设定主仓库路径 会按照设定顺序去查找-->
    <repositories>
        <!--  阿里中央仓库  首选-->
        <repository>
            <id>alimaven</id>
            <name>aliyum maven</name>
            <url>http://maven.aliyun.com/nexus/content/groups/public</url>
        </repository>
    </repositories>
    <!-- 设置仓库插件路径 -->
    <pluginRepositories>
        <pluginRepository>
            <id>alimaven</id>
            <name>aliyum maven</name>
            <url>http://maven.aliyun.com/nexus/content/groups/public</url>
        </pluginRepository>
    </pluginRepositories>

    <dependencies>
        <!--下面的web、test在spring boot 生态中成为Starter POMs,是一套一站式spring相关技术解决方案,starter POMs采用spring-boot-starter-*的命名方式,如:spring-boot-starter-jdbc-->
        <!-- 全栈Web开发模块,包含嵌入式的Tomcate、Spring MVC -->
        <dependency>
            <groupId>org.springframework.boot</groupId>
            <artifactId>spring-boot-starter-web</artifactId>
            <exclusions>
                <exclusion>
                    <groupId>org.springframework.boot</groupId>
                    <artifactId>spring-boot-starter-logging</artifactId>
                </exclusion>
            </exclusions>
        </dependency>
        <dependency> <!-- 引入log4j2依赖  spring boot 用log4j2-->
            <groupId>org.springframework.boot</groupId>
            <artifactId>spring-boot-starter-log4j2</artifactId>
        </dependency>

        <!-- 通用的测试模块,包含JUnit、Hamcrest、Mockito -->
        <dependency>
            <groupId>org.springframework.boot</groupId>
            <artifactId>spring-boot-starter-test</artifactId>
            <scope>test</scope>
            <exclusions>
                <exclusion>
                    <groupId>org.junit.vintage</groupId>
                    <artifactId>junit-vintage-engine</artifactId>
                </exclusion>
            </exclusions>
        </dependency>

        <!-- 热部署模块
                    devtools 监听classpath下的文件变动,并会立即重启应用,采用的是虚拟机机制,so重启很快
                    注意:(1)base classloader (Base类加载器) 加载不改变的class,例如第三方提供的jar
                          (2) restart classloader(Restart类加载器) 加载正在开发的Class
                        重启之所以很快是因为只加载了开发的Class,没有重新加载第三方的jar -->
        <dependency>
            <groupId>org.springframework.boot</groupId>
            <artifactId>spring-boot-devtools</artifactId>
            <scope>runtime</scope><!-- 这个需要为 true 热部署才有效 -->
            <optional>true</optional><!--optional=true 依赖不会传递,该项目依赖devtools-->
        </dependency>

        <!-- 用于监控端点 (运维监控)
        添加该配置,控制台会有以下内容输出: o.s.b.a.e.web.EndpointLinksResolver      : Exposing 2 endpoint(s) beneath base path '/actuator'
        访问http://localhost:8081/actuator 就可以获得该应用的各项监控指标 -->
        <dependency>
            <groupId>org.springframework.boot</groupId>
            <artifactId>spring-boot-starter-actuator</artifactId>
        </dependency>

        <!--阿里 FastJson依赖-->
        <dependency>
            <groupId>com.alibaba</groupId>
            <artifactId>fastjson</artifactId>
            <version>1.2.68</version>
        </dependency>

        <!-- 启用注解读取配置文件支持 -->
        <dependency>
            <groupId>org.springframework.boot</groupId>
            <artifactId>spring-boot-configuration-processor</artifactId>
            <optional>true</optional>
        </dependency>

    </dependencies>

    <!--  dependencyManagement 标签不会引入依赖  -->
    <dependencyManagement>
        <dependencies>
            <!-- spring-cloud 版本 -->
            <dependency>
                <groupId>org.springframework.cloud</groupId>
                <artifactId>spring-cloud-dependencies</artifactId>
                <version>${spring-cloud.version}</version>
                <type>pom</type>
                <scope>import</scope>
            </dependency>
        </dependencies>
    </dependencyManagement>

    <!-- spring-boot-maven-plugin插件可以方便的启停应用, 通过 mvn spring-boot:run 命令快速启动Spring Boot应用 -->
    <build>
        <plugins>
            <plugin>
                <groupId>org.springframework.boot</groupId>
                <artifactId>spring-boot-maven-plugin</artifactId>
                <configuration>
                    <environmentVariables>
                        <encoding>UTF-8</encoding>
                        <source>1.8</source>
                        <target>1.8</target>
                        <compilerArguments>
                            <verbose/>
                            <!-- windows下使用分号(;)分隔,linux/mac下使用冒号(:)分隔 -->
                            <bootclasspath>${java.home}/lib/rt.jar;${java.home}/lib/jce.jar</bootclasspath>
                        </compilerArguments>
                    </environmentVariables>
                </configuration>
            </plugin>
        </plugins>
    </build>

</project>
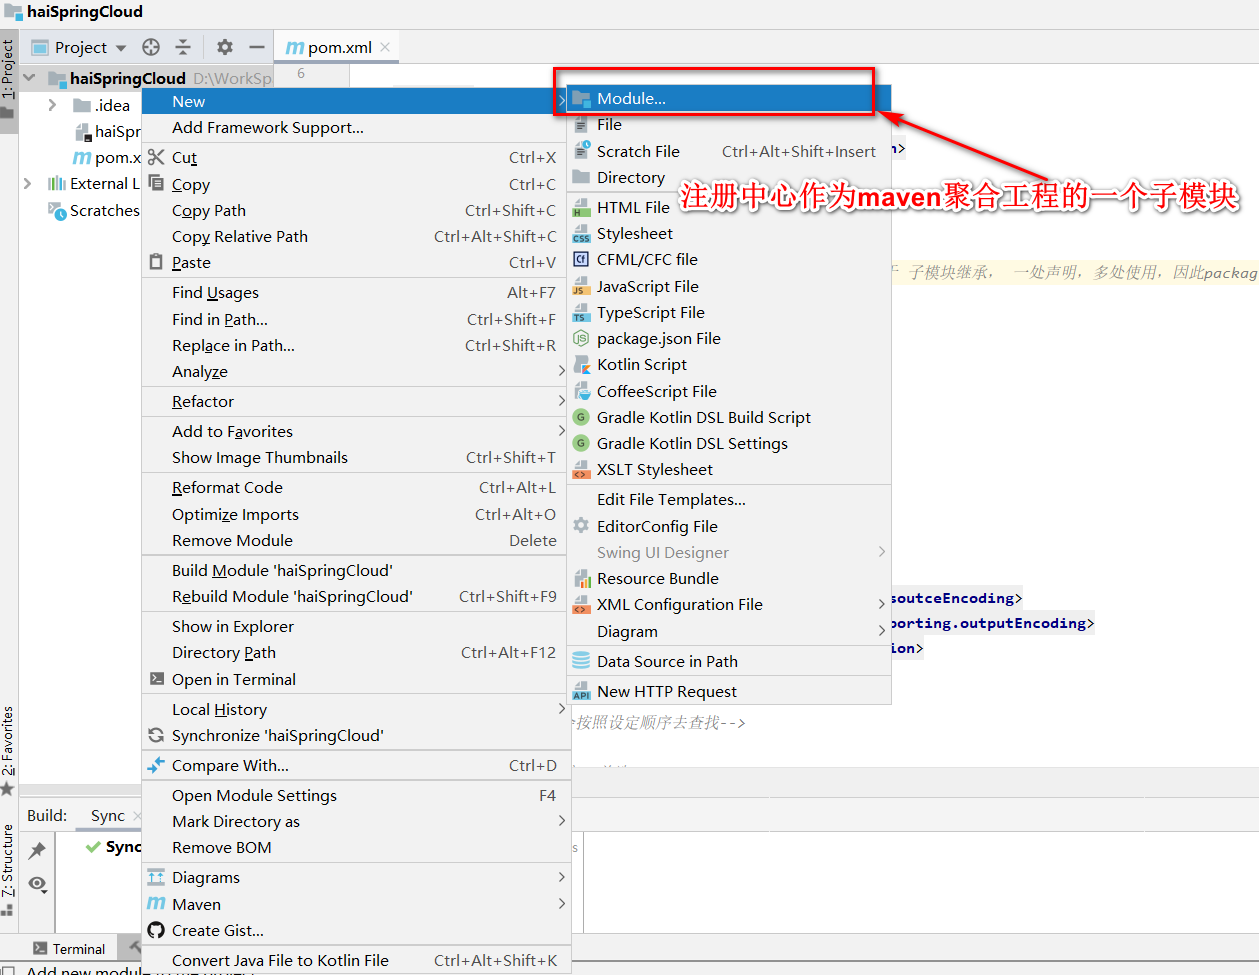
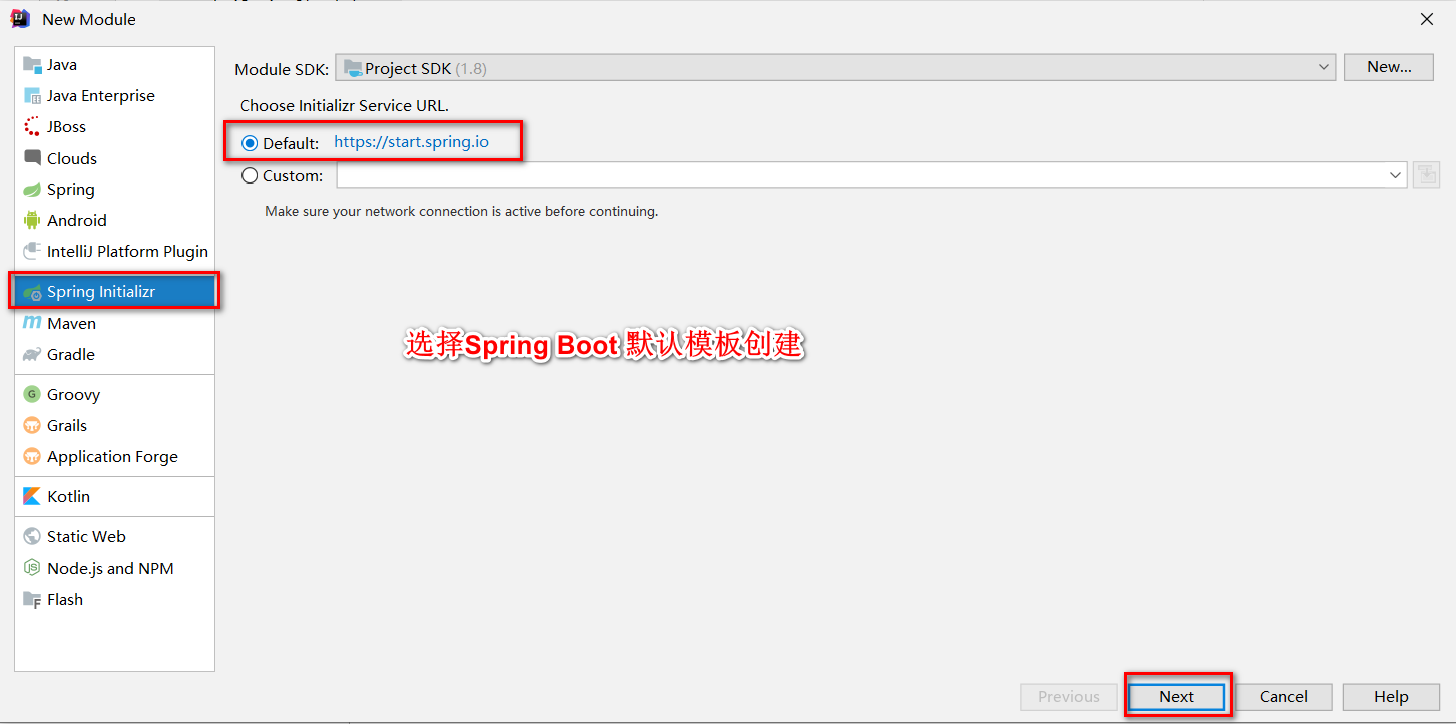
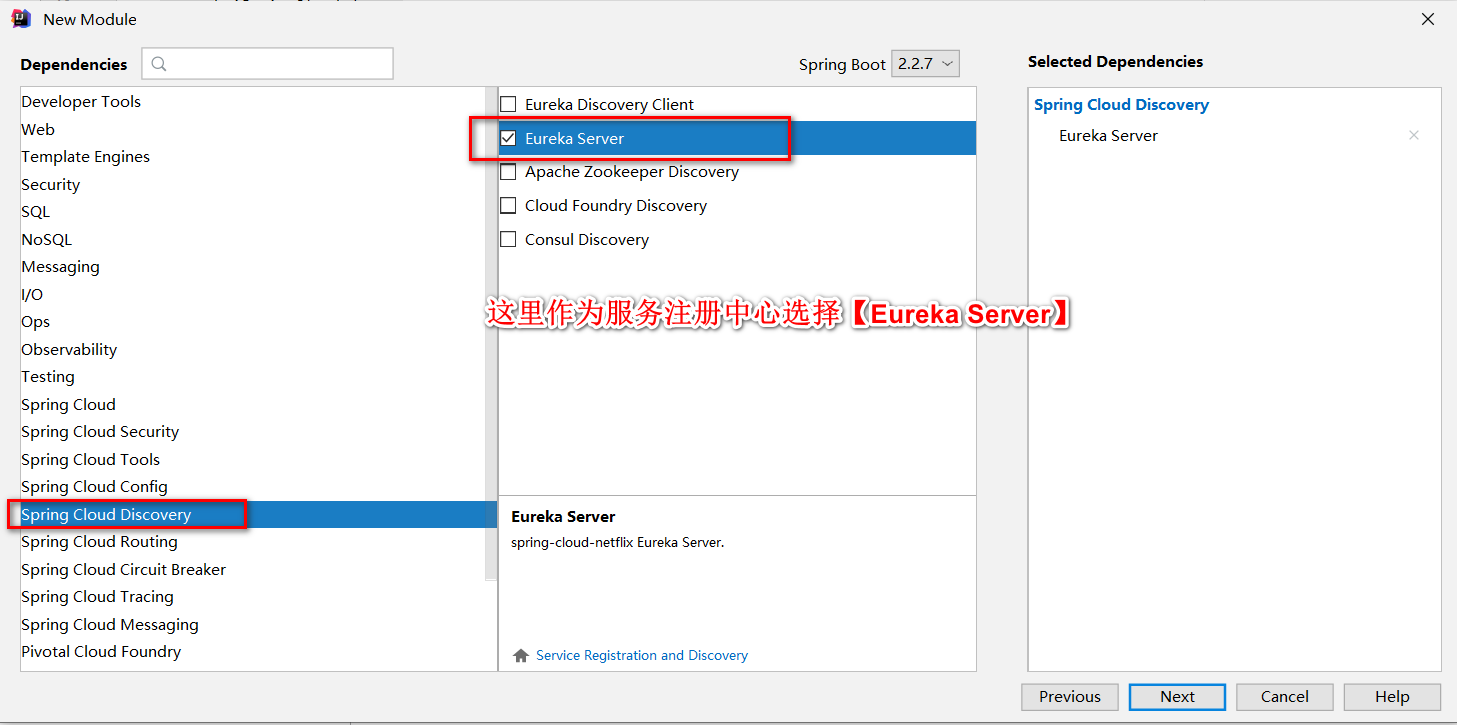
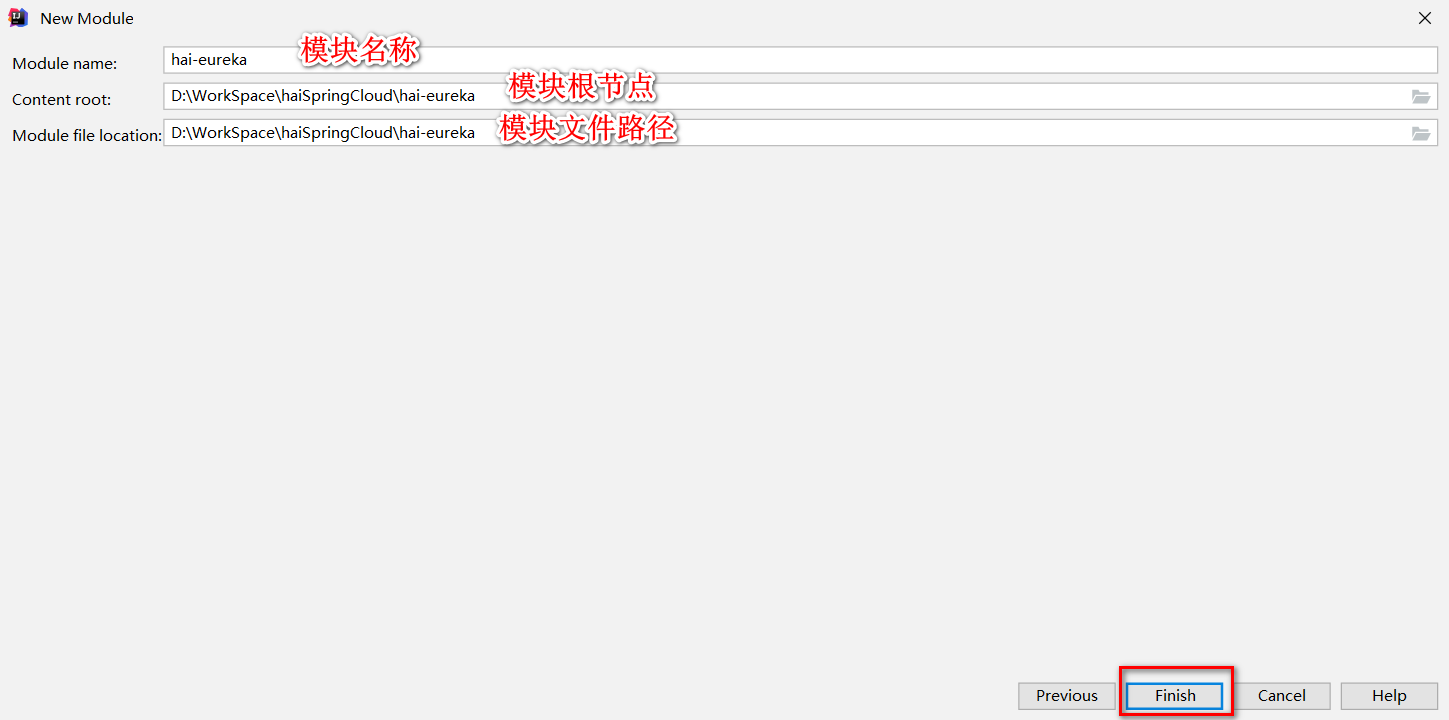
3、创建Spring Cloud 核心模块, Eureka注册中心
3.1 通过spring Boot 搭建Eureka注册中心

3.2、由于这是一个子模块,需要继承父模块,修改pom.xml
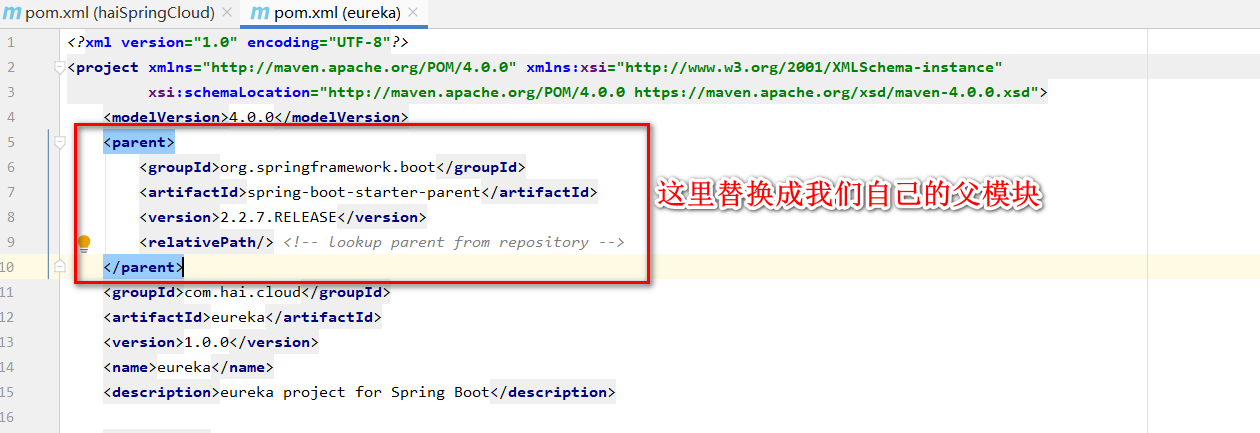
在父模块pom.xml中添加hai-uereka模块
<modules>
     <module>hai-eureka</module>
</modules>
3.3、修改resources/application.properties为application-dev.yml (Spring Boot 支持 .properties 和 .yml 个人喜欢用yml,这个不改也可以),添加以下配置
#ָ指定应用名 在spring Cloud 中会被注册为服务名
spring:
  application:
    name: hai-eureka
  profiles:
    active: dev

#指定端口
server:
  port: 8760

eureka:
  server: # 详见 org.springframework.cloud.netflix.eureka.server.EurekaServerConfigBean
    enable-self-preservation: false  #关闭保护机制 eureka 当心跳失败率大于85%就会触发自我保护,Eureka Server不剔除已关停的节点,这里关闭eureka保护机制
    eviction-interval-timer-in-ms: 10000 #设置清理无效节点的时间间隔,毫秒单位(默认是60秒),这里修改为10秒
    peer-eureka-nodes-update-interval-ms: 1000
    wait-time-in-ms-when-sync-empty: 0
  instance:
    hostname: localhost
  client: # 详见 org.springframework.cloud.netflix.eureka.EurekaClientConfigBean
    register-with-eureka: false #eureka默认既可以做服务端也可以做客户端, 由于该应用为注册中心,所以设置为false,代表不向注册中心注册自己
    fetch-registry: false  #注册中心的职责就是维护服务实例,他并不需要去检索服务,所以也设置为false
    eureka-server-total-connections: 200 # 总连接数,默认200
    serviceUrl:
      defaultZone: http://${eureka.instance.hostname}:${server.port}/eureka/
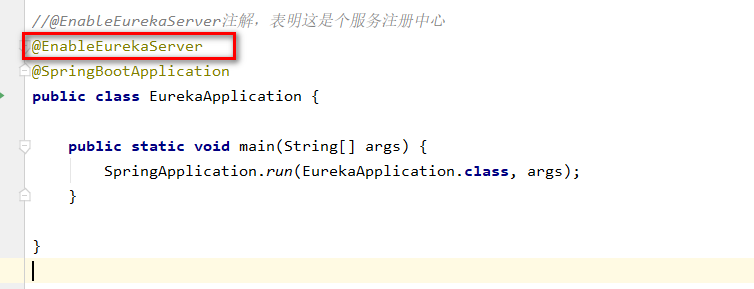
3.4 在启动类添加 @EnableEurekaServer,开启服务注册功能
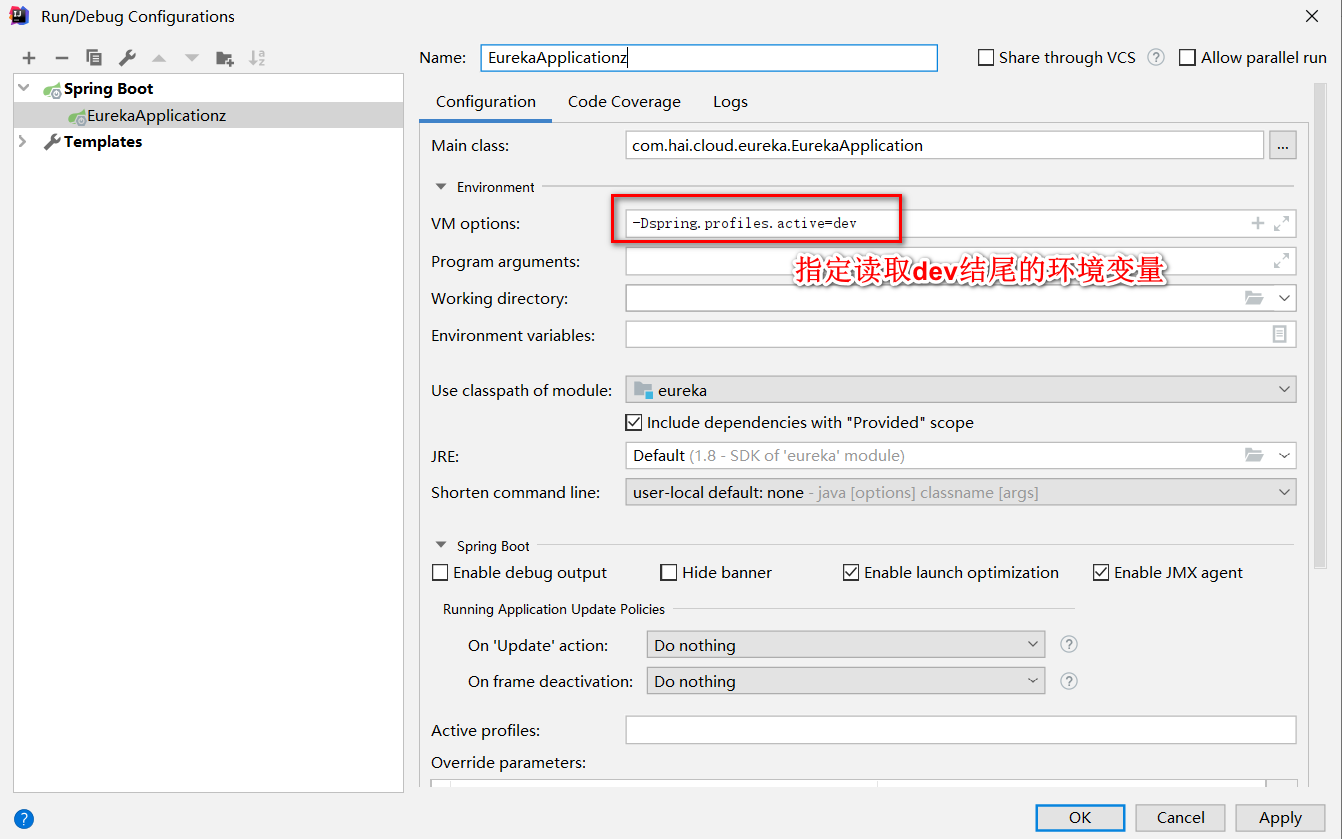
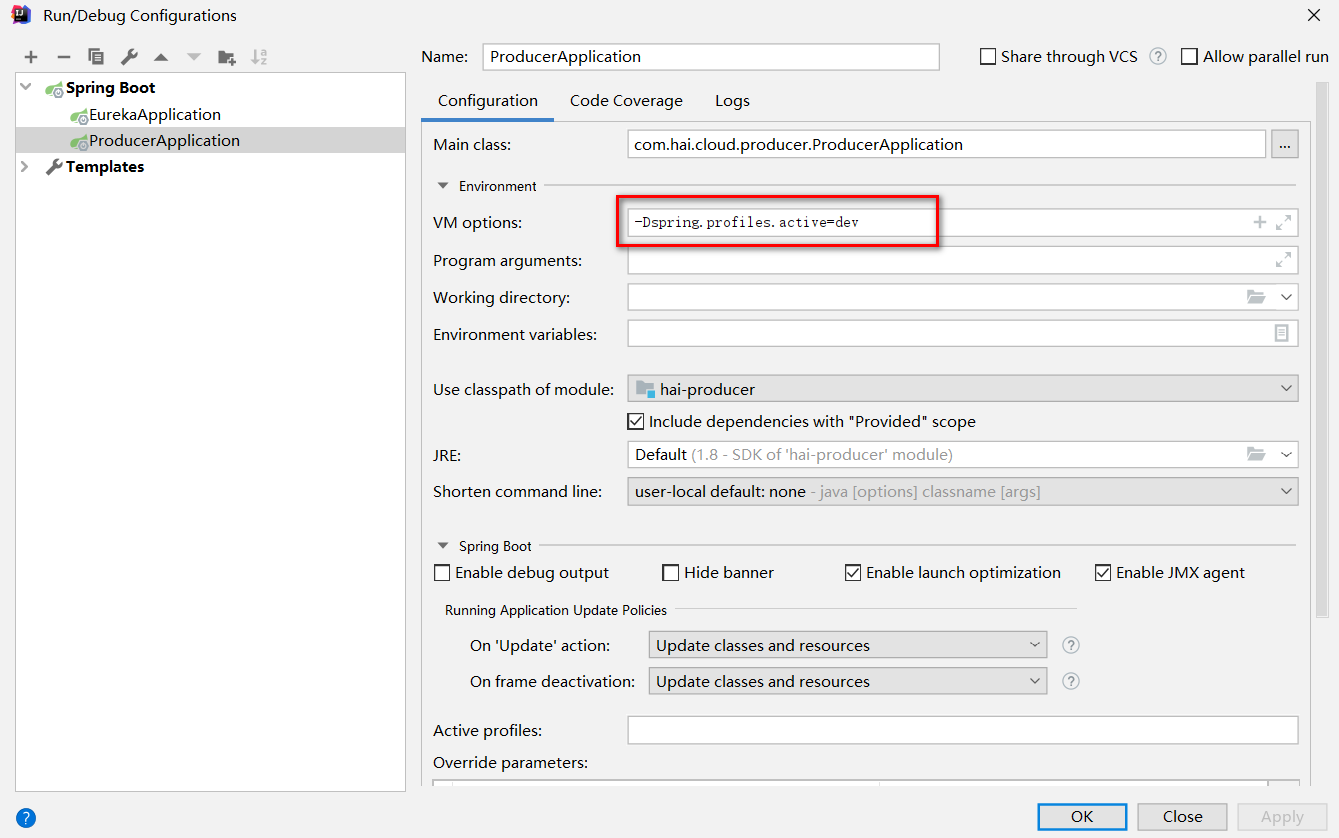
3.5修改启动配置,指定dev环境 (-Dspring.profiles.active=dev)并启动
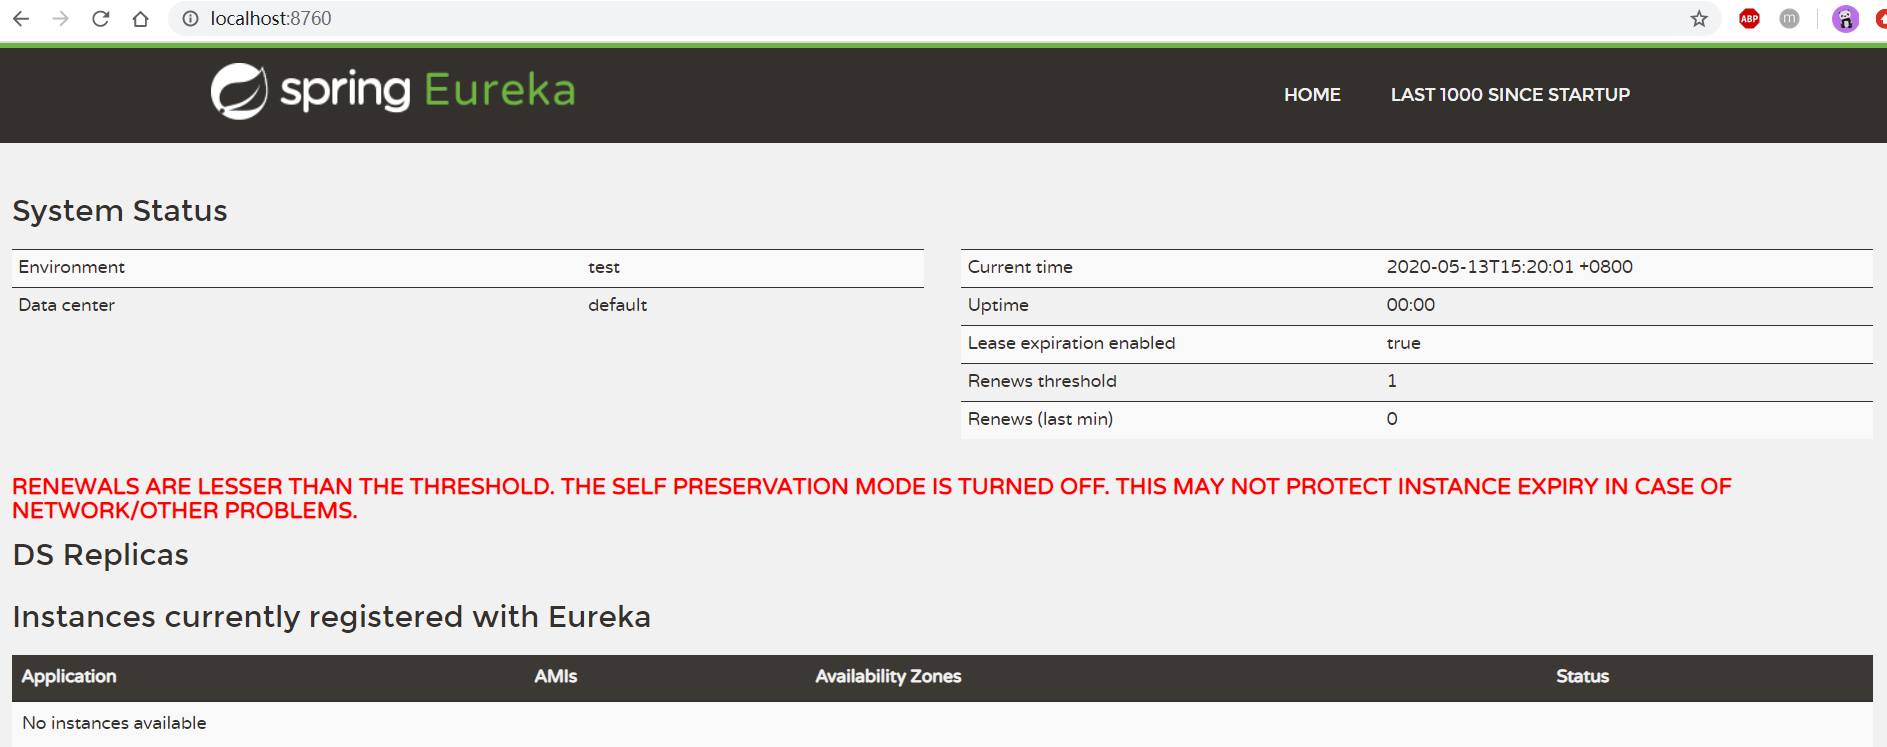
接下来就是见证奇迹的时刻了,用浏览器打开 http://localhost:8760 , 访问成功
Spring Cloud 核心组件 注册中心已经搭好了,这会就可以喝点东西休息休息啦
4、接下来就该创建服务提供者,注册到Eureka注册中心去
4.1 还是用Spring Boot 创建 创建 子模块

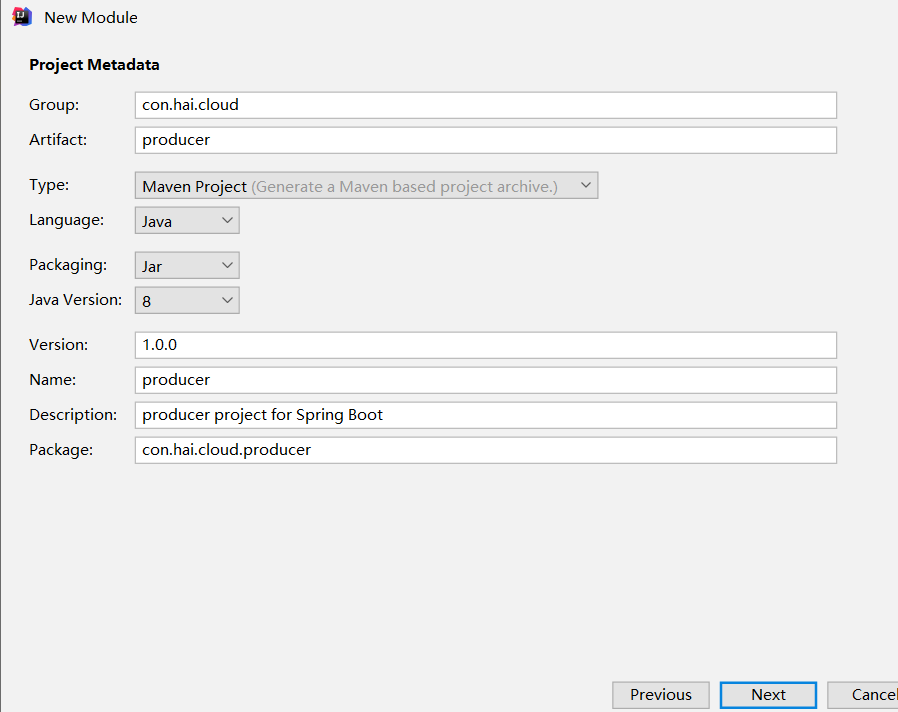
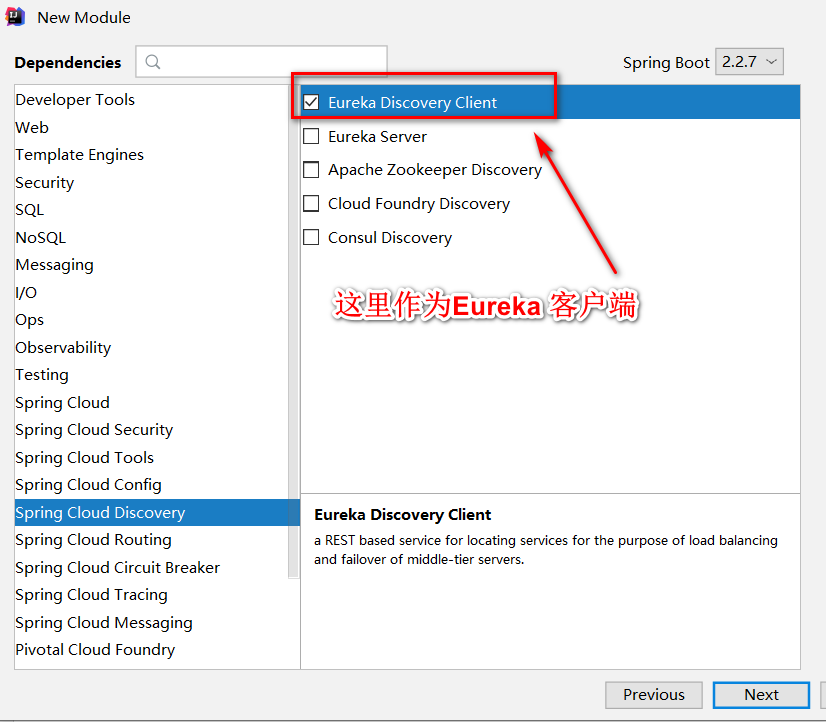

4.2 修改producer pom文件,
<?xml version="1.0" encoding="UTF-8"?>
<project xmlns="http://maven.apache.org/POM/4.0.0" xmlns:xsi="http://www.w3.org/2001/XMLSchema-instance"
         xsi:schemaLocation="http://maven.apache.org/POM/4.0.0 https://maven.apache.org/xsd/maven-4.0.0.xsd">
    <modelVersion>4.0.0</modelVersion>
    <parent>
        <groupId>com.hai.cloud</groupId>
        <artifactId>haiSpringCloud</artifactId>
        <version>1.0.0</version>
        <relativePath/> <!-- lookup parent from repository -->
    </parent>
    <groupId>com.hai.cloud</groupId>
    <artifactId>producer</artifactId>
    <version>1.0.0</version>
    <name>producer</name>
    <description>producer project for Spring Boot</description>

    <dependencies>
        <dependency>
            <groupId>org.springframework.cloud</groupId>
            <artifactId>spring-cloud-starter-netflix-eureka-client</artifactId>
        </dependency>

    </dependencies>

</project>
4.3 修改 application.properties 为application-dev.yml ,添加以下配置
# 指定应用名 在spring Cloud 中会被注册为服务名
spring:
  profiles:
    active: dev
  application:
    name: hai-producer
server:
  port: 8081

eureka:
  client:
    register-with-eureka: true  #该应用作为客户端 向eureka 注册 服务  默认是 true
    fetch-registry: true  # 允许检索服务  默认是 true
    serviceUrl:
      defaultZone: http://localhost:8760/eureka/
  instance:
    #prefer-ip-address: true  我这里用的是 hostname 使用IP 需要设置该项为 true
    hostname: localhost
    lease-renewal-interval-in-seconds: 30 # 服务续约任务的调用时间间隔, 单位秒, 默认30s
    lease-expiration-duration-in-seconds: 90 # 服务失效时间,单位秒  默认90s
4.4 修改启动,添加 @EnableDiscoveryClient

4.5、创建controller ,写个测试接口,打印一些服务信息
package com.hai.cloud.producer.controller;

import org.apache.logging.log4j.LogManager;
import org.apache.logging.log4j.Logger;
import org.springframework.beans.factory.annotation.Autowired;
import org.springframework.cloud.client.ServiceInstance;
import org.springframework.cloud.client.discovery.composite.CompositeDiscoveryClient;
import org.springframework.web.bind.annotation.RequestMapping;
import org.springframework.web.bind.annotation.RequestMethod;
import org.springframework.web.bind.annotation.RestController;

/**
 * @program: haiSpringCloud
 * @description: 用户相关控制类
 * @author: lizhihai
 * @create: 2020-05-04
 */
@RestController
public class UserController {

    Logger log = LogManager.getLogger(LogManager.ROOT_LOGGER_NAME);

    /**
     * 高版本的 spring cloud 需要用CompositeDiscoveryClient 通过serverid获取instance对象
     */
    @Autowired
    CompositeDiscoveryClient discoveryClient;

    @RequestMapping(value = "/index", method = RequestMethod.GET)
    public String index(){
        //打印服务信息
        this.stuServerInfo("/index");
        return "Hello World";
    }

    /**
     * @Description:  打印服务信息
     * @Param: path 接口路径
     * @Author: lizhihai
     * @Date: 2020/5/4
     */
    public void stuServerInfo(String path){
        //获取serviceId
        String serviceId = discoveryClient.getServices().get(0);
        //通过 serceId获取Instance对象
        ServiceInstance instance = discoveryClient.getInstances(serviceId).get(0);
        log.info("HOST==>" + instance.getHost());
        log.info("SERVICEID==>" + instance.getServiceId());
        log.info("INSTANCEID==>" + instance.getInstanceId());
        log.info("URL==>" + instance.getUri() + path);
    }
}
4.6 、配置启动项 ,指定环境变量 -Dspring.profiles.active=dev, 并启动
再次访问http://localhost:8760 就会发现application多了一条数据,可以与我前面的截图对比

5、创建消费者模块
流程和上面的一样
在启动类中添添加@EnableDiscoveryClient 并添加以下方法
    /**
     * @Description: RestTemplate 会使用Ribbon 的自动化配置
     *              通过LoadBalanced 可以开启客户端的负载均衡
     * @Author: lizhihai
     * @Date: 2020/5/13
     */
    @Bean
    @LoadBalanced
    public RestTemplate restTemplate() {
        return new RestTemplate();
    }
创建一个Controller,通过服务名调用producer 的接口
import org.springframework.beans.factory.annotation.Autowired;
import org.springframework.http.ResponseEntity;
import org.springframework.web.bind.annotation.RequestMapping;
import org.springframework.web.bind.annotation.RequestMethod;
import org.springframework.web.bind.annotation.RestController;
import org.springframework.web.client.RestTemplate;

/**
 * @program: haiSpringCloud
 * @description: 服务消费
 * @author: lizhihai
 * @create: 2020-05-13
 */
@RestController
public class ConsumerController {
    @Autowired
    RestTemplate restTemplate;

    /**
     * @Description:  通过Ribbon 调用无参的GET请求 除了 getForEntity 还有 getForObject  、
     *          调用SPRING-BOOT-PRODUCER 服务的index接口
     * @Author: lizhihai
     * @return: ResponseEntity对象是Spring对HTTP请求响应的封装,其中包括:HttpStatus(404、500) 、 HttpEntity 、 HttpHeaders
     * @Date: 2020/5/13
     */
    @RequestMapping(value = "/indexConsumer1", method = RequestMethod.GET)
    public ResponseEntity<String> indexConsumer1(){
        ResponseEntity<String> responseEntity = restTemplate.getForEntity("http://HAI-PRODUCER/index", String.class);
        return responseEntity;
    }
}
以9001端口启动,
注册中心多了一条application

访问 localhost:9001/indexConsumer1 如下:

HAI-PRODUCER 服务控制台输出

我们前台调用 localhost:9001/indexConsumer1, 通过注册中心调用了 HAI-PRODUCER/index 接口
到这里就打工告成了