一、环境安装
"""
node   ---    python
npm    ---    pip

pip:是一个现代的,通用的Python包管理工具。提供了对Python包的查找,下载,安装,卸载的功能。
python: C语言编写,解释执行python语言的
node:  C++语言编写,解释执行JavaScript语言的
npm类似于pip,是为node环境安装额外功能的
"""
1.安装node(附带npm)
官网下载安装包,傻瓜式安装:https://nodejs.org/zh-cn/
2.安装cnpm
npm install -g cnpm --registry=https://registry.npm.taobao.org
#这个东西主要用来换源不然你后面下载会很慢,所有的npm都可以用npm来代替
3.安装脚手架
cnpm install -g @vue/cli
或者
npm install -g @vue/cli
4.清理缓存
npm cache clean --force
#如果第2.3步安装总是失败的情况下可以尝试清下缓存重新安装执行2.3步
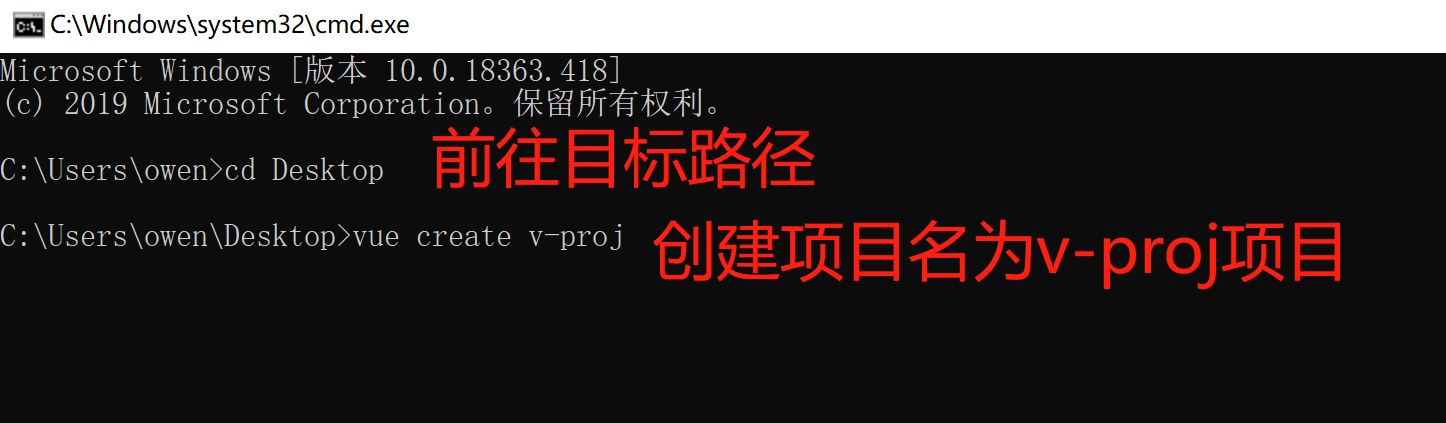
项目创建
在终端中创建项目
#第一次出现的选项
default (babel, eslint)
Manually select features #一般不选默认设置
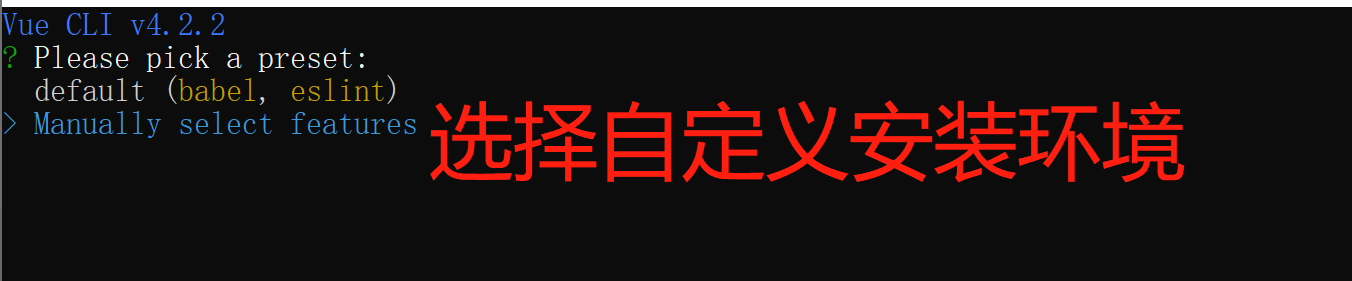
default为系统默认  一般不选
Manually select features为自定义
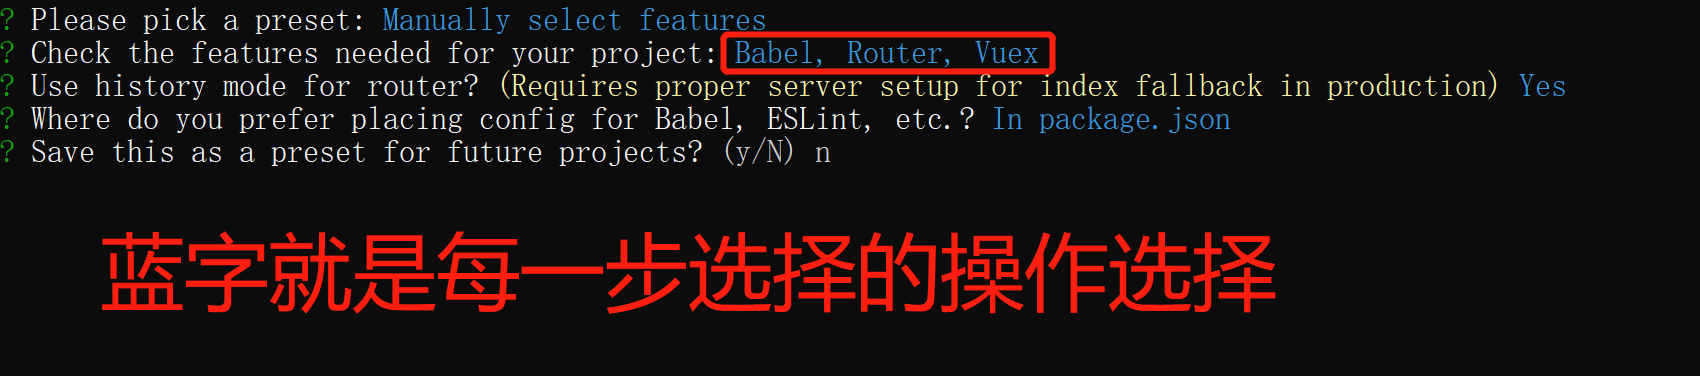
#第二次出现
#空格勾选,回车下一步
(*) Babel    #我们在VUe中一般都用ES6语法写的,这个插件功能很强大一般都选的把ES5语法解析成ES6
( ) TypeScript      #也是种语法js的升级版,脸书蛮推荐这个语法的,学这个蛮贵的
( ) Progressive Web App (PWA) Support #前台优化的一个功能集合,提高前台项目效率
(*) Router #前后端交互中ajax交互来达成前后端分离,这个就是前台的路由
(*) Vuex #Vue中父组件与子子组件传递消息,设置成全局的单例来方便消息传递
( ) CSS Pre-processors #如果选了后面他会让你选你用less或者sass中其中某个做预处理
( ) Linter / Formatter  #规范编码格式
( ) Unit Testing  #测试相关
( ) E2E Testing     #测试相关
#一般勾选这四个,其它具体情况具体分析
npm run serve //运行
ctrl+c   //退出
// 要提前进入项目根目录
步骤:

1)拷贝环境 node_modules 以外的文件与文件夹到目标文件夹
2)终端进入目标文件夹所在位置
3)执行:npm install 重新构建依赖(npm可以用cnpm替换)
补充:ReadMe解读
# my_vue
## Project setup
```
npm install #安装环境依赖
```
### Compiles and hot-reloads for development
```
npm run serve #启动项目
```
### Compiles and minifies for production
```
npm run build #项目打包
```
### Run your tests
```
npm run test #运行测试脚本
```
### Lints and fixes files
```
npm run lint #执行代码规范检测
```
### Customize configuration
See [Configuration Reference](https://cli.vuejs.org/config/).
1)根组件:App.vue
<template>
    <div id="app">
        <router-view />
    </div>
</template>

2)路由配置:router/index.js
const routes = [
    {
        path: '/',
        name: 'Home',
        component: Home
    }
];

3)组件:views和components文件夹
    i)删除除Home.vue以外的所有组件
    ii)初始化Home.vue
    <template>
        <div class="home">
        </div>
    </template>

4)分类管理资源:assets文件夹
    建立img、css、js子文件夹,删除原来的资源

5)如果要修改页面标签图标
    替换public文件夹下的favicon.ico图片文件
├── v-proj
|    ├── node_modules      // 当前项目所有依赖,一般不可以移植给其他电脑环境
|    ├── public
|    |    ├── favicon.ico    // 标签图标
|    |    └── index.html    // 当前项目唯一的页面
|    ├── src
|    |    ├── assets        // 静态资源img、css、js
|    |    ├── components    // 小组件
|    |    ├── views        // 页面组件
|    |    ├── App.vue        // 根组件
|    |    ├── main.js        // 全局脚本文件(项目的入口)
|    |    ├── router
|    |    |    └── index.js// 路由脚本文件(配置路由 url链接 与 页面组件的映射关系)
|    |    └── store
|    |    |    └── index.js// 仓库脚本文件(vuex插件的配置文件,数据仓库)
|    ├── README.md
└    └── package.json等配置文件
全局脚本文件main.js(项目入口)
- main.js是项目的入口文件
- new Vue()就是创建根组件,用render读取一个.vue文件,$mount渲染替换index.html中的占位
- 项目所依赖的环境,比如:vue环境、路由环境、仓库环境、第三方环境、自定义环境都是在main.js中完成
import Vue from 'vue'
import App from './App.vue'
import router from './router'
import store from './store'

Vue.config.productionTip = false

new Vue({
    router,
    store,
    render: h => h(App)
}).$mount('#app')
可以改写成
import Vue from 'vue'  // 加载vue环境
import App from './App.vue'  // 加载根组件
import router from './router'  // 加载路由环境
import store from './store'  // 加载数据仓库环境

Vue.config.productionTip = false;  // tip小提示

import FirstCP from './views/FirstCP'
new Vue({
    el: '#app',
    router: router,
    store: store,
    render: function (h) {
        return h(FirstCP);  // 读取FirstCP.vue替换index.html中的占位
    }
});
.Vue文件
<template>
    <!-- 模板区域 -->
</template>
<script>
    // 逻辑代码区域
    // 该语法和script绑定出现
    export default {

    }
</script>
<style scoped>
    /* 样式区域 */
    /* scoped表示这里的样式只适用于组件内部, scoped与style绑定出现 */
</style>