前一段有看到博友用HTML5做了个太极的动画效果,分步骤展示了制作过程,一时兴起遂闲暇之余用WPF 简单用border拼接实现。
先来分步实现
第一步:先画出左边黑色半圆
<Border Width="200" Height="400" CornerRadius="200,0,0,200" Background="Black" HorizontalAlignment="Left"></Border>
CornerRadius 属性可以设置四个边角的弧度,通过改变边角弧度达到画圆的目的。
效果图如下:

第二步:与第一步类似,画出右侧白色半圆
<Border Width="200" Height="400" CornerRadius="0,200,200,0" Background="White" HorizontalAlignment="Right"></Border>
只是将 Border 的 HorizontalAlignment 属性 设置为“Right”。
第三步:添加上方位置 黑色小半圆
<Border Width="100" Height="200" CornerRadius="0,200,200,0" Background="Black" HorizontalAlignment="Left" VerticalAlignment="Top" Margin="200,0,0,0"></Border>
需要注意的是通过 Margin 属性定位其位置。
第四步:同理第三步, 添加下方位置 白色小半圆
<Border Width="100" Height="200" CornerRadius="200,0,0,200" Background="White" HorizontalAlignment="Left" VerticalAlignment="Bottom" Margin="100,0,0,0"></Border>

基本上已经看的出样子了,接下来
第五步:正上方位置添加 白色小正圆
<Border Width="50" Height="50" CornerRadius="50" Background="White" VerticalAlignment="Top" Margin="0,75,0,0"></Border>
给定其背景色为白色。
第六步:同理第五步,在正下方添加 黑色小正圆,并给定其背景色为黑色。
<Border Width="50" Height="50" CornerRadius="50" Background="Black" VerticalAlignment="Bottom" Margin="0,0,0,75"></Border>
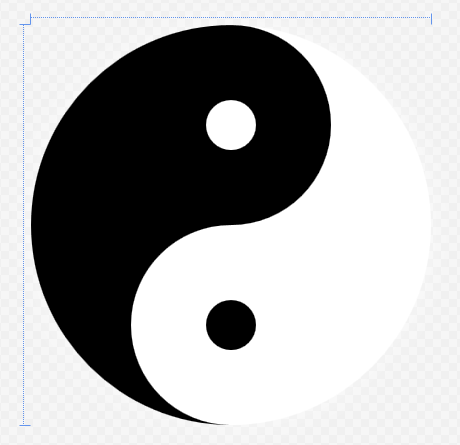
效果图如下
附上完整代码示例
前端完整XAML:
<UserControl x:Class="Jexton.Jtools.JexTaiChi"
             xmlns="http://schemas.microsoft.com/winfx/2006/xaml/presentation"
             xmlns:x="http://schemas.microsoft.com/winfx/2006/xaml"
             xmlns:mc="http://schemas.openxmlformats.org/markup-compatibility/2006"
             xmlns:d="http://schemas.microsoft.com/expression/blend/2008"
             mc:Ignorable="d"
             d:DesignHeight="500" d:DesignWidth="500">
    <Border x:Name="Taichi" Margin="20" Width="400" Height="400" CornerRadius="400" RenderTransformOrigin="0.5,0.5">
        <Border.RenderTransform>
            <TransformGroup>
                <ScaleTransform/>
                <SkewTransform/>
                <RotateTransform Angle="0"/>
                <TranslateTransform/>
            </TransformGroup>
        </Border.RenderTransform>
        <Border.Effect>
            <DropShadowEffect ShadowDepth="0" BlurRadius="40" Color="White" Opacity="0.5"></DropShadowEffect>
        </Border.Effect>
        <Grid>
            <!--左边黑半圆-->
            <Border Width="200" Height="400" CornerRadius="200,0,0,200" Background="Black" HorizontalAlignment="Left"></Border>
            <!--右边白半圆-->
            <Border Width="200" Height="400" CornerRadius="0,200,200,0" Background="White" HorizontalAlignment="Right"></Border>
            <!--黑色小半圆-->
            <Border Width="100" Height="200" CornerRadius="0,200,200,0" Background="Black" HorizontalAlignment="Left" VerticalAlignment="Top" Margin="200,0,0,0"></Border>
            <!--白色小半圆-->
            <Border Width="100" Height="200" CornerRadius="200,0,0,200" Background="White" HorizontalAlignment="Left" VerticalAlignment="Bottom" Margin="100,0,0,0"></Border>
            <!--白色小正圆-->
            <Border Width="50" Height="50" CornerRadius="50" Background="White" VerticalAlignment="Top" Margin="0,75,0,0"></Border>
            <!--黑色小正圆-->
            <Border Width="50" Height="50" CornerRadius="50" Background="Black" VerticalAlignment="Bottom" Margin="0,0,0,75"></Border>
        </Grid>
    </Border>
</UserControl>
至此UI部分完成,接下来还可以让它 ”动“ 起来:
后端代码 :
   ThreadPool.QueueUserWorkItem(new WaitCallback(w=>{
                int Angle = 0;
                while (true)
                {
                    if (Angle == 360) { Angle = 0; }
                    Taichi.Dispatcher.BeginInvoke(new Action(() => {
                        //Taichi
                        TransformGroup group = new TransformGroup();
                        group.Children.Add(new ScaleTransform());
                        group.Children.Add(new SkewTransform());
                        group.Children.Add(new TranslateTransform());
                        group.Children.Add(new RotateTransform(Angle));
                        Taichi.RenderTransform = group;
                    }));
                    Angle = Angle + 10;
                    Thread.Sleep(50);
                }
            }));
写在最后的话:
在WPF中很多复杂图形也是可以使用简单布局元素拼凑出来的。