heartbeat+httpd HA安装准备工作
说明
1、服务器信息
先通过heartbeat验证HA的最基本功能,两个节点服务器提供httpd服务,验证heartbeat是否可以正确配置并启动服务,切换两个节点是否正常提供服务。
服务器配置环境说明
|
1
2
3
4
5
6
|
服务器1:ha1.dawu.com ha1 eth0 192.168.1.101服务器2:ha2.dawu.com ha2 eth0 192.168.1.102VIP信息:VIP:192.168.1.10 |
本次验证较为简单,没有做心跳线,都是通过eth0网卡通信。
2、主机名
ha1主机要修改的内容
|
1
2
3
4
5
6
7
8
9
|
vim /etc/hosts192.168.1.101 ha1.dawu.com ha1192.168.1.102 ha2.dawu.com ha2[root@ha1 ~]# vim /etc/sysconfig/networkNETWORKING=yesHOSTNAME=ha1.dawu.comGATEWAY=192.168.1.1[root@ha1 ~]# uname -nha1.dawu.com |
ha2主机要修改的内容
|
1
2
3
4
5
6
7
8
9
|
vim /etc/hosts192.168.1.101 ha1.dawu.com ha1192.168.1.102 ha2.dawu.com ha2[root@ha1 ~]# vim /etc/sysconfig/networkNETWORKING=yesHOSTNAME=ha1.dawu.comGATEWAY=192.168.1.1[root@ha1 ~]# uname -nha2.dawu.com |
验证主机名
|
1
2
3
4
5
6
7
8
|
在ha1节点ping ha2.dawu.com[root@ha1 ~]# ping ha2.dawu.comPING ha2.dawu.com (192.168.1.102) 56(84) bytes of data.64 bytes from ha2.dawu.com (192.168.1.102): icmp_seq=1 ttl=64 time=1.66 ms在ha2节点ping ha1.dawu.com[root@ha2 html]# ping ha1.dawu.comPING ha1.dawu.com (192.168.1.101) 56(84) bytes of data.64 bytes from ha1.dawu.com (192.168.1.101): icmp_seq=1 ttl=64 time=0.171 ms |
时间服务器同步设置
两台服务器做同样的设置
|
1
2
|
[root@ha2 html]# crontab -e*/5 * * * * /usr/sbin/ntpdate ntp.ubuntu.com &> /dev/null |
ssh密钥认证做互信机制
|
1
2
3
4
5
6
7
8
9
10
11
12
13
14
15
16
17
18
19
20
21
22
23
24
25
26
|
[root@ha1 ~]# ssh-keygen -t rsa -f ~/.ssh/id_rsa -P '' #生成密码信息Generating public/private rsa key pair.Your identification has been saved in /root/.ssh/id_rsa.Your public key has been saved in /root/.ssh/id_rsa.pub.The key fingerprint is:e6:b4:3b:4b:a9:47:fb:a3:8d:37:ea:e5:eb:18:ae:f1 root@ha1.dawu.comThe key's randomart image is:+--[ RSA 2048]----+| || || || || S || +.o || ..*.. || *+O+ || o+EO*+ |+-----------------+[root@ha1 ~]# ssh-copy-id -i ~/.ssh/id_rsa.pub root@ha2.dawu.com #把公钥copy到ha2节点The authenticity of host 'ha2.dawu.com (192.168.1.102)' can't be established.RSA key fingerprint is 81:64:f4:af:ae:fc:6a:d1:1c:a2:e4:49:4e:be:d5:7f.Are you sure you want to continue connecting (yes/no)? yes #输入yes,回车Warning: Permanently added 'ha2.dawu.com,192.168.1.102' (RSA) to the list of known hosts.root@ha2.dawu.com's password: #输入节点ha2的密码密码。Now try logging into the machine, with "ssh 'root@ha2.dawu.com'", and check in: .ssh/authorized_keysto make sure we haven't added extra keys that you weren't expecting. |
ha2节点服务器做同样设置
|
1
2
3
4
5
6
7
8
9
10
11
12
13
14
15
16
17
18
19
20
21
22
23
24
25
26
|
[root@ha2 html]# ssh-keygen -t rsa -f ~/.ssh/id_rsa -P ''Generating public/private rsa key pair.Your identification has been saved in /root/.ssh/id_rsa.Your public key has been saved in /root/.ssh/id_rsa.pub.The key fingerprint is:b9:88:f9:99:c4:ba:c1:9a:b1:3e:ab:17:94:ee:4a:96 root@ha2.dawu.comThe key's randomart image is:+--[ RSA 2048]----+| || || . || o . || o S || +. + . . || E..= + . ||o += = o ||o=*oo.+ |+-----------------+[root@ha2 html]# ssh-copy-id -i ~/.ssh/id_rsa.pub root@ha1.dawu.comThe authenticity of host 'ha1.dawu.com (192.168.1.101)' can't be established.RSA key fingerprint is fb:0a:c8:27:ff:c1:62:de:d9:45:0f:08:9a:75:d9:58.Are you sure you want to continue connecting (yes/no)? yesWarning: Permanently added 'ha1.dawu.com,192.168.1.101' (RSA) to the list of known hosts.root@ha1.dawu.com's password: Now try logging into the machine, with "ssh 'root@ha1.dawu.com'", and check in: .ssh/authorized_keysto make sure we haven't added extra keys that you weren't expecting. |
到此双方ssh互信机制已设置完成。
通过ssh互信查看双方节点服务器时间是否同步。
|
1
2
3
|
[root@ha1 ~]# date;ssh ha2 'date'Thu Oct 22 11:41:13 CST 2015Thu Oct 22 11:41:13 CST 2015 |
双方节点服务器时间已同步。
两节点分别提供httpd服务
|
1
2
|
ha1节点httpd网页内容为:ha1.dawu.com验证网页是否正常访问。ha2节点httpd网页内容为:ha2.dawu.com验证网页是否正常访问。 |
在切换HA角色的时候查看是否能正常切换角色使用。
关闭httpd服务,关闭httpd服务开机启动,因为httpd服务将由heartbeat服务接管控制。
|
1
2
3
|
[root@ha2 ~]# service httpd stopStopping httpd: [ OK ][root@ha2 ~]# chkconfig httpd off |
两台服务器节点做同样配置 ,关闭httpd服务。
准备工作已完成。
heartbeat HA高可用群集安装
1.安装所需依赖软件包
|
1
|
yum install PyXML net-snmp-libs perl-MailTools gettext gnutls libtool-ltdl |
2.安装libnet
libnet是在epel源中,要下载epel源安装包,安装完毕之后就不会再出现依赖libnet.so.1()(64bit) is needed by heartbeat-2.1.4-12.el6.x86_64
wget https://dl.fedoraproject.org/pub/epel/6/x86_64/libnet-1.1.6-7.el6.x86_64.rpm
所需安装包
[root@ha2 heartbeat2]# ls
heartbeat-2.1.4-12.el6.x86_64.rpm
heartbeat-debuginfo-2.1.4-12.el6.x86_64.rpm
heartbeat-devel-2.1.4-12.el6.x86_64.rpm
heartbeat-gui-2.1.4-12.el6.x86_64.rpm
heartbeat-ldirectord-2.1.4-12.el6.x86_64.rpm
heartbeat-pils-2.1.4-12.el6.x86_64.rpm
heartbeat-stonith-2.1.4-12.el6.x86_64.rpm
libnet-1.1.6-7.el6.x86_64.rpm
3.安装heartbeat
安装非常简单,只要依赖关系解决就不会存在问题。
|
1
2
|
[root@ha2 ~]# rpm -ivh libnet-1.1.6-7.el6.x86_64.rpm [root@ha2 ~]# rpm -ivh heartbeat-2.1.4-12.el6.x86_64.rpm heartbeat-stonith-2.1.4-12.el6.x86_64.rpm heartbeat-pils-2.1.4-12.el6.x86_64.rpm |
双方节点服务器做同样安装配置。
4.配置heartbeat
需要配置文件有三个:authkeys、haresources、ha.cf。这三个配置文件需要在/etc/ha.d目录下面,但是默认是没有这三个文件的,需要在/usr/share/doc/heartbeat-2.1.4/目录下复制过来
#复制这三个文件到/etc/ha.d目录
|
1
2
3
|
[root@ha1 ~]# cp /usr/share/doc/heartbeat-2.1.4/{authkeys,haresources,ha.cf} /etc/ha.d/[root@ha1 ~]# ls /etc/ha.d/authkeys ha.cf harc haresources rc.d README.config resource.d shellfuncs |
4.1 配置authkeys文件:用于HMAC信息加密的认证机制与认证密码(此文件的权限必须为600,否则heartbeat无法启动)
[root@ha1 ~]# chmod 600 /etc/ha.d/authkeys
[root@ha1 ~]# ll /etc/ha.d/authkeys
-rw-------. 1 root root 645 Oct 22 14:03 /etc/ha.d/authkeys
4.2 配置authkeys认证所使用的密钥
|
1
2
3
4
5
6
7
8
|
方法一:[root@ha1 heartbeat2]# openssl rand -hex 8 >> /etc/ha.d/authkeys #生成密钥追加到authkeys文件中方法二:[root@node1 ha.d]# dd if=/dev/random count=1 bs=512 | md5sum 0+1 records in0+1 records out63 bytes (63 B) copied, 0.000106155 s, 593 kB/sf6fbf1ae8d574e2f915d4a3bd9783f74 |
|
1
2
3
4
5
6
|
[root@ha1 ~]# vim /etc/ha.d/authkeys #修改为以下配置,使用sha1加密auth 2#1 crc#2 sha1 HI!#3 md5 Hello!2 sha1 d1856d8377ad7bdb |
4.3 设置核心配置文件ha.cf
|
1
2
3
4
5
6
7
8
9
10
11
12
13
|
[root@ha1 ~]# grep -v '#' /etc/ha.d/ha.cf logfile /var/log/ha-logkeepalive 1deadtime 30warntime 10udpport 694mcast eth0 225.0.1.1 694 1 0auto_failback onnode ha1.dawu.comnode ha2.dawu.comping 192.168.1.100compression bz2compression_threshold 2 |
heartbeat参数说明
logfile /var/log/ha-log
指明heartbaet的ha-log日志存放位置,heartbeat日志记录方式有两种,可以指定ha-log文件,也可以在rsyslog.conf日志配置文件来记录日志,heartbeat默认是借助于rsyslog来记录日志的,这里开启指定记录在/var/log/ha-log中方便查询。
keepalive 1000ms
指定心跳使用间隔时间为1秒(即每两秒钟在eth1上发送一次广播)
deadtime 8
指定备用节点在8秒内没有收到主节点的心跳信号后,则立即接管主节点的服务资源
warntime 3
指定心跳延迟的时间为3秒。当3秒钟内备份节点不能接收到主节点的心跳信号时,就会往日志中写入一个警告日志,但此时不会切换服务
udpport 694
设置广播通信使用的端口,694为默认使用的端口号。
auto_failback on
用来定义当主节点恢复后,是否将服务自动切回。主节点在正常情况下占用资源并运行所有的服务,遇到故障中断时把资源交给备份节点由备份节点接管服务并运行。该选项设为on时,一旦主节点恢复运行,自动获取资源并接管备份节点,如果该选项设置为off,当主节点恢复后,将变为备份节点,而原来的备份节点成为主节点
mcast eth0 225.0.1.1 694 1 0
采用网卡eth0的Udp多播来组织心跳,一般在备用节点不止一台时使用。Bcast、ucast和mcast分别代表广播、单播和多播,是组织心跳的三种方式,任选其一即可。
node ha1.dawu.com
主节点主机名,通过命令“uanme –n”查看获得。
node ha2.dawu.com
备用节点主机名
ping 192.168.1.100
选择ping节点,ping节点选择的越好,HA集群就越强壮,可以选择固定的路由器作为ping节点,但是最好不要选择集群中的成员作为ping节点,ping节点仅仅用来测试网络连接。
compression bz2
对传输的数据进行压缩,是可选项
compression_threshold 2
表示小于2k将不予以压缩
修改haresources文件
|
1
2
|
[root@ha1 ~]# grep -v "#" /etc/ha.d/haresourcesha1.dawu.com 192.168.1.10/24/eth0 httpd |
说明:
ha1.dawu.com 集群节点
192.168.1.10/24/eth0 集群VIP/掩码/那个网卡
httpd 定义服务资源httpd
vip192.168.1.10优先访问ha1.dawu.com服务节点上的httpd服务,如果本节点掉线,转移到第二个节点上(在ha.cf中定义的节点),如果恢复后ha1.dawu.com重新上线接管服务,将集群服务资源夺回。
以上是在ha1节点中所有的配置操作,现在要将刚修改的三个文件复制到ha2节点服务器
|
1
2
3
4
|
[root@ha1 ha.d]# scp -p ha.cf haresources authkeys ha2:/etc/ha.d/ ha.cf 100% 10KB 10.3KB/s 00:00 haresources 100% 5946 5.8KB/s 00:00 authkeys 100% 668 0.7KB/s 00:00 |
复制完毕之后,所有的配置工作就已基本完毕。
启动heartbeat服务
|
1
2
3
4
|
[root@ha1 ha.d]# service heartbeat start #启动heartbeat服务Starting High-Availability services: 2015/10/22_14:28:22 INFO: Resource is stoppedDone. |
查看端口是否启动成功。
|
1
2
3
4
5
|
[root@ha1 ha.d]# netstat -unlpActive Internet connections (only servers)Proto Recv-Q Send-Q Local Address Foreign Address State PID/Program name udp 0 0 0.0.0.0:59828 0.0.0.0:* 26435/heartbeat: wr udp 0 0 225.0.1.1:694 0.0.0.0:* 26435/heartbeat: wr |
查看vip是否正常启用。
|
1
2
3
4
5
6
7
8
9
10
11
12
|
[root@ha1 ha.d]# ifconfigeth0 Link encap:Ethernet HWaddr 00:0C:29:DF:C0:9A inet addr:192.168.1.101 Bcast:192.168.1.255 Mask:255.255.255.0 inet6 addr: fe80::20c:29ff:fedf:c09a/64 Scope:Link UP BROADCAST RUNNING MULTICAST MTU:1500 Metric:1 RX packets:2367063 errors:0 dropped:0 overruns:0 frame:0 TX packets:222053 errors:0 dropped:0 overruns:0 carrier:0 collisions:0 txqueuelen:1000 RX bytes:554709941 (529.0 MiB) TX bytes:20793207 (19.8 MiB)eth0:0 Link encap:Ethernet HWaddr 00:0C:29:DF:C0:9A inet addr:192.168.1.10 Bcast:192.168.1.255 Mask:255.255.255.0 UP BROADCAST RUNNING MULTICAST MTU:1500 Metric:1 |
查看日志信息
|
1
2
3
4
5
6
7
8
9
10
11
|
[root@ha1 ha.d]# tail /var/log/ha-log ip-request-resp[26573]: 2015/10/22_14:28:52 received ip-request-resp 192.168.1.10/24/eth0 OK yesResourceManager[26592]: 2015/10/22_14:28:52 info: Acquiring resource group: ha1.dawu.com 192.168.1.10/24/eth0 httpdIPaddr[26618]: 2015/10/22_14:28:52 INFO: Resource is stoppedResourceManager[26592]: 2015/10/22_14:28:52 info: Running /etc/ha.d/resource.d/IPaddr 192.168.1.100/24/eth0 startIPaddr[26715]: 2015/10/22_14:28:52 INFO: Using calculated netmask for 192.168.1.10: 255.255.255.0IPaddr[26715]: 2015/10/22_14:28:52 INFO: eval ifconfig eth0:0 192.168.1.10 netmask 255.255.255.0 broadcast 192.168.1.255IPaddr[26686]: 2015/10/22_14:28:52 INFO: SuccessResourceManager[26592]: 2015/10/22_14:28:52 info: Running /etc/init.d/httpd startheartbeat[26430]: 2015/10/22_14:29:02 info: Local Resource acquisition completed. (none)heartbeat[26430]: 2015/10/22_14:29:02 info: local resource transition completed. |
ha1节点服务器已正常启动成功。
启动ha2节点服务,通过ha1节点来启动ha2节点服务。
|
1
2
3
4
|
[root@ha1 ha.d]# ssh ha2 'service heartbeat start'Starting High-Availability services: 2015/10/22_14:32:51 INFO: Resource is stoppedDone. |
启动成功
测试heartbeat服务
切换是否正常
1、登录网页查看网页内容,显示ha1.dawu.com说明服务已成功,并且由ah1.dawu.com主机提供服务。

2、停止ha1节点服务。
停止heartbeat方法可以使用service heartbeat stop或使用hb_standby来切换备用节点服务。
|
1
2
3
|
[root@ha1 ha.d]# /usr/lib64/heartbeat/hb_standby 2015/10/22_14:46:18 Going standby [all].[root@ha1 ha.d]# |
在次登入网页查看网页内容,显示为ha2.dawu.com,说明由ha2节点提供服务,到此heartbeat双机已安装配置启动,能正常使用并切换服务,基本功能已实现。
heartbeat安装基于nfs的HA双机热备方案
由上已安装了基于本地文件的heartbeat双机热备方案,网络文件都存放在两台本地主机并且文件都要实时保持一致,本次将使用基于NFS的共享存储方案,挂载NFS文件系统来实现HA双机热备方案,本实验只是实现heartbeat外挂其他存储方案来实现,NFS一般不用于生产环境,但是本实验是为了实现原理,其他存储方式基本差不多。
1准备工作
1.1 增加一台服务器实现NFS共享存储
|
1
2
3
|
[root@nfs ~]# uname -nnfs.dawu.comip地址:192.168.1.100 |
1.2安装nfs
|
1
|
[root@nfs ~]# yum install nfs* |
1.3创建目录与网页文件
|
1
2
3
|
[root@nfs ~]# mkdir /data/html -pvmkdir: created directory `/data/html'[root@nfs data]# vim /data/html/index.html |
NFS share!
1.4创建共享
|
1
2
3
4
|
[root@nfs data]# vim /etc/exports /data/html 192.168.1.0/24(rw,sync,no_root_squash)[root@nfs data]# exportfs -arvexporting 192.168.1.0/24:/data/html |
1.5启用nfs服务,并设为开机启动
|
1
2
3
4
5
6
|
[root@nfs data]# service nfs startStarting NFS services: [ OK ]Starting NFS mountd: [ OK ]Starting NFS daemon: [ OK ]Starting RPC idmapd: [ OK ][root@nfs data]# chkconfig nfs on |
2.测试两节点挂载nfs
2.1 ha1节点测试挂载nfs
检查nfs-utils软件包是否安装
|
1
2
|
[root@nfs data]# rpm -qa nfs-utilsnfs-utils-1.2.3-64.el6.x86_64 |
如果未安装
|
1
|
yum install nfs-utils |
|
1
2
3
4
5
6
|
[root@ha1 ha.d]# mount -t nfs 192.168.1.100:/data/html /var/www/html/[root@ha1 ha.d]# mount #查看挂载信息,显示已挂载nfs192.168.1.100:/data/html on /var/www/html type nfs (rw,vers=4,addr=192.168.1.100,clientaddr=192.168.1.101)[root@ha1 ha.d]# cat /var/www/html/index.html #查看网页信息是否正常NFS share![root@ha1 ha.d]# umount /var/www/html/ #umount挂载的目录 |
ha2节点测试挂载nfs
|
1
2
3
4
5
6
|
[root@ha2 heartbeat2]# mount -t nfs 192.168.1.100:/data/html /var/www/html/[root@ha2 heartbeat2]# mount #查看挂载信息,显示已挂载NFS192.168.1.100:/data/html on /var/www/html type nfs (rw,vers=4,addr=192.168.1.100,clientaddr=192.168.1.102)[root@ha2 heartbeat2]# cat /var/www/html/index.html #查看网页信息是否正常NFS share![root@ha2 heartbeat2]# umount /var/www/html/ #umount挂载的目录 |
ha1 ha2节点都已成功测试nfs挂载
3.修改haresources配置文件
|
1
2
|
[root@ha1 ha.d]# vim haresources ha1.dawu.com 192.168.1.10/24/eth0 Filesystem::192.168.1.100:/data/html::/var/www/html::nfs httpd |
|
1
2
3
4
5
6
7
8
|
参数简单说明:参数传递间隔符是::资源代理的名字必须要与资源代理(脚本)名相同,区分大小写第一段Filesystem:表示资源代理的类型第二段192.168.1.100:/data/html表示为:那台主机的的NFS文件共享的目录第三段/var/www/html:表示要挂载的位置第四段nfs:为文件系统的类型[root@ha1 ha.d]# scp haresources ha2:/etc/ha.d/ #复制一份配置文件给ha2haresources 100% 6003 5.9KB/s 00:00 |
4. 启动heartbeat服务
|
1
2
3
4
5
6
7
|
[root@ha1 ha.d]# service heartbeat start;ssh ha2 'service heartbeat start'Starting High-Availability services: 2015/10/22_16:37:22 INFO: Resource is stoppedDone.Starting High-Availability services: 2015/10/22_16:37:23 INFO: Resource is stoppedDone. |
5.测试网页
登录http://192.168.1.10/显示正常。
|
1
2
|
[root@ha1 ha.d]# mount192.168.1.100:/data/html on /var/www/html type nfs (rw,vers=4,addr=192.168.1.100,clientaddr=192.168.1.101) |
停止ha1节点服务,查看ha2节点是否正常切换
|
1
2
3
4
|
[root@ha1 ha.d]# /usr/lib64/heartbeat/hb_standby 2015/10/22_16:41:58 Going standby [all].[root@ha2 heartbeat2]# mount192.168.1.100:/data/html on /var/www/html type nfs (rw,vers=4,addr=192.168.1.100,clientaddr=192.168.1.102) |
到此基于nfs系统的heartbeat HA基本已实现
实现基于heartbeat v2版crm 实现HA mysql+wordpress
说明:
通过LAMP组合,基于heartbeat v2版 crm 实现HA.部署wordpress,实现用于编辑的文章中的任何数据在节点切换后都能正常访问;
1.1 停止heartbeat服务
|
1
2
3
4
5
|
[root@ha1 heartbeat2]# service heartbeat stop;ssh ha2 'service heartbeat stop'Stopping High-Availability services: Done.Stopping High-Availability services: Done. |
1.2 在nfs服务器上创建mysql用户
|
1
2
3
4
|
[root@nfs html]# groupadd -g 27 mysql[root@nfs html]# useradd -u 27 -g mysql -s /sbin/nologin -M mysql[root@nfs html]# id mysqluid=27(mysql) gid=27(mysql) groups=27(mysql) |
注意:nfs服务器上创建的mysql用户gid和uid都要与ha1、ha2的mysql用户保持一致
1.3创建数据文件并修改权限
|
1
2
3
|
[root@nfs html]# chown -R mysql.mysql /data/data/[root@nfs html]# ll /data/data/ -ddrwxr-xr-x. 2 mysql mysql 4096 Oct 22 22:11 /data/data/ |
1.4 在nfs服务器上创建apache用户
ha1:
|
1
2
|
[root@ha1 heartbeat2]# id apacheuid=48(apache) gid=48(apache) groups=48(apache) |
ha2:
|
1
2
|
[root@ha2 ~]# id apacheuid=48(apache) gid=48(apache) groups=48(apache) |
nfs:
|
1
2
|
[root@nfs html]# id apacheuid=48(apache) gid=48(apache) groups=48(apache) |
注意:以上三台gid和uid都保持一致
1.5修改权限
|
1
2
3
|
[root@nfs html]# chown -R apache.apache /data/html/[root@nfs html]# ll /data/html/ -ddrwxr-xr-x. 3 apache apache 4096 Oct 22 21:18 /data/html/ |
1.6添加共享存储
|
1
2
3
4
5
6
|
[root@nfs ~]# vim /etc/exports/data/html 192.168.1.0/24(rw,no_root_squash)/data/data 192.168.1.0/24(rw,no_root_squash)[root@nfs ~]# exportfs -avrexporting 192.168.1.0/24:/data/dataexporting 192.168.1.0/24:/data/html |
1.7重启nfs服务
[root@nfs ~]# service nfs restart
Shutting down NFS daemon: [ OK ]
Shutting down NFS mountd: [ OK ]
Shutting down NFS services: [ OK ]
Shutting down RPC idmapd: [ OK ]
Starting NFS services: [ OK ]
Starting NFS mountd: [ OK ]
Starting NFS daemon: [ OK ]
Starting RPC idmapd: [ OK ]
1.8下载wordpress
|
1
2
3
4
5
6
7
8
9
10
11
|
[root@nfs source]# wget https://cn.wordpress.org/wordpress-4.3.1-zh_CN.tar.gz--2015-10-22 21:14:29-- https://cn.wordpress.org/wordpress-4.3.1-zh_CN.tar.gzResolving cn.wordpress.org... 66.155.40.249, 66.155.40.250Connecting to cn.wordpress.org|66.155.40.249|:443... connected.HTTP request sent, awaiting response... 200 OKLength: 6922520 (6.6M) [application/octet-stream]Saving to: “wordpress-4.3.1-zh_CN.tar.gz”100%[=========================================================>] 6,922,520 221K/s in 58s 2015-10-22 21:15:27 (117 KB/s) - “wordpress-4.3.1-zh_CN.tar.gz” saved [6922520/6922520] |
1.9解压wordpress
|
1
2
3
4
|
[root@nfs source]# tar -zxvf wordpress-4.3.1-zh_CN.tar.gz -C /data/html/ #解压至/data/html目录查看/data/html目录[root@nfs html]# ls /data/html/index.html wordpress |
1.10在ha1和ha2上安装mysql
|
1
|
[root@ha1 heartbeat2]# yum -y install mysql mysql-server mysql-devel |
2.测试两节点挂载
2.1 ha1节点挂载nfs wordpress
|
1
2
3
4
5
|
[root@ha1 heartbeat2]# mount -t nfs 192.168.1.100:/data/html /var/www/html/[root@ha1 heartbeat2]# mount192.168.1.100:/data/html on /var/www/html type nfs (rw,vers=4,addr=192.168.1.100,clientaddr=192.168.1.101)[root@ha1 heartbeat2]# ls /var/www/html/ #查看wordpress文件正常index.html wordpress |
2.2 ha1节点挂载nfs mysql
|
1
2
3
4
5
|
[root@ha1 heartbeat2]# mkdir /mydata/data -p[root@ha1 heartbeat2]# mount -t nfs 192.168.1.100:/data/data /mydata/data/[root@ha1 heartbeat2]# mount192.168.1.100:/data/html on /var/www/html type nfs (rw,vers=4,addr=192.168.1.100,clientaddr=192.168.1.101)192.168.1.100:/data/data on /mydata/data type nfs (rw,vers=4,addr=192.168.1.100,clientaddr=192.168.1.101) |
2.3 初始化mysql数据库
|
1
2
3
4
5
6
7
8
9
10
11
12
13
14
15
16
17
18
19
20
21
22
23
24
25
|
[root@ha1 ~]# vim /etc/my.cnf[mysqld]datadir=/mydata/data #修改数据库数据文件存放路径[root@ha1 heartbeat2]# /usr/bin/mysql_install_db --user=mysql --datadir=/mydata/data/Installing MySQL system tables...OKFilling help tables...OKTo start mysqld at boot time you have to copysupport-files/mysql.server to the right place for your systemPLEASE REMEMBER TO SET A PASSWORD FOR THE MySQL root USER !To do so, start the server, then issue the following commands:/usr/bin/mysqladmin -u root password 'new-password'/usr/bin/mysqladmin -u root -h ha1.dawu.com password 'new-password'Alternatively you can run:/usr/bin/mysql_secure_installationwhich will also give you the option of removing the testdatabases and anonymous user created by default. This isstrongly recommended for production servers.See the manual for more instructions.You can start the MySQL daemon with:cd /usr ; /usr/bin/mysqld_safe &You can test the MySQL daemon with mysql-test-run.plcd /usr/mysql-test ; perl mysql-test-run.plPlease report any problems with the /usr/bin/mysqlbug script! |
2.4启动mysql
|
1
|
[root@ha1 ~]# service mysqld start #启动成功 |
2.5 卸载挂载设置
|
1
2
3
4
5
6
7
8
|
[root@ha1 ~]# umount /mydata/data/ umount.nfs: /mydata/data: device is busy #数据库需要先停止umount.nfs: /mydata/data: device is busy[root@ha1 ~]# service mysqld stopStopping mysqld: [ OK ][root@ha1 ~]# umount /mydata/data/ #卸载成功[root@ha1 data]# service httpd stop[root@ha1 data]# umount /var/www/html/ |
2.6在节点ha2上测试挂载点和数据库
|
1
2
3
4
5
6
7
8
9
10
|
[root@ha2 ~]# vim /etc/my.cnf[mysqld]datadir=/mydata/data #修改数据库数据文件存放路径[root@ha2 ~]# mount -t nfs 192.168.1.100:/data/data /mydata/data #挂载mount.nfs: mount point /mydata/data does not exist#/mydata/data目录不存在[root@ha2 ~]# mkdir /mydata/data -p #创建目录[root@ha2 ~]# mount -t nfs 192.168.1.100:/data/data /mydata/data #挂载成功[root@ha2 ~]# ll -d /mydata/data/#查看目录权限drwxr-xr-x. 4 mysql mysql 4096 Oct 23 03:37 /mydata/data/[root@ha2 ~]# |
2.7重启数据库
|
1
2
3
4
5
6
7
8
9
10
11
12
13
14
15
16
17
18
19
20
21
22
23
24
25
|
[root@ha2 ~]# service mysqld restartStopping mysqld: [ OK ]Starting mysqld: [ OK ][root@ha2 ~]# mysql #连接数据库Welcome to the MySQL monitor. Commands end with ; or g.Your MySQL connection id is 2Server version: 5.1.73 Source distributionCopyright (c) 2000, 2013, Oracle and/or its affiliates. All rights reserved.Oracle is a registered trademark of Oracle Corporation and/or itsaffiliates. Other names may be trademarks of their respectiveowners.Type 'help;' or 'h' for help. Type 'c' to clear the current input statement.mysql> show databases;#查看数据库+--------------------+| Database |+--------------------+| information_schema || mysql || test |+--------------------+3 rows in set (0.01 sec)mysql> create database testdb;#创建数据库testdbQuery OK, 1 row affected (0.01 sec)mysql> quitBye |
3.安装heartbeat-gui
3.1在节点ha1和节点ha2上分别执行如下操作
|
1
2
3
4
5
6
7
|
[root@ha1 ~]# cd /usr/local/src/rpm/heartbeat2/[root@ha1 heartbeat2]# lsheartbeat-2.1.4-12.el6.x86_64.rpm heartbeat-ldirectord-2.1.4-12.el6.x86_64.rpmheartbeat-debuginfo-2.1.4-12.el6.x86_64.rpm heartbeat-pils-2.1.4-12.el6.x86_64.rpmheartbeat-devel-2.1.4-12.el6.x86_64.rpm heartbeat-stonith-2.1.4-12.el6.x86_64.rpmheartbeat-gui-2.1.4-12.el6.x86_64.rpm libnet-1.1.6-7.el6.x86_64.rpm[root@ha1 heartbeat2]# yum localinstall heartbeat-gui-2.1.4-12.el6.x86_64.rpm |
3.2配置ha.cf文件
|
1
2
3
4
5
|
[root@ha1 heartbeat2]# vim /etc/ha.d/ha.cf crm on #添加一行复制一份给ha2[root@ha1 heartbeat2]# scp /etc/ha.d/ha.cf 192.168.1.102:/etc/ha.d/ha.cf 100% 10KB 10.3KB/s 00:00 |
3.3启动heartbeat
|
1
2
3
4
5
6
7
8
9
10
11
12
13
14
15
16
17
18
19
20
21
22
23
|
[root@ha1 ~]# service heartbeat start;ssh ha2 'service heartbeat start'Starting High-Availability services: Done.Starting High-Availability services: Done.[root@ha1 ~]# crm_monLast updated: Fri Oct 23 22:08:31 2015Current DC: ha2.dawu.com (ab5b0dc8-c583-4381-8185-11dc12dc5755)2 Nodes configured.0 Resources configured.============Node: ha2.dawu.com (ab5b0dc8-c583-4381-8185-11dc12dc5755): onlineNode: ha1.dawu.com (806ae335-3fbc-4747-b94b-89076a75a74a): online[root@ha1 ~]# hb_gui Traceback (most recent call last): File "/usr/bin/hb_gui", line 41, in ? import gtk, gtk.glade, gobject File "/usr/lib64/python2.4/site-packages/gtk-2.0/gtk/__init__.py", line 76, in ? _init() File "/usr/lib64/python2.4/site-packages/gtk-2.0/gtk/__init__.py", line 64, in _init _gtk.init_check() RuntimeError: could not open display |
在xshell启动hb_gui出错下面我们来说一下,解决方法:
具体步骤如下:File –> Properties –> SSH –> Tunneling –> Forward X11 connections to: Xmanager,然后重新启动一下xshell,再进行测试。
以上步骤重新启动后如出现如下警告:
The remote SSH server rejected X11 forwarding request.
请检查sshd的配置文件有没有不对的地方
|
1
2
3
|
X11Forwarding yes参数设置如果没有问题,解决如下:yum install xorg-x11-xauth |
|
1
2
3
|
如果出现乱码:yum install xorg-x11-font*费尽千心hb_gui终于正常了。 |
4. 配置crm
要使用crm资源管理器,我们得配置一下用户名和密码,heartbeat安装好以后会默认给我新建一个hacluster用户,用来管理集群资源的,下面我们先来给hacluster配置一下密码hacluster,即用户名为hacluster,密码也为hacluster。(注,crm配置文件在DC上才会生效)
ha1:
|
1
2
3
4
5
6
7
8
9
10
11
12
13
14
15
16
17
18
19
20
|
[root@ha1 ~]# tail /etc/passwdsaslauth:x:499:76:Saslauthd user:/var/empty/saslauth:/sbin/nologinpostfix:x:89:89::/var/spool/postfix:/sbin/nologinsshd:x:74:74:Privilege-separated SSH:/var/empty/sshd:/sbin/nologinntp:x:38:38::/etc/ntp:/sbin/nologinapache:x:48:48:Apache:/var/www:/sbin/nologinmysql:x:27:27:MySQL Server:/var/lib/mysql:/bin/bashhacluster:x:498:498:heartbeat user:/var/lib/heartbeat/cores/hacluster:/sbin/nologinrpc:x:32:32:Rpcbind Daemon:/var/cache/rpcbind:/sbin/nologinrpcuser:x:29:29:RPC Service User:/var/lib/nfs:/sbin/nologinnfsnobody:x:65534:65534:Anonymous NFS User:/var/lib/nfs:/sbin/nologin[root@ha1 ~]#[root@ha1 ~]# passwd haclusterChanging password for user hacluster.New password: BAD PASSWORD: it is based on a (reversed) dictionary wordBAD PASSWORD: is too simpleRetype new password: passwd: all authentication tokens updated successfully. |
ha2:
|
1
2
3
4
5
6
7
8
9
10
11
12
13
14
15
16
17
18
19
|
[root@ha2 ~]# tail /etc/passwdbasher:x:505:506::/home/basher:/bin/bashnologin:x:506:507::/home/nologin:/sbin/nologinuser1:x:507:508::/home/user1:/bin/bashntp:x:38:38::/etc/ntp:/sbin/nologinapache:x:48:48:Apache:/var/www:/sbin/nologinmysql:x:27:27:MySQL Server:/var/lib/mysql:/bin/bashhacluster:x:497:497:heartbeat user:/var/lib/heartbeat/cores/hacluster:/sbin/nologinrpc:x:32:32:Rpcbind Daemon:/var/cache/rpcbind:/sbin/nologinrpcuser:x:29:29:RPC Service User:/var/lib/nfs:/sbin/nologinnfsnobody:x:65534:65534:Anonymous NFS User:/var/lib/nfs:/sbin/nologin[root@ha2 ~]# passwd haclusterChanging password for user hacluster.New password: BAD PASSWORD: it is based on a (reversed) dictionary wordBAD PASSWORD: is too simpleRetype new password: passwd: all authentication tokens updated successfully.[root@ha2 ~]# |
4.1 crm图形界面配置详解
4.1 登录DC节点
说明:一般我们用图形界面配置资源时,都连接到DC节点,在DC节点配置完成所有资源后,DC节点会自动同步资源到其它节点中。
|
1
2
|
[root@ha1 ~]# hb_gui &[1] 34103 |
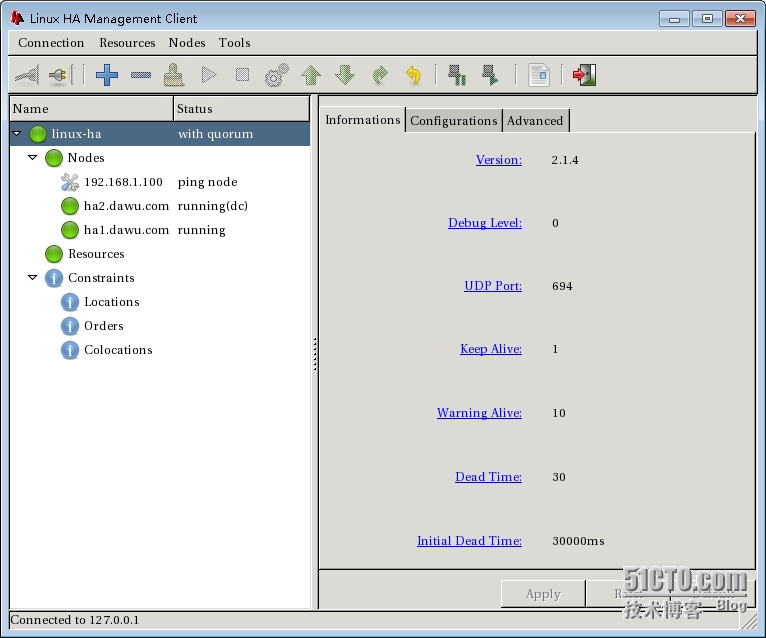
(2).输入DC节点名称或IP地址,并输入密码,点击确定
(3).登录后默认显示界面
4.2.高可用Web集群中资源
VIP
httpd
filesystem
Mysql
说明:高可用Web集群中有四个资源,分别是VIP、httpd服务、mysql服务、filesystem(NFS,用来存放Web文件和mysql数据库文件),下面我们就来配置一下这四个资源。
4.3.crm 增加资源
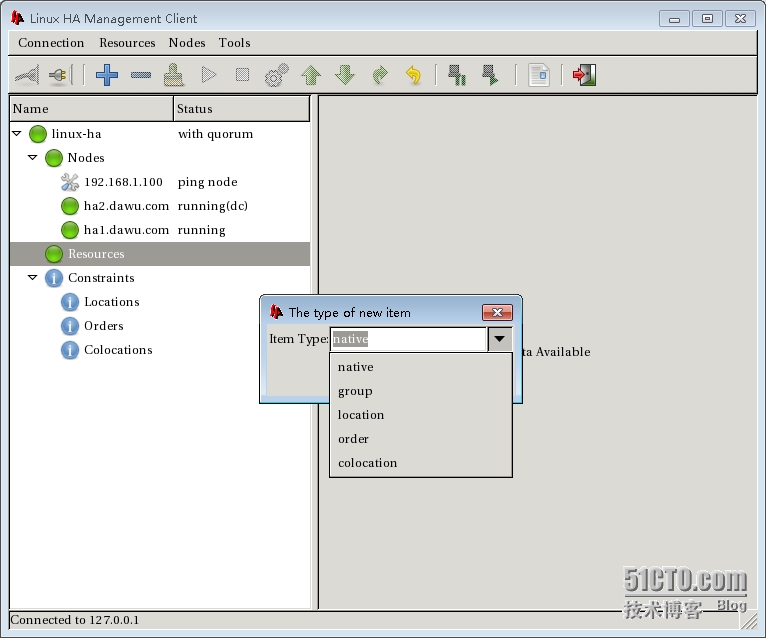
(1).新增资源
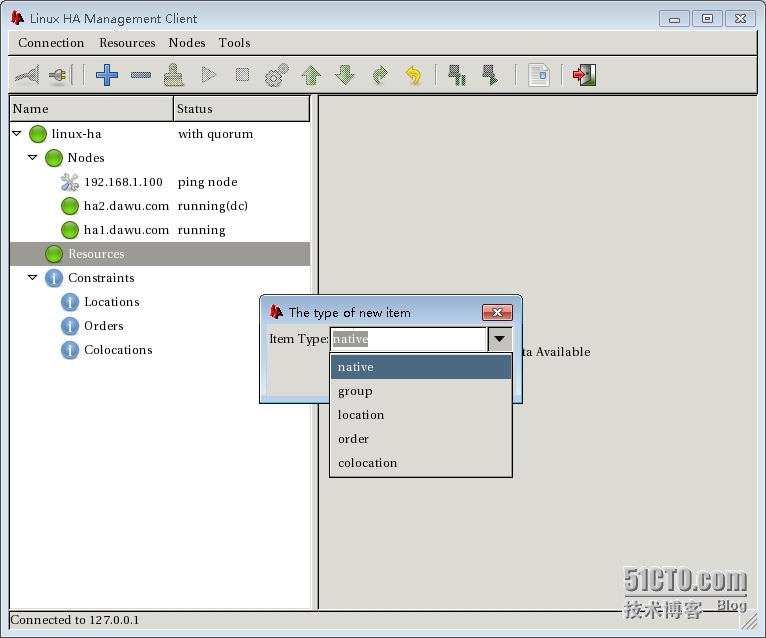
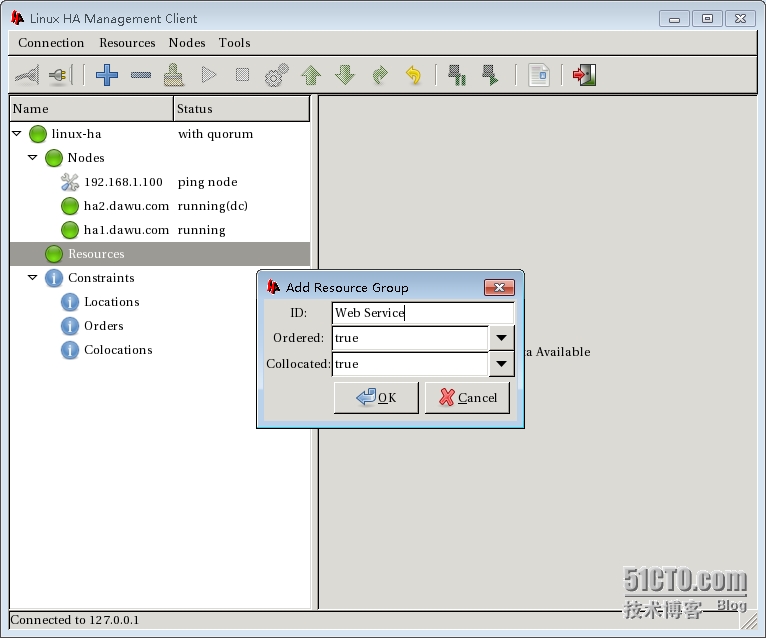
(2).新增group资源(注,VIP、httpd、mysql、filesystem都是Web高可用集群,所以都在一个组中,这里我们选择group)
(3).给组资源增加一个ID号
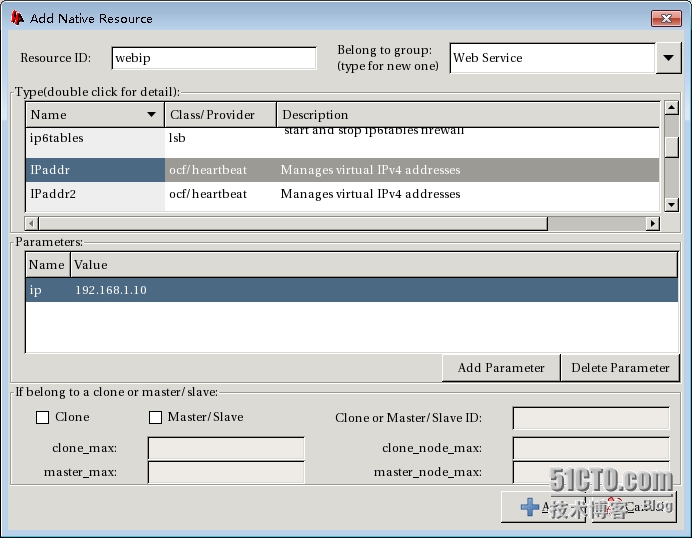
(4).新增VIP,给VIP取个ID号为webip,设置ip为192.168.1.10,大家还可以看到VIP属于Web Service组
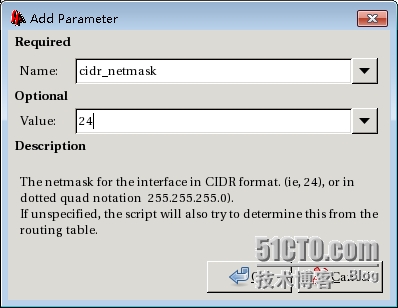
(5).增加VIP参数,如子网掩码等
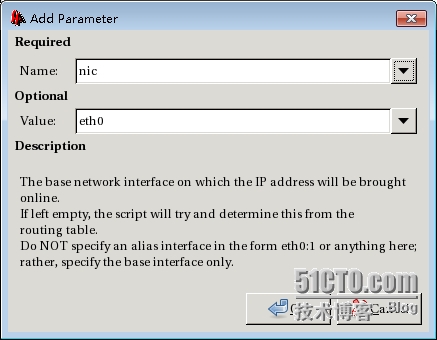
(6).设置VIP在哪个端口别名上
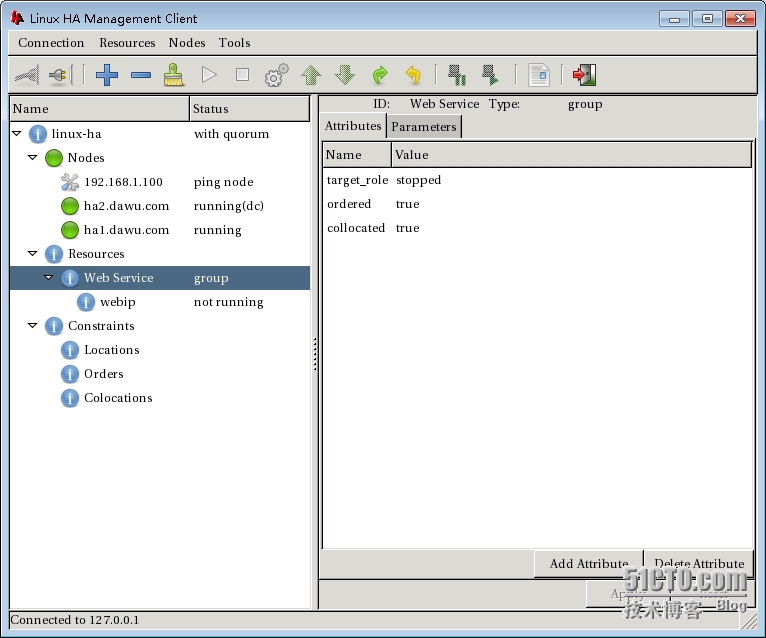
(7).增加好的webip,现在还没有运行,我们可以右击使其运行
(8).启动webip
(9).这是已启动的webip运行在DC节点上
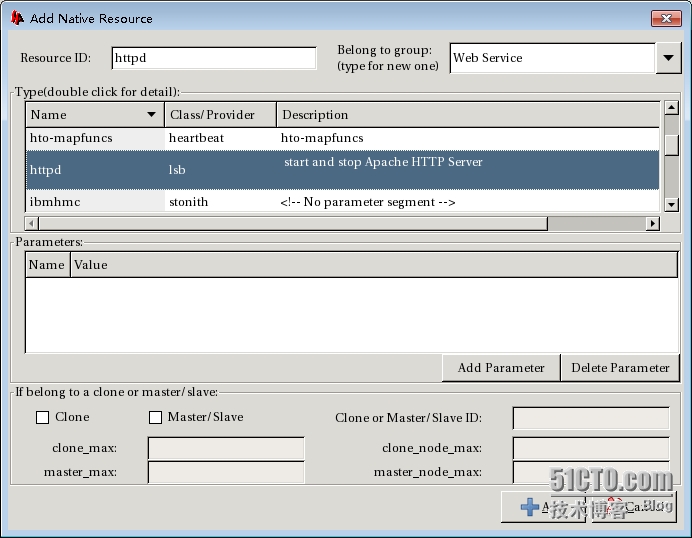
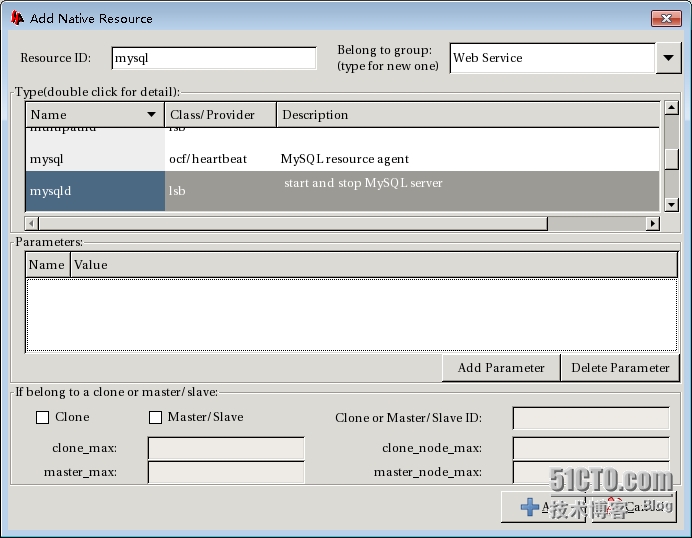
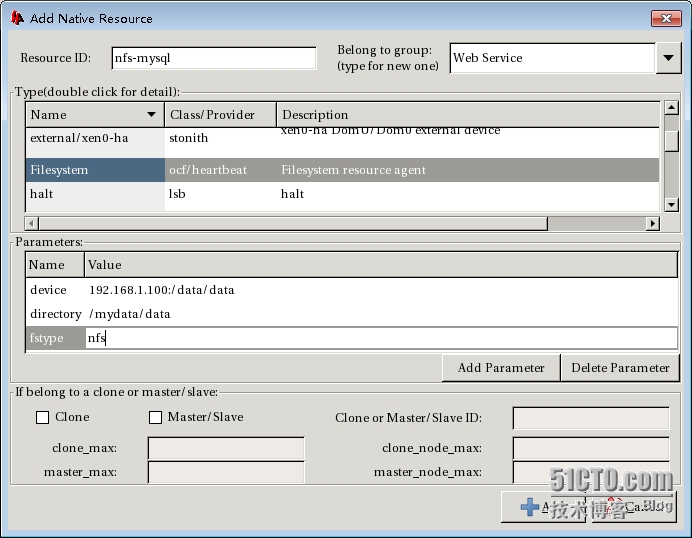
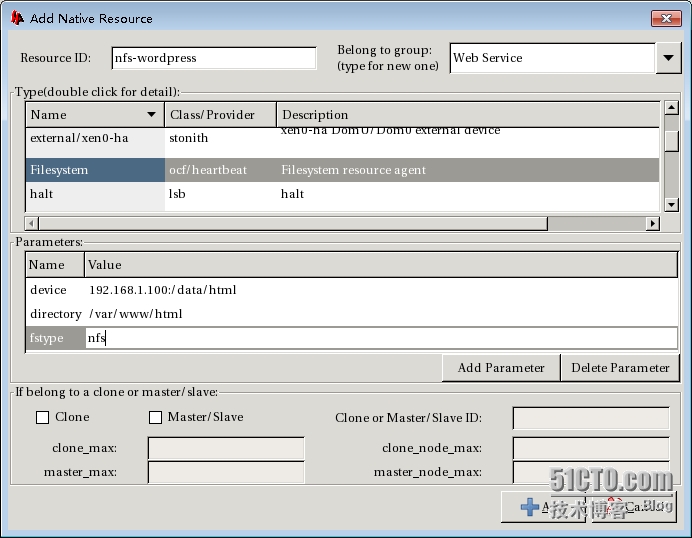
(10).以次添加nfs-mysql、mysql、nfs-wordpress、httpd
(11).添加完结果如下:
(12).启动group后连接http://192.168.1.10/wordpress地址
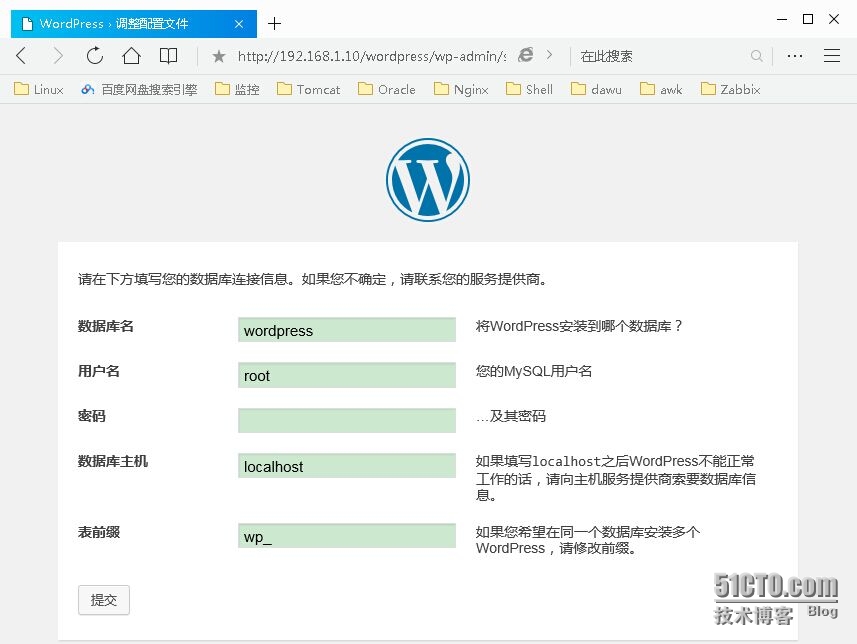 (13).创建wordpress数据库,配置安装wordpress
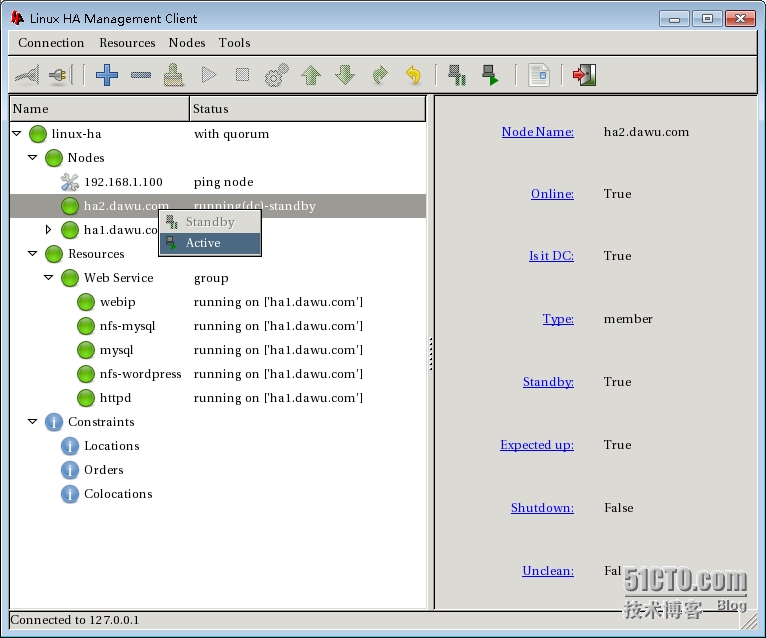
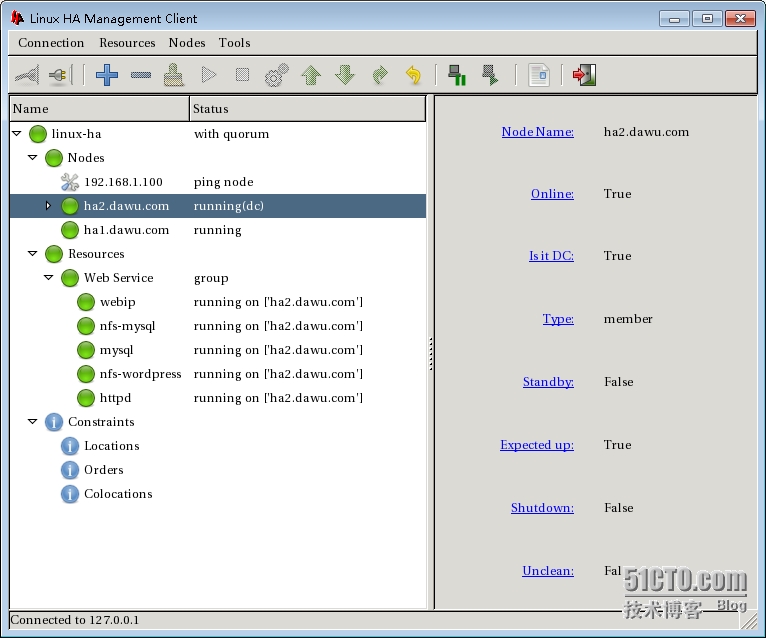
(15).切换节点
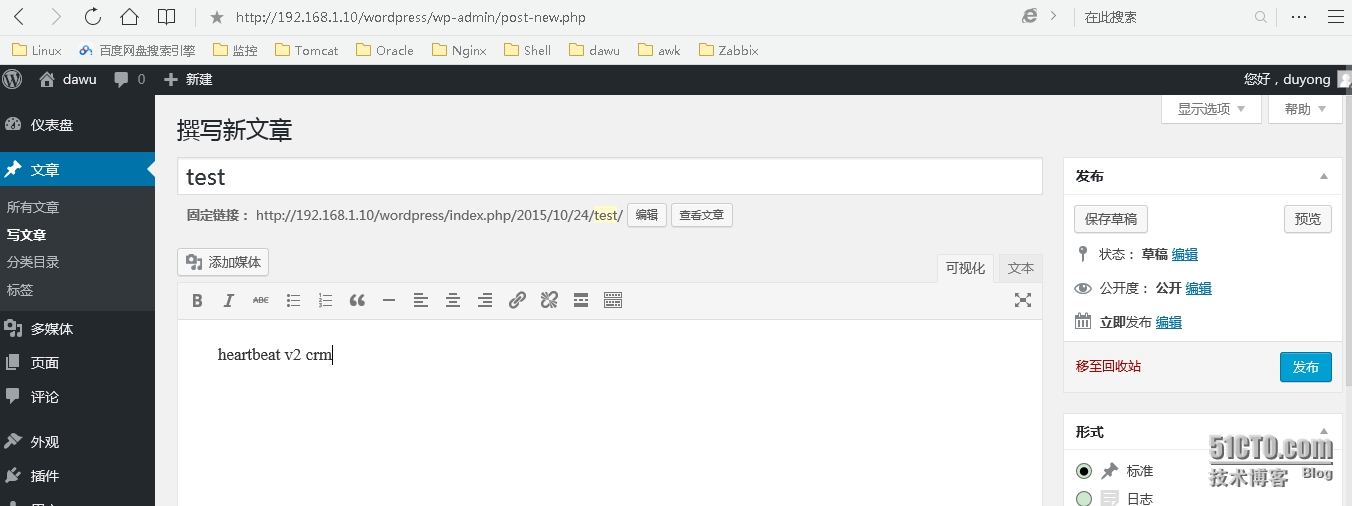
(16).查看wordpress,新添加的文章依然存在


