| Markdown版本笔记 | 我的GitHub首页 | 我的博客 | 我的微信 | 我的邮箱 |
|---|---|---|---|---|
| MyAndroidBlogs | baiqiantao | baiqiantao | bqt20094 | baiqiantao@sina.com |
目录
AndFix 简介
使用案例
配置
初始化
有问题的类
生成补丁包
加载补丁包
更多介绍
原理简介
apkpatch 工具
混淆
安全
补丁包的组成
源码分析
PatchManager 初始化
AndFixManager 初始化
SecurityChecker 初始化
PatchManager.init 方法
PatchManager.loadPatch 方法
AndFixManager.fix 方法
AndFix 简介
特点
- AndFix is a library that offer
hot-fixfor Android App. - AndFix is a solution to fix the bugs online instead of redistributing重新发布 Android App. It is distributed as
Android Library. - Andfix is an acronym缩写 for
Android hot-fix. - AndFix supports Android version
from 2.3 to 7.0,both ARM and X86 architecture,both Dalvik and ART runtime,both 32bit and 64bit. - The compressed被压缩的 file format of AndFix's patch is
.apatch. It is dispatched from your own server to client to fix your App's bugs.
局限性
- 无法添加新类和新的字段
- 需要使用加固前的 apk 制作补丁,但是
补丁文件很容易被反编译,也就是修改过的那些类的源码容易泄露 - 使用加固平台可能会使热补丁功能失效(看到有人在360加固提了这个问题,自己还未验证)
原理
AndFix的简单而纯粹,就是方法的替换,把有bug的方法替换成补丁文件中的方法。在Native层使用指针替换的方式替换bug方法,以达到修复bug的目的。
AndFix judges判断 the methods should be replaced by java custom annotation and replaces it by hooking it. AndFix has a native method
art_replaceMethodin ART ordalvik_replaceMethodin Dalvik.
使用案例
配置
引入依赖:
implementation 'com.alipay.euler:andfix:0.5.0@aar'//andfix不混淆:
-keep class * extends java.lang.annotation.Annotation
-keepclasseswithmembernames class * {
    native <methods>;
}
-keep class com.alipay.euler.andfix.** { *; }
初始化
在Application.onCreate()中初始化
private void initAndFix() {
    try {
        PatchManager patchManager = new PatchManager(this);
        String appversion = getPackageManager().getPackageInfo(getPackageName(), 0).versionName;
        patchManager.init(appversion);
        patchManager.loadPatch();
    } catch (PackageManager.NameNotFoundException e) {
        e.printStackTrace();
    }
}
注意每次 appversion 变更都会导致所有补丁被删除,如果 appversion 没有改变,则会加载已经保存的所有补丁。
有问题的类
有问题的类
public class BugClass {
    public static String staticMethod(String str) {
        return "有问题的类:" + str;
    }

    public int normalMethod() {
        return 0;
    }
}
用于修复Bug后的新类
public class BugClass {//修复后会用这个新类完全替换旧的类

    public static String staticMethod(String str) {
        return "修复后的类:" + str;
    }

    public int normalMethod() {
        return 10086;
    }
}
生成补丁包
如果发现目前线上的安装包有bug,则可以通过如下步骤打补丁包:
- 首先将已安装到手机上、具有bug的安装包
old.apk放到一个目录中 - 然后基于产生
old.apk的源码进行bug修复,把这个bug改掉后,再生成一个新的安装包new.apk(必须用同一个签名文件) - 然后通过官方提供的工具
apkpatch在 CMD 命令行中生成补丁文件 - 执行以后会生成一个
.apatch格式的补丁文件
命令格式:
apkpatch -f 【new.apk】 -t 【old.apk】 -o 【输出路径】 -n 【文件名前缀】 -k 【签名文件】 -p 【密码】 -a 【昵称】 -e 【密码】例如:
apkpatch -f new.apk -t old.apk -o . -n bqt -k zxnew.keystore -p zk1234509876 -a zxwk -e zk1234509876打印的日志:
add modified Method:Ljava/lang/String;  staticMethod(Ljava/lang/String;)  in Class:Lcom/my/bqt/andFix/BugClass;
add modified Method:I  normalMethod()  in Class:Lcom/my/bqt/andFix/BugClass;
产生的文件:

加载补丁包
在需要的地方调用PatchManager.addPatch方法加载新补丁,比如可以在进入应用时请求一下服务器,如果服务器告诉客户端有补丁(服务器应有针对性的告诉不同版本的客户端是否需要下载补丁,以及需要下载那个补丁),则可以在补丁下载完成之后加载。
public class AndFixActivity extends ListActivity {
    private static final String APATCH_PATH = Environment.getExternalStorageDirectory().getAbsolutePath() + "/bqt/";
    private static final String APATCH_NAME = "bqt-d1299f30f412347ffc7dc64dd2e8d0ae.apatch";

    protected void onCreate(Bundle savedInstanceState) {
        super.onCreate(savedInstanceState);
        String[] array = {"修复补丁",
            "测试静态方法",
            "测试普通方法",};
        setListAdapter(new ArrayAdapter<>(this, android.R.layout.simple_list_item_1, array));
        String[] permissions = {Manifest.permission.WRITE_EXTERNAL_STORAGE, Manifest.permission.INTERNET};
        ActivityCompat.requestPermissions(this, permissions, 0);
    }

    @Override
    protected void onListItemClick(ListView l, View v, int position, long id) {
        switch (position) {
            case 0:
                addPatch();
                break;
            case 1:
                Toast.makeText(this, BugClass.staticMethod("hello"), Toast.LENGTH_SHORT).show();
                break;
            case 2:
                Toast.makeText(this, "值为:" + new BugClass().normalMethod(), Toast.LENGTH_SHORT).show();
                break;
        }
    }

    private void addPatch() {
        try {
            PatchManager patchManager = new PatchManager(this);
            patchManager.addPatch(APATCH_PATH + APATCH_NAME);//path of the patch file that was downloaded
            Toast.makeText(this, "热修复完成", Toast.LENGTH_SHORT).show();
            File f = new File(APATCH_PATH, APATCH_NAME);
            if (f.exists()) Log.i("bqt", "加载补丁成功后,删除下载的补丁:" + f.delete());
        } catch (IOException e) {
            e.printStackTrace();
            Toast.makeText(this, "修复失败", Toast.LENGTH_SHORT).show();
        }
    }
}
加载过的补丁会被保存到 data/packagename/files/apatch_opt 目录下,所以下载过来的补丁用过一次就可以删除了。

更多介绍
原理简介
The implementation principle of AndFix is method body's replacing:
AndFix的原理简单而纯粹,就是方法的替换,把有bug的方法替换成补丁文件中的方法。
注:
在Native层使用指针替换的方式替换bug方法,以达到修复bug的目的。
AndFix judges判断 the methods should be replaced by java custom annotation and replaces it by hooking it. AndFix has a native method art_replaceMethod in ART or dalvik_replaceMethod in Dalvik.
For more details, here.
官方提供的原理图

开发、修复过程

apkpatch 工具
AndFix provides a patch-making tool called apkpatch.
Prepare two android packages, one is the online package, the other one is the package after you fix bugs by coding.
Generate
Generate .apatch file by providing the two package:
apkpatch -f <new> -t <old> -o <output> -k <keystore> -p <***> -a <alias> -e <***> -a,--alias <alias> alias.
-e,--epassword <***> entry password.
-f,--from <loc> new Apk file path.
-k,--keystore <loc> keystore path.
-n,--name <name> patch name.
-o,--out <dir> output dir.
-p,--kpassword <***> keystore password.
-t,--to <loc> old Apk file path.merge
Sometimes, your team members may fix each other's bugs, and generate not only one .apatch. For this situation, you can merge .apatch files using this tool:
apkpatch -m <apatch_path...> -k <keystore> -p <***> -a <alias> -e <***> -a,--alias <alias> alias.
-e,--epassword <***> entry password.
-k,--keystore <loc> keystore path.
-m,--merge <loc...> path of .apatch files.
-n,--name <name> patch name.
-o,--out <dir> output dir.
-p,--kpassword <***> keystore password.Now you get the application savior救星, the patch file. Then you need to dispatch it to your client in some way, push or pull.
混淆
If you enable ProGuard, you must save the mapping.txt, so your new version's build can use it with "-applymapping".
And it is necessary to keep classes as follow,
- Native method:com.alipay.euler.andfix.AndFix
- Annotation:com.alipay.euler.andfix.annotation.MethodReplace
To ensure that these classes can be found after running an obfuscation混淆的、困惑的 and static analysis tool like ProGuard, add the configuration below to your ProGuard configuration file.
-keep class * extends java.lang.annotation.Annotation
-keepclasseswithmembernames class * {
    native <methods>;
}
-keep class com.alipay.euler.andfix.** { *; }
安全
The following is important but out of AndFix's range.
- verify the signature of patch file
- verify the fingerprint指纹 of optimize优化 file
官网提示开发者需要验证下载过来的 apatch 文件的签名,如果不验证那么任何人都可以制作自己的 apatch 文件来对你的 APP 进行修改。但是实际上 AndFix 已经做了验证,如果补丁文件的签名和当前 apk 的签名不是同一个的话,就不能加载补丁。
官网还有一条,提示需要验证 optimize file 的指纹,应该是为了防止有人替换掉本地保存的补丁文件,所以要验证 MD5 码,然而 SecurityChecker 类里面也已经做了这个工作。但是这个 MD5 码是保存在 sharedpreference 里面,如果手机已经 root 那么还是可以被访问的。
补丁包的组成
我们在执行apkpatch命令时会将新旧两个apk做一次对比,然后找出不同的部分,并将相关的信息组装到补丁包中。
例如上面的案例中,将生成的apatch文件后缀改成zip再解压开,可以看到里面有一个META-INF文件夹和一个dex文件:

META-INF文件夹中有四个文件,其中MANIFEST.MF、CERT.SF、CERT.RSA是Android标准安装包中必带的一些签名校验相关的文件,PATCH.MF是此框架加入的一个文件。

PATCH.MF文件的内容
Manifest-Version: 1.0
Patch-Name: bqt
Created-Time: 13 Apr 2019 14:37:13 GMT
From-File: new.apk
To-File: old.apk
Patch-Classes: com.my.bqt.andFix.BugClass_CF
Created-By: 1.0 (ApkPatch)反编译dex文件后查看一下源码,里面就是被修复的代码所在的类文件。这些更改过的类都加上了一个_CF的后缀,并且变动的方法都被加上了一个叫@MethodReplace的 annotation,通过此注解的 clazz 和 method 属性指定了需要替换哪个类的哪个方法。
package com.my.bqt.andFix;

import com.alipay.euler.andfix.annotation.MethodReplace;

public class BugClass_CF
{
  @MethodReplace(clazz="com.my.bqt.andFix.BugClass", method="staticMethod")
  public static String staticMethod(String paramString)
  {
    StringBuilder localStringBuilder = new StringBuilder();
    localStringBuilder.append("修复后的类:");
    localStringBuilder.append(paramString);
    return localStringBuilder.toString();
  }

  @MethodReplace(clazz="com.my.bqt.andFix.BugClass", method="normalMethod")
  public int normalMethod()
  {
    return 10086;
  }
}
然后客户端得到补丁文件后就会根据 annotation 来寻找需要替换的方法,最后由JNI层完成方法的替换。
源码分析
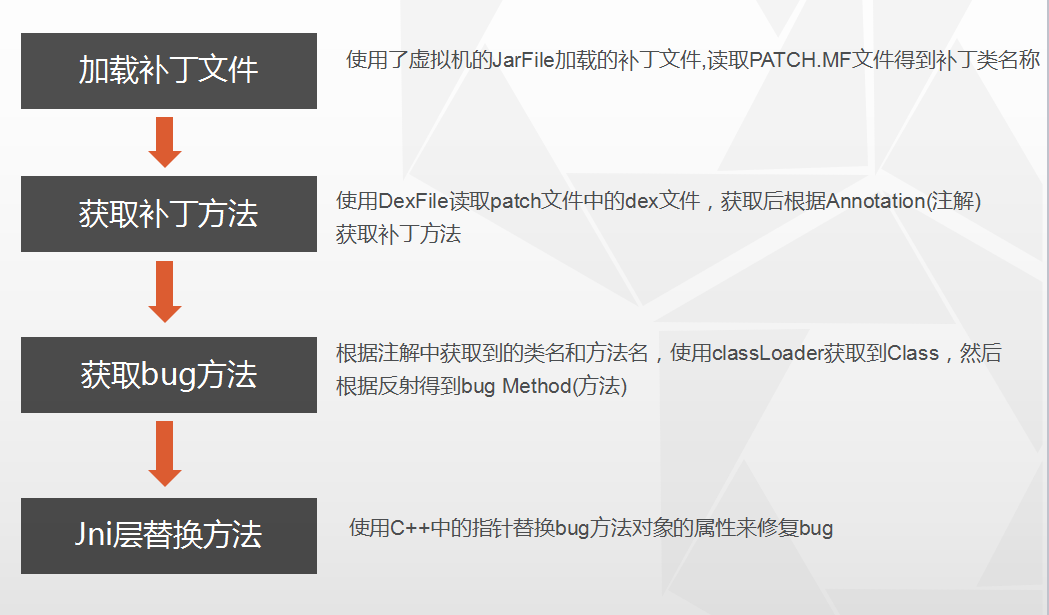
jar包中的类

用一张图来描述方法替换过程
PatchManager 初始化
在Application中初始化PatchManger的操作为:
PatchManager patchManager = new PatchManager(this);
patchManager.init(appversion);
patchManager.loadPatch();
PS:后面 patchManager.addPatch 的流程和下面的差不多,就不单独分析了
首先是实例化了一个PatchManger实例对象:
private final AndFixManager mAndFixManager;
private final File mPatchDir; //存放patch补丁文件的文件夹
private final SortedSet<Patch> mPatchs; //存放Patch类的集合,此类适合大并发
private final Map<String, ClassLoader> mLoaders; //存放类对应的类加载器集合

public PatchManager(Context context) {
    mContext = context;
    mAndFixManager = new AndFixManager(mContext);
    mPatchDir = new File(mContext.getFilesDir(), DIR);
    mPatchs = new ConcurrentSkipListSet<Patch>();
    mLoaders = new ConcurrentHashMap<String, ClassLoader>();
}
AndFixManager 初始化
我们主要看AndFixManager的初始化:
public AndFixManager(Context context) {
    mContext = context;
    mSupport = Compat.isSupport();//判断Android机型是否适支持AndFix
    if (mSupport) {
        mSecurityChecker = new SecurityChecker(mContext);//初始化签名检验类
        //下面的逻辑很简单,就是根据mPatchDir能不能创建、是不是目录来决定mSupport的值
    }
}里面的主要工作就是判断Android机型是否支持AndFix,我们看下Compat.isSupport()方法:
//whether support on the device。return true if the device support AndFix
public static synchronized boolean isSupport() {
    if (isChecked) return isSupport; //只检测一次
    isChecked = true;
    boolean isYunOs = isYunOS();//判断系统是否是YunOs系统,YunOs系统是阿里巴巴的系统
    boolean setup = AndFix.setup();//判断是否初始化成功
    boolean isSupportSDKVersion = isSupportSDKVersion();//根据sdk版本判断是否支持
    if (!isYunOs && setup && isSupportSDKVersion) isSupport = true;
    if (inBlackList()) isSupport = false;//黑名单
    return isSupport;
}
主要包括三个判断,其中比较重要的是初始化判断和系统版本判断,初始化判断最终是调用了 native 方法:
//return true if initialize success
public static boolean setup() {
    try {
        final String vmVersion = System.getProperty("java.vm.version");
        boolean isArt = vmVersion != null && vmVersion.startsWith("2"); //虚拟机类型
        int apilevel = Build.VERSION.SDK_INT;
        return setup(isArt, apilevel);
    } catch (Exception e) {
        Log.e(TAG, "setup", e);
        return false;
    }
}

private static native boolean setup(boolean isArt, int apilevel);
系统版本判断逻辑:
//from android 2.3 to android 7.0
private static boolean isSupportSDKVersion() {
    if (android.os.Build.VERSION.SDK_INT >= 8 && android.os.Build.VERSION.SDK_INT <= 24) {
        return true;
    }
    return false;
}
SecurityChecker 初始化
在上面 AndFixManager 的初始化过程中,如果判断Android机型支持AndFix,则接下来会通过 new 构造一个 SecurityChecker:
public SecurityChecker(Context context) {
    mContext = context;
    init(mContext);
}
主要是获取当前应用的签名及其他信息,为了判断与patch文件的签名是否一致
// initialize,and check debuggable
private void init(Context context) {
    try {
        PackageManager pm = context.getPackageManager();
        String packageName = context.getPackageName();

        PackageInfo packageInfo = pm.getPackageInfo(packageName, PackageManager.GET_SIGNATURES);
        CertificateFactory certFactory = CertificateFactory.getInstance("X.509");
        ByteArrayInputStream stream = new ByteArrayInputStream(packageInfo.signatures[0].toByteArray());
        X509Certificate cert = (X509Certificate) certFactory.generateCertificate(stream);
        mDebuggable = cert.getSubjectX500Principal().equals(DEBUG_DN);
        mPublicKey = cert.getPublicKey();
    } catch (NameNotFoundException e) {
        Log.e(TAG, "init", e);
    } catch (CertificateException e) {
        Log.e(TAG, "init", e);
    }
}
PatchManager.init 方法
接下来,看一下版本的初始化:
patchManager.init(appversion);public void init(String appVersion) {
//如果mPatchDir不存在且不能创建、或者不是目录则直接结束
SharedPreferences sp = mContext.getSharedPreferences(SP_NAME, Context.MODE_PRIVATE);//存储关于patch文件的信息
String ver = sp.getString(SP_VERSION, null); //根据你传入的版本号和之前的对比,做不同的处理
if (ver == null || !ver.equalsIgnoreCase(appVersion)) {
cleanPatch();//删除所有的本地缓存patch文件
sp.edit().putString(SP_VERSION, appVersion).commit();//并把传入的版本号保存
} else {
initPatchs();//初始化patch列表,把本地的patch文件加载到内存
}
}private void initPatchs() {
File[] files = mPatchDir.listFiles();
for (File file : files) {
addPatch(file);
}
}SharedPreferences中实际保存的内容为:
<?xml version='1.0' encoding='utf-8' standalone='yes' ?>
<map>
    <string name="version">1.0</string>
</map>
简单来说,其逻辑其实就是,如果版本相同(说明没有升级,bug还没修复),则在启动时逐个加载补丁;如果版本不同(说明升级了,bug已经不存在了),则删除所有的本地缓存patch文件,因为这些补丁文件只对上一个版本才有效。
PatchManager.loadPatch 方法
patchManager.loadPatch();先来看看 Patch 是个什么鬼:

看来这货只是一个实现Comparable接口的普通的Javabean,就是用来封装数据的,就是把PATCH.MF文件的内容封装到这个类中:
Manifest-Version: 1.0
Patch-Name: bqt
Created-Time: 13 Apr 2019 14:37:13 GMT
From-File: new.apk
To-File: old.apk
Patch-Classes: com.my.bqt.andFix.BugClass_CF
Created-By: 1.0 (ApkPatch)大致过程就是通过使用JarFile读取Patch文件,然后获取META-INF/PATCH.MF文件中的Patch-Name、Created-Time、Patch-Classes信息:
mName = main.getValue(PATCH_NAME);//获取PATCH.MF属性Patch-Name
mTime = new Date(main.getValue(CREATED_TIME));//获取PATCH.MF属性Created-Time
mClassesMap.put(mName, strings);然后我们看loadPatch()的具体逻辑:
// load patch,call when application start
public void loadPatch() {
    mLoaders.put("*", mContext.getClassLoader());// wildcard
    Set<String> patchNames;
    List<String> classes;
    for (Patch patch : mPatchs) { //遍历所有Patch(即补丁包)
        patchNames = patch.getPatchNames();
        for (String patchName : patchNames) { //每个补丁包都遍历下需要修复的类
            classes = patch.getClasses(patchName);//找到要修复的类
            mAndFixManager.fix(patch.getFile(), mContext.getClassLoader(), classes);//修复
        }
    }
}
AndFixManager.fix 方法
下面开始具体的修复逻辑了
public synchronized void fix(File file, ClassLoader classLoader, List<String> classes) {
    if (!mSupport) return;
    if (!mSecurityChecker.verifyApk(file)) return; //检验patch文件的签名

    try {
        File optfile = new File(mOptDir, file.getName());
        boolean saveFingerprint = true;
        if (optfile.exists()) {
            // need to verify fingerprint when the optimize file exist, prevent someone attack on jailbreak device with Vulnerability-Parasyte.
            if (mSecurityChecker.verifyOpt(optfile)) {
                saveFingerprint = false;
            } else if (!optfile.delete()) {
                return;
            }
        }

        //加载patch文件中的dex,此方法已被标记为@Deprecated
        final DexFile dexFile = DexFile.loadDex(file.getAbsolutePath(), optfile.getAbsolutePath(), Context.MODE_PRIVATE);

        if (saveFingerprint) mSecurityChecker.saveOptSig(optfile); //保存到文件名和文件MD5到SharedPreferences中

        ClassLoader patchClassLoader = new ClassLoader(classLoader) {
            @Override
            protected Class<?> findClass(String className)    throws ClassNotFoundException {
                //重写ClasLoader的findClass方法
                Class<?> clazz = dexFile.loadClass(className, this);
                if (clazz == null && className.startsWith("com.alipay.euler.andfix")) {
                    return Class.forName(className);// annotation’s class not found
                }
                if (clazz == null) {
                    throw new ClassNotFoundException(className);
                }
                return clazz;
            }
        };
        Enumeration<String> entrys = dexFile.entries();
        Class<?> clazz = null;
        while (entrys.hasMoreElements()) {
            String entry = entrys.nextElement();
            if (classes != null && !classes.contains(entry)) continue;//跳过,不需要修复
            clazz = dexFile.loadClass(entry, patchClassLoader); //获取有bug的类文件
            if (clazz != null) fixClass(clazz, classLoader); //修复类
        }
    } catch (IOException e) {
        Log.e(TAG, "pacth", e);
    }
}
接着看下 fixClass 方法:
private void fixClass(Class<?> clazz, ClassLoader classLoader) {
    Method[] methods = clazz.getDeclaredMethods();
    MethodReplace methodReplace;
    String clz;
    String meth;
    for (Method method : methods) {
        methodReplace = method.getAnnotation(MethodReplace.class); //有bug的方法在生成的patch的类中的方法都是有注解的
        if (methodReplace == null)    continue;
        clz = methodReplace.clazz();//获取注解中clazz的值
        meth = methodReplace.method();//获取注解中method的值
        if (!isEmpty(clz) && !isEmpty(meth)) {
            replaceMethod(classLoader, clz, meth, method);
        }
    }
}
接着看下 replaceMethod 方法:
private void replaceMethod(ClassLoader classLoader, String clz, String meth, Method method) {
    try {
        String key = clz + "@" + classLoader.toString();
        Class<?> clazz = mFixedClass.get(key);
        if (clazz == null) {// class not load
            Class<?> clzz = classLoader.loadClass(clz);
            clazz = AndFix.initTargetClass(clzz);    // initialize target class
        }
        if (clazz != null) {// initialize class OK
            mFixedClass.put(key, clazz);
            Method src = clazz.getDeclaredMethod(meth, method.getParameterTypes()); //根据反射获取到有bug的类的方法(有bug的apk)
            AndFix.addReplaceMethod(src, method);//src是有bug的方法,method是补丁方法,下面只需将两者替换就可以了
        }
    } catch (Exception e) {
        Log.e(TAG, "replaceMethod", e);
    }
}
接着就是调用 native 方法了:
public static void addReplaceMethod(Method src, Method dest) {
    try {
        replaceMethod(src, dest); //调用了native方法
        initFields(dest.getDeclaringClass()); //modify access flag of class’ fields to public
    } catch (Throwable e) {
        Log.e(TAG, "addReplaceMethod", e);
    }
}
private static native void replaceMethod(Method dest, Method src);后面涉及到 native 层的逻辑就不写了,这一块不熟。
2018-6-11