前情提要:
一:scrapy 爬取妹子网 全站
知识点: scrapy回调函数的使用
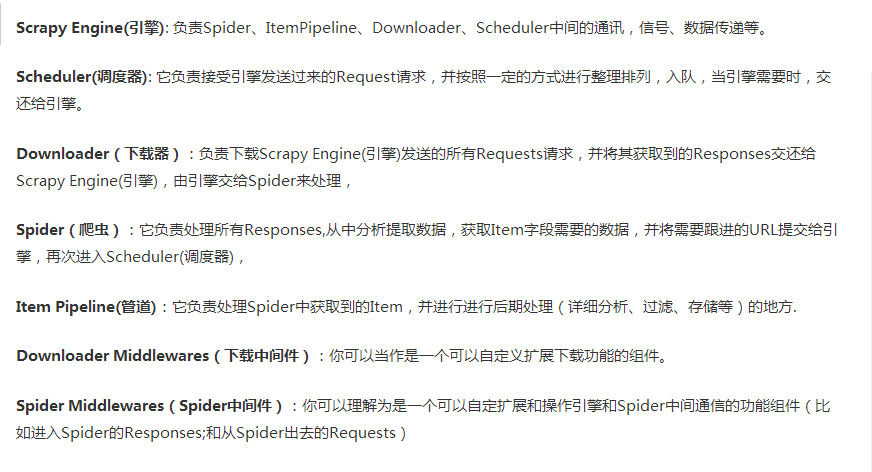
二: scrapy的各个组件之间的关系解析
Scrapy 框架
Scrapy是用纯Python实现一个为了爬取网站数据、提取结构性数据而编写的应用框架,用途非常广泛。
框架的力量,用户只需要定制开发几个模块就可以轻松的实现一个爬虫,用来抓取网页内容以及各种图片,非常之方便。
Scrapy 使用了 Twisted'twɪstɪd异步网络框架来处理网络通讯,可以加快我们的下载速度,不用自己去实现异步框架,并且包含了各种中间件接口,可以灵活的完成各种需求。

三:post 的scrapy的使用
四:首页详情页的数据连续爬取
例子:4567tv网站
4.1:setting设置 ,
注意:设置
->1:

->2:


# -*- coding: utf-8 -*-

# Scrapy settings for postdemo1 project
#
# For simplicity, this file contains only settings considered important or
# commonly used. You can find more settings consulting the documentation:
#
#     https://doc.scrapy.org/en/latest/topics/settings.html
#     https://doc.scrapy.org/en/latest/topics/downloader-middleware.html
#     https://doc.scrapy.org/en/latest/topics/spider-middleware.html

BOT_NAME = 'postdemo1'

SPIDER_MODULES = ['postdemo1.spiders']
NEWSPIDER_MODULE = 'postdemo1.spiders'


# Crawl responsibly by identifying yourself (and your website) on the user-agent
USER_AGENT = 'Mozilla/5.0 (Windows NT 6.1; WOW64) AppleWebKit/537.36 (KHTML, like Gecko) Chrome/69.0.3497.100 Safari/537.36'

# Obey robots.txt rules
# 不遵循robot协议
ROBOTSTXT_OBEY = False
# 设置错误等级
# LOG_LEVEL ='ERROR'

# Configure maximum concurrent requests performed by Scrapy (default: 16)
#CONCURRENT_REQUESTS = 32

# Configure a delay for requests for the same website (default: 0)
# See https://doc.scrapy.org/en/latest/topics/settings.html#download-delay
# See also autothrottle settings and docs
#DOWNLOAD_DELAY = 3
# The download delay setting will honor only one of:
#CONCURRENT_REQUESTS_PER_DOMAIN = 16
#CONCURRENT_REQUESTS_PER_IP = 16

# Disable cookies (enabled by default)
#COOKIES_ENABLED = False

# Disable Telnet Console (enabled by default)
#TELNETCONSOLE_ENABLED = False

# Override the default request headers:
#DEFAULT_REQUEST_HEADERS = {
#   'Accept': 'text/html,application/xhtml+xml,application/xml;q=0.9,*/*;q=0.8',
#   'Accept-Language': 'en',
#}

# Enable or disable spider middlewares
# See https://doc.scrapy.org/en/latest/topics/spider-middleware.html
#SPIDER_MIDDLEWARES = {
#    'postdemo1.middlewares.Postdemo1SpiderMiddleware': 543,
#}

# Enable or disable downloader middlewares
# See https://doc.scrapy.org/en/latest/topics/downloader-middleware.html
#DOWNLOADER_MIDDLEWARES = {
#    'postdemo1.middlewares.Postdemo1DownloaderMiddleware': 543,
#}

# Enable or disable extensions
# See https://doc.scrapy.org/en/latest/topics/extensions.html
#EXTENSIONS = {
#    'scrapy.extensions.telnet.TelnetConsole': None,
#}

# Configure item pipelines
# See https://doc.scrapy.org/en/latest/topics/item-pipeline.html
#ITEM_PIPELINES = {
#    'postdemo1.pipelines.Postdemo1Pipeline': 300,
#}

# Enable and configure the AutoThrottle extension (disabled by default)
# See https://doc.scrapy.org/en/latest/topics/autothrottle.html
#AUTOTHROTTLE_ENABLED = True
# The initial download delay
#AUTOTHROTTLE_START_DELAY = 5
# The maximum download delay to be set in case of high latencies
#AUTOTHROTTLE_MAX_DELAY = 60
# The average number of requests Scrapy should be sending in parallel to
# each remote server
#AUTOTHROTTLE_TARGET_CONCURRENCY = 1.0
# Enable showing throttling stats for every response received:
#AUTOTHROTTLE_DEBUG = False

# Enable and configure HTTP caching (disabled by default)
# See https://doc.scrapy.org/en/latest/topics/downloader-middleware.html#httpcache-middleware-settings
#HTTPCACHE_ENABLED = True
#HTTPCACHE_EXPIRATION_SECS = 0
#HTTPCACHE_DIR = 'httpcache'
#HTTPCACHE_IGNORE_HTTP_CODES = []
#HTTPCACHE_STORAGE = 'scrapy.extensions.httpcache.FilesystemCacheStorage'
4.2 爬虫文件
1:爬取首页
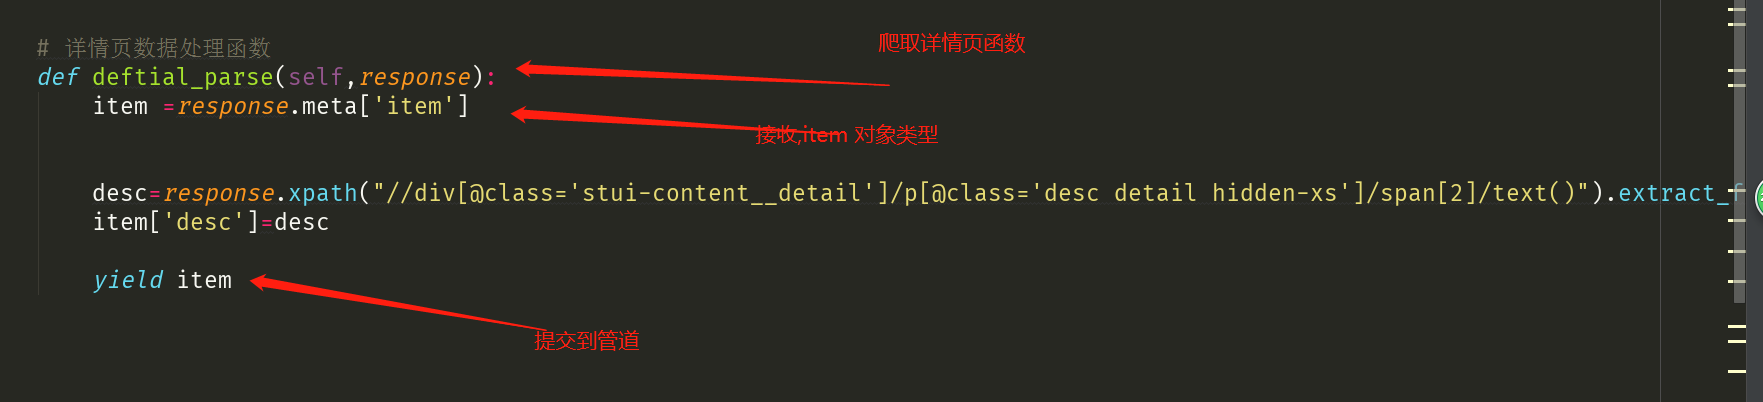
2:爬取详情页
4.3数据持久化
# -*- coding: utf-8 -*-

# Define your item pipelines here
#
# Don't forget to add your pipeline to the ITEM_PIPELINES setting
# See: https://doc.scrapy.org/en/latest/topics/item-pipeline.html


# class Postdemo1Pipeline(object):
#     def process_item(self, item, spider):
#         print(item)
#         return item


import pymysql
from redis import Redis


class Postdemo1Pipeline(object):
    fp = None
    def open_spider(self,spider):
        print('开始爬虫!')
        self.fp = open('./xiaohua.txt','w',encoding='utf-8')
    #作用:实现持久化存储的操作
    #该方法的item参数就可以接收爬虫文件提交过来的item对象
    #该方法每接收一个item就会被调用一次(调用多次)
    def process_item(self, item, spider):
        name = item['name']
        desc = item['desc']
        self.fp.write(name+':'+desc+'
')
        #返回值的作用:就是将item传递给下一个即将被执行的管道类
        return item

    def close_spider(self,spider):
        print('结束爬虫!')
        self.fp.close()


class MysqlPipeline(object):
    conn = None
    cursor = None
    def open_spider(self, spider):
        #解决数据库字段无法存储中文处理:alter table tableName convert to charset utf8;
        self.conn = pymysql.Connect(host='127.0.0.1',port=3306,user='root',password='123',db='test')
        print(self.conn)
    def process_item(self, item, spider):
        self.cursor = self.conn.cursor()
        try:
            self.cursor.execute('insert into xiahua values ("%s","%s")'%(item['name'],item['img_url']))
            self.conn.commit()
        except Exception as e:
            print(e)
            self.conn.rollback()
        return item
    def close_spider(self, spider):
        self.cursor.close()
        self.conn.close()


class RedisPipeline(object):
    conn = None
    def open_spider(self, spider):
        self.conn = Redis(host='127.0.0.1',port=6379)
        print(self.conn)
    def process_item(self, item, spider):
        dic = {
            'name':item['name'],
            'img_url':item['img_url']
        }
        print(dic)
        self.conn.lpush('xiaohua',dic)
        return item
    def close_spider(self, spider):
        pass
五:获取动态加载数据(更改响应数据)