一、OpenSSL及证书服务
目标:
本案例要求熟悉OpenSSL工具的基本使用,完成以下任务操作:
- 使用OpenSSL加密/解密文件
- 搭建企业自有的CA服务器,为颁发数字证书提供基础环境
方案:
使用两台RHEL7虚拟机,其中svr7作为CA数字证书服务器,而pc207作为测试用客户机。
步骤:
步骤一:使用OpenSSL加密/解密文件
1)加密文件
创建一个明文的文本文件f1.txt,使用openssl进行加密,选用des3加密算法,输出的加密文件为f1.txt.enc 。
[root@svr7 ~]# rpm -qi openssl > f1.txt //建立明文的测试文件
[root@svr7 ~]# head -2 f1.txt
Name : openssl Relocations: (not relocatable)
Version : 1.0.0 Vendor: Red Hat, Inc.
[root@svr7 ~]# openssl enc -des3 -e -in f1.txt -out f1.txt.enc
enter des-ede3-cbc encryption password: //设置一个密码
Verifying - enter des-ede3-cbc encryption password: //再次输入设置的密码
[root@svr7 ~]# file f1.txt*
f1.txt: UTF-8 Unicode English text
f1.txt.enc: data //加密后变成非ASCII格式
2)解密文件
查看未解密的f1.txt.enc文件时显示乱码,必须解密后才能查看。
[root@svr7 ~]# head -2 f1.txt.enc
Salted__▒▒▒▒C̏▒x▒6Q▒
.O▒l▒g▒)▒▒▒{▒▒G▒▒t▒▒!▒▒▒Cc0▒▒▒c쬂▒V▒Dp▒▒9▒▒▒[▒▒▒X▒f▒ڍ▒j@▒▒▒▒▒▒▒=@▒.ɮP▒1e▒▒▒"M`▒W▒=▒▒▒-a,▒▒j7▒M▒▒b▒+▒▒ 麋0▒▒▒k▒▒z▒Zʢ
[root@svr7 ~]# openssl enc -des3 -d -in f1.txt.enc -out f1-new.txt
enter des-ede3-cbc decryption password: //输入解密口令
[root@svr7 ~]# head -2 f1-new.txt //查看解密后的文本
Name : openssl Relocations: (not relocatable)
Version : 1.0.0 Vendor: Red Hat, Inc.
步骤二:搭建企业自有的CA服务器,为颁发数字证书提供基础
1)配置CA签署环境
修改OpenSSL的主配置文件位于/etc/pki/tls/openssl.cnf,为证书创建过程提供一些默认的设置:
[root@svr7 ~]# vim /etc/pki/tls/openssl.cnf
.. ..
[ CA_default ]
dir = /etc/pki/CA //CA相关文件的默认目录
certs = $dir/certs //为用户颁发证书的存放位置
crl_dir = $dir/crl //证书废止列表(CRL)文件的存放位置
database = $dir/index.txt //证书数据的索引文件,需手动建立
certificate = $dir/my-ca.crt //CA服务器根证书文件
serial = $dir/serial //序号记录文件,需手动建立
.. ..
private_key = $dir/private/my-ca.key //CA服务器私钥文件
[ req_distinguished_name ] //证书请求的识别信息
countryName = Country Name (2 letter code)
countryName_default = CN //国家名缩写
stateOrProvinceName = State or Province Name (full name)
stateOrProvinceName_default = Beijing //所在省份
localityName = Locality Name (eg, city)
localityName_default = Beijing //所在城市
0.organizationName = Organization Name (eg, company)
0.organizationName_default = Tedu Technology Ltd //所在单位/组织
默认CA配置目录位于/etc/pki/CA/,需要建立初始化序列文件、索引文件:
[root@svr7 ~]# cd /etc/pki/CA
[root@svr7 CA]# touch index.txt //建立数据索引文件
[root@svr7 CA]# echo 01 > serial //建立序号文件
2)为CA服务器创建私钥
此私钥在后续签发证书时都会用到,建议设置一个私钥口令进行保护。
[root@svr7 ~]# cd /etc/pki/CA/private
[root@svr7 private]# openssl genrsa -des3 2048 > my-ca.key
Generating RSA private key, 2048 bit long modulus
...............................+++
............+++
e is 65537 (0x10001)
Enter pass phrase: //设置一个私钥口令
Verifying - Enter pass phrase: //再次输入设置的私钥口令
[root@svr7 private]# chmod 600 my-ca.key
[root@svr7 private]# ls -l my-ca.key
-rw-------. 1 root root 1751 8月 6 14:12 my-ca.key
3)为CA服务器创建根证书
此根证书将提供给所有客户企业及个人,用来验证证书持有者的合法身份。证书请求识别信息会根据第1)步设置的自动读取,但通用名称、邮箱地址需要手动指定。
[root@svr7 private]# openssl req
> -new -x509 -key my-ca.key -days 365 > ../my-ca.crt
Enter pass phrase for my-ca.key: //验证私钥口令
You are about to be asked to enter information that will be incorporated
into your certificate request.
What you are about to enter is what is called a Distinguished Name or a DN.
There are quite a few fields but you can leave some blank
For some fields there will be a default value,
If you enter '.', the field will be left blank.
-----
Country Name (2 letter code) [CN]:
State or Province Name (full name) [Beijing]:
Locality Name (eg, city) [Beijing]:
Organization Name (eg, company) [Tedu Technology Ltd]:
Organizational Unit Name (eg, section) []:
Common Name (eg, your name or your server's hostname) []:Tedu CA Server
Email Address []:zengye@tedu.cn
4)发布根证书文件
本例中通过自带的httpd服务提供Web方式的下载。
[root@svr7 private]# mkdir /var/www/html/certs/
[root@svr7 private]# cp ../my-ca.crt /var/www/html/certs/TARENA-CA.CRT
[root@svr7 private]# service httpd start
正在启动 httpd:httpd: Could not reliably determine the server's fully qualified domain name, using svr7.tedu.cn for ServerName
[确定]
确认在客户机能够下载到根证书。
[root@pc207 ~]# wget http://192.168.4.7/certs/TARENA-CA.CRT
.. ..
2017-08-17 23:36:51 (49.5 MB/s) - 已保存 “TARENA-CA.CRT” [1436/1436])
完成这些步骤以后,就已经具有了签发证书的环境。当收到企业或个人提交的证书签发请求(CSR)文件以后,就可以执行验证和签发了(后续讲解内容)。
二、邮件TLS/SSL加密通信
目标:
本案例要求为基于Postfix+Dovecot的邮件服务器提供加密通信支持,主要完成以下任务操作:
- 为SMTP服务(postfix)添加TLS/SSL加密通信支持
- 基于dovecot配置POP3s+IMAPS加密通信支持
- 客户端收发信测试,确保加密的邮件通信可用
方案:
使用两台RHEL7虚拟机,其中svr7作为CA服务器,而mail作为测试用的Postfix+Dovecot邮件服务器。另外可准备一台pc120作为收发邮件的Windows测试机,安装邮件客户端软件或Outlook 2010。
步骤:
步骤一:准备一个简单的Postfix+Dovecot邮件服务器,支持SMTP认证
1) 快速安装邮件相关软件、添加邮箱账号
确认已安装postfix、dovecot、cyrus-sasl软件包,启动saslauthd服务:
[root@www ~]# yum -y install postfix dovecot cyrus-sasl
.. ..
[root@www ~]# vim /etc/sasl2/smtpd.conf
pwcheck_method: saslauthd
mech_list: plain login
[root@www ~]# service saslauthd start ; chkconfig saslauthd on
正在启动 saslauthd: [确定]
添加两个邮箱账号mickey、minnie。
[root@www ~]# useradd mickey
[root@www ~]# echo 123456 | passwd --stdin mickeyy
更改用户 mickeyy 的密码 。
passwd: 所有的身份验证令牌已经成功更新。
[root@www ~]# useradd minnie
[root@www ~]# echo 123456 | passwd --stdin minnie
更改用户 minnie 的密码 。
passwd: 所有的身份验证令牌已经成功更新。
2) 配置并启动postfix服务
[root@mail ~]# cd /etc/postfix/
[root@mail postfix]# cp main.cf main.cf.origin
[root@mail postfix]# vim main.cf
.. ..
myhostname = mail.tedu.cn
mydomain = tedu.cn
myorigin = $mydomain
inet_interfaces = all
mydestination = $myhostname, localhost.$mydomain, localhost, $mydomain
mynetworks = 127.0.0.0/8
home_mailbox = Maildir/ //设置邮箱路径
smtpd_sasl_auth_enable = yes
smtpd_sasl_security_options = noanonymous
smtpd_recipient_restrictions =
permit_mynetworks,
permit_sasl_authenticated,
reject_unauth_destination
[root@mail postfix]# systemctl restart postfix
[root@mail postfix]# netstat -anpt | grep master
tcp 0 0 0.0.0.0:25 0.0.0.0:* LISTEN 32120/master
3) 配置并启动dovecot服务
[root@mail dovecot]# vim /etc/dovecot/conf.d/10-mail.conf
mail_location = maildir:~/Maildir //设置邮箱路径
.. ..
[root@mail dovecot]# vim /etc/dovecot/conf.d/10-ssl.conf
.. ..
ssl = no //先禁用SSL
#ssl_cert = </etc/pki/dovecot/certs/dovecot.pem //注释掉此处两行内容
#ssl_key = </etc/pki/dovecot/private/dovecot.pem
[root@mail postfix]# systemctl restart dovecot
正在启动 Dovecot Imap: [确定]
[root@mail postfix]# netstat -anpt | grep dovecot
tcp 0 0 0.0.0.0:110 0.0.0.0:* LISTEN 32243/dovecot
tcp 0 0 0.0.0.0:143 0.0.0.0:* LISTEN 32243/dovecot
4) 简单测试一下,确认未作TLS/SSL加密时邮件收发可用
由root给mickey用户发送一封邮件,确认mickey的邮箱能收到该邮件。
[root@mail ~]# echo "Hello Mickey" | mail -s "Test Mail XXXX" mickey@tedu.cn
[root@mail ~]# cat /home/mickey/Maildir/new/137690.. //找最新的一封邮件
Return-Path: <root@tedu.cn>
X-Original-To: mickey@tedu.cn
Delivered-To: mickey@tedu.cn
Received: by mail.tedu.cn (Postfix, from userid 0)
id 28846836EA; Mon, 19 Aug 2017 17:36:58 +0800 (CST)
Date: Mon, 19 Aug 2017 17:36:58 +0800
To: mickey@tedu.cn
Subject: Test Mail XXXX
User-Agent: Heirloom mailx 12.4 7/29/08
MIME-Version: 1.0
Content-Type: text/plain; charset=us-ascii
Content-Transfer-Encoding: 7bit
Message-Id: <20130819093658.28846836EA@mail.tedu.cn>
From: root@tedu.cn (root)
Hello Mickey
步骤二:创建CSR证书签发申请,提交给CA服务器签署,下载签署后的证书
1) 在mail服务器上,创建服务私钥
由于此例中的私钥主要用于加密的邮件通信,为了方便服务控制,不要设置私钥口令(在postfix中也不好配置) 。
[root@mail ~]# cd /etc/pki/tls/private/
[root@mail private]# openssl genrsa 2048 > mail.key //不设置私钥口令
Generating RSA private key, 2048 bit long modulus
............................................................+++
................+++
e is 65537 (0x10001)
[root@mail private]# chmod 600 mail.key
2)在mail服务器上,创建CSR证书签发请求
基于前一步创建的服务私钥来建立CSR请求,根据提示设置的国家、省、市、组织信息要与CA根证书的设置保持一致。
[root@mail private]# openssl req -new -key mail.key > ~/mail.csr
You are about to be asked to enter information that will be incorporated
into your certificate request.
What you are about to enter is what is called a Distinguished Name or a DN.
There are quite a few fields but you can leave some blank
For some fields there will be a default value,
If you enter '.', the field will be left blank.
-----
Country Name (2 letter code) [XX]:CN
State or Province Name (full name) []:Beijing
Locality Name (eg, city) [Default City]:Beijing
Organization Name (eg, company) [Default Company Ltd]:Tedu Technology Ltd
Organizational Unit Name (eg, section) []:
Common Name (eg, your name or your server's hostname) []:mail.tedu.cn
Email Address []:postmaster@tedu.cn
Please enter the following 'extra' attributes
to be sent with your certificate request
A challenge password []:
An optional company name []:
3)在CA服务器svr7上,签署并发布证书
首先获得mail服务器(比如SCP方式)提交的CSR证书签发请求文件,然后正式签署并通过httpd服务提供下载。
[root@svr7 ~]# scp 192.168.4.120:/root/mail.csr ./
root@192.168.4.120's password:
mail.csr 100% 1062 1.0KB/s 00:00
[root@svr7 ~]# cd /etc/pki/CA/certs/
[root@svr7 certs]# openssl ca -in ~/mail.csr > mail.crt //签署证书
Using configuration from /etc/pki/tls/openssl.cnf
Enter pass phrase for /etc/pki/CA/private/my-ca.key: //验证私钥口令
Check that the request matches the signature
Signature ok
Certificate Details:
.. ..
Certificate is to be certified until Aug 19 08:31:12 2014 GMT (365 days)
Sign the certificate? [y/n]:y
1 out of 1 certificate requests certified, commit? [y/n]y
Write out database with 1 new entries
Data Base Updated
[root@svr7 certs]# cp mail.crt /var/www/html/certs/ //复制到Web下载目录
4)在mail服务器上,下载签发好的证书文件,确认私钥、证书的存放路径
[root@mail ~]# cd /etc/pki/tls/certs/
[root@mail certs]# wget http://192.168.4.7/certs/mail.crt
.. ..
2017-05-17 16:35:27 (300 MB/s) - 已保存 “mail.crt” [4633/4633])
[root@mail certs]# ls -lh /etc/pki/tls/certs/mail.crt
-rw-r--r--. 1 root root 4.6K 8月 19 16:32 /etc/pki/tls/certs/mail.crt
[root@mail certs]# ls -lh /etc/pki/tls/private/mail.key
-rw-------. 1 root root 1.7K 8月 19 16:22 /etc/pki/tls/private/mail.key
步骤三:分别为postfix、dovecot添加TLS/SSL加密通信支持
大多数情况下,加密的和非加密的服务会同时提供,允许邮箱用户自行选择 。当然,如果确实有需要,可以只提供加密的收发信服务,禁用非TLS/SSL加密的收发信服务。
1) 修改postfix服务配置,启用SSL加密通信
[root@svr7 ~]# vim
.. ..
smtpd_use_tls = yes
#smtpd_tls_auth_only = yes //若启用此项,则非TLS的SMTP通信将被阻止
smtpd_tls_key_file = /etc/pki/tls/private/mail.key
smtpd_tls_cert_file = /etc/pki/tls/certs/mail.crt
#smtpd_tls_loglevel = 1 //排错阶段可启用此配置
[root@mail ~]# service postfix reload
重新载入postfix: [确定]
2)修改dovecot服务配置,启用SSL加密通信
[root@mail ~]# vim /etc/dovecot/conf.d/10-ssl.conf
.. ..
ssl = yes
#ssl_cert = </etc/pki/dovecot/certs/dovecot.pem
#ssl_key = </etc/pki/dovecot/private/dovecot.pem
ssl_cert = </etc/pki/tls/certs/mailsvr.crt
ssl_key = </etc/pki/tls/private/mailsvr.key
[root@mail ~]# netstat -anpt | grep dovecot
tcp 0 0 0.0.0.0:110 0.0.0.0:* LISTEN 32243/dovecot
tcp 0 0 0.0.0.0:143 0.0.0.0:* LISTEN 32243/dovecot
tcp 0 0 0.0.0.0:993 0.0.0.0:* LISTEN 32243/dovecot
tcp 0 0 0.0.0.0:995 0.0.0.0:* LISTEN 32243/dovecot
注意:若要禁用非加密的POP3、IMAP通信,可以参考以下配置(可选)。
[root@mail ~]# vim /etc/dovecot/conf.d/10-master.conf
inet_listener imap {
port = 0 //停用非加密的imap服务
}
inet_listener pop3 {
port = 0 //停用非加密的pop3服务
}
步骤四:在邮件客户端(比如Outlook Express)验证加密的邮件通信
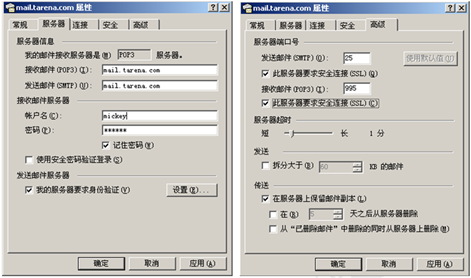
1)为测试用户mickey配置邮件收发账号
设置好电子邮件地址、用户账号密码、收发信服务器等属性。接收邮件选POP3或IMAP,勾选安全连接(SSL) ,如下图所示。
2)加密的收发信测试
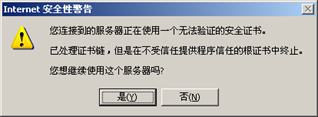
新建一封测试邮件,发送给minnie@tedu.cn、抄送给自己,确认能够成功发送并接收邮件。首次发送邮件时会出现安全提示,如下图所示,选“是”继续即可。
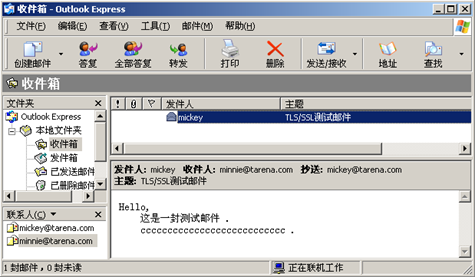
成功发出邮件以后,即可收取到抄送给自己的邮件,如下图所示。