CubeMap采样
Unity提供了Unity_GlossyEnvironment函数来对cubemap进行采样。该函数的实现如下:
half3 Unity_GlossyEnvironment (UNITY_ARGS_TEXCUBE(tex), half4 hdr, Unity_GlossyEnvironmentData glossIn)
{
    half perceptualRoughness = glossIn.roughness /* perceptualRoughness */ ;

// TODO: CAUTION: remap from Morten may work only with offline convolution, see impact with runtime convolution!
// For now disabled
#if 0
    float m = PerceptualRoughnessToRoughness(perceptualRoughness); // m is the real roughness parameter
    const float fEps = 1.192092896e-07F;        // smallest such that 1.0+FLT_EPSILON != 1.0  (+1e-4h is NOT good here. is visibly very wrong)
    float n =  (2.0/max(fEps, m*m))-2.0;        // remap to spec power. See eq. 21 in --> https://dl.dropboxusercontent.com/u/55891920/papers/mm_brdf.pdf

    n /= 4;                                     // remap from n_dot_h formulatino to n_dot_r. See section "Pre-convolved Cube Maps vs Path Tracers" --> https://s3.amazonaws.com/docs.knaldtech.com/knald/1.0.0/lys_power_drops.html

    perceptualRoughness = pow( 2/(n+2), 0.25);      // remap back to square root of real roughness (0.25 include both the sqrt root of the conversion and sqrt for going from roughness to perceptualRoughness)
#else
    // MM: came up with a surprisingly close approximation to what the #if 0'ed out code above does.
    perceptualRoughness = perceptualRoughness*(1.7 - 0.7*perceptualRoughness);
#endif


    half mip = perceptualRoughnessToMipmapLevel(perceptualRoughness);
    half3 R = glossIn.reflUVW;
    half4 rgbm = UNITY_SAMPLE_TEXCUBE_LOD(tex, R, mip);

    return DecodeHDR(rgbm, hdr);
}
UNITY_ARGS_TEXCUBE宏是一个用来定义cubemap作为函数参数的宏,用于函数的声明,我们在调用函数时需要相应地使用UNITY_PASS_TEXCUBE宏进行cubmap参数传递。hdr参数用于当cubemap中包含hdr颜色时,需要将hdr转换到rgb颜色,一般直接传unity_SpecCube0_HDR即可。Unity_GlossyEnvironmentData是unity定义的一个数据结构,我们需要设置它的roughness和reflUVW属性,roughness就是材质的粗糙程度,越粗糙物体的反射越模糊;reflUVW就是反射向量,用于采样cubemap。我们可以这样调用该函数:
float3 reflectionDir = reflect(-viewDir, i.normal);
Unity_GlossyEnvironmentData envData;
envData.roughness = 1 - _Smoothness;
envData.reflUVW = reflectionDir;
float3 specular = Unity_GlossyEnvironment(UNITY_PASS_TEXCUBE(unity_SpecCube0), unity_SpecCube0_HDR, envData);
该函数首先对roughness进行变换,因为roughness和cubemap的mipmap level并非是线性关系,Unity使用了一个近似的公式来进行模拟:
因为roughness越大,物体的反射越模糊,这就类似于采样的cubemap的mipmap level越高。得到对应的mipmap level之后,我们就可以用UNITY_SAMPLE_TEXCUBE_LOD对cubemap进行采样,得到采样的结果。如果是hdr格式,进一步转换到rgb格式。
box projection
使用Unity提供的反射探针,我们可以方便地实现反射的效果。如果要显示反射效果的物体是会移动的,我们需要在反射探针中勾选Box Projection,这样反射探针的box会随着物体移动而移动,从而只用一个反射探针,也可以实现不同的反射效果。同样地,unity提供了BoxProjectedCubemapDirection函数来方便我们计算box projection下的反射向量:
inline float3 BoxProjectedCubemapDirection (float3 worldRefl, float3 worldPos, float4 cubemapCenter, float4 boxMin, float4 boxMax)
{
    // Do we have a valid reflection probe?
    UNITY_BRANCH
    if (cubemapCenter.w > 0.0)
    {
        float3 nrdir = normalize(worldRefl);

        #if 1
            float3 rbmax = (boxMax.xyz - worldPos) / nrdir;
            float3 rbmin = (boxMin.xyz - worldPos) / nrdir;

            float3 rbminmax = (nrdir > 0.0f) ? rbmax : rbmin;

        #else // Optimized version
            float3 rbmax = (boxMax.xyz - worldPos);
            float3 rbmin = (boxMin.xyz - worldPos);

            float3 select = step (float3(0,0,0), nrdir);
            float3 rbminmax = lerp (rbmax, rbmin, select);
            rbminmax /= nrdir;
        #endif

        float fa = min(min(rbminmax.x, rbminmax.y), rbminmax.z);

        worldPos -= cubemapCenter.xyz;
        worldRefl = worldPos + nrdir * fa;
    }
    return worldRefl;
}
worldRefl即为世界空间的反射向量,worldPos即为要计算的点的世界坐标,cubemapCenter是反射探针的坐标,boxMin和boxMax是反射探针包围盒的最小最大坐标。我们可以这样调用BoxProjectedCubemapDirection:
float3 reflectionDir = reflect(-viewDir, i.normal);
float3 reflUVW = BoxProjectedCubemapDirection(reflectionDir, i.worldPos, unity_SpecCube0_ProbePosition, unity_SpecCube0_BoxMin, unity_SpecCube0_BoxMax);
继续看函数内部实现,这里有个条件判断,当cubemapCenter.w > 0时,说明反射探针启用了box projection,我们只需要在启用的情况下进行计算。
在启用box projection时,传入的worldRefl向量并非恰好是我们对cubemap采样的向量,如图所示,I为当前点,C为反射探针的中心点,P为cubemap的采样点,我们要求的就是向量W。

首先,我们需要根据cubemap采样的原理,计算出向量U。向量U的方向与worldRefl向量一致,长度为与最近的包围盒的面相交的点的距离。容易知道,六个面到点I的距离可以表示为两组三维向量:
            float3 rbmax = (boxMax.xyz - worldPos);
            float3 rbmin = (boxMin.xyz - worldPos);
然后根据归一化后的worldRefl向量,也就是worldRefl向量的方向,可以得到沿该方向去,到达六个面所需要的时间:
			float3 nrdir = normalize(worldRefl);
			float3 rbmax = (boxMax.xyz - worldPos) / nrdir;
             float3 rbmin = (boxMin.xyz - worldPos) / nrdir;
我们要求的所需要的最短时间必然是大于0的时间中的最小值:
			float3 rbminmax = (nrdir > 0.0f) ? rbmax : rbmin;
			float fa = min(min(rbminmax.x, rbminmax.y), rbminmax.z);
进而,可以求出向量U:
float3 u = nrdir * fa;
向量V的值很显然就是两个点世界坐标的差值:
float3 v = cubemapCenter.xyz - worldPos;
那么,向量W = U - V为:
float3 w = nrdir * fa + worldPos - cubemapCenter.xyz;
反射探针插值
Unity允许让我们对两个反射探针采样的值进行插值融合,得到一个过渡的效果。Unity提供了UNITY_SPECCUBE_BLENDING宏来判断当前平台是否支持反射探针融合。另外,unity_SpecCube0_BoxMin的w分量存储了第一个反射探针所占的权重,如果权重比较大,我们的实现代码就可以忽略第二个反射探针的存在,避免不必要的性能开销:
		#if UNITY_SPECCUBE_BLENDING
			float interpolator = unity_SpecCube0_BoxMin.w;
			UNITY_BRANCH
			if (interpolator < 0.99999) {
				float3 probe1 = Unity_GlossyEnvironment(
					UNITY_PASS_TEXCUBE_SAMPLER(unity_SpecCube1, unity_SpecCube0),
					unity_SpecCube0_HDR, envData
				);
				float3 specular = lerp(probe1, probe0, interpolator);
			}
			else {
				float3 specular = probe0;
			}
		#else
			float3 specular = probe0;
		#endif
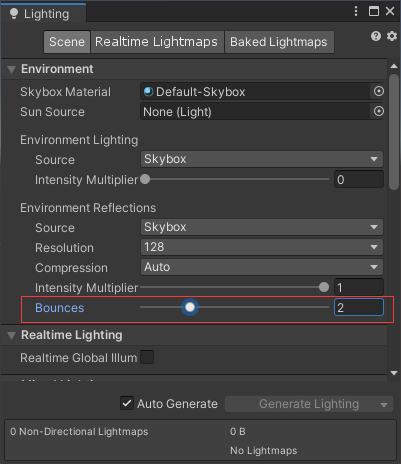
多次反射
为了实现镜中镜之类的效果,Unity支持对反射探针的cubemap进行多次渲染,这样就可以把反射的信息也渲染到cubemap中。相关的设置在Window/Rendering/Lighting Settings中:
Reference
[1] Reflections
如果你觉得我的文章有帮助,欢迎关注我的微信公众号(大龄社畜的游戏开发之路)-