kenika 原文 C#+AE实现类似IDentify功能及对高亮显示相关接口的总结
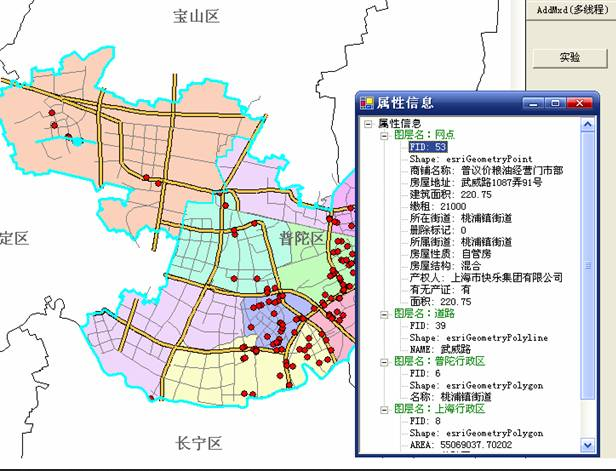
ArcMap中的Identify功能是有目的查看要素(Feature)属性信息经常使用的工具。ArcMap中的Identify功能有以下几个特征:
第一, 鼠标点击具有“穿透力”,可以同时对多个图层的要素实现选择;
第二, 同一图层可以选择多个要素;
第三, 被选中要素并不高亮显示,而是以绿色闪烁一次;
第四, 所有选中要素列于弹出的信息窗口中。
今天用C#和AE也试着写了一个类似于Identify功能的工具,有如下要求:
第一, 鼠标具有“穿透力”,可以同时对多个图层进行选择(点选);
第二, 每一图层最多只能选中一个要素,这与ArcMap中不同;
第三, 被选中要素需要高亮显示,而不是闪烁一次,也与ArcMap不同;
第四, 按下工具后,在地图上单击弹出属性信息窗口,再次单击,仍有该窗口显示属性信息,即不可打开多个属性信息窗口。
思考:我们先来考虑属性信息窗口,由于无论在地图上点击多少次,都只出现同一属性信息窗口,所以应该将属性信息窗口设计成Singleton(单件)模式,该窗体包含一个TreeView控件用来显示数状信息。由于要求鼠标点击可以同时针对多个图层进行选择,而且每个图层最多可以选择一个,所以必须使用IFeatureSelection接口循环对每个图层进行选择,而不能用IMap的SelectByShape()(9.2中为SearchByShape())方法进行选择,因为后者只能控制在所有的图层中选择一个,而不能控制每个图层只选择一个。
private void axMapControl1_OnMouseDown(object sender, ESRI.ArcGIS.MapControl.IMapControlEvents2_OnMouseDownEvent e)
{
if(this.blnIsIdentifyEnable)
     {
         //如果查询比较频繁,此类变量可以设置成类级别
         IFeatureLayer pFL;
         IFeatureSelection pFeatureSelection;
         IEnvelope pEnv;
         IGeometry pGeometry;
         ISpatialFilter pSpatialFilter;
         ISelectionSet pSelectionSet;
         IEnumIDs pEnumIDs;
         IFeature pFeature;
//                ImageList imageList = new ImageList();
//                imageList.

         //用于查询的矩形(相当于点的缓冲区,这样比生成缓冲区节省资源),
         //envelope的大小根据实际情况设定,以方便使用为准
         pEnv = new EnvelopeClass();
         pEnv.PutCoords(e.mapX-200,e.mapY-200,e.mapX+200,e.mapY+200);
         pGeometry = pEnv as IGeometry;
         pSpatialFilter = new SpatialFilterClass();
         pSpatialFilter.Geometry = pGeometry;
         pSpatialFilter.SpatialRel = esriSpatialRelEnum.esriSpatialRelIntersects;

         //运用singleton模式设计窗体,只允许存在一个ShowAttributeTable实例
         ShowAttributeTable frmShowAttribute = ShowAttributeTable.CreateForm();
         frmShowAttribute.Show();
         frmShowAttribute.AttributeTreeView.Nodes.Clear();//首先清除上次结果
         frmShowAttribute.AttributeTreeView.ShowLines = true;
         frmShowAttribute.AttributeTreeView.ShowPlusMinus = true;

         TreeNode rootNode = new TreeNode();
         rootNode.Text = "属性信息";
//                rootNode.ImageIndex

         Font font = new Font("黑体",10);
         rootNode.NodeFont = font;
         //添加根节点“属性信息”
         frmShowAttribute.AttributeTreeView.Nodes.Add(rootNode);


         //没有必要将地图上的高亮选择清除,因为下面对每个图层的选择都用esriSelectionResultNew,会自动清除上次的高亮显示,
         //而不同图层之间的高亮选择不会有任何影响,因为IFeatureSelection接口的一切属性和方法都是针对一个图层
//                this.axMapControl1.Map.ClearSelection();
         for(int i=0;i<this.axMapControl1.LayerCount;i++)
         {
             pFL = this.axMapControl1.get_Layer(i) as IFeatureLayer;
             if(pFL.Visible && pFL.Selectable)
             {
                 pFeatureSelection = pFL as IFeatureSelection;
                 //选择之前先清除,这是个好习惯(除非是用Add方式)
                 pFeatureSelection.Clear();
                 pFeatureSelection.SelectFeatures(pSpatialFilter,esriSelectionResultEnum.esriSelectionResultNew,true);
                 pSelectionSet = pFeatureSelection.SelectionSet;
                 //如果选择集内有Feature
                 if(pSelectionSet.Count>0)
                 {
                     //构建图层节点并添加到根节点
                     TreeNode layerNameNode = new TreeNode();
                     layerNameNode.ForeColor = Color.Green;
                     layerNameNode.Text = "图层名:" + pFL.Name;

                     rootNode.Nodes.Add(layerNameNode);

                     //通过pEnumIDs获得该SelectionSet中的Feature的id值,再用FeatureClass.GetFeature()方法获得该Feature对象
                     //这里为了学习新接口而使用了IEnumIDs,为了获得SelectionSet中的Feature,可以使用其Search()方法
                     //获得ICursor,再使用循环获得Feature,如下注释选定行
//                            pSelectionSet.Search(null,false,out pCursor);
//                            pRow = pCursor.NextRow();
//                            if(pRow!=null)
//                            {
//                            }
                     pEnumIDs = pSelectionSet.IDs;
                     long id = pEnumIDs.Next();
                     while(id!=-1)
                     {
                         pFeature = pFL.FeatureClass.GetFeature((int)id);
                         for(int j=0;j<pFeature.Fields.FieldCount;j++)
                         {
                             if(j!=1)
                             {
                                 //构建字段值节点并添加到图层节点下
                                 TreeNode fieldInfoNode = new TreeNode();
                                 fieldInfoNode.Text = pFeature.Fields.get_Field(j).Name + ": " + pFeature.get_Value(j).ToString();
                                 layerNameNode.Nodes.Add(fieldInfoNode);
                             }
                             //如果是shape字段就显示GeometryType
                             else
                             {
                                 TreeNode fieldInfoNode = new TreeNode();
                                 fieldInfoNode.Text = pFeature.Fields.get_Field(j).Name + ": " + pFeature.Shape.GeometryType.ToString();
                                 layerNameNode.Nodes.Add(fieldInfoNode);
                             }
                             frmShowAttribute.AttributeTreeView.ExpandAll();
                         }

                         id = pEnumIDs.Next();
                     }
                 }

             }
 }

}
属性信息窗体ShowAttributeTable的设计的关键代码:
 public class ShowAttributeTable : System.Windows.Forms.Form
 {
  /// <summary>
  /// 必需的设计器变量。
  /// </summary>
  private System.ComponentModel.Container components = null;
  private System.Windows.Forms.TreeView treeView1;
  public TreeView AttributeTreeView//设置treeView1的属性
  {
   get{return this.treeView1;}
   set{this.treeView1 = value;}
  }
  private static ShowAttributeTable frm;
  public static ShowAttributeTable CreateForm()
  {
   if(frm==null)
    frm = new ShowAttributeTable();
   return frm;
  }
  private ShowAttributeTable()
  {
   //
   // Windows 窗体设计器支持所必需的
   //
   InitializeComponent();
   //
   // TODO: 在 InitializeComponent 调用后添加任何构造函数代码
   //
  }

  /// <summary>
  /// 清理所有正在使用的资源。
  /// </summary>
  protected override void Dispose( bool disposing )
  {
   if( disposing )
   {
    if(components != null)
    {
     components.Dispose();
    }
   }
   base.Dispose( disposing );
  }
  #region Windows 窗体设计器生成的代码
  /// <summary>
  /// 设计器支持所需的方法 - 不要使用代码编辑器修改
  /// 此方法的内容。
  /// </summary>
  private void InitializeComponent()
  {
   this.treeView1 = new System.Windows.Forms.TreeView();
   this.SuspendLayout();
   //
   // treeView1
   //
   this.treeView1.Dock = System.Windows.Forms.DockStyle.Fill;
   this.treeView1.ImageIndex = -1;
   this.treeView1.Location = new System.Drawing.Point(0, 0);
   this.treeView1.Name = "treeView1";
   this.treeView1.SelectedImageIndex = -1;
   this.treeView1.Size = new System.Drawing.Size(272, 349);
   this.treeView1.TabIndex = 0;
   //
   // ShowAttributeTable
   //
   this.AutoScaleBaseSize = new System.Drawing.Size(6, 14);
   this.ClientSize = new System.Drawing.Size(272, 349);
   this.Controls.Add(this.treeView1);
   this.Name = "ShowAttributeTable";
   this.Text = "属性信息";
   this.TopMost = true;
   this.Closed += new System.EventHandler(this.ShowAttributeTable_Closed);
   this.ResumeLayout(false);
  }
  #endregion
  private void ShowAttributeTable_Closed(object sender, System.EventArgs e)
  {
   frm = null;
  }
 }
对相关接口的总结:
IFeatureSelection:只针对一个图层进行选择,对于选择集而言,无论是New还是Add都是对一个图层。不同的图层之间(当然对应不同的IFeatureSelection),不能Add,即使选择集是New的,刷新后,原来高亮的feature仍然存在,因为这个New无法改变其他图层,要想清除以前的选择,只能用IFeatureSelection接口的Clear()方法或IMap的ClearSelection()方法,同理,前者只清除一个特定图层的高亮显示效果,而后者则清除所有图层的高亮显示效果。
ISelectionSet:该接口可接受IFeatureSelection的SelectionSet属性,表示选中的要素的集合,这些要素必须来自同一个图层。可以继续ISeletionSet进行search查询。一般来讲图层中高亮显示的要素即为ISelectionSet中的要素,但有一种特殊情况除外:当鼠标某次选择没有选到要素时(用New的方式),ISelectionSet中的要素数为0,但是图层上上次查询留下的高亮显示的效果并不会因为使用了New的方式或者地图刷新而消失,这时出现了高亮显示的要素和ISelectionSet中的要素不一致的情况。为了保持一致,可以判断ISelectionSet中的要素数是否为0,等于0时,就清除该图层所有要素,就像ArcMap那样,点击空白处,上次的选择消失。
ISelection:IMap的FeatureSelection属性即示ISelection类型的。与ISelectionSet不同,ISelection内可以容纳不同图层的Feature。该接口与mapSelection类实现,除ISelection接口外,mapSelection类还实现了IEnumFeature和IEnumFeatureSetup接口,这三者之间可以通过QI进行接口转换。注意,ISelection直接转换位IEnumFeature后,可以利用IEnumFeature的Next()方法循环来得到其中的每一个Feature,但是所有Feature都只具有shape信息,其他字段的信息一概没有!为了获得所有字段的信息,必须通过IEnumFeatureSetup的AllFields属性进行设置,使用方法如下:
IEnumFeatureSetup pEnumFeatureSetup = this.axMapControl1.Map.FeatureSelection as IEnumFeatureSetup;
pEnumFeatureSetup.AllFields = true;
IEnumFeature pEnumFeature = pEnumFeatureSetup as IEnumFeature;
IFeature pFeature = pEnumFeature.Next();
while(pFeature!=null)
{
    MessageBox.Show(pFeature.get_value(3).toString());
    pFeature = pEnumFeature.Next();
}
IMap:该接口的查询也会经常用到,主要有SelectByShape(9.2中为SearchByShape())和SelectFeature()两个方法。前者通过图形对多个图层同时进行选择,后者对指定的Feature进行选择(其第二个参数为IFeature类型),这个方法在某些场合有妙用,比如,绘制一个Feature后,通常它应该处于高亮显示的状态,用SelectFeature()正好可以完美的完成。我以前为了实现这个功能,往往是利用鼠标点生成一个缓冲区,再做空间查询,效率当然会很低。
先说到这里,再慢慢琢磨。