此实验需要三台服务器:
一台服务器如下:
192.168.72.130 安装LAMP环境
1.yum 安装AP环境:
yum install httpd httpd-devel php php-devel php-mysql -y
2.安装数据库 详见以下链接:
http://jiaxinwang.blog.51cto.com/12273793/1935065
3.启动httpd服务
systemctl start httpd
4. 关闭防火墙和selinux服务或者加上相应的端口
systemctl stop firewalld

setenforce 0
5.下载discuz网站模板(下载在/var/www/html目录下)
wget http://download.comsenz.com/DiscuzX/3.2/Discuz_X3.2_SC_UTF8.zip
6.解压
unzip Discuz_X3.2_SC_UTF8.zip
由于网站代码在upload 所以把upload文件夹的文件移动到发布目录下
7.发现目录不存在和不可写;给权限
chmod -R 757 data/ config/ uc_client/ uc_server/

setenforce 也要关掉
8.在发布目录下找到config_global.php文件修改文件
目录:/var/www/html/config
修改为:$_config['db']['1']['dbhost'] = '192.168.1.156';
9.创建数据库
数据库名:服务器的IP或者域名 192.168.72.130
数据库名:在数据库中创建个数据库
数据库用户名:root
数据库密码:123456
再加个密码,其他默认
创建数据库的命令:create database discuz;
10.当下一步时出现Host '192.168.1.156' is not allowed to connect to this MySQL server这个错误时;
解决:给数据库root一个可以远程访问的权限
grant all on *.* to root@'%' identified by '123456';
然后问题解决,下一步,等待安装完成!
11.下载redis 本实验使用的是redis-2.8.18
cd /usr/src

wget http://download.redis.io/releases/redis-2.8.18.tar.gz

解压:tar zvxf redis-2.8.18.tar.gz

进入解压目录:cd redis-2.8.18/
预编译: make PREFIX=/usr/local/redis install
安装:make && make install
12.将安装目录的bin文件的文件做个软连接到/usr/bin/下
ln -s /usr/local/redis/bin/* /usr/bin/
13.在解压目录下有redis.conf配置文件 拷贝到安装目录下
cp /usr/src/redis-2.8.18/redis.conf /etc/redis/
14.启动redis
进入配置文件
vim /etc/redis/redis.conf

将daemonize no 改为daemonize yes
保存、退出
启动接配置文件 redis-server /etc/redis/redis.conf
ps -ef | grep redis

root     53762     1  0 17:53 ?        00:00:06 redis-server *:6379

root     54130  1700  0 18:24 pts/0    00:00:00 grep --color=auto redis
15.到发布目录下修改config_global.php文件
/var/www/html/config

$_config['memory']['redis']['server'] = '192.168.1.135';####改为redis服务器IP地址
16.在redis服务器输入 redis-cli进入redis
在论坛上随便点击(产生keys值)然后在redis服务器输入keys *查看keys值
发现没有 因为php没有redis模块,要添加phpredis模块
(做个php测试页面,如果找不到redis说明没有redis模块)
17.下载安装phpredis
wget https://github.com/phpredis/phpredis/archive/3.1.2.tar.gz
tar zvxf 3.1.2.tar.gz
cd phpredis-3.1.2/
phpize(php初始化)
./configure --with-php-config=/usr/bin/php-config --enable-redis(预编译)
make && make install(安装)
18.在php配置文件中添加redis模块
vim /etc/php.ini

extension_dir = "/usr/lib64/php/modules/"

extension=redis.so
18.重启httpd服务
systemctl restart httpd
19.再去论坛点几下,产生keys值,然后去redis看下有没有keys值产生
127.0.0.1:6379> keys *
 1) "iducIG_announcements"
 2) "iducIG_common_member_count_1"
 3) "iducIG_magic"
 4) "iducIG_usergroup_7"
 5) "iducIG_forumlinks"
 6) "iducIG_onlinerecord"
 7) "iducIG_common_member_status_1"
 8) "iducIG_plugin"
 9) "iducIG_diytemplatenamehome"
10) "iducIG_historyposts"
11) "iducIG_forum_index_page_1"
12) "iducIG_userstats"
13) "iducIG_common_member_field_home_1"
14) "iducIG_pluginlanguage_script"
15) "iducIG_onlinelist"
16) "iducIG_creditrule"
17) "iducIG_common_member_1"
18) "iducIG_usergroup_1"
19) "iducIG_pluginlanguage_system"
20) "iducIG_diytemplatename"
21) "iducIG_stamps"
22) "iducIG_forum_guide"
23) "iducIG_home_follow_1"
24) "iducIG_common_member_profile_1"
25) "iducIG_cronpublish"
26) "iducIG_forums"
27) "iducIG_common_member_field_forum_1"
28) "iducIG_style_default"
29) "iducIG_cronnextrun"
30) "iducIG_profilesetting"
31) "iducIG_userapp"
32) "iducIG_posttable_info"
33) "iducIG_usergroups"
34) "iducIG_setting"
35) "iducIG_diytemplatenameforum"
36) "iducIG_heats"
127.0.0.1:6379>
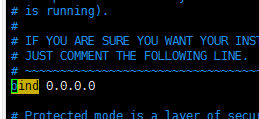
#vim /usr/redis/redis.conf
将主库bind 127.0.0.1 改为 bind 0.0.0.0保存退出
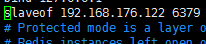
#vim /usr/redis/redis.conf
从库在bind下添加一行
启动redisz主库和从库
注:防火墙和setenforce