复习巩固一下这些基础的知识。参考了老罗的视频和文档。
这块地方如果做应用开发的话,基本上每个都会要用到。
- 5种布局
android提供了5种布局,分别是FrameLayout(框架布局),LinearLayout(线性布局),RelativeLayout(相对布局),TableLayout (表格布局),AbsoluteLayout(绝对布局)等。
在Android系统中,可视化控件都是从Android.view.View继承的。在设置点击监听的时候要选择View的监听,不要选成了Dialog的监听。
开发者可以通过xml的方式来布局这些view,基本上app的开发都是使用的这一种,类似与J2ee中的jsp。
也可以完全使用java代码来创建View,这个在各种开发sdk中会用到,方便用户集成。
这篇文章主要讲解xml的布局方式。
- xml定义视图
Xml布局文件是android系统中定义的视图常用方法,所有的布局文件必须包含在res/layout目录中。定义XML布局的命名和定义注意事项如下:
xml布局文件必须是以xml文件名结束,命名必须是符合java的规范
xml布局文件的根节点必须是包含android的命名空间,命名空间必须是xmlns:android=http://schemas.android.com/apk/res/android
为xml文件布局中的标签指定的id需要使用这样的格式: android:id=“@+id/标签名称“该标记会保存在R文件中。android:id=“@id/标签名称“表示引起已经声明过的ID。
每一个视图的id都会在R类中生成与之对应的变量,因此视图ID的值必须是符合java规范的
-
使用XML布局文件定义视图
如果是要使用xml布局文件,通常需要oncreate方法中使用setContentView来加载指定的xml布局文件
@Override
public void onCreate(Bundle savedInstanceState) {
super.onCreate(savedInstanceState);
setContentView(R.layout.main);
获得xml布局文件注意一下几点:
使用findViewById之前需要使用setContentView先加载xml文件、布局文件会抛出异常信息。也就是说findViewById方法要在setContentView之后才能使用。
所有的的xml文件布局文件的视图id都在R类生成相对应的变量
-
Android中长度单位介绍
Android表示单位长度的方式通常有三种表示方式。
px:表示屏幕实际的象素。例如,320*480的屏幕在横向有320个象素,在纵向有480个象素。
dp(dip): 是屏幕的物理尺寸。大小为1英寸的1/72。
sp(与刻度无关的像素):与dp类似,但是可以根据用户的字体大小首选项进行缩放。
具体可以参考下: http://www.cnblogs.com/greatverve/archive/2011/12/28/android-dip-dp-sp-pt-px.html
设计技巧:
如果设置表示长度、高度等属性时可以使用dp 或sp。但如果设置字体,需要使用sp。
dp是与密度无关,sp除了与密度无关外,还与scale无关
如果使用dp和sp,系统会根据屏幕密度的变化自动进行转换。
-
Android布局中常用属性介绍
layout_margin是控件边缘相对于父控件的边距

layout_padding是控件内容相对于控件边缘的边距

gravity和layout_gravity的区别
android:gravity与android:layout_gravity
他们的区别在于:android:gravity用于设置View组件的对齐方式,而android:layout_gravity用于设置Container组件的对齐方式。


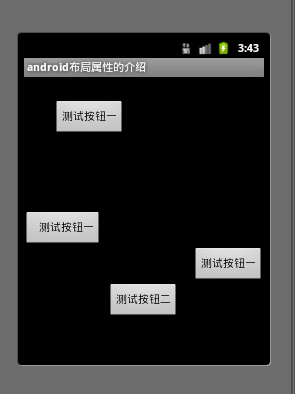
 1 <?xml version="1.0" encoding="utf-8"?>
 2 <LinearLayout xmlns:android="http://schemas.android.com/apk/res/android"
 3     android:orientation="vertical" android:layout_width="fill_parent"
 4     android:layout_height="fill_parent">
 5     <Button android:id="@+id/button" android:layout_width="wrap_content"
 6         android:layout_marginTop="30dp" android:layout_marginLeft="40dp"
 7         android:layout_marginRight="60dp" android:layout_marginBottom="100dp"
 8         android:layout_height="wrap_content" android:text="测试按钮一"></Button>
 9
10     <Button android:id="@+id/button2" android:layout_width="wrap_content"
11         android:layout_height="wrap_content" android:paddingLeft="20sp"
12         android:paddingTop="5sp" android:text="测试按钮一"></Button>
13
14     <Button android:id="@+id/button3" android:layout_width="wrap_content"
15         android:layout_gravity="right" android:layout_height="wrap_content"
16         android:text="测试按钮一"></Button>
17     <Button android:id="@+id/button3" android:layout_width="wrap_content"
18         android:layout_gravity="center" android:layout_height="wrap_content"
19         android:text="测试按钮二"></Button>
20 </LinearLayout>
效果图:
- 线性布局
线性布局是最常用的布局线性布局在xml文件中使用<LinearLayout>来定义
线性布局可以分为水平和垂直的方向的布局,可以通过android:orientation=“vertical”来定义方向,该属性可以有horizontal和vertical两个方向。
<LinearLayout>标签中有一个很重要的属性gravity,该属性用于控制布局中视图的位置,如果设置多个值需要使用 | 进行分隔。
android:layout_weight权重的描述 layout_weight 用于给一个线性布局中的诸多视图的重要度赋值。 所有的视图都有一个layout_weight值,默认为零,意思是需要显示 多大的视图就占据多大的屏幕空 间。若赋一个高于零的值,则将父视 图中的可用空间分割,分割大小具体取决于每一个视图的layout_weight 值以及该值在当前屏幕布局的整体 layout_weight值和在其它视图屏幕布 局的layout_weight值中所占的比率而定。layout_weight越小,显示比例越大
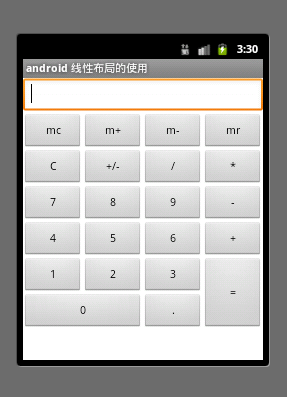
  1 <?xml version="1.0" encoding="utf-8"?>
  2 <LinearLayout xmlns:android="http://schemas.android.com/apk/res/android"
  3     android:orientation="vertical" android:layout_width="match_parent"
  4     android:layout_height="match_parent" android:background="#FFFFFF">
  5
  6     <LinearLayout android:orientation="horizontal"
  7         android:layout_width="match_parent" android:layout_height="wrap_content">
  8         <EditText android:id="@+id/msg" android:layout_width="match_parent"
  9             android:layout_height="wrap_content"></EditText>
 10     </LinearLayout>
 11     <!-- 布局可以嵌套布局 -->
 12     <LinearLayout android:orientation="horizontal"
 13         android:layout_width="match_parent" android:layout_height="wrap_content">
 14         <Button android:layout_width="match_parent"
 15             android:layout_height="wrap_content" android:text="mc"
 16             android:layout_weight="1"></Button>
 17         <Button android:layout_width="match_parent"
 18             android:layout_weight="1" android:layout_height="wrap_content"
 19             android:text="m+"></Button>
 20         <Button android:layout_width="match_parent"
 21             android:layout_weight="1" android:layout_height="wrap_content"
 22             android:text="m-"></Button>
 23         <Button android:layout_width="match_parent"
 24             android:layout_weight="1" android:layout_height="wrap_content"
 25             android:text="mr"></Button>
 26     </LinearLayout>
 27
 28     <LinearLayout android:orientation="horizontal"
 29         android:layout_width="match_parent" android:layout_height="wrap_content">
 30         <Button android:layout_width="match_parent"
 31             android:layout_height="wrap_content" android:text="C"
 32             android:layout_weight="1"></Button>
 33         <Button android:layout_width="match_parent"
 34             android:layout_height="wrap_content" android:text="+/-"
 35             android:layout_weight="1"></Button>
 36         <Button android:layout_width="match_parent"
 37             android:layout_height="wrap_content" android:text="/"
 38             android:layout_weight="1"></Button>
 39         <Button android:layout_width="match_parent"
 40             android:layout_height="wrap_content" android:text="*"
 41             android:layout_weight="1"></Button>
 42     </LinearLayout>
 43     <LinearLayout android:orientation="horizontal"
 44         android:layout_width="match_parent" android:layout_height="wrap_content">
 45         <Button android:layout_width="match_parent"
 46             android:layout_height="wrap_content" android:text="7"
 47             android:layout_weight="1"></Button>
 48         <Button android:layout_width="match_parent"
 49             android:layout_height="wrap_content" android:text="8"
 50             android:layout_weight="1"></Button>
 51         <Button android:layout_width="match_parent"
 52             android:layout_height="wrap_content" android:text="9"
 53             android:layout_weight="1"></Button>
 54         <Button android:layout_width="match_parent"
 55             android:layout_height="wrap_content" android:text="-"
 56             android:layout_weight="1"></Button>
 57     </LinearLayout>
 58     <LinearLayout android:orientation="horizontal"
 59         android:layout_width="match_parent" android:layout_height="wrap_content">
 60         <Button android:layout_width="match_parent"
 61             android:layout_height="wrap_content" android:text="4"
 62             android:layout_weight="1"></Button>
 63         <Button android:layout_width="match_parent"
 64             android:layout_height="wrap_content" android:text="5"
 65             android:layout_weight="1"></Button>
 66         <Button android:layout_width="match_parent"
 67             android:layout_height="wrap_content" android:text="6"
 68             android:layout_weight="1"></Button>
 69         <Button android:layout_width="match_parent"
 70             android:layout_height="wrap_content" android:text="+"
 71             android:layout_weight="1"></Button>
 72     </LinearLayout>
 73
 74     <LinearLayout android:orientation="horizontal"
 75         android:layout_width="match_parent" android:layout_height="wrap_content">
 76         <LinearLayout android:layout_weight="3"
 77             android:orientation="vertical" android:layout_width="wrap_content"
 78             android:layout_height="wrap_content">
 79
 80             <LinearLayout android:orientation="horizontal"
 81                 android:layout_width="match_parent" android:layout_height="wrap_content">
 82                 <Button android:layout_width="match_parent"
 83                     android:layout_height="wrap_content" android:text="1"
 84                     android:layout_weight="1"></Button>
 85                 <Button android:layout_width="match_parent"
 86                     android:layout_height="wrap_content" android:text="2"
 87                     android:layout_weight="1"></Button>
 88                 <Button android:layout_width="match_parent"
 89                     android:layout_height="wrap_content" android:text="3"
 90                     android:layout_weight="1"></Button>
 91             </LinearLayout>
 92
 93             <LinearLayout android:orientation="horizontal"
 94                 android:layout_width="match_parent" android:layout_height="wrap_content">
 95                 <Button android:layout_width="0px" android:layout_height="wrap_content"
 96                     android:text="0" android:layout_weight="2"></Button>
 97                 <Button android:layout_width="0px" android:layout_height="wrap_content"
 98                     android:text="." android:layout_weight="1"></Button>
 99             </LinearLayout>
100         </LinearLayout>
101         <LinearLayout android:orientation="horizontal"
102             android:layout_width="wrap_content" android:layout_weight="1"
103             android:layout_height="match_parent">
104             <Button android:layout_width="match_parent"
105                 android:layout_height="match_parent" android:text="="
106                 android:layout_weight="1"></Button>
107         </LinearLayout>
108     </LinearLayout>
109 </LinearLayout>
显示效果图:
在xml里面有一个android:layout_width="0px" 的让人很困惑,google一下。
参考链接http://www.cnblogs.com/mybkn/articles/2535519.html 解释的很清楚:
- 框架布局FrameLayOut
框架布局是最简单的布局方式、所有添加到这个布局中的视图都是以层叠的方式显示。第一个添加到框架布局中的视图显示在最底层,最后一个被放在最顶层,上一层的视图会覆盖下一层的视图,因此框架布局类似堆栈布局。
属性值 描述
top 将视图放到屏幕的顶端
Buttom 将视图放到屏幕的底端
Left 将视图放在屏幕的左侧
Right 将视图放在屏幕的右侧
Center_vertical 将视图按照垂直方向居中显示
horizontal_vertical 将视图按照水平方向居中显示
 1 <?xml version="1.0" encoding="utf-8"?>
 2 <FrameLayout xmlns:android="http://schemas.android.com/apk/res/android"
 3     android:layout_width="fill_parent"
 4     android:layout_height="fill_parent"
 5     android:orientation="vertical" >
 6
 7     <ImageView
 8         android:layout_width="fill_parent"
 9         android:layout_height="wrap_content"
10         android:layout_gravity="center"
11         android:background="@drawable/background" >
12     </ImageView>
13
14     <ImageView
15         android:layout_width="85dp"
16         android:layout_height="85dp"
17          android:layout_gravity="center"
18         android:layout_marginBottom="80dip"
19
20         android:background="@drawable/superman" >
21     </ImageView>
22
23     <ImageView
24         android:layout_width="63dp"
25         android:layout_height="46dp"
26         android:layout_gravity="center"
27         android:layout_marginTop="80dip"
28         android:background="@drawable/bird" >
29     </ImageView>
30
31 </FrameLayout>
效果图:

- RelativeLayout相对布局
RelativeLayout可以设置某一个视图相对于其他视图的位置,这些位置可以包括上下左右等
属性 说明
android:layout_below 在某元素的下方
android:layout_above 在某元素的的上方
android:layout_toLeftOf 在某元素的左边
android:layout_toRightOf 在某元素的右边
 1 <?xml version="1.0" encoding="utf-8"?>
 2 <RelativeLayout xmlns:android="http://schemas.android.com/apk/res/android"
 3     android:gravity="center" android:layout_width="fill_parent"
 4     android:layout_height="fill_parent">
 5
 6     <Button android:id="@+id/button1" android:layout_width="wrap_content"
 7         android:layout_height="wrap_content" android:text="Button1"
 8         android:textSize="16dp"></Button>
 9
10     <Button android:layout_width="wrap_content" android:id="@+id/button2"
11         android:layout_height="wrap_content" android:text="Button2"
12         android:textSize="16dp" android:layout_toRightOf="@id/button1"
13         android:layout_below="@id/button1"></Button>
14
15     <Button android:id="@+id/button3" android:layout_width="wrap_content"
16         android:layout_height="wrap_content" android:text="Button3"
17         android:textSize="16dp" android:layout_toLeftOf="@id/button2"
18         android:layout_below="@id/button2"></Button>
19
20     <Button android:id="@+id/button4" android:layout_width="wrap_content"
21         android:layout_height="wrap_content" android:text="Button4"
22         android:textSize="16dp" android:layout_toRightOf="@id/button2"
23         android:layout_above="@id/button2"></Button>
24
25     <Button android:id="@+id/button5" android:layout_width="wrap_content"
26         android:layout_height="wrap_content" android:text="Button5"
27         android:textSize="16dp" android:layout_toRightOf="@id/button2"
28         android:layout_below="@id/button2"></Button>
29 </RelativeLayout>
效果图:

- 绝对布局AbsoluteLayout
所谓绝对布局(AbsoluteLayout),是指屏幕中所有控件的摆放由开发人员通过设置控件的坐标来指定,控件容器不再负责管理其子控件的位置。由于子控件的位置和布局都是通过坐标来指定,因此AbsoluteLayout类中没有特殊的属性和方法。 可以通过android:layout_x和android:layout_y属性可以设置视图的横坐标和纵坐标的位置。
- TableLayout布局
在TableLayout布局中,一个列的宽度由该列中最宽的那个单元格指定,而表格的宽度是由父容器指定的。在TableLayout中,可以为列设置三种属性: Shrinkable:如果一个列被标识为Shrinkable,则该列的宽度可以进行收缩,以使表格能够适应其父容器的大小。 Stretchable:如果一个列被标识为Stretchable,则该列的宽度可以进行拉伸,以使填满表格中的空闲空间。 Collapsed:如果一个列被标识为Collapsed,则该列会被隐藏 注意:一个列可以同时具有Shrinkable属性和Stretchable属性,在这种情况下,该列的宽度将任意拉伸或收缩以适应父容器
TableLayout继承自LinearLayout类,除了继承来自父类的属性和方法,TableLayout类中还包含表格布局所特有的属性和方法,如下表:
属性名称 对应方法 描述
android:collapseColumns setColumnCollapsed(int,boolean) 设置指定列号的列属性为Collapsed
android:shrinkColumns setShrinkAllColumns(boolean) 设置指定列号的列属性为Shrinkable
android:stretchColumns setStretchAllColumns(boolean) 设置指定列号的列属性为Stretchable
注意:TableLayout中所谓的列序号是从0开始计算的。setShrinkAllColumns和setStretchAllColumns实现的功能是将表格中的所有列设置为Shrinkable或Stretchable。
它是由多个TableRow对象组成,每个TableRow可以有0个或多个单元格,每个单元格就是一个View。这些TableRow,单元格不能设置layout_width,宽度默认是fill_parent的,只有高度layout_height可以自定义,默认是wrap_content。
 1 <?xml version="1.0" encoding="utf-8"?>
 2 <LinearLayout xmlns:android="http://schemas.android.com/apk/res/android"
 3     android:orientation="vertical" android:layout_width="fill_parent"
 4     android:layout_height="fill_parent">
 5
 6     <TableLayout android:id="@+id/tablelayout1"
 7         android:layout_width="fill_parent" android:layout_height="wrap_content"
 8         android:background="#FFFFFF" android:stretchColumns="0">
 9         <TableRow android:id="@+id/tablerow1" android:layout_width="fill_parent"
10             android:layout_height="wrap_content">
11             <TextView android:id="@+id/textview1" android:layout_width="wrap_content"
12                 android:layout_height="wrap_content" android:background="#fd8d8d"
13                 android:textColor="#000000"
14                 android:padding="4px"
15                 android:text="表格布局的使用"
16                 android:layout_centerInParent="true">
17             </TextView>
18         </TableRow>
19     </TableLayout>
20
21     <TableLayout android:id="@+id/mytablelayout2"
22         android:layout_width="match_parent" android:layout_height="wrap_content"
23         android:stretchColumns="0,1,2,3">
24
25         <TableRow android:id="@+id/tablerow2" android:layout_width="fill_parent"
26             android:layout_height="wrap_content">
27             <Button android:id="@+id/button1" android:layout_width="wrap_content"
28                 android:layout_height="wrap_content" android:text="Button1"></Button>
29             <Button android:id="@+id/button1" android:layout_width="wrap_content"
30                 android:layout_height="wrap_content" android:text="Button2"></Button>
31             <Button android:id="@+id/button1" android:layout_width="wrap_content"
32                 android:layout_height="wrap_content" android:text="Button3"></Button>
33             <Button android:id="@+id/button1" android:layout_width="wrap_content"
34                 android:layout_height="wrap_content" android:text="Button4"></Button>
35         </TableRow>
36     </TableLayout>
37
38     <TableLayout android:id="@+id/tablelayout3"
39         android:layout_width="fill_parent" android:layout_height="wrap_content"
40         android:stretchColumns="0">
41         <TableRow android:id="@+id/tablerow3" android:layout_width="fill_parent"
42             android:layout_height="wrap_content">
43
44             <EditText android:text="查询" android:layout_width="match_parent"
45                 android:layout_height="match_parent" android:id="@+id/textview1"></EditText>
46         </TableRow>
47     </TableLayout>
48 </LinearLayout>
效果图:
