今天自习写ExpandListView的作业,昨天没写博客就是去写作业去了。
今天来说昨天内容吧!
其实ExpandListView和ListView的用法大同小异。
首先就是创建一个自己的适配器(现在好像只会写自定义的适配器)
创建的时候继承BaseExpandListView,然后实现里面的方法。

这里一个个方法重写下,出来getView的两个方法难写点,其他的还都简单。
一个个解释哈,我们刚开始实现接口的抽象方法后,创建自己需要的字符串,
就拿手机QQ的联系人界面来说
group的作用就是给分组命名的字符串,每个都有一个字符串,所以用字符串数组
child就是你分组的人,以此类推是不是就是二维字符串数组。
至于geyan我这边想写那个个性签名的那些话传过来
getGroupCount:返回分组的个数
getChildrenCount:分组里面的二级菜单个数。(二级菜单就是联系人,比如特别关心里面的张三)
getGroup:就是获得这个组当前的下标的值
getChild:就是获得这个二级菜单当前的下标的值
getGroupId:给每个分组分配id=下标
getChildId:你懂的
hasStableIds:这个是看数据是否稳定,就是是否有重复id,大概这个意思,我一般是true,稳定总 是好的,当然视情况而定吧
getGroupView:这个懂吧,先得在layout里写好布局,然后实例化连接它。然后就给它连接控件进行操作。
getChildView:这个就是给二级菜单用的布局,也得写好布局xml,千万不要搞混了,或者传个控件给实例化。
isChildSelectable:这个是说二级菜单可不可选。


继续,我们写好适配器就是连接ExpandListView。

自己写的适配器new个对象,三个参数就是一个字符串数组做分组,两个字符串二维数组做二级菜单的内容。然后就是监听,第一个是二级菜单的监听,第二个是分组的监听。
还是比较简单的,然后自己注意写好三个布局,应该不会难看(本活动的布局,分组的布局,二级菜单的布局)
我做出的效果就是如图:

做了一些修饰,其实我把这个融入到我昨天写的界面里去了。
会不会奇怪为啥有那个三角形不打开是右边,打开却在下面。这里说下选择器。
在drawable里面创建一个select.xml。然后在里面写:
这里的作用就是看你这个是不是展开的,如果不是就右三角形,这两个三角形是在阿里巴巴矢量图标库里下载过来的。
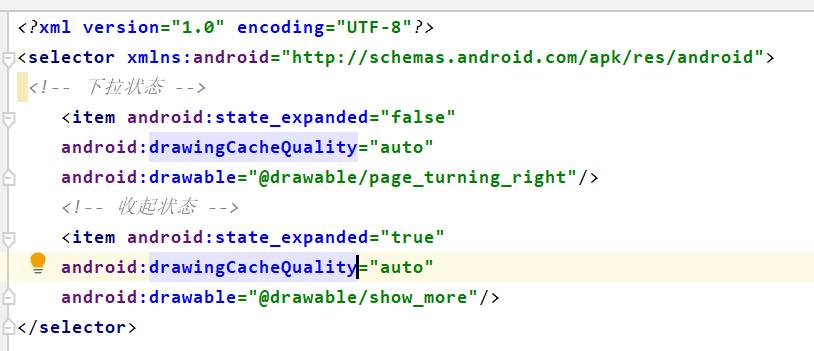
怎么用呢?,展开是expand,我们学的也是ExpandListView,肯定是在布局中找到控件并搞地址。

可以看到groupIndicator,这个就是它的指针图标,选择器就相当于监听。
l
补充个内容,就是图片的裁剪,变圆形,这个得自己写个Bitmap,
package com.example.listview;
import android.content.Context;
import android.graphics.Bitmap;
import android.graphics.Canvas;
import android.graphics.Matrix;
import android.graphics.Paint;
import android.graphics.PorterDuff;
import android.graphics.PorterDuffXfermode;
import android.graphics.Rect;
import android.graphics.drawable.BitmapDrawable;
import android.graphics.drawable.Drawable;
import android.util.AttributeSet;
import android.widget.ImageView;
public class MyImage extends androidx.appcompat.widget.AppCompatImageView {
private Paint paint = new Paint();
public MyImage(Context context) {
super(context);
}
public MyImage(Context context, AttributeSet attrs) {
super(context, attrs);
}
public MyImage(Context context, AttributeSet attrs, int defStyle) {
super(context, attrs, defStyle);
}
//将头像按比例缩放
private Bitmap scaleBitmap(Bitmap bitmap){
int width = getWidth();
//一定要强转成float 不然有可能因为精度不够 出现 scale为0 的错误
float scale = (float)width/(float)bitmap.getWidth();
Matrix matrix = new Matrix();
matrix.postScale(scale, scale);
return Bitmap.createBitmap(bitmap, 0, 0, bitmap.getWidth(), bitmap.getHeight(), matrix, true);
}
//将原始图像裁剪成正方形
private Bitmap dealRawBitmap(Bitmap bitmap){
int width = bitmap.getWidth();
int height = bitmap.getHeight();
//获取宽度
int minWidth = width > height ? height:width ;
//计算正方形的范围
int leftTopX = (width - minWidth)/2;
int leftTopY = (height - minWidth)/2;
//裁剪成正方形
Bitmap newBitmap = Bitmap.createBitmap(bitmap,leftTopX,leftTopY,minWidth,minWidth,null,false);
return scaleBitmap(newBitmap);
}
@Override
protected void onDraw(Canvas canvas) {
Drawable drawable = getDrawable();
if (null != drawable) {
Bitmap rawBitmap =((BitmapDrawable)drawable).getBitmap();
//处理Bitmap 转成正方形
Bitmap newBitmap = dealRawBitmap(rawBitmap);
//将newBitmap 转换成圆形
Bitmap circleBitmap = toRoundCorner(newBitmap, 14);
final Rect rect = new Rect(0, 0, circleBitmap.getWidth(), circleBitmap.getHeight());
paint.reset();
//绘制到画布上
canvas.drawBitmap(circleBitmap, rect, rect, paint);
} else {
super.onDraw(canvas);
}
}
private Bitmap toRoundCorner(Bitmap bitmap, int pixels) {
//指定为 ARGB_4444 可以减小图片大小
Bitmap output = Bitmap.createBitmap(bitmap.getWidth(), bitmap.getHeight(), Bitmap.Config.ARGB_4444);
Canvas canvas = new Canvas(output);
final int color = 0xff424242;
final Rect rect = new Rect(0, 0,bitmap.getWidth(), bitmap.getHeight());
paint.setAntiAlias(true);
canvas.drawARGB(0, 0, 0, 0);
paint.setColor(color);
int x = bitmap.getWidth();
canvas.drawCircle(x / 2, x / 2, x / 2, paint);
paint.setXfermode(new PorterDuffXfermode(PorterDuff.Mode.SRC_IN));
canvas.drawBitmap(bitmap, rect, rect, paint);
return output;
}
}
这个就是自己创个class,写进去就行
然后自己用图片的时候就<MyImage 等提示找到那个路径和自己差不多的,
<com.example.listview.MyImage
    android:id="@+id/image_p"
    android:layout_width="60dp"
    android:layout_height="60dp"
    android:layout_margin="10dp"
    android:src="@drawable/pika1"

    />
用法和ImageView一样。

再提一下自己改标题,每次是不是看着那个标题总是自己的项目名称,是不是看着不爽。
我们先写一个自己想要的标题,本牛崽这边是title_right
再到你的活动相对应的布局里去调用这句话
<include layout="@layout/title_right"></include>
你会发现有两个标题在那排着,
这个时候得到活动里去隐藏默认的标题。
在onCreate方法里,
ActionBar actionbar = getSupportActionBar();
if (actionbar != null) {
    actionbar.hide();
}
本牛崽百度搞到的,
就这些了。。。好像还比较简单吧,得自己多打,现在有的兄弟姐妹前面的代码没打,每天听理论,现在都不知道下手了。
一定得多敲,脑子记忆会刷新,手指记忆会记很久。