系统版本说明


[root@db01 data]# uname -r
3.10.0-693.el7.x86_64
[root@db01 data]# cat /etc/os-release
NAME="CentOS Linux"
VERSION="7 (Core)"
ID="centos"
ID_LIKE="rhel fedora"
VERSION_ID="7"
PRETTY_NAME="CentOS Linux 7 (Core)"
ANSI_COLOR="0;31"
CPE_NAME="cpe:/o:centos:centos:7"
HOME_URL="https://www.centos.org/"
BUG_REPORT_URL="https://bugs.centos.org/"

CENTOS_MANTISBT_PROJECT="CentOS-7"
CENTOS_MANTISBT_PROJECT_VERSION="7"
REDHAT_SUPPORT_PRODUCT="centos"
REDHAT_SUPPORT_PRODUCT_VERSION="7"
1.下载源码包
下载地址:https://downloads.mysql.com/archives/community/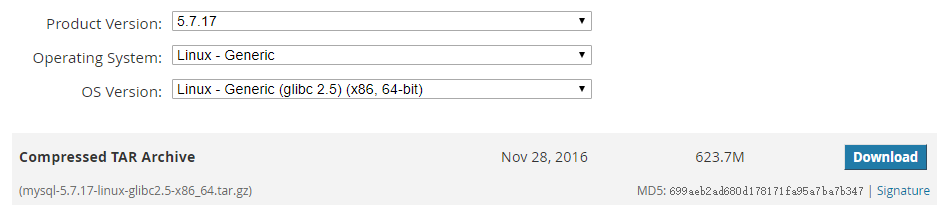
1 yum install -y lrzsz bash-completion #下载常用软件包、命令提示工具
2.解压数据包
1  mkdir  -p /server/tools #创建压缩包存放位置
2  cd  /server/tools
3  rz  -y #上传数据库包
4  tar  xf mysql-5.7.17-linux-glibc2.5-x86_64.tar.gz  #解压文件
5  mkdir  -p /application/mysql-5.7.17       #创建目录
6  cd  mysql-5.7.17-linux-glibc2.5-x86_64
7  mv  * /application/mysql-5.7.17/  #移动文件
8  mkdir  -p /application/mysql-5.7.17/data  #创建数据存储目录
9  useradd  -s /sbin/nologin -M mysql  #创建mysql用户
10  chown  -R mysql.mysql /application/mysql-5.7.17/data  #授权
11 chown -R mysql.mysql /application/mysql5.6.34 #如果出现了权限问题,记得将数据的目录给到文件权限,而不软链接权限
3.初始化数据库
1  yum   install   libaio   #安装静态依赖库
2  /application/mysql-5.7.17/bin/mysqld  --initialize --basedir=/application/mysql-5.7.17  --datadir=/application/mysql-5.7.17/data/  --user=mysql
root@localhost: T9j27b<Po(.E
4.修改配置文件
 1 cd /application/mysql-5.7.17/support-files #进入配置目录
 2 vim my.conf #编辑配置文件
 3 #
 4 [server] #此处可以设置多种服务,但是在测试环境下可以使用server
 5 user=mysql
 6 basedir=/application/mysql-5.7.17
 7 datadir=/application/mysql-5.7.17/data
 8 socket=/application/mysql-5.7.17/db01.sock #此处db01为当前主机名称
 9 log-error=/var/log/mysql-5.7.17.log
10 pid-file=/application/mysql-5.7.17/db01.pid #此处db01为当前主机名称
11 port=3306
12 [client]#此处可以设置多种连接工具,但是尽量还是使用具体的方式连接
13 socket=/application/mysql-5.7.17/db01.sock #此处db01为当前主机名称
1 touch /application/mysql-5.7.17/db01.pid #创建文件
2 sed -i 's#/usr/local/mysql#/application/mysql-5.7.17#g' /application/mysql-5.7.17/bin/mysqld_safe  /application/mysql-5.7.17/support-files/mysql.server  #替换文件
5.启动与关闭服务
#启动
chown -R mysql.mysql /application/mysql-5.7.17 #授权
/application/mysql-5.7.17/support-files/mysql.server start #启动服务 方式1,默认使用/etc/my.conf配置文件
/application/mysql-5.7.17/bin/mysqld_safe --defaults-file=/application/mysql-5.7.17/support-files/my.conf & #方式2,可以指定配置文件路径
#关闭
/application/mysql-5.7.17/bin/mysqladmin -uroot -p'T9j27b<Po(.E' -S /application/mysql-5.7.17/anyux.sock -P3307 shutdown
#检查端口
ss -lntup | grep 33
6.连接服务
1 mysql -uroot -p'T9j27b<Po(.E'
2 mysql -uroot -p'root' -S /application/mysql-5.7.17/db01.sock #连接
/application/mysql-5.7.17/bin/mysqladmin -uroot -pT9j27b<Po(.E  password #使用初始密码修改密码,注意密码使用单引号括起来,此处直接回车,会交互式地在输入定义密码
#mysqladmin: [Warning] Using a password on the command line interface can be #insecure.
#New password: root 测试密码为root
#Confirm new password: root 测试密码为root
#Warning: Since password will be sent to server in plain text, use ssl connection #to ensure password safety.
7.查看用户

8.远程连接数据库
mysql> grant all on *.* to 'root'@'10.0.0.%' identified by 'root';
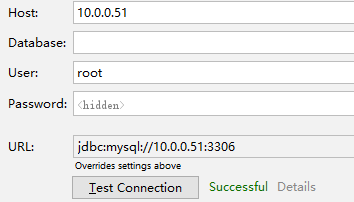
测试连接数据库
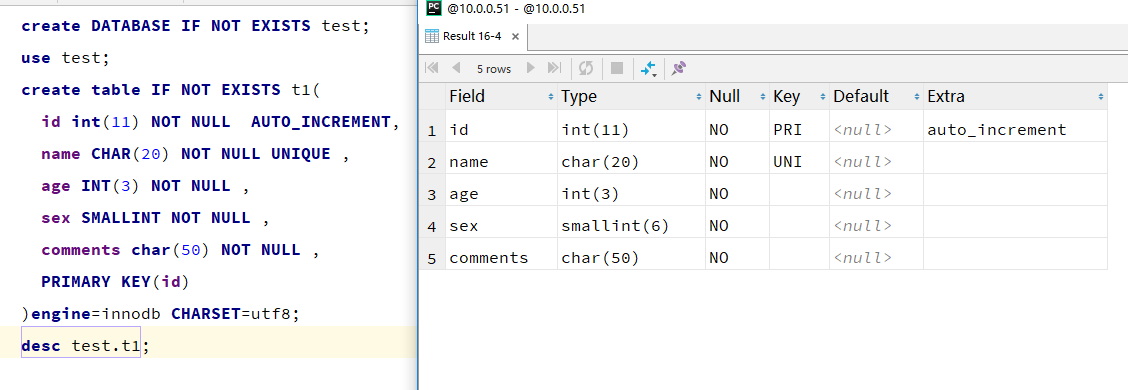
 1 create DATABASE IF NOT EXISTS test;
 2 use test;
 3 create table IF NOT EXISTS t1(
 4   id int(11) NOT NULL  AUTO_INCREMENT,
 5   name CHAR(20) NOT NULL UNIQUE ,
 6   age INT(3) NOT NULL ,
 7   sex SMALLINT NOT NULL ,
 8   comments char(50) NOT NULL ,
 9   PRIMARY KEY(id)
10 )engine=innodb CHARSET=utf8;
11 desc test.t1;
插入上面的代码并在pycharm中查看表结构
bash-completion
yum install -y http://repo.mysql.com/mysql57-community-release-el7-8.noarch.rpm

yum -y install mysql-server
默认配置文件路径:
配置文件:/etc/my.cnf
日志文件:/var/log/var/log/mysqld.log
服务启动脚本:/usr/lib/systemd/system/mysqld.service
socket文件:/var/run/mysqld/mysqld.pid
[mysqld]
#
# Remove leading # and set to the amount of RAM for the most important data
# cache in MySQL. Start at 70% of total RAM for dedicated server, else 10%.
# innodb_buffer_pool_size = 128M
#
# Remove leading # to turn on a very important data integrity option: logging
# changes to the binary log between backups.
# log_bin
#
# Remove leading # to set options mainly useful for reporting servers.
# The server defaults are faster for transactions and fast SELECTs.
# Adjust sizes as needed, experiment to find the optimal values.
# join_buffer_size = 128M
# sort_buffer_size = 2M
# read_rnd_buffer_size = 2M
datadir=/var/lib/mysql
socket=/var/lib/mysql/mysql.sock
server_id = 1
expire_logs_days = 3

# Disabling symbolic-links is recommended to prevent assorted security risks
symbolic-links=0

log-error=/var/log/mysqld.log
pid-file=/var/run/mysqld/mysqld.pid
systemctl restart mysqld.service
ps -ef | grep mysql
ss -anlnt | grep 3306
  grep "password" /var/log/mysqld.log  #此处显示密码
mysql -uroot -p
password: (输入密码)
重新启动mysqld
#/etc/init.d/mysqld restart ( service mysqld restart )
use mysql
update user set password=password("12345") where user="root";
mysql 5.7的数据库没有了password字段 用的是authentication_string字段
mysql> update mysql.user set authentication_string=password('root') where user='root' ;
flush privileges;