为什么是 Xcode 和 Swift
为什么是 Xcode 和 Swift? 原因很简单,我们不想做特效,只是想模拟 iOS 上真实的体验。Xcode 不是模拟动画,而像是一个 mini app,能给我们更接近真实的感受。
当然,Xcode 和 Swift 都有一定的学习曲线,但是就跟开始学习 Sketch 一样,开始阶段总是很难,很想放弃,这是人之常情。想想掌握之后的乐趣,会不会有动力一些?
这篇文章,会用 Xcode 和 Swift 做一个简单的动画。不会 Swift, 没用过 Xcode 都没有关系,我会把内容按照步骤呈现出来,方便你照着做。
第 1 步: 新建一个 Project
-
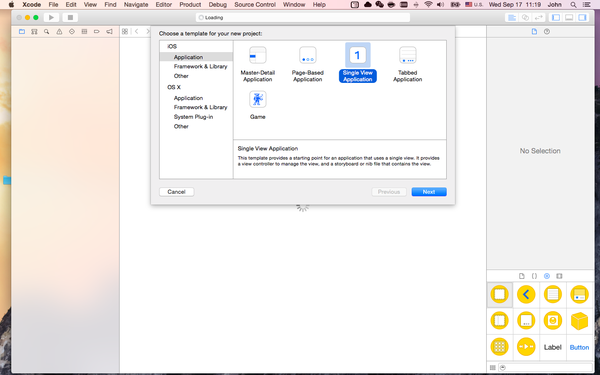
打开 Xcode,选择 Create a new Xcode project
-
模版中选择 Single View Application
-
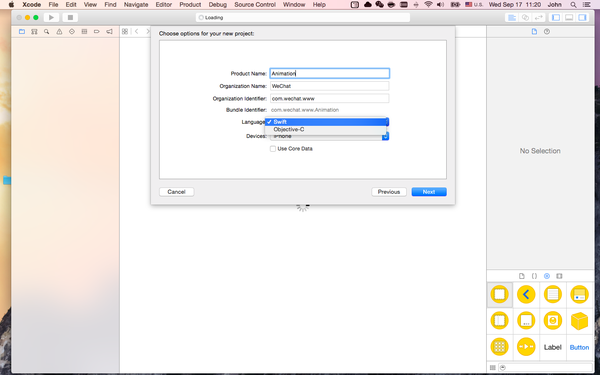
填写相关的信息,注意这里 Language 选择 Swift, Device 选择 iPhone
-
点击 next 之后,选择项目的保存位置,然后点击 Create
-
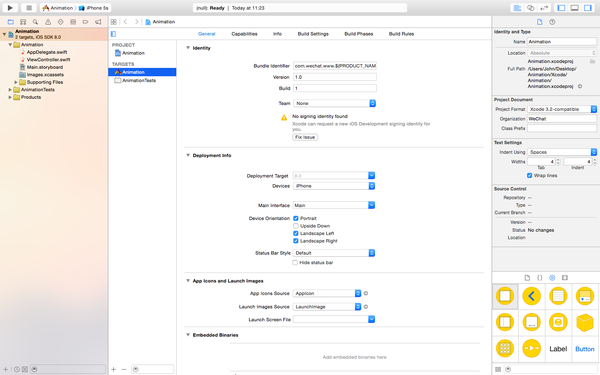
这样我们就新建了一个项目。
第 2 步: 在界面中绘制一个矩形
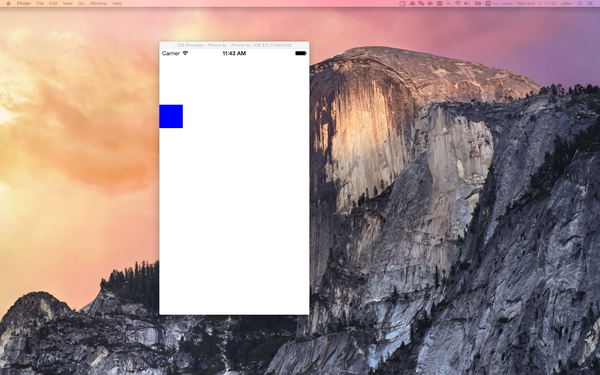
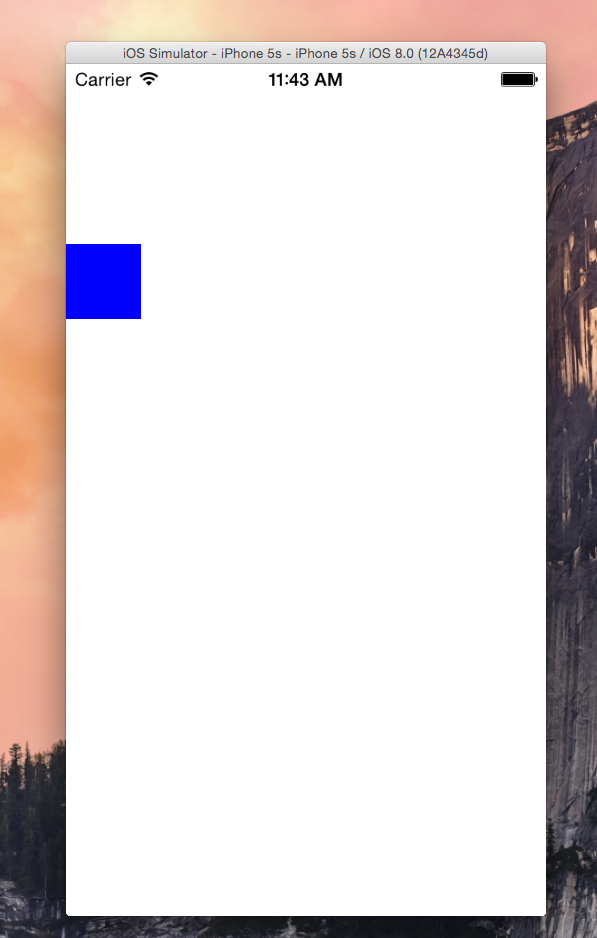
我们想在屏幕上绘制一个蓝色的正方形,像这样
-
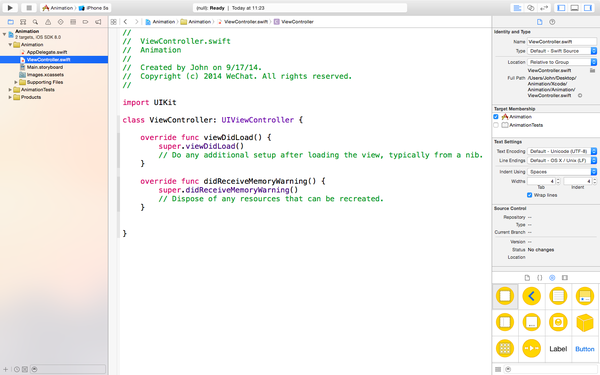
从左侧文件导航里,打开 ViewController.swift 这个文件
-
不要被这里的其他代码干扰,我们所要做的就是在 viewDidLoad() 这个函数里添加我们的代码
-
通过 let coloredSquare = UIView() 创建一个正方形。这里 let 表示创建的是一个常量。UIView 是 UIKit 提供的绘制图形的一个函数。
-
设置图形的背景颜色 coloredSquare.backgroundColor = UIColor.blueColor()
-
绘制图形的位置和大小 coloredSquare.frame = CGRectMake(0, 120, 50, 50) iOS 的坐标系统是从屏幕左上角开始的,也就是说左上角是(0, 0),所以我们绘制的是一个坐标为(0, 120),边长为 50 的一个矩形
-
将图形添加到视图当中 self.view.addSubview(coloredSquare)
-
点击左上角的三角形按钮,运行一下。可以看到图形被绘制到了一个 iPhone 模拟器当中。
代码如下:
         // Create and add a colored square
         let coloredSquare = UIView()

         // Set background color to blue
         coloredSquare.backgroundColor = UIColor.blueColor()

         // Set frame of the square
         coloredSquare.frame = CGRectMake(0, 120, 50, 50)

         // Add the square to the screen
         self.view.addSubview(coloredSquare)
通过这一步,四行代码我们就绘制出了一个简单图形,接下来我们为图形添加一个从左到右移动的动画。
第 3 步: 给图形添加动画效果
我们想让这个矩形从左到右移动,背景颜色由蓝色变为红色,可以通过这段代码实现:
         UIView.animateWithDuration(1.0, animations: {

             // Change the background color when animation ends
             coloredSquare.backgroundColor = UIColor.redColor()

             // Change the position of the square
             coloredSquare.frame = CGRectMake(320-50, 120, 50, 50)

         })
下面做以解释:
-
Apple 在 UIView 这个类当中提供了 animationWithDuration 函数,这个函数需要两个参数 1) 动画持续的时间 2) 动画结束的状态。其中动画结束的状态是通过定义在 block 中实现的,block 可以理解成是把一块代码当作参数传递给函数。
-
改变颜色的代码 coloredSquare.backgroundColor = UIColor.redColor()
-
改变正方形的位置 coloredSquare.frame = CGRectMake(320-50, 120, 50, 50) 这里 x 坐标为什么是 320 - 50?因为 iPhone 5s 横坐标有 320 points,矩形的宽为 50 points,为了完整显示矩形我们要让它横坐标为 320-50.
-
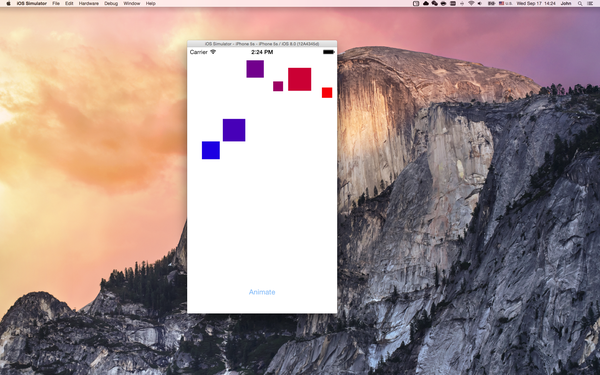
点击左上角运行按钮,可以看到 iOS 模拟器出现了这个小动画。
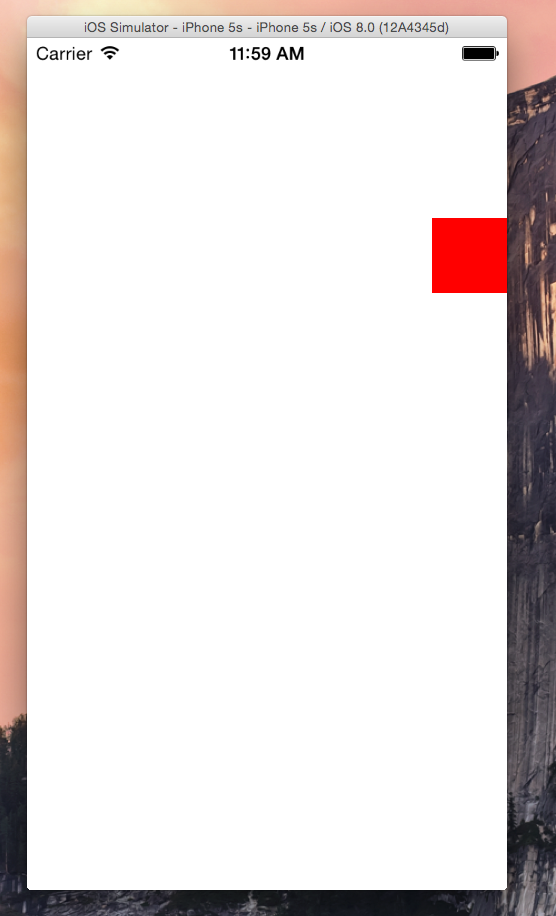
可以看到,我们只定义了初始状态和结束状态,以及过渡时间, iOS 帮助我们做了一个圆滑的过渡。
接下来我们要说明一些概念,只是为了更好地理解,可以选择跳过
第 4 步: 了解 animationWithDuration 方法
什么可以被动画
我们上面只对背景颜色和位置做了动画,UIView 还提供了对更多属性做动画的方法:
1. frame. 可以改变视图的大小和相对位置;
3. alpha. 改变视图的透明度;
4. backgroundColor. 改变视图背景颜色;
5. contentStretch. 改变视图内容填充到整个空间中。
更多动画方法
Apple 给了我们四个动画函数,上面我们只是用了最简单的一个。下面是对这四个函数的简要说明:
1. 简单动画函数
            UIView.animateWithDuration(duration, {
 })
这也是我们上面所使用的,只有两个变量:
* duration. 动画所需要的时间(秒)
* animation. 定义动画
2. 包含结束方法的动画方法
 UIView.animateWithDuration(duration, animations: {
 }, completion: { finished in
 })
增加了一个变量completion,它定义了当动画完成时运行的代码。
3. 包含 options 和 completion 的动画方法
 UIView.animateWithDuration(duration, delay: delay, options: options, animations: {
 }, completion: { finished in
 })
增加了两个参数:
* delay: 动画开始前需要等待的时间(秒);
* options: 更多可以改变动画效果的选择
4. 包含弹簧物理特性的动画方法
这是 iOS 7 中新增的,允许我们创建一个基于动画对物理引擎。
 UIView.animateWithDuration(duration, delay: delay, usingSpringWithDamping: damping, initialSpringVelocity: velocity, options: options, animations: {
 }, completion: { finished in
 })
增加了两个参数:
* dampingRatio. 定义振幅大小(0=无穷;1=没有)
* initialVelocity. 动画开始有多快(1=正常)
** UIViewAnimationOptions **
Apple 在动画方法中给出了许多可选项。比如,我们传递给参数 options 一个 Repeat 值:
        let options = UIViewAnimationOptions.Repeat
         UIView.animateWithDuration(1, delay: 0.0, options: options, animations: {
             coloredSquare.backgroundColor = UIColor.redColor()
             coloredSquare.frame = CGRectMake(320-50, 120, 50, 50)
         }, completion: nil)
运行之后,可以看到,动画不断重复。如果将 options 的值改为 Autoreverse呢
方形动画结束之后,按照相反的顺序会再执行一遍。这里有一个比较奇怪的地方,就是反方向执行之后,方形会自动回到右边,变成红色。这是因为我们设置的结束动画就是这样。
接下来我们使用 ‘|’分割线将Autoreverse, Repeat 和 CurveEaseInOut 结合到一起。
let options = UIViewAnimationOptions.Autoreverse | UIViewAnimationOptions.Repeat | UIViewAnimationOptions.CurveEaseInOut
运行之后可以看到,这些可选项被结合到一起了。
第 5 步: 触发动画
-
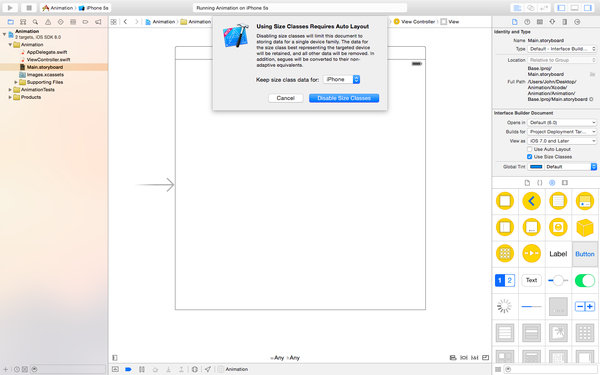
从 ViewController.swift 切换到 Main.storyboard,我们不使用 auto layout所以需要从右上角 File Inspector中关闭 Use Auto Layout
-
-
从右上角打开 Assistant Editor,允许我们同事看到storyboard 和对应的类文件
-
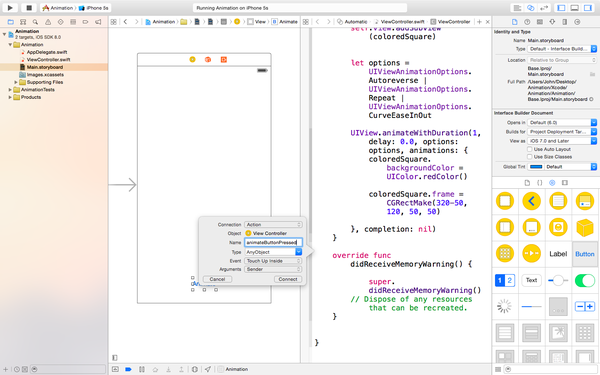
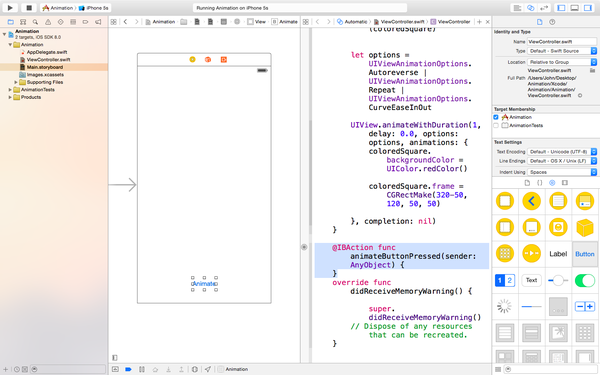
        @IBAction func animateButtonPressed(sender: AnyObject) {
     }
这个函数与storyboard中的button建立了连接,每次被点击都会调用这里的函数。
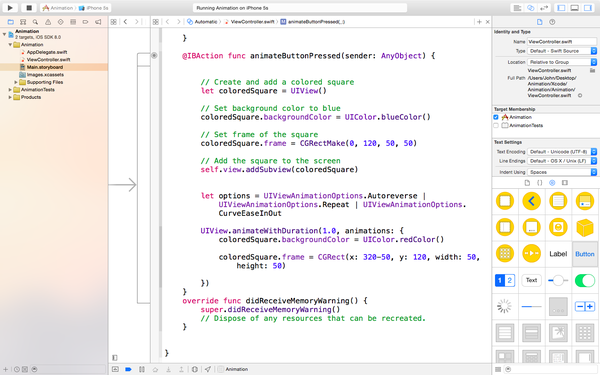
                 UIView.animateWithDuration(1.0, animations: {
                     coloredSquare.backgroundColor = UIColor.redColor()
                     coloredSquare.frame = CGRect(x: 320-50, y: 120,  50, height: 50)
                     }, completion{ animationFinished in
                          coloredSquare.removeFromSuperview()
             })
第 6 步: 重构代码通过上面的步骤,我们能够实现一个简单的动画。考虑到代码越写越多,为了维护方便和代码重用,我们现在重构以上的代码。
首先,我们将 hardcode 的部分
        let coloredSquare = UIView()
        coloredSquare.backgroundColor = UIColor.blueColor()
        coloredSquare.frame = CGRectMake(0, 120, 50, 50)
        self.view.addSubview(coloredSquare)
变为更为通用的变量:
         let size: CGFloat = 50
         let yPosition: CGFloat = 120
         let coloredSquare = UIView()
         coloredSquare.backgroundColor = UIColor.blueColor()
         coloredSquare.frame = CGRectMake(0, yPosition, size, size)
         self.view.addSubview(coloredSquare)
然后,重构动画部分的代码
         let duration = 1.0
         let delay = 0.0
         let options = UIViewAnimationOptions.CurveLinear
         UIView.animateWithDuration(duration, delay: delay, options: options, animations: {
             coloredSquare.backgroundColor = UIColor.redColor()
             coloredSquare.frame = CGRectMake(320-size, yPosition, size, size)
             }, completion: { animationFinished in
                 coloredSquare.removeFromSuperview()
         })
点击左上角运行之后,跟之前动画效果一样。
第 7 步: 使用循环
上面几步,我们都是对一个方形进行动画,我们接下来随机生成多个对象,并且每个对象的大小随机,可以使用 rand()方法生成一个随机数:
         let size: CGFloat = CGFloat(Int(rand()) % 40 + 20.0)
         let yPosition: CGFloat = CGFloat(Int(rand()) % 200 + 20.0)
现在,我们点击一次就会生成一个方形。接下来我们把这些放在一个循环里,每点击一次就会出现多个图形。Swift 中的循环长这样:
                for loopNumber in 0...10 {
         }
把我们动画代码放到循环里,就实现了我们的目的。
第 8 步: 模拟小鱼游来游去
到现在,我们掌握了基本的动画多方法。接下来我们将上面的代码改造到更有意义一些,模拟一群小鱼在屏幕上游来游去。
-
使用 Sketch 画一只小鱼,导出为 fish.png。将fish.png直接拖拽到 Xcode里,images.xcassets文件夹下;

-
回到 ViewController.swift 文件下,将之前的矩阵修改为小鱼:
         let fish = UIImageView()
         fish.image = UIImage(named: "fish")
         fish.frame = CGRectMake(0, yPosition, size, size)
         self.view.addSubview(fish)
同时,对动画这里的代码也做修改:
            UIView.animateWithDuration(duration, delay: delay, options: options, animations: {
                 fish.frame = CGRectMake(320-size, yPosition, size, size)
                }, completion: { animationFinished in
                     fish.removeFromSuperview()
             })
重新运行,可以看到出现了10条鱼。每一个大小和y轴的位置都不一样。
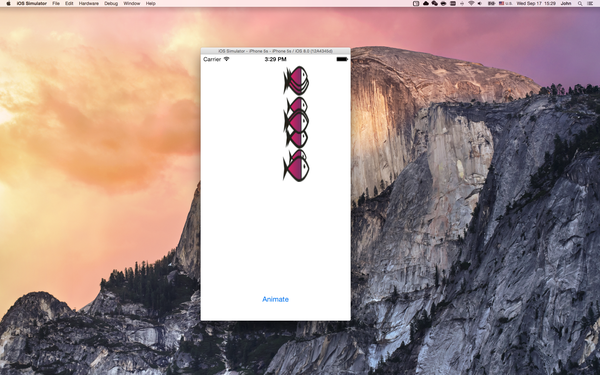
这里有3个问题,1) 每次小鱼直接尾巴就出现; 2)头刚碰到屏幕右边就会消失; 3)小鱼都是同时出现同时消失。第一个问题我们可以修改将小鱼的初始位置由 0 变为 0-size
fish.frame = CGRectMake(0-size, yPosition, size, size)
第二个问题,原因是我们将动画结束位置设在了320-size,为了让小鱼能够完整游出界面,我们修改动画结束时yPosition为320
fish.frame = CGRectMake(320, yPosition, size, size)
第三个问题,现在他们都粘在一起,怎样让他们分散开来呢?可以通过给x轴一个随机数;或者给动画一个延迟。这里我们使用改变x轴的方法解决:
给x轴一个随机的初始位置
let xPosition: CGFloat = CGFloat((Int(rand()) % 320)-320)
同时更改小鱼生成时的位置
fish.frame = CGRectMake(xPosition, yPosition, size, size)
为了让每条鱼在界面上逗留的时间不一样,我们同时给duration一个随机值
let duration = NSTimeInterval(Int(rand()) % 3)
再次运行,就可以看到小鱼随机地游来游去。
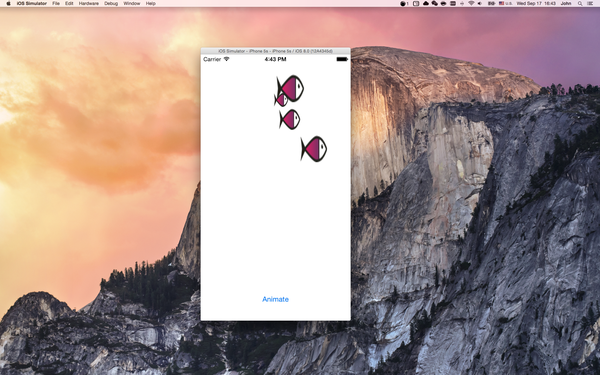
这个动画基本完成了,但是如果我们想在这个界面上动态地更改小鱼的数量呢?
第 8 步: 动态更改小鱼数量
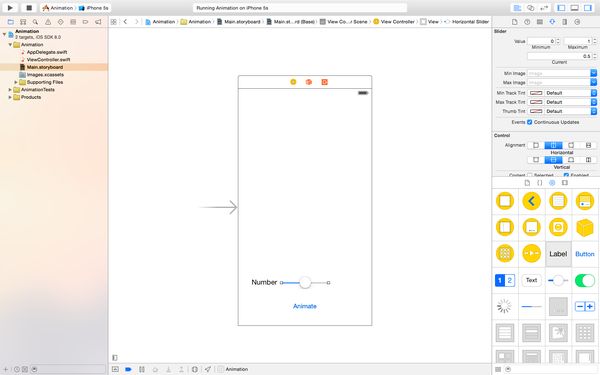
-
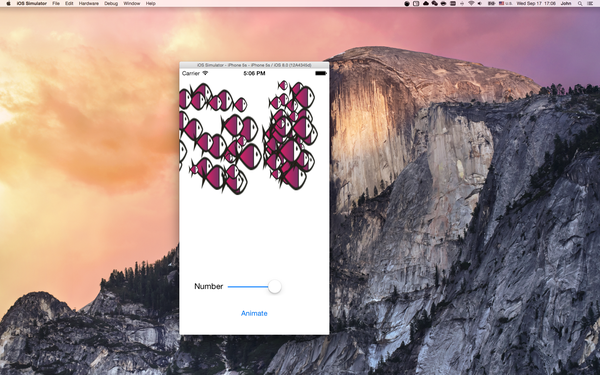
切换到故事版,拖一个slider过来,再拖一个label
-
选中Slider,从右上角属性检查器更改Slider的上限,下限和默认值。这里我们更改下限为0,上限为100
-
点击右上角的 Assistant Editor,与之前类似的步骤:按住control,同时拖动 Slider 到viewDidLoad()函数上面的位置
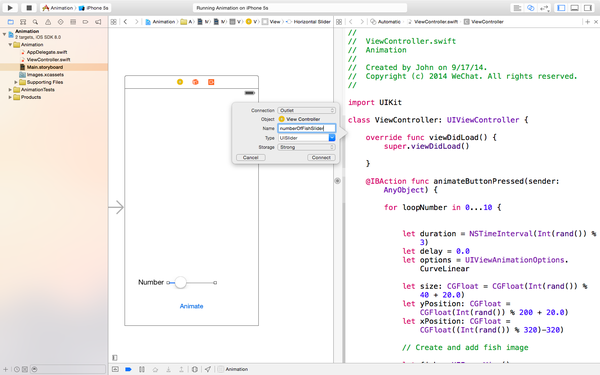
-
在弹出的popover中,保持类型为Outlet,name给一个numberOfFishSlider,Xcode中会生成
@IBOutlet var numberOfFishSlider: UISlider!
-
现在,我们需要做的就是改变循环次数。我们可以通过 self.numberOfFishSlider.value 拿到当前位置的值,只需要转换为 Int类型
        let numberOfFish = Int(self.numberOfFishSlider.value)
         for loopNumber in 1...numberOfFish {
现在,可以从Slider上选择不同数量的小鱼,看效果。
到现在,我们的动画原型就完成了。下面是完整代码:
//
//  ViewController.swift
//  Animation
//
//  Created by John on 9/17/14.
//  Copyright (c) 2014 WeChat. All rights reserved.
//

import UIKit

class ViewController: UIViewController {

    @IBOutlet var numberOfFishSlider: UISlider!

    override func viewDidLoad() {
        super.viewDidLoad()

    }

    @IBAction func animateButtonPressed(sender: AnyObject) {

        let numberOfFish = Int(self.numberOfFishSlider.value)

        for loopNumber in 1...numberOfFish {


            let duration = NSTimeInterval(Int(rand()) % 3)
            let delay = 0.0
            let options = UIViewAnimationOptions.CurveLinear

            let size: CGFloat = CGFloat(Int(rand()) % 40 + 20.0)
            let yPosition: CGFloat = CGFloat(Int(rand()) % 200 + 20.0)
            let xPosition: CGFloat = CGFloat((Int(rand()) % 320)-320)

            // Create and add fish image

            let fish = UIImageView()
            fish.image = UIImage(named: "fish")
            fish.frame = CGRectMake(xPosition, yPosition, size, size)
            self.view.addSubview(fish)


            // Create Animation

            UIView.animateWithDuration(duration, delay: delay, options: options, animations: {

                fish.frame = CGRectMake(320, yPosition, size, size)

               }, completion: { animationFinished in
                    fish.removeFromSuperview()
            })
        }


    }
    override func didReceiveMemoryWarning() {
        super.didReceiveMemoryWarning()
        // Dispose of any resources that can be recreated.
    }


}