1.用idea构建maven-archetype-webapp类型的项目
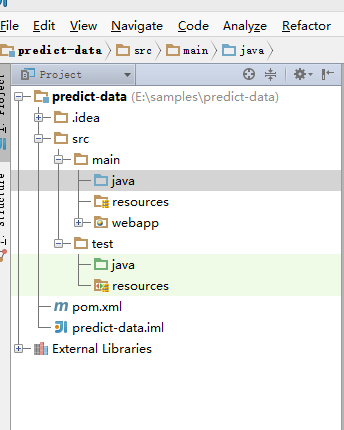
2.完善目录,增加重要的source Folder,这个不是简单的Floder,这些文件夹是会参与编译的。增加src/main/java,src/test/resources,src/test/java目录。让目录变成标准的maven结构,如图。
3.在pom文件中增加依赖包
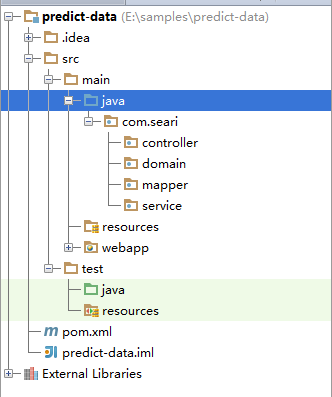
4.创建web开发常用的包结构,如图
3.创建springMVC分发器配置文件,在resources下创建dispatcher-servlet.xml
<?xml version="1.0" encoding="UTF-8"?>
<beans xmlns="http://www.springframework.org/schema/beans"
       xmlns:xsi="http://www.w3.org/2001/XMLSchema-instance" xmlns:p="http://www.springframework.org/schema/p"
       xmlns:context="http://www.springframework.org/schema/context" xmlns:mvc="http://www.springframework.org/schema/mvc"
       xsi:schemaLocation="http://www.springframework.org/schema/beans
       http://www.springframework.org/schema/beans/spring-beans.xsd
       http://www.springframework.org/schema/context
       http://www.springframework.org/schema/context/spring-context.xsd
       http://www.springframework.org/schema/mvc
       http://www.springframework.org/schema/mvc/spring-mvc.xsd ">

    <!-- 启用spring mvc 注解 -->
    <mvc:annotation-driven />

    <!-- 设置注解的类所在的包-->
    <context:component-scan base-package="com.seari.controller" />

    <bean class="org.springframework.web.servlet.view.InternalResourceViewResolver">
        <property name="prefix" value="/WEB-INF/views/" />
        <property name="suffix" value=".jsp" />
    </bean>
</beans>
5.编辑jdbc配置文件,在resources下创建jdbc.properties
jdbc_driverClassName=com.mysql.jdbc.Driver
jbdc_url=jdbc:mysql://localhost:3306/test?useUnicode=true&characterEncoding=utf-8
jdbc_username=root
jdbc_password=root
6.编辑spring-mybatis合成配置文件,在resources下创建spring-mybatis.xml
<?xml version="1.0" encoding="UTF-8"?>
<beans xmlns="http://www.springframework.org/schema/beans"
       xmlns:xsi="http://www.w3.org/2001/XMLSchema-instance"
       xmlns:context="http://www.springframework.org/schema/context"
       xsi:schemaLocation="http://www.springframework.org/schema/beans
       http://www.springframework.org/schema/beans/spring-beans.xsd http://www.springframework.org/schema/context http://www.springframework.org/schema/context/spring-context.xsd">

    <!-- 引入JDBC文件 -->
    <context:property-placeholder location="classpath:conf/jdbc.properties" />

    <!-- 配置数据源 -->
    <bean id="dataSource" class="com.alibaba.druid.pool.DruidDataSource" init-method="init" destroy-method="close">
        <property name="driverClassName">
            <value>${jdbc_driverClassName}</value>
        </property>
        <property name="url">
            <value>${jbdc_url}</value>
        </property>
        <property name="username">
            <value>${jdbc_username}</value>
        </property>
        <property name="password">
            <value>${jdbc_password}</value>
        </property>

        <!-- 连接池最大连接数 -->
        <property name="maxActive">
            <value>20</value>
        </property>

        <!-- 初始化连接大小 -->
        <property name="initialSize">
            <value>1</value>
        </property>

        <!-- 获取连接最大等待时间 -->
        <property name="maxWait">
            <value>60000</value>
        </property>

        <!-- 连接池最大和最小空闲 -->
        <property name="maxIdle">
            <value>20</value>
        </property>
        <property name="minIdle">
            <value>3</value>
        </property>

        <!-- 自动清除无用连接 -->
        <property name="removeAbandoned">
            <value>true</value>
        </property>

        <!-- 清除无用连接的等待时间 -->
        <property name="removeAbandonedTimeout">
            <value>180</value>
        </property>

        <!-- 连接属性 -->
        <property name="connectionProperties">
            <value>clientEncoding=UTF-8</value>
        </property>
    </bean>

    <!-- 扫描文件(自动将service层注入) -->
    <context:component-scan base-package="com.seari.service" />

    <!-- mybatis文件配置,扫描所有mapper文件 -->
    <bean id="sqlSessionFactory" class="org.mybatis.spring.SqlSessionFactoryBean">
        <property name="dataSource" ref="dataSource" />
    </bean>

    <!-- spring与mybatis整合配置,扫描所有的mapper -->
    <bean class="org.mybatis.spring.mapper.MapperScannerConfigurer">
        <property name="basePackage" value="com.seari.mapper"/>
        <property name="sqlSessionFactoryBeanName" value="sqlSessionFactory" />
    </bean>

    <!-- 对数据源进行事务管理 -->
    <bean id="transactionManager" class="org.springframework.jdbc.datasource.DataSourceTransactionManager">
        <property name="dataSource" ref="dataSource"/>
    </bean>
</beans>
注:这里没有指明java源代码目录mapper包下接口对应的mapper.xml文件,所以会用默认的路径,即跟mapper类对应的文件下,在resources下新建跟mapper类相同的路径,如图:

7.编辑web.xml
<?xml version="1.0" encoding="UTF-8"?>

<web-app version="2.5"
        xmlns="http://java.sun.com/xml/ns/javaee"
        xmlns:xsi="http://www.w3.org/2001/XMLSchema-instance"
        xsi:schemaLocation="http://java.sun.com/xml/ns/javaee
        http://java.sun.com/xml/ns/javaee/web-app_2_5.xsd">
    <display-name>Archetype Created Web Application</display-name>

    <context-param>
        <param-name>contextConfigLocation</param-name>
        <param-value>classpath:conf/spring-mybatis.xml</param-value>
    </context-param>

    <!-- 字符集过滤器 -->
    <filter>
        <filter-name>CharacterEncodingFilter</filter-name>
        <filter-class>org.springframework.web.filter.CharacterEncodingFilter</filter-class>
        <init-param>
            <param-name>encoding</param-name>
            <param-value>UTF-8</param-value>
        </init-param>
        <init-param>
            <param-name>forceEncoding</param-name>
            <param-value>true</param-value>
        </init-param>
    </filter>
    <filter-mapping>
        <filter-name>CharacterEncodingFilter</filter-name>
        <url-pattern>/*</url-pattern>
    </filter-mapping>

    <listener>
        <listener-class>org.springframework.web.context.ContextLoaderListener</listener-class>
    </listener>
    <!-- SpringMVC 分发器 -->
    <servlet>
        <servlet-name>dispatcher</servlet-name>
        <servlet-class>org.springframework.web.servlet.DispatcherServlet</servlet-class>
        <init-param>
            <param-name>contextConfigLocation</param-name>
            <param-value>classpath:conf/dispatcher-servlet.xml</param-value>
        </init-param>
        <load-on-startup>1</load-on-startup>
    </servlet>
    <servlet-mapping>
        <servlet-name>dispatcher</servlet-name>
        <url-pattern>/</url-pattern>
    </servlet-mapping>

    <welcome-file-list>
        <welcome-file>index</welcome-file>
    </welcome-file-list>
</web-app>
8.编写测试相关类文件和页面测试