一、原理及特点
参数放在XML文件中进行管理
用httpClient简单封装一个httpUtils工具类
测试用例管理使用了testNg管理,使用了TestNG参数化测试,通过xml文件来执行case。
测试报告这里用到第三方的包ReportNG 项目组织用Maven
二、准备
使用工具:eclipse,maven
用到的第三方jar包:dom4j、reportng、testng
理解难点:httpUtils和xmlUtil工具类的封装;dom4j使用;CookieStore的应用
三、框架构思
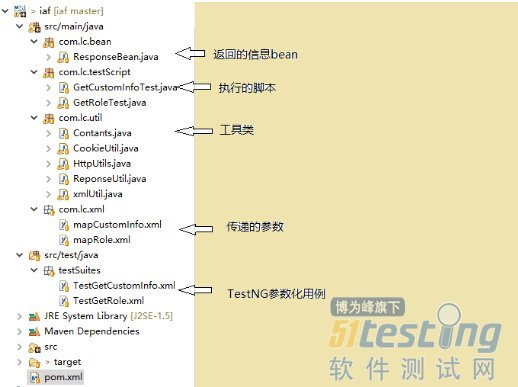
1、项目结构
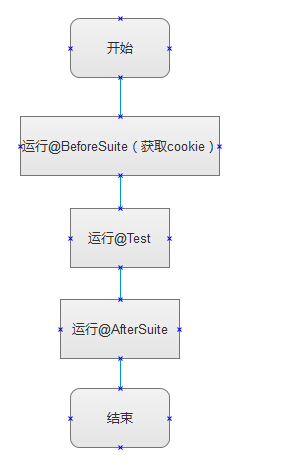
2、用例执行流程
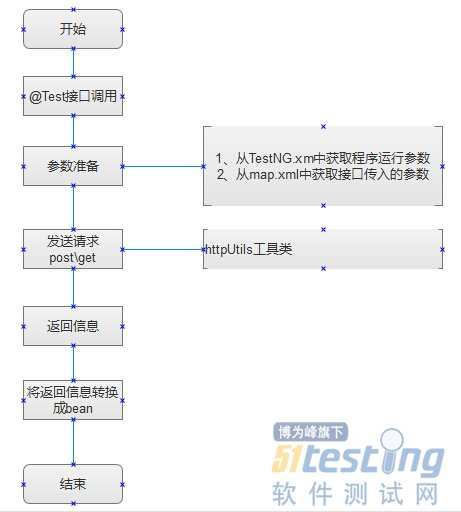
3、接口调用流程
4、调度脚本流程

四、框架实现
1、输入参数
1.1 参数放在XML文件中进行管理
例:这里测试获取角色的接口输入参数为,page和rows,mapRole.xml内容如下
<?xml version="1.0" encoding="UTF-8"?>
<map>
<bean beanName="GetRole">
<!--Locator lists -->
<locator name="page" value="1"></locator>
<locator name="rows" value="10"></locator>
</bean>
</map>
1.2 封装一个xmlUtil工具类负责读取XML,使用第三方的jar包dom4j
1.2.1 xmlUtil中readXMLDocument方法返回值为HashMap<String, String>
public static HashMap<String, String> readXMLDocument(String beanName,String xmlName){
}
参数xmlName(xml文件的名字); 参数beanName(xml文件中节点的名称);
1.3 封装一个CookieUtil工具类,通过CookieStore储存cookie
1.3.1 CookieUtil类中setCookieStore方法返回值为CookieStore
public CookieStore setCookieStore(HttpResponse httpResponse) {
}
1.4 用httpClient简单封装一个httpUtils工具类有get.post,put,delete方法
1.4.1 httpUtils中post封装方法如下:
public CloseableHttpResponse post(String url, Map<String, String> params,CloseableHttpClient httpclient,CookieStore cookieStore){
}
2、返回参数
2.1 创建一个接口返回对象ResponseBean,
对象ResponseBean,包括status、statusCode、contentType、body、url、method、cookies
2.2 在工具类中在创建一个ReponseUtil工具类
ReponseUtil工具类负责将请求的返回数据CloseableHttpResponse 转换成ResponseBean
public ResponseBean setResponseBean(CloseableHttpResponse httpResponse) {
}
3、测试用例
测试用例管理使用了testNg管理 ,使用了TestNG参数化测试,通过xml文件来执行case
3.1 测试case脚本
|
public class GetRoleTest {
static CookieStore cookieStore ;
static CookieUtil cookieUtil=new CookieUtil() ;
CloseableHttpClient client;
HttpUtils httpUtils=HttpUtils.getInstance();
@Parameters({ "url", "objBean" ,"statusCode","xmlName"})
@BeforeSuite
/*
* 登录进入系统获取JSESSIONID放入到CookieStore中
* */
public void TestLoginIn(String url ,String objBean, String statusCode,String xmlName) {
Map<String,String> params=xmlUtil.readXMLDocument(objBean,xmlName);
client = HttpClients.createDefault();
CloseableHttpResponse httpResponse= httpUtils.post(url, params, client, cookieStore);
//cookieUtil.printResponse(httpResponse);
cookieStore=cookieUtil.setCookieStore(httpResponse);
}
@Parameters({ "url", "objBean" ,"statusCode","body","xmlName"})
@Test(priority = 2)
public void TestGetRole(String url ,String objBean, String statusCode,String body,String xmlName) {
Map<String,String> params=xmlUtil.readXMLDocument(objBean,xmlName);
client = HttpClients.custom().setDefaultCookieStore(cookieStore).build();
CloseableHttpResponse httpResponse= httpUtils.post(url, params, client, cookieStore);
ResponseBean rb=new ReponseUtil().setResponseBean(httpResponse);
// add Assert
Assert.assertEquals("OK", rb.getStatus());
Assert.assertEquals(statusCode, rb.getStatusCode());
Assert.assertEquals(true, rb.getBody().contains(body));
}
@AfterSuite
public void closeClient(){
try {
// 关闭流并释放资源
client.close();
} catch (IOException e) {
e.printStackTrace();
}
}
}
|
[注] 因为API接口测试时每次都要校验Cookie,所有我们每次都先执行登录操作去获取Cookie
3.2 xml文件的编写
|
<?xml version="1.0" encoding="UTF-8"?>
<!DOCTYPE suite SYSTEM "http://testng.org/testng-1.0.dtd">
<suite name="TestGetRole" parallel="classes" thread-count="5">
<parameter name="url" value="/sys/login" />
<parameter name="objBean" value="loginIn" />
<parameter name="status" value="OK" />
<parameter name="statusCode" value="200" />
<parameter name="xmlName" value="mapRole" />
<test name="TestGetRole" preserve-order="true">
<parameter name="url" value="/json/getRoleInfo" />
<parameter name="objBean" value="GetRole" />
<parameter name="status" value="OK" />
<parameter name="statusCode" value="200" />
<parameter name="body" value="roleName" />
<classes>
<class name="com.lc.testScript.GetRoleTest">
<methods>
<include name="TestGetRole" />
<!--<include name="TestGetRole2" />-->
</methods>
</class>
</classes>
</test>
</suite>
|
右键->run as ->TestNG Suite,这个场景的的测试用例就可以运行了
4、测试报告和项目组织
测试报告这里用到第三方的包ReportNG 项目组织用Maven
|
<project xmlns="http://maven.apache.org/POM/4.0.0" xmlns:xsi="http://www.w3.org/2001/XMLSchema-instance"
xsi:schemaLocation="http://maven.apache.org/POM/4.0.0 http://maven.apache.org/xsd/maven-4.0.0.xsd">
<modelVersion>4.0.0</modelVersion>
..........................................
..........................................
..........................................
<properties>
<project.build.sourceEncoding>UTF-8</project.build.sourceEncoding>
<xmlFileName1>TestGetRole.xml</xmlFileName>
.................这里写testNG对应的XML名称----------------------
<xmlFileName10>TestGetUser.xml</xmlFileName>
</properties>
<dependencies>
..........................
</dependencies>
<build>
<plugin>
<groupId>org.apache.maven.plugins</groupId>
<artifactId>maven-surefire-plugin</artifactId>
<version>2.19</version>
<configuration>
<suiteXmlFiles>
<suiteXmlFile>src/test/java/testSuites/${xmlFileName}</suiteXmlFile>
.................略............
..............这里的和properties中的xmlFileName想对应............
<suiteXmlFile>src/test/java/testSuites/${xmlFileName10}</suiteXmlFile>
</suiteXmlFiles>
</configuration>
</plugin>
<!-- 添加插件,添加ReportNg的监听器,修改最后的TestNg的报告 -->
<plugin>
<groupId>org.apache.maven.plugins</groupId>
<artifactId>maven-surefire-plugin</artifactId>
<version>2.5</version>
<configuration>
<properties>
<property>
<name>usedefaultlisteners</name>
<value>false</value>
</property>
<property>
<name>listener</name>
<value>org.uncommons.reportng.HTMLReporter</value>
</property>
</properties>
<workingDirectory>target/</workingDirectory>
</configuration>
</plugin>
<plugin>
<artifactId>maven-compiler-plugin</artifactId>
<version>3.5.1</version>
<configuration>
<source>1.8</source>
<target>1.8</target>
</configuration>
</plugin>
</plugins>
</build>
</project>
|
[注] 因为是maven的项目所以要将testSuite的xml文件放在maven的test目录下,这样右键pom.xml文件maven test,所有的测试用例就开始执行了
测试报告

框架目前存在的不足
1、数据库数据校验这一块的功能还没有完善,计划用MyBatis
2、参数使用了xml文件配置虽然灵活但有些繁琐,目前还没想到好的解决方案,testlink是否可以尝试一下呢