应用场景
我们假设你有一个“云笔记”产品,并提供了“云笔记服务”和“云相册服务”,此时用户需要在不同的设备(PC、Android、iPhone、TV、Watch)上去访问这些“资源”(笔记,图片)
那么用户如何才能访问属于自己的那部分资源呢?此时传统的做法就是提供自己的账号和密码给我们的“云笔记”,登录成功后就可以获取资源了。但这样的做法会有以下几个问题:
- “云笔记服务”和“云相册服务”会分别部署,难道我们要分别登录吗?
- 如果有第三方应用程序想要接入我们的“云笔记”,难道需要用户提供账号和密码给第三方应用程序,让他记录后再访问我们的资源吗?
- 用户如何限制第三方应用程序在我们“云笔记”的授权范围和使用期限?难道把所有资料都永久暴露给它吗?
- 如果用户修改了密码收回了权限,那么所有第三方应用程序会全部失效。
- 只要有一个接入的第三方应用程序遭到破解,那么用户的密码就会泄露,后果不堪设想。
为了解决如上问题,oAuth 应用而生。
名词解释
- 第三方应用程序(Third-party application): 又称之为客户端(client),比如上节中提到的设备(PC、Android、iPhone、TV、Watch),我们会在这些设备中安装我们自己研发的 APP。又比如我们的产品想要使用 QQ、微信等第三方登录。对我们的产品来说,QQ、微信登录是第三方登录系统。我们又需要第三方登录系统的资源(头像、昵称等)。对于 QQ、微信等系统我们又是第三方应用程序。
- HTTP 服务提供商(HTTP service): 我们的云笔记产品以及 QQ、微信等都可以称之为“服务提供商”。
- 资源所有者(Resource Owner): 又称之为用户(user)。
- 用户代理(User Agent): 比如浏览器,代替用户去访问这些资源。
- 认证服务器(Authorization server): 即服务提供商专门用来处理认证的服务器,简单点说就是登录功能(验证用户的账号密码是否正确以及分配相应的权限)
- 资源服务器(Resource server): 即服务提供商存放用户生成的资源的服务器。它与认证服务器,可以是同一台服务器,也可以是不同的服务器。简单点说就是资源的访问入口,比如上节中提到的“云笔记服务”和“云相册服务”都可以称之为资源服务器。
交互过程

举个例子来说吧,你使用qq号登录知乎,肯定不能告诉知乎你的密码,那么怎么做呢?知乎返回授权页,用户授权知乎,然后知乎向qq申请令牌,知乎通过令牌去访问用户qq相关的资源,这样用户的密码不会向知乎暴露,知乎也访问了用户相关的qq信息。
客户端授权模式
客户端必须得到用户的授权(authorization grant),才能获得令牌(access token)。oAuth 2.0 定义了四种授权方式。
- implicit:简化模式,不推荐使用
- authorization code:授权码模式
- resource owner password credentials:密码模式
- client credentials:客户端模式
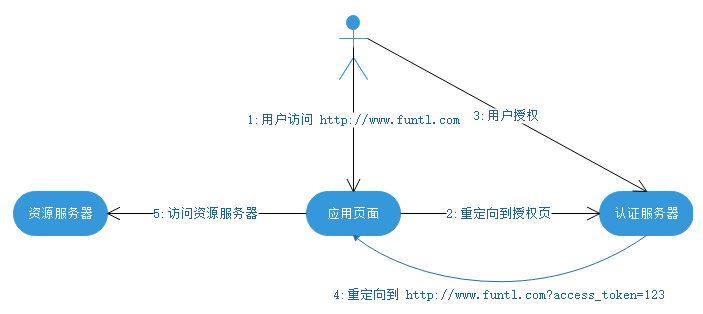
1、简化模式
简化模式适用于纯静态页面应用。所谓纯静态页面应用,也就是应用没有在服务器上执行代码的权限(通常是把代码托管在别人的服务器上),只有前端 JS 代码的控制权。
这种场景下,应用是没有持久化存储的能力的。因此,按照 oAuth2.0 的规定,这种应用是拿不到 Refresh Token 的。其整个授权流程如下:
2、授权码模式
授权码模式适用于有自己的服务器的应用,它是一个一次性的临时凭证,用来换取 access_token 和 refresh_token。认证服务器提供了一个类似这样的接口:
https://www.baidu.com/exchange?code=&client_id=&client_secret=
需要传入 code、client_id 以及 client_secret。验证通过后,返回 access_token 和 refresh_token。一旦换取成功,code 立即作废,不能再使用第二次。流程图如下:
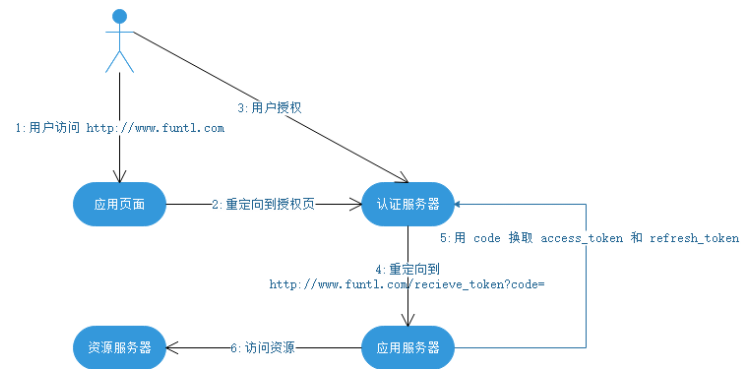
这个 code 的作用是保护 token 的安全性。上一节说到,简单模式下,token 是不安全的。这是因为在第 4 步当中直接把 token 返回给应用。而这一步容易被拦截、窃听。引入了 code 之后,即使攻击者能够窃取到 code,但是由于他无法获得应用保存在服务器的 client_secret,因此也无法通过 code 换取 token。而第 5 步,为什么不容易被拦截、窃听呢?这是因为,首先,这是一个从服务器到服务器的访问,黑客比较难捕捉到;其次,这个请求通常要求是 https 的实现。即使能窃听到数据包也无法解析出内容。
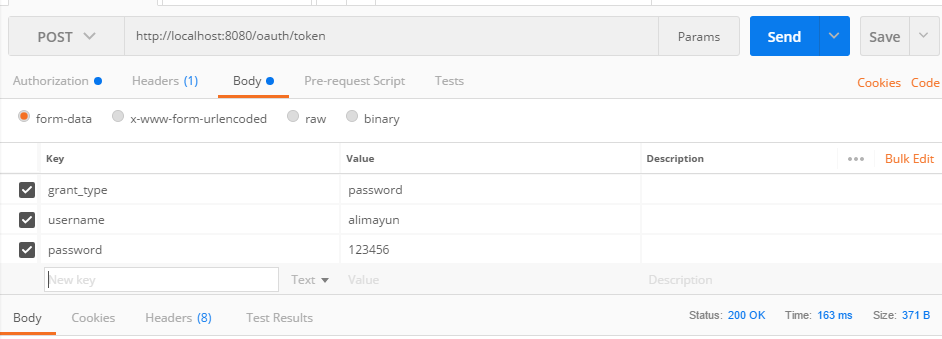
3、密码模式-----本文后续基于此种方式
密码模式中,用户向客户端提供自己的用户名和密码。客户端使用这些信息,向 "服务商提供商" 索要授权。在这种模式中,用户必须把自己的密码给客户端,但是客户端不得储存密码。这通常用在用户对客户端高度信任的情况下,比如客户端是操作系统的一部分。
一个典型的例子是同一个企业内部的不同产品要使用本企业的 oAuth2.0 体系。在有些情况下,产品希望能够定制化授权页面。由于是同个企业,不需要向用户展示“xxx将获取以下权限”等字样并询问用户的授权意向,而只需进行用户的身份认证即可。这个时候,由具体的产品团队开发定制化的授权界面,接收用户输入账号密码,并直接传递给鉴权服务器进行授权即可。

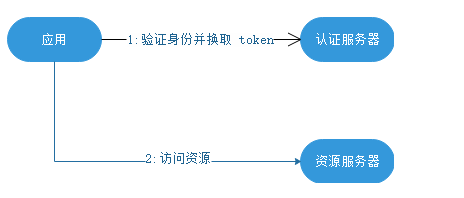
4、客户端模式
如果信任关系再进一步,或者调用者是一个后端的模块,没有用户界面的时候,可以使用客户端模式。鉴权服务器直接对客户端进行身份验证,验证通过后,返回 token。
代码模块
表结构
oauth_client_details-----客户端相关数据
CREATE TABLE `oauth_client_details` (
  `client_id` varchar(128) NOT NULL,
  `resource_ids` varchar(256) DEFAULT NULL,
  `client_secret` varchar(256) DEFAULT NULL,
  `scope` varchar(256) DEFAULT NULL,
  `authorized_grant_types` varchar(256) DEFAULT NULL,
  `web_server_redirect_uri` varchar(256) DEFAULT NULL,
  `authorities` varchar(256) DEFAULT NULL,
  `access_token_validity` int(11) DEFAULT NULL,
  `refresh_token_validity` int(11) DEFAULT NULL,
  `additional_information` varchar(4096) DEFAULT NULL,
  `autoapprove` varchar(256) DEFAULT NULL,
  PRIMARY KEY (`client_id`)
) ENGINE=InnoDB DEFAULT CHARSET=utf8;

client_secret:一定要为BycrPassWord后的串,因为oauth2会拿明文密码通过bycr加密后与数据库中数据进行比对。
authorized_grant_types:授权方式,本文以password为例
access_token_validity:token有效期
后台代码
1、pom.xml
<?xml version="1.0" encoding="UTF-8"?>
<project xmlns="http://maven.apache.org/POM/4.0.0" xmlns:xsi="http://www.w3.org/2001/XMLSchema-instance"
         xsi:schemaLocation="http://maven.apache.org/POM/4.0.0 http://maven.apache.org/xsd/maven-4.0.0.xsd">
    <modelVersion>4.0.0</modelVersion>
    <parent>
        <groupId>org.springframework.boot</groupId>
        <artifactId>spring-boot-starter-parent</artifactId>
        <version>2.1.6.RELEASE</version>
        <relativePath/> <!-- lookup parent from repository -->
    </parent>
    <groupId>com.ty</groupId>
    <artifactId>auth</artifactId>
    <version>0.0.1-SNAPSHOT</version>
    <name>auth</name>
    <description>Demo project for Spring Boot</description>

    <properties>
        <java.version>1.8</java.version>
    </properties>

    <dependencies>
        <dependency>
            <groupId>org.springframework.boot</groupId>
            <artifactId>spring-boot-starter</artifactId>
        </dependency>

        <dependency>
            <groupId>org.springframework.boot</groupId>
            <artifactId>spring-boot-starter-web</artifactId>
        </dependency>

        <dependency>
            <groupId>org.springframework.boot</groupId>
            <artifactId>spring-boot-starter-test</artifactId>
            <scope>test</scope>
        </dependency>

        <dependency>
            <groupId>org.springframework.cloud</groupId>
            <artifactId>spring-cloud-starter-oauth2</artifactId>
            <version>2.1.3.RELEASE</version>
        </dependency>

        <dependency>
            <groupId>mysql</groupId>
            <artifactId>mysql-connector-java</artifactId>
            <version>8.0.16</version>
        </dependency>

        <dependency>
            <groupId>org.springframework.boot</groupId>
            <artifactId>spring-boot-starter-jdbc</artifactId>
            <version>2.1.6.RELEASE</version>
        </dependency>

        <dependency>
            <groupId>org.springframework.boot</groupId>
            <artifactId>spring-boot-starter-data-redis</artifactId>
            <version>2.1.6.RELEASE</version>
        </dependency>
    </dependencies>

    <build>
        <plugins>
            <plugin>
                <groupId>org.springframework.boot</groupId>
                <artifactId>spring-boot-maven-plugin</artifactId>
            </plugin>
        </plugins>
    </build>

</project>
2、application.yml
spring:
  application:
    name: auth-server
  security:
    user:
      # 账号
      name: taoyong
      # 密码
      password: 123456
  datasource:
    url: jdbc:mysql://localhost:3306/mysql?useUnicode=true&characterEncoding=utf8&serverTimezone=GMT%2B8&useSSL=false
    driverClassName: com.mysql.jdbc.Driver
    username: alimayun
    password: ty123456
  redis:
    host: 127.0.0.1
    port: 6379
    password:
server:
  port: 8080
3、AuthorizationServerConfiguration
package com.ty.auth.config.auth;

import com.ty.auth.exception.handler.CustomWebResponseExceptionTranslator;
import com.ty.auth.store.CustomRedisToken;
import org.springframework.beans.factory.annotation.Autowired;
import org.springframework.context.annotation.Bean;
import org.springframework.context.annotation.Configuration;
import org.springframework.data.redis.connection.RedisConnectionFactory;
import org.springframework.security.authentication.AuthenticationManager;
import org.springframework.security.oauth2.config.annotation.configurers.ClientDetailsServiceConfigurer;
import org.springframework.security.oauth2.config.annotation.web.configuration.AuthorizationServerConfigurerAdapter;
import org.springframework.security.oauth2.config.annotation.web.configuration.EnableAuthorizationServer;
import org.springframework.security.oauth2.config.annotation.web.configurers.AuthorizationServerEndpointsConfigurer;
import org.springframework.security.oauth2.provider.ClientDetailsService;
import org.springframework.security.oauth2.provider.client.JdbcClientDetailsService;
import org.springframework.security.oauth2.provider.error.WebResponseExceptionTranslator;
import org.springframework.security.oauth2.provider.token.TokenStore;
import org.springframework.security.oauth2.provider.token.store.JdbcTokenStore;
import org.springframework.security.oauth2.provider.token.store.redis.RedisTokenStore;

import javax.sql.DataSource;

@Configuration
@EnableAuthorizationServer
public class AuthorizationServerConfiguration extends AuthorizationServerConfigurerAdapter {

    @Autowired
    public DataSource dataSource;

    //使用password模式必须要此bean
    @Autowired
    private AuthenticationManager authenticationManager;

    @Autowired
    private RedisConnectionFactory redisConnectionFactory;

    @Bean
    public TokenStore tokenStore() {
        // 基于redis实现,令牌保存到redis,并且可以实现redis刷新的功能
        return new CustomRedisToken(redisConnectionFactory, jdbcClientDetails());
    }

    @Bean
    public ClientDetailsService jdbcClientDetails() {
        // 基于 JDBC 实现,需要事先在数据库配置客户端信息
        return new JdbcClientDetailsService(dataSource);
    }

    @Override
    public void configure(AuthorizationServerEndpointsConfigurer endpoints) throws Exception {
        // 设置令牌
        endpoints.tokenStore(tokenStore());
        endpoints.authenticationManager(authenticationManager);
        endpoints.exceptionTranslator(new CustomWebResponseExceptionTranslator());
    }

    @Override
    public void configure(ClientDetailsServiceConfigurer clients) throws Exception {
        // 读取客户端配置
        clients.withClientDetails(jdbcClientDetails());
    }
}
4、WebSecurityConfiguration
package com.ty.auth.config.security;

import org.springframework.context.annotation.Bean;
import org.springframework.context.annotation.Configuration;
import org.springframework.security.authentication.AuthenticationManager;
import org.springframework.security.config.annotation.authentication.builders.AuthenticationManagerBuilder;
import org.springframework.security.config.annotation.method.configuration.EnableGlobalMethodSecurity;
import org.springframework.security.config.annotation.web.configuration.EnableWebSecurity;
import org.springframework.security.config.annotation.web.configuration.WebSecurityConfigurerAdapter;
import org.springframework.security.core.userdetails.UserDetails;
import org.springframework.security.core.userdetails.UserDetailsService;
import org.springframework.security.crypto.bcrypt.BCryptPasswordEncoder;

@Configuration
@EnableWebSecurity
@EnableGlobalMethodSecurity(prePostEnabled = true, securedEnabled = true, jsr250Enabled = true)
public class WebSecurityConfiguration extends WebSecurityConfigurerAdapter {

    @Bean
    public BCryptPasswordEncoder passwordEncoder() {
        // 设置默认的加密方式
        return new BCryptPasswordEncoder();
    }

    //password模式必须需要
    @Override
    @Bean
    public AuthenticationManager authenticationManagerBean() throws Exception {

        return super.authenticationManagerBean();
    }

    @Override
    protected void configure(AuthenticationManagerBuilder auth) throws Exception {
        //这里可以在数据库中做。主要就是实现UserDetailsService接口,自定义loadUserByUsername方法
        //auth.userDetailsService(xxx)
        auth.inMemoryAuthentication()
                // 在内存中创建用户并为密码加密
                .withUser("alimayun").password(passwordEncoder().encode("123456")).roles("USER")
                .and()
                .withUser("ty").password(passwordEncoder().encode("123456")).roles("ADMIN");

    }
}
5、ResourceServerConfigurer
package com.ty.auth.config.resource;

import com.ty.auth.exception.handler.CustomAccessDeniedHandler;
import com.ty.auth.exception.handler.MyAuthenticationEntryPoint;
import org.springframework.beans.factory.annotation.Autowired;
import org.springframework.context.annotation.Configuration;
import org.springframework.security.oauth2.config.annotation.web.configuration.EnableResourceServer;
import org.springframework.security.oauth2.config.annotation.web.configuration.ResourceServerConfigurerAdapter;
import org.springframework.security.oauth2.config.annotation.web.configurers.ResourceServerSecurityConfigurer;
import org.springframework.security.oauth2.provider.token.TokenStore;

//为了方便,直接把认证服务器也当做是一个资源服务器
@Configuration
@EnableResourceServer
public class ResourceServerConfigurer extends ResourceServerConfigurerAdapter {

    @Autowired
    private TokenStore tokenStore;

    @Override
    public void configure(ResourceServerSecurityConfigurer resources) throws Exception {
        resources.tokenStore(tokenStore).authenticationEntryPoint(new MyAuthenticationEntryPoint())
                .accessDeniedHandler(new CustomAccessDeniedHandler());
    }
}
6、异常类
CustomAccessDeniedHandler
package com.ty.auth.exception.handler;

import com.fasterxml.jackson.databind.ObjectMapper;
import org.springframework.beans.factory.annotation.Autowired;
import org.springframework.security.access.AccessDeniedException;
import org.springframework.security.web.access.AccessDeniedHandler;
import org.springframework.stereotype.Service;


import org.springframework.security.web.access.AccessDeniedHandler;

import javax.servlet.ServletException;
import javax.servlet.http.HttpServletRequest;
import javax.servlet.http.HttpServletResponse;
import java.io.IOException;
import java.util.Date;
import java.util.HashMap;
import java.util.Map;

public class CustomAccessDeniedHandler implements AccessDeniedHandler {
    @Autowired
    private ObjectMapper objectMapper;

    //权限不足异常处理类
    @Override
    public void handle(HttpServletRequest request, HttpServletResponse response, AccessDeniedException accessDeniedException) throws IOException, ServletException {
        response.setContentType("application/json;charset=UTF-8");
        Map<String, Object> map = new HashMap<>();
        map.put("resultCode", "400");
        map.put("resultMsg", accessDeniedException.getMessage());
        map.put("path", request.getServletPath());
        map.put("timestamp", String.valueOf(new Date().getTime()));
        response.setContentType("application/json");
        response.setStatus(HttpServletResponse.SC_UNAUTHORIZED);
        response.getWriter().write(objectMapper.writeValueAsString(map));
    }
}
MyAuthenticationEntryPoint
package com.ty.auth.exception.handler;

import com.fasterxml.jackson.databind.ObjectMapper;
import org.springframework.security.core.AuthenticationException;
import org.springframework.security.web.AuthenticationEntryPoint;
import org.springframework.stereotype.Service;

import javax.servlet.ServletException;
import javax.servlet.http.HttpServletRequest;
import javax.servlet.http.HttpServletResponse;
import java.io.IOException;
import java.util.Date;
import java.util.HashMap;
import java.util.Map;

public class MyAuthenticationEntryPoint implements AuthenticationEntryPoint {

    //认证无效,例如token无效等等
    @Override
    public void commence(HttpServletRequest request, HttpServletResponse response, AuthenticationException authException)
            throws IOException, ServletException {
        Map<String, Object> map = new HashMap<>();
        //通过自定义异常可以按照自己的意愿去返回这些异常信息,因为大部分企业级应用都是前后分离,对前端友好很重要!
        map.put("resultCode", "401");
        map.put("resultMsg", authException.getMessage());
        map.put("path", request.getServletPath());
        map.put("timestamp", String.valueOf(new Date().getTime()));
        response.setContentType("application/json");
        response.setStatus(HttpServletResponse.SC_UNAUTHORIZED);
        try {
        ObjectMapper mapper = new ObjectMapper();
        mapper.writeValue(response.getOutputStream(), map);
        } catch (Exception e) {
        throw new ServletException();
        }
    }
}
CustomWebResponseExceptionTranslator
package com.ty.auth.exception.handler;

import org.springframework.http.ResponseEntity;
import org.springframework.security.authentication.InternalAuthenticationServiceException;
import org.springframework.security.oauth2.common.exceptions.InvalidGrantException;
import org.springframework.security.oauth2.common.exceptions.InvalidTokenException;
import org.springframework.security.oauth2.common.exceptions.OAuth2Exception;
import org.springframework.security.oauth2.provider.error.WebResponseExceptionTranslator;
import org.springframework.stereotype.Service;

import javax.xml.transform.Result;
import java.util.HashMap;
import java.util.Map;

//这是获取token阶段出现异常部分
public class CustomWebResponseExceptionTranslator implements WebResponseExceptionTranslator {
    public ResponseEntity translate(Exception e) throws Exception {
        if (e instanceof InternalAuthenticationServiceException) {
            Map<String, Object> result = new HashMap<>();
            result.put("resultCode", "401");
            result.put("resultMsg", "用户不存在");
            return ResponseEntity.ok(result);
        }

        if (e instanceof InvalidGrantException) {
            Map<String, Object> result = new HashMap<>();
            result.put("resultCode", "401");
            result.put("resultMsg", "密码错误");
            return ResponseEntity.ok(result);
        }

        if (e instanceof InvalidTokenException) {
            Map<String, Object> result = new HashMap<>();
            result.put("resultCode", "401");
            result.put("resultMsg", "token未识别");
            return ResponseEntity.ok(result);
        }
        throw e;
    }

}
7、CustomRedisToken
package com.ty.auth.store;

import org.springframework.data.redis.connection.RedisConnectionFactory;
import org.springframework.security.oauth2.common.DefaultOAuth2AccessToken;
import org.springframework.security.oauth2.common.OAuth2AccessToken;
import org.springframework.security.oauth2.provider.ClientDetails;
import org.springframework.security.oauth2.provider.ClientDetailsService;
import org.springframework.security.oauth2.provider.OAuth2Authentication;
import org.springframework.security.oauth2.provider.OAuth2Request;
import org.springframework.security.oauth2.provider.token.store.redis.RedisTokenStore;

import java.util.Date;

public class CustomRedisToken extends RedisTokenStore {
    private ClientDetailsService clientDetailsService;

    public CustomRedisToken(RedisConnectionFactory connectionFactory, ClientDetailsService clientDetailsService) {
        super(connectionFactory);
        this.clientDetailsService = clientDetailsService;
    }

    //为什么需要刷新token的时间,比如默认1个小时,客户一直在操作,到了1个小时,让其登录,这种体验很差,应该是客户啥时候不请求服务器了,隔多长时间
    //认为其token失效
    // 其实这块可以看下源码,在客户端请求过来的时候,首先到达的是org.springframework.security.oauth2.provider.authentication.
    // OAuth2AuthenticationProcessingFilter。然后在请求校验完token有效之后,以当前时间刷新token,具体时间配置在数据库中~~~
    @Override
    public OAuth2Authentication readAuthentication(OAuth2AccessToken token) {
        OAuth2Authentication result = readAuthentication(token.getValue());
        if (result != null) {
            // 如果token没有失效  更新AccessToken过期时间
            DefaultOAuth2AccessToken oAuth2AccessToken = (DefaultOAuth2AccessToken) token;

            //重新设置过期时间
            int validitySeconds = getAccessTokenValiditySeconds(result.getOAuth2Request());
            if (validitySeconds > 0) {
                oAuth2AccessToken.setExpiration(new Date(System.currentTimeMillis() + (validitySeconds * 1000L)));
            }

            //将重新设置过的过期时间重新存入redis, 此时会覆盖redis中原本的过期时间
            storeAccessToken(token, result);
        }
        return result;
    }

    protected int getAccessTokenValiditySeconds(OAuth2Request clientAuth) {
        if (clientDetailsService != null) {
            ClientDetails client = clientDetailsService.loadClientByClientId(clientAuth.getClientId());
            Integer validity = client.getAccessTokenValiditySeconds();
            if (validity != null) {
                return validity;
            }
        }
        // default 12 hours.
        int accessTokenValiditySeconds = 60 * 60 * 12;
        return accessTokenValiditySeconds;
    }
}
测试
首先编写一个测试controller
package com.ty.auth.controller;

import org.springframework.web.bind.annotation.PostMapping;
import org.springframework.web.bind.annotation.RestController;

@RestController
public class TestController {

    @PostMapping("/hello")
    public String hello() {
        return "hello";
    }
}
1、打开postman,直接访问

提示401,没有认证
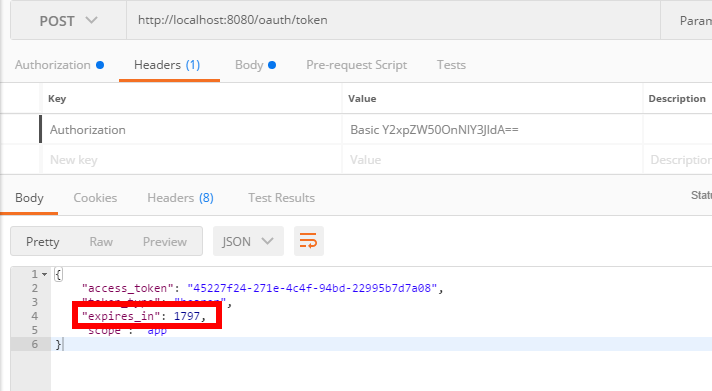
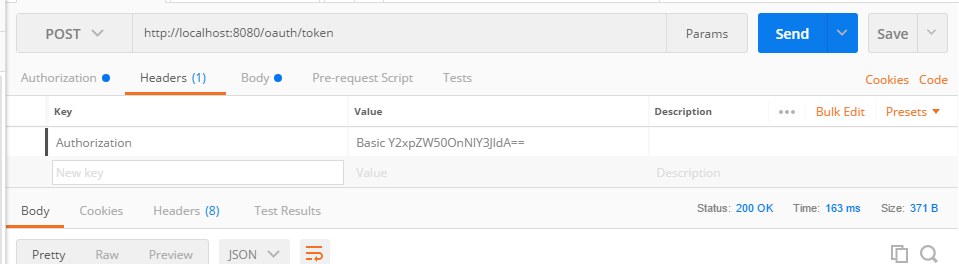
2、请求token
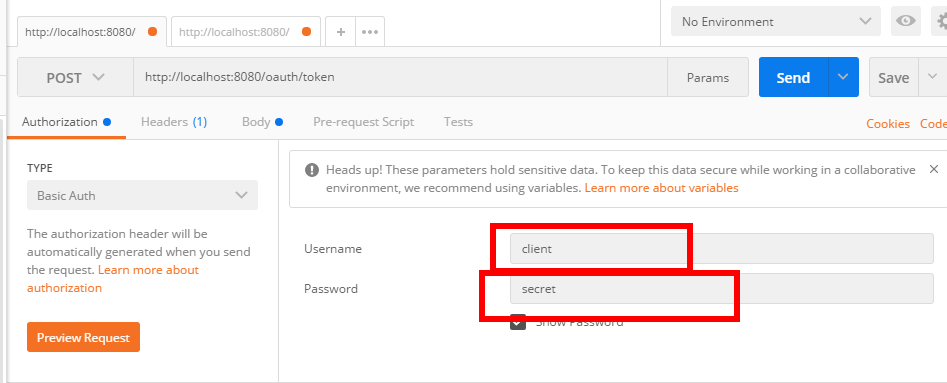
点击preview request,变成下面这样:

3、拿着token值访问/hello
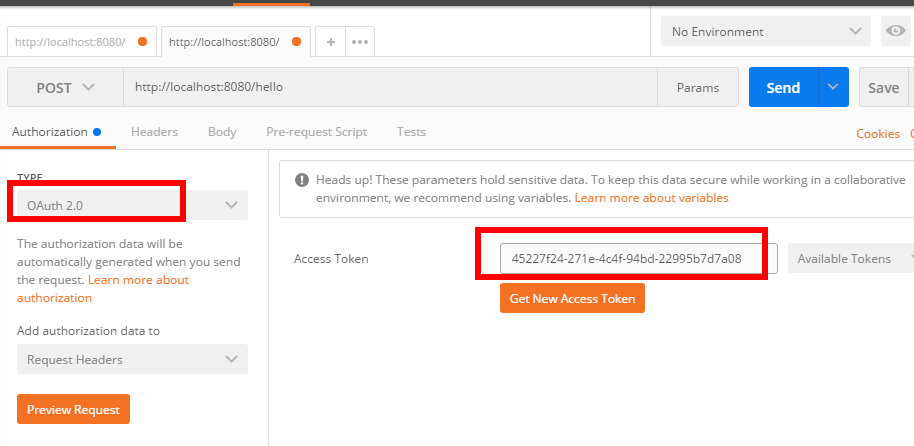
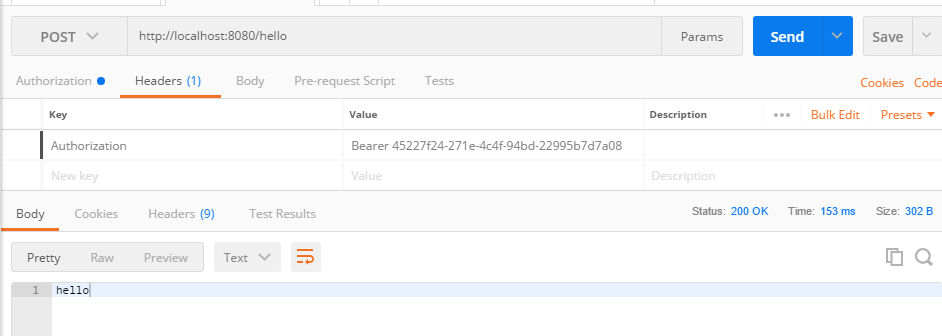
这就是一个简单的认证过程。token我设置默认是1800s过期,随着我不断请求,token有效期也会自动顺延
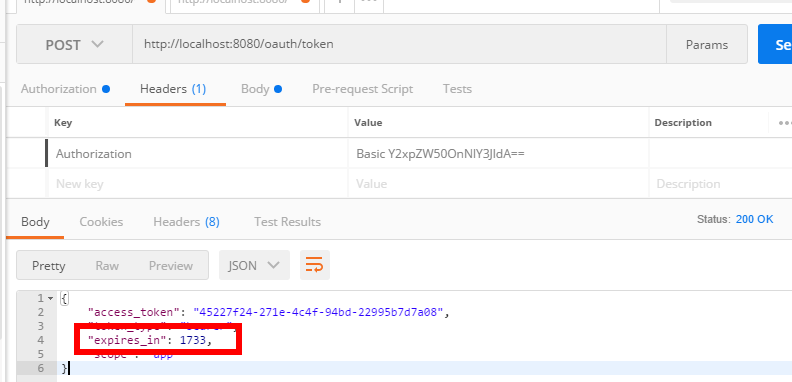
1733秒过期,过一会儿我再访问/hello,刷新token