spring对于java程序员来说,重要性不可言喻,可以想象下如果没有他,我们要多做多少工作,下面一个系列来介绍下spring(5.x版本)。
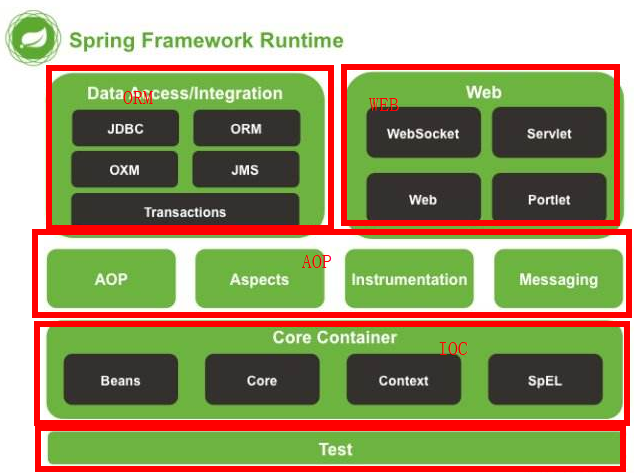
spring模块
IOC概念
spring中最重要的两个部分就是ioc和aop,先来介绍ioc。ioc也叫控制反转,其实说白了,就是容器帮你去创建对象(前提是你交给对象管理),并且创造出的对象默认是单例的,也可以非单例,并且自动帮你实现注入功能,很屌。
项目demo
先来建个demo项目,本人使用的是idea,新建maven项目,
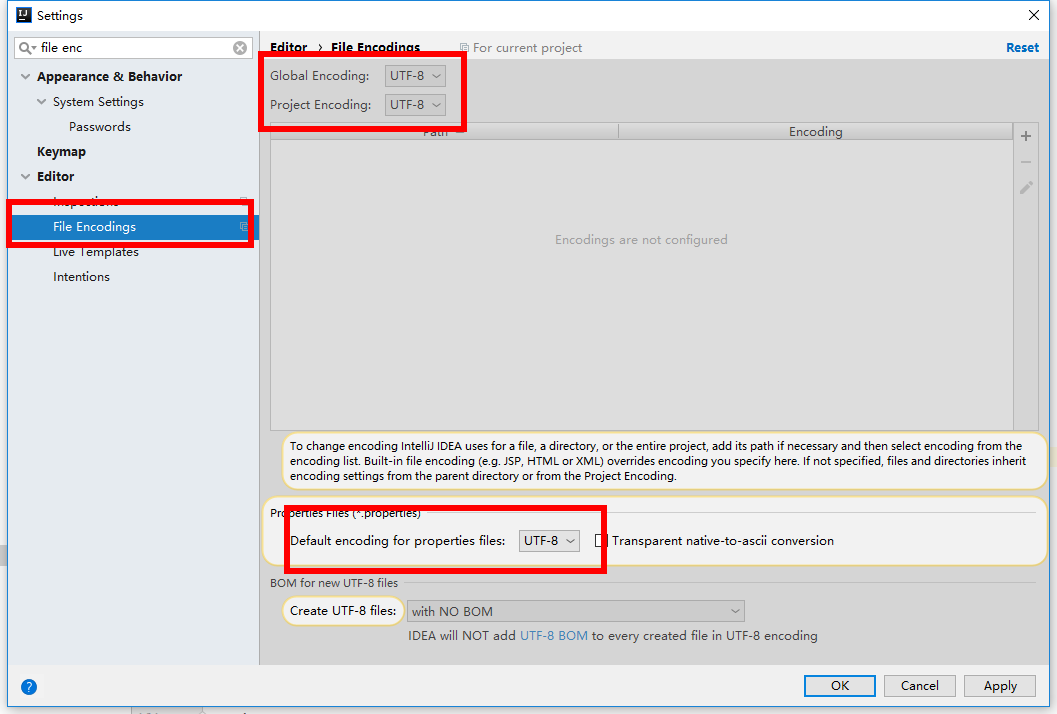
1、设置编码
为了防止项目中出现乱码,统一使用utf-8编码格式。
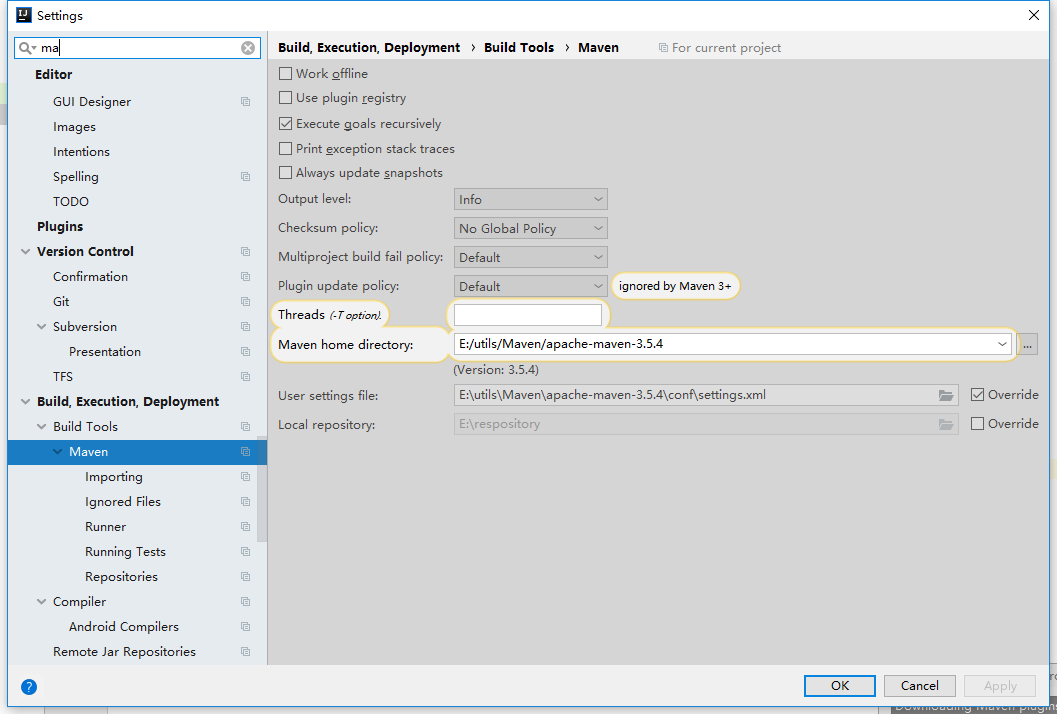
2、idea中设置maven
首先在maven的setting.xml配置maven镜像,在mirrors节点下配置阿里云镜像,国内的下载速度快
  <mirrors>
    <!-- mirror
     | Specifies a repository mirror site to use instead of a given repository. The repository that
     | this mirror serves has an ID that matches the mirrorOf element of this mirror. IDs are used
     | for inheritance and direct lookup purposes, and must be unique across the set of mirrors.
     |
    <mirror>
      <id>mirrorId</id>
      <mirrorOf>repositoryId</mirrorOf>
      <name>Human Readable Name for this Mirror.</name>
      <url>http://my.repository.com/repo/path</url>
    </mirror>
     -->
     <mirror>
        <id>nexus-aliyun</id>
        <mirrorOf>*</mirrorOf>
        <name>Nexus aliyun</name>
        <url>http://maven.aliyun.com/nexus/content/groups/public</url>
    </mirror>
  </mirrors>
然后在idea中将maven的设置改成自己本地,不然会取默认的配置。
3、新建maven项目

4、添加依赖等。pom.xml如下:
<?xml version="1.0" encoding="UTF-8"?>
<project xmlns="http://maven.apache.org/POM/4.0.0"
         xmlns:xsi="http://www.w3.org/2001/XMLSchema-instance"
         xsi:schemaLocation="http://maven.apache.org/POM/4.0.0 http://maven.apache.org/xsd/maven-4.0.0.xsd">
    <modelVersion>4.0.0</modelVersion>

    <groupId>com.ty</groupId>
    <artifactId>SpringStudy</artifactId>
    <version>1.0-SNAPSHOT</version>
    <name>spring4.x study</name>
    <description>it's only for studying</description>

    <dependencies>
        <dependency>
            <groupId>org.springframework</groupId>
            <artifactId>spring-core</artifactId>
            <version>5.1.6.RELEASE</version>
        </dependency>
        <dependency>
            <groupId>org.springframework</groupId>
            <artifactId>spring-beans</artifactId>
            <version>5.1.6.RELEASE</version>
        </dependency>
        <dependency>
            <groupId>javax.servlet</groupId>
            <artifactId>javax.servlet-api</artifactId>
            <version>4.0.1</version>
            <scope>provided</scope>
        </dependency>
        <dependency>
            <groupId>javax.servlet</groupId>
            <artifactId>jstl</artifactId>
            <version>1.2</version>
        </dependency>

    </dependencies>
</project>
5、新建两个类
package com.ty.beans;

public class School {

    private String address;

    private Student student;

    public School(Student student) {
        this.student = student;
    }
}
package com.ty.beans;

public class Student {

    private int age;

    private String name;

    public int getAge() {
        return age;
    }

    public void setAge(int age) {
        this.age = age;
    }

    public String getName() {
        return name;
    }

    public void setName(String name) {
        this.name = name;
    }
}
applicationContext.xml文件:
<?xml version="1.0" encoding="UTF-8"?>
<beans xmlns="http://www.springframework.org/schema/beans"
       xmlns:xsi="http://www.w3.org/2001/XMLSchema-instance"
       xsi:schemaLocation="http://www.springframework.org/schema/beans http://www.springframework.org/schema/beans/spring-beans.xsd">

    <bean id="student" class="com.ty.beans.Student">
        <!-- property代表的是set方法注入-->
        <property name="age" value="27"></property>
        <property name="name" value="马云"></property>
    </bean>

    <bean id="school" class="com.ty.beans.School">
        <!-- constructor代表的是构造器注入-->
        <constructor-arg ref="student"></constructor-arg>
    </bean>
</beans>
测试类:
package com.ty.beans;

import javafx.application.Application;
import org.junit.Test;
import org.junit.runner.RunWith;
import org.springframework.beans.factory.BeanFactory;
import org.springframework.beans.factory.xml.XmlBeanFactory;
import org.springframework.context.ApplicationContext;
import org.springframework.context.support.ClassPathXmlApplicationContext;
import org.springframework.test.context.ContextConfiguration;
import org.springframework.test.context.junit4.AbstractJUnit4SpringContextTests;
import org.springframework.test.context.junit4.SpringJUnit4ClassRunner;

@ContextConfiguration(locations = { "classpath:applicationContext.xml" })
@RunWith(SpringJUnit4ClassRunner.class)
public class IOCTest  {

    @Test
    public void testIOC() {
        ApplicationContext context = new ClassPathXmlApplicationContext("classpath:applicationContext.xml");
        System.out.println(context.getBean("student"));
        System.out.println(context.getBean("school"));
    }
}
运行结果:
com.ty.beans.Student@65d6b83b
com.ty.beans.School@d706f19
那么为啥spring可以做到这点呢?往下看:
相关java基础回顾
本人在说jvm模块的类加载的时候,说到class文件流经过验证后进入方法区,并且会创建一个class对象,而java中的反射可以使用class对象进行操作,如构造函数、属性和方法等等。
1、反射
package com.ty.reflect;

public class Car {

    private String brand;

    private String color;

    private int maxSpeed;

    public Car() {

    }

    public Car(String brand, String color, int maxSpeed) {
        this.brand = brand;
        this.color = color;
        this.maxSpeed = maxSpeed;
    }

    public void introduce() {
        System.out.println("This is a test" + ";汽车品牌为" + this.getBrand());
    }

    public String getBrand() {
        return brand;
    }

    public void setBrand(String brand) {
        this.brand = brand;
    }

    public String getColor() {
        return color;
    }

    public void setColor(String color) {
        this.color = color;
    }

    public int getMaxSpeed() {
        return maxSpeed;
    }

    public void setMaxSpeed(int maxSpeed) {
        this.maxSpeed = maxSpeed;
    }
}
package com.ty.reflect;

import java.lang.reflect.Constructor;
import java.lang.reflect.Method;

public class ReflectTest {

    public static Car init() throws Throwable {
        Class clazz = Car.class;

        //获取car的无参构造器
        Constructor<?> cons = clazz.getDeclaredConstructor();
        //通过无参构造器实例化对象
        Car car = (Car) cons.newInstance();

        Method setBrand = clazz.getMethod("setBrand", String.class);
        //实例方法的第一个隐式参数就是当前对象this
        setBrand.invoke(car, "大众");
        return car;
    }

    public static void main(String[] args) throws Throwable {
        Car car = init();
        car.introduce();
    }
}
运行结果:
This is a test;汽车品牌为大众
注:如果某个类中存在private属性或是方法,反射可以直接访问,因此反射也从一定程度上打破了封装。
field.setAccessible(true);
method.setAccessible(true);
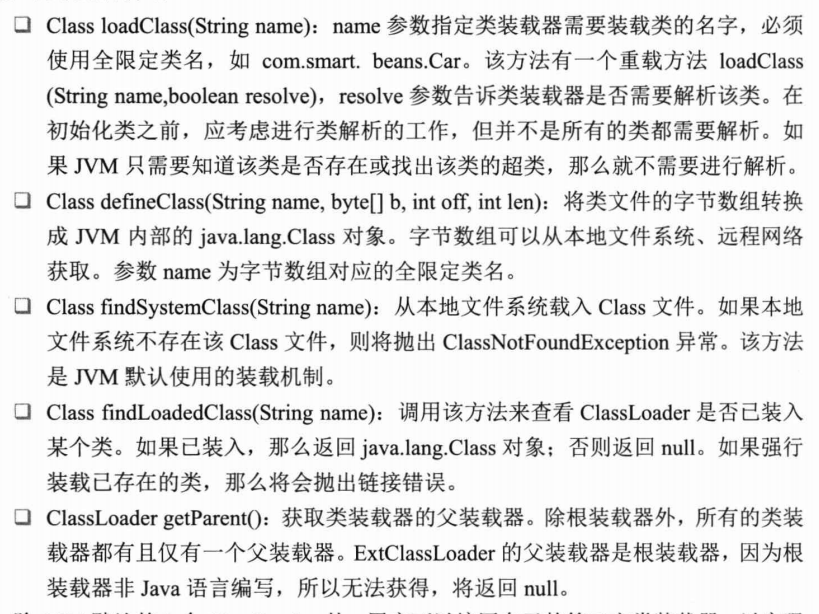
2、ClassLoader方法

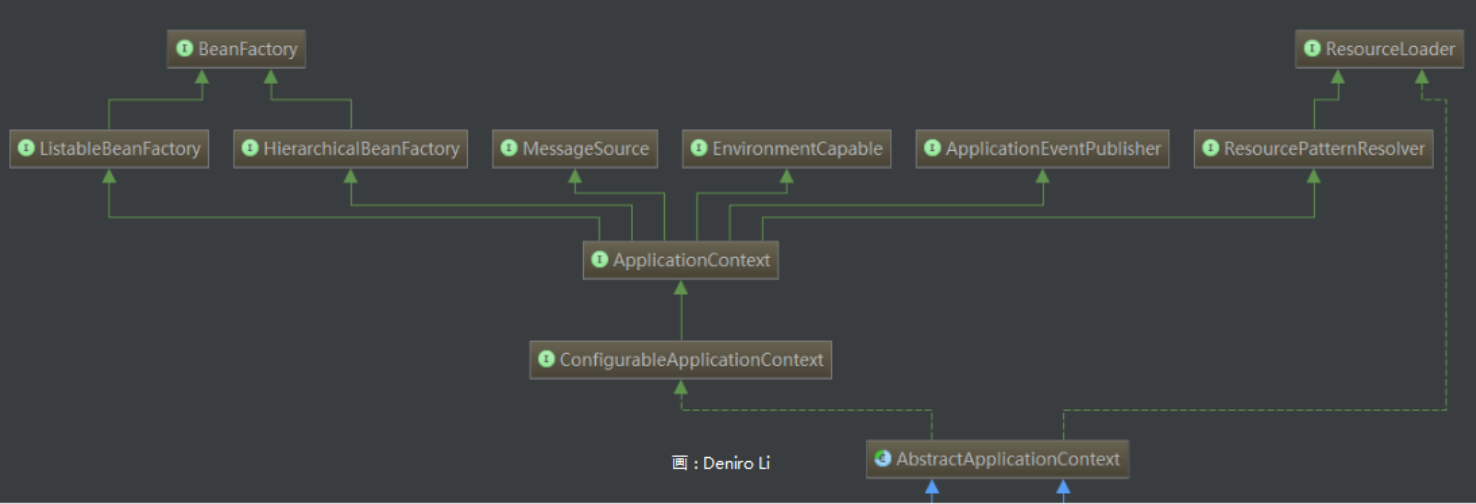
BeanFactory
一般将BeanFactory称为ioc容器,将ApplicationContext称为应用上下文。

ApplicationContext
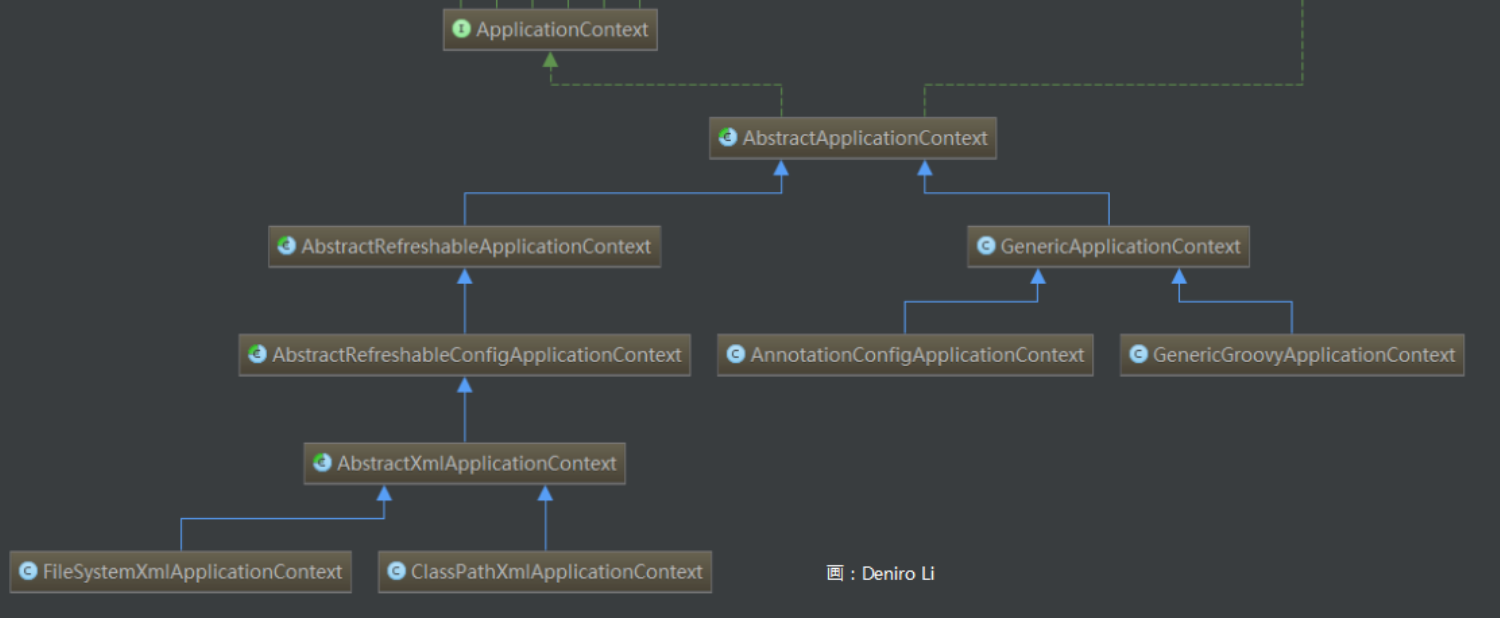
1、ApplicationContext
2、WebApplicationContext
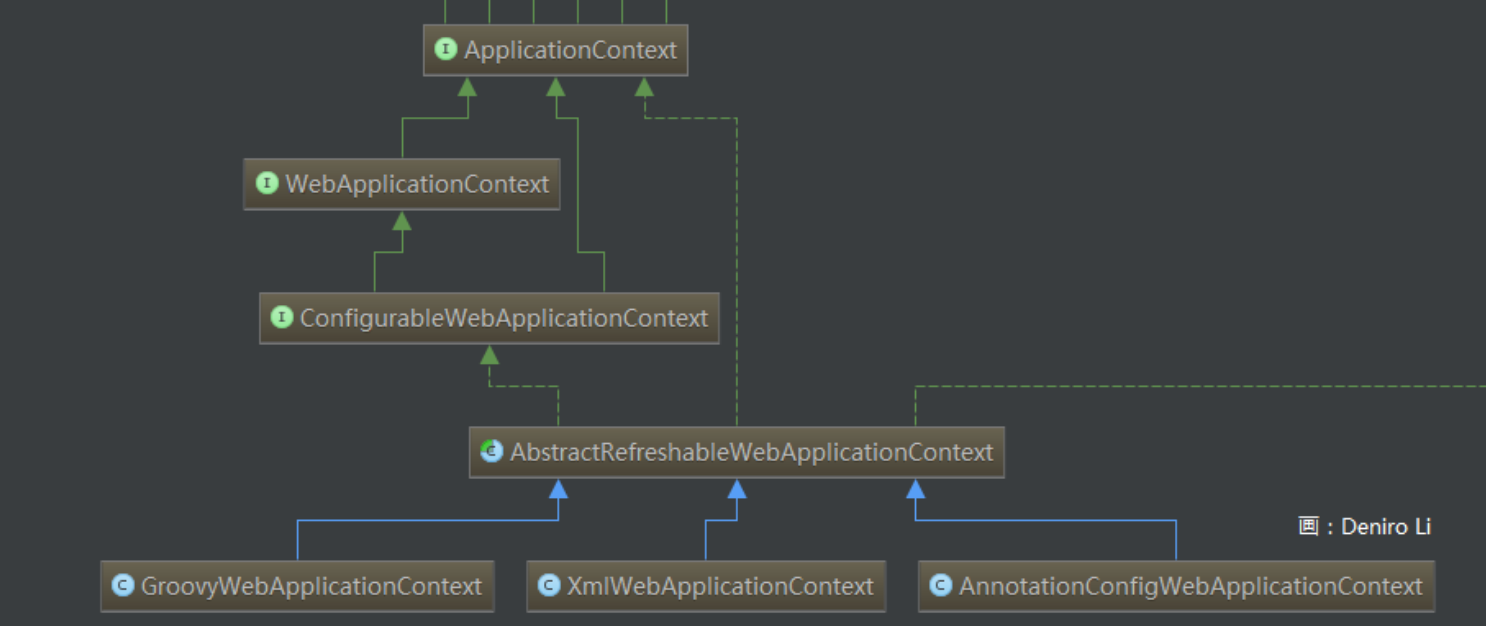
专门为web应用所准备,允许从相对于web根目录的路径中装载配置文件完成初始化工作。并且从WebApplicationContext中可以获得ServletContext(web容器上下文)的引用,整个web应用上下文对象将作为属性放置到ServletContext中,保证web应用环境可以访问Spring应用上下文。
ServletContext:javaee标准规定了,servlet容器需要在应用项目启动时,给应用项目初始化一个ServletContext作为公共环境容器存放公共信息。ServletContext中的信息都是由容器提供的。
在非web应用的环境下,bean只有singleton和prototype两种作用域。WebApplicationContext为bean添加三个新的作用域:request、session和global session。
WebApplicationContext可以通过WebApplicationContextUtils.getWebApplicationContext(ServletContext sc)获取。
WebApplicationContextUtils.getWebApplicationContext(ServletContext sc)
WebApplicationContext需要ServletContext实例,也就是说依赖于web容器,所以我们在web.xml中需要配置web容器监听器(ServletContextListener)。例如:
<?xml version="1.0" encoding="UTF-8"?>
<web-app xmlns:xsi="http://www.w3.org/2001/XMLSchema-instance"
         xmlns="http://java.sun.com/xml/ns/javaee"
         xsi:schemaLocation="http://java.sun.com/xml/ns/javaee http://java.sun.com/xml/ns/javaee/web-app_3_0.xsd"
         version="3.0">

    <!-- 指定 spring 配置文件-->
    <context-param>
        <param-name>contextConfigLocation</param-name>
        <param-value>classpath:applicationContext.xml</param-value>
    </context-param>

    <!-- web 容器监听器-->
    <listener>
        <listener-class>org.springframework.web.context.ContextLoaderListener</listener-class>
    </listener>


</web-app>
ContextLoaderListener通过contextConfigLocation中配置的xml信息来获取Spring的相关信息。另外WebApplicationContext必须要使用日志功能,所以可以将log4j.properties文件配置在web.xml中,例如:
<!-- 指定 log4j 配置文件-->
<context-param>
    <param-name>log4jConfigLocation</param-name>
    <param-value>/WEB-INF/log4j.properties</param-value>
</context-param>
<!-- Log4j 监听器-->
<listener>
    <listener-class>org.springframework.web.util.Log4jConfigListener</listener-class>
</listener>