profile配置
通常企业级应用都会区分开发环境、测试环境以及生产环境等等。spring提供了全局profile配置的方式,使得在不同环境下使用不同的applicaiton.properties,走不同的配置。
模板:application-{profile}.properties
示例:


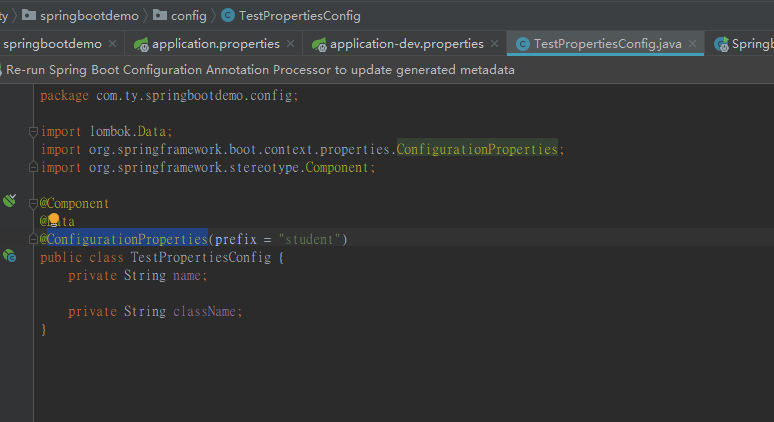
程序会根据application.properties文件中配置的spring.profiles.active=xxx的值,找到对应的application-xxx.properties中具体的属性值
当springboot项目打成jar包之后,可以直接通过命令方式执行,如下:
java -jar xxx.jar --spring.profiles.active=test
这样就是将当前项目运行模式调整为test,从而找到不同的application-xxx.properties文件。
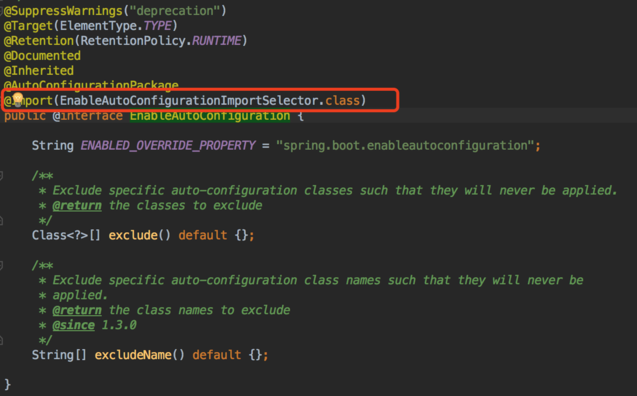
springboot运行原理
springboot关于自动配置的源码在spring-boot-autoconfigure.jar中,查看源码可以到此包。
@SpringBootApplication的核心功能其实是由@EnableAutoConfiguration注解提供,源码如下:
原理这块这篇文章讲的不错:https://www.cnblogs.com/shamo89/p/8184960.html
spring boot的web开发
springboot提供了spring-boot-starter-web对web开发予以支持,主要嵌入了tomcat以及springmvc的相关依赖。
1、静态资源访问
Spring Boot默认提供静态资源⽬录位置需置于classpath下,⽬录名需符合如下规则:
- /static
- /public
- /resources
- /META-INF/resources
2、web页面
通常我们需要返回一个页面,springboot默认的模板配置路径为: src/main/resources/templates 。springboot推荐使用模板引擎,不推荐使用jsp,并且使用jsp还相对麻烦。
thymeleaf模板引擎
在springboot中,jsp不推荐使用,因为jsp在内嵌的servlet的容器上运行有一些问题,内嵌的tomcat不支持以jar形式运行jsp。最为推荐的则是thymeleaf,提供了完美的springmvc的支持。
Thymeleaf是⼀个XML/XHTML/HTML5模板引擎,可⽤于Web与⾮Web环境中的应⽤开发。
A、引入jar包
<dependency>
<groupId>org.springframework.boot</groupId>
<artifactId>spring-boot-starter-thymeleaf</artifactId>
</dependency>
B、页面中引入thymeleaf
<html xmlns:th="http://www.thymeleaf.org">
C、访问model中的数据
<span th:text="${singlePerson.name}">name</span>
D、model数据迭代
<div class="panel-body">
    <ul class="list-group">
    <li class="list-group-item" th:each="person:${people}">
      <span th:text="${person.name}">name</span>
      <span th:text="${person.age}">age</span>
    </li>
    </ul>
</div>
E、数据判断
<div th:if="${not #lists.isEmpty(people)}">
    <div class="panel-body">
        <ul class="list-group">
        <li class="list-group-item" th:each="person:${people}">
          <span th:text="${person.name}">name</span>
          <span th:text="${person.age}">age</span>
        </li>
        </ul>
    </div>
</div>
F、js中获取model数据
<script th:inline="javascript">
    var single = [[${singlePerson}]];
    console.log(single.name + "/" + single.age);
</script>
通过<script th:inline="javascript">才能使js直接获取到model中的数据;[[${}]]获取model中的数据
如果需要修改Thymeleaf的相关默认配置,只需要在application.properties文件中修改以下属性即可,默认配置如下:
# Enable template caching.
spring.thymeleaf.cache=true
# Check that the templates location exists.
spring.thymeleaf.check-template-location=true
# Content-Type value.
spring.thymeleaf.content-type=text/html
# Enable MVC Thymeleaf view resolution.
spring.thymeleaf.enabled=true
# Template encoding.
spring.thymeleaf.encoding=UTF-8
# Comma-separated list of view names that should be excluded from resolution.
spring.thymeleaf.excluded-view-names=
# Template mode to be applied to templates. See also StandardTemplateModeHandlers.
spring.thymeleaf.mode=HTML5
# Prefix that gets prepended to view names when building a URL.
spring.thymeleaf.prefix=classpath:/templates/
# Suffix that gets appended to view names when building a URL.
spring.thymeleaf.suffix=.html spring.thymeleaf.template-resolver-order= # Order of
the template resolver in the chain. spring.thymeleaf.view-names= # Comma-separated
list of view names that can be resolved.
统一异常处理
springboot中默认定义了异常处理页面,如果我们访问的url出现错误,springboot会自动将我们的请求转发到/error中,会出现如下的界面:
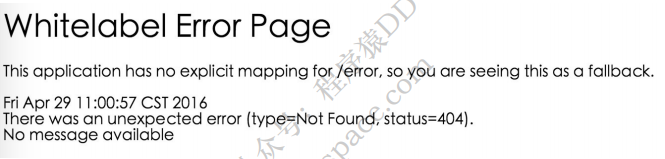
这个页面太草率了,你当然可以自己去实现:
//创建全局的异常处理类
@ControllerAdvice
class GlobalExceptionHandler {

    public static final String DEFAULT_ERROR_VIEW = "error";
    //针对不同的异常单独处理,这里则统一处理了
    @ExceptionHandler(value = Exception.class)
    public ModelAndView defaultErrorHandler(HttpServletRequest req, Exception e) throws Exception {
        ModelAndView mav = new ModelAndView();
        mav.addObject("exception", e);
        mav.addObject("url", req.getRequestURL());
        mav.setViewName(DEFAULT_ERROR_VIEW);
        return mav;
    }
}
自己实现error.html
<!DOCTYPE html>
<html>
<head lang="en">
<meta charset="UTF-8" />
<title>统⼀异常处理</title>
</head>
<body>
<h1>Error Handler</h1>
<div th:text="${url}"></div>
<div th:text="${exception.message}"></div>
</body>
</html>
效果如下:

如果你返回的不是页面,而是json报错信息,也可以支持,如下:
异常信息类:
public class ErrorInfo<T> {
    public static final Integer OK = 0;
    public static final Integer ERROR = 100;
    private Integer code;
    private String message;
    private String url;
    private T data;
    // 省略getter和setter
}
自定义异常:
public class MyException extends Exception {
    public MyException(String message) {
        super(message);
    }
}
controller:
@Controller
public class HelloController {
    @RequestMapping("/json")
    public String json() throws MyException {
        throw new MyException("发⽣错误2");
    }
}
全局异常处理类:
@ControllerAdvice
public class GlobalExceptionHandler {
    @ExceptionHandler(value = MyException.class)
    @ResponseBody
    public ErrorInfo<String> jsonErrorHandler(HttpServletRequest req, MyException e) throws Exception {
        ErrorInfo<String> r = new ErrorInfo<>();
        r.setMessage(e.getMessage());
        r.setCode(ErrorInfo.ERROR);
        r.setData("Some Data");
        r.setUrl(req.getRequestURL().toString());
        return r;
    }
}
运行效果如下:
{
    code: 100,
    data: "Some Data",
    message: "发⽣错误2",
    url: "http://localhost:8080/json"
}
如何接收xml的请求参数
大部分开发过程中使用的请求参数无非就是json、string等,但是xml偶尔也会遇到,那么遇到xml的请求参数如何处理呢?
思路:在本人的spring系列文章中,曾提到springmvc是怎么将请求参数绑定到处理方法的入参中的,里面涉及到一个叫做HttpMessageConverter的东西,那么思路就来了,只要在收到请求后将参数解析成对应的对象即可。
1、引入MappingJackson2XmlHttpMessageConverter
<dependency>
<groupId>com.fasterxml.jackson.dataformat</groupId>
<artifactId>jackson-dataformat-xml</artifactId>
</dependency>
2、定义对象与对象之间的关系
假设请求xml是这样的格式:
<User>
    <name>aaaa</name>
    <age>10</age>
</User>
@Data
@NoArgsConstructor
@AllArgsConstructor
//上面三个都是lombok的注解,注解名字也非常清晰了
@JacksonXmlRootElement(localName = "User")
public class User {
    @JacksonXmlProperty(localName = "name")
    private String name;
    @JacksonXmlProperty(localName = "age")
    private Integer age;
}
3、创建接口
@Controller
public class UserController {
    //@PostMapping = @RequestMapping(method = RequestMethod.POST)
    //consumes指定处理请求的提交内容类型(Content-Type),例如application/json, text/html;
    //produces指定返回的内容类型,仅当request请求头中的(Accept)类型中包含该指定类型才返回
    @PostMapping(value = "/user",consumes = MediaType.APPLICATION_XML_VALUE,produces = MediaType.APPLICATION_XML_VALUE)
    @ResponseBody
    public User create(@RequestBody User user) {
        user.setName("didispace.com : " + user.getName());
        user.setAge(user.getAge() + 100);
        return user;
    }
}
整合spring security
我们在编写Web应用时,经常需要对⻚⾯做⼀些安全控制,⽐如:对于没有访问权限的用户需要转到登录表单页面。要实现访问控制的方法多种多样,可以通过Aop、拦截器实现,也可以通过框架实现(如:Apache Shiro、Spring Security)。
controller:
@Controller
public class HelloController {
    @RequestMapping("/")
    public String index() {
        return "index";
    }

    @RequestMapping("/hello")
    public String hello() {
        return "hello";
    }

  @RequestMapping("/login")
  public String login() {
    return "login";
  }
}
index.html
<!DOCTYPE html>
<html xmlns="http://www.w3.org/1999/xhtml" xmlns:th="http://www.thymeleaf.org"
xmlns:sec="http://www.thymeleaf.org/thymeleaf-extras-springsecurity3">
<head>
    <title>Spring Security入门</title>
</head>
<body>
    <h1>欢迎使用Spring Security!</h1>
    <p>点击 <a th:href="@{/hello}">这里</a> 打个招呼吧</p>
</body>
</html>
hello.html
<!DOCTYPE html>
<html xmlns="http://www.w3.org/1999/xhtml" xmlns:th="http://www.thymeleaf.org"
xmlns:sec="http://www.thymeleaf.org/thymeleaf-extras-springsecurity3">
<head>
    <title>Hello World!</title>
</head>
<body>
    <h1>Hello world!</h1>
</body>
</html>
login.html
<!DOCTYPE html>
<html xmlns="http://www.w3.org/1999/xhtml"
xmlns:th="http://www.thymeleaf.org"
xmlns:sec="http://www.thymeleaf.org/thymeleaf-extras-springsecurity3">
<head>
    <title>Spring Security Example </title>
</head>
<body>
    <div th:if="${param.error}">
        用户名或密码错误
    </div>
    <div th:if="${param.logout}">
        您已注销成功
    </div>
    <form th:action="@{/login}" method="post">
        <div>
            <label> 用户名 : <input type="text" name="username"/>
            </label>
        </div>
        <div>
            <label> 密 码 : <input type="password" name="password"/>
            </label>
        </div>
        <div><input type="submit" value="登录"/></div>
    </form>
</body>
</html>
添加依赖:
<dependency>
    <groupId>org.springframework.boot</groupId>
    <artifactId>spring-boot-starter-security</artifactId>
</dependency>
spring security配置:
@Configuration
@EnableWebSecurity
public class WebSecurityConfig extends WebSecurityConfigurerAdapter {
    @Override
    protected void configure(HttpSecurity http) throws Exception {
        http
        .authorizeRequests()
        .antMatchers("/", "/home").permitAll()
        .anyRequest().authenticated()
        .and()
        .formLogin()
        .loginPage("/login")
        .permitAll()
        .and()
        .logout()
        .permitAll();
    }

    @Autowired
    public void configureGlobal(AuthenticationManagerBuilder auth) throws Exception{
        auth
        .inMemoryAuthentication()
        .withUser("user").password("password").roles("USER");
    }
}
- 通过 @EnableWebSecurity 注解开启Spring Security的功能
- 继承 WebSecurityConfigurerAdapter ,并重写它的方法来设置一些web安全的细节
- configure(HttpSecurity http) 方法
- 通过 authorizeRequests() 定义哪些URL需要被保护、哪些不需要被保护。例如以上代码指定了 / 和 /home 不需要任何认证就可以访问,其他的路径都必须通过身份验证。
- 通过 formLogin() 定义当需要用户登录时候,转到的登录页面。
- configureGlobal(AuthenticationManagerBuilder auth) 方法,在内存中创建了一个用户,该用户的名称为user,密码为password,用户角色为USER。