MySQL集群是一个无共享的(share-nothing)、分布式节点架构的存储方案,目的是提供容错性和高性能。
MySQL NDB Cluster架构如图:
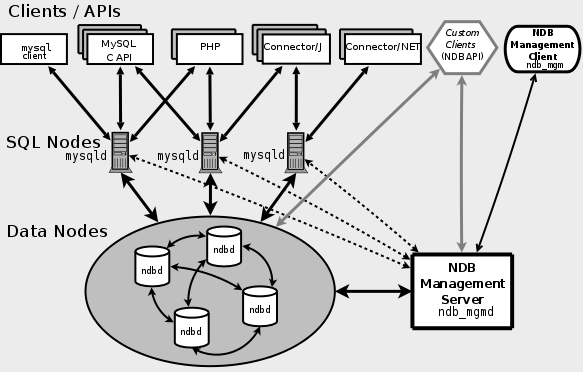
MySQL NDB Cluster架构按照节点类型分为三部分:
- 管理节点:管理节点通过对配置文件conifg.ini的维护来对其他节点进行管理。该文件可以用来配置有多少副本需要维护、在数据节点上为数据和索引分配多少内存、数据节点的位置、数据节点上保存数据的磁盘的位置,SQL节点的位置信息等,管理节点只能有一个。
- SQL节点:SQL节点可以理解为应用程序和数据节点的一个桥梁,应用程序不能直接访问数据节点,只能先访问SQL节点,然后SQL节点再去访问数据节点来返回数据,Cluster中可以有多个SQL节点,通过每个SQL节点查询到的数据都是一致的,一般来说,SQL节点越多,分配到每个SQL节点的负载就越小,系统的整体性能就越好;
- 数据节点:数据节点用来存放数据,可有多个数据节点。
下面演示MySQL NDB Cluster的安装:
1、环境信息:
管理节点Mgmd:10.24.32.180
SQL节点Mysqld1:10.24.32.181
SQL节点Mysqld2:10.24.32.182
数据节点Ndbd1:10.24.32.183
数据节点Ndbd2:10.24.32.184
2、下载MySQL NDB Cluster软件;
[root@strong /]# ll /u01/
total 873104
-rw-r--r--. 1 root root 894037512 Mar  6 13:26 mysql-cluster-gpl-7.5.9-linux-glibc2.12-x86_64.tar.gz
[root@strong /]#
3、安装SQL节点,在每个SQL节点都执行如下操作;
1)创建mysql用户和组,如果该用户和组不存在:
[root@strong ~]# grep mysql /etc/passwd
[root@strong ~]# grep mysql /etc/group
[root@strong ~]# groupadd mysql
[root@strong ~]# useradd -g mysql -s /bin/false mysql
[root@strong ~]#
2)解压缩 mysql-cluster软件;
[root@strong local]# tar zxvf /u01/mysql-cluster-gpl-7.5.9-linux-glibc2.12-x86_64.tar.gz
[root@strong local]# ln -s mysql-cluster-gpl-7.5.9-linux-glibc2.12-x86_64/ mysql
[root@strong local]#
3)设置数据库系统
[root@strong local]# cd mysql
[root@strong mysql]# ./bin/mysqld --initialize --user=mysql
2018-03-06T11:04:27.469235Z 0 [Warning] TIMESTAMP with implicit DEFAULT value is deprecated. Please use --explicit_defaults_for_timestamp server option (see documentation for more details).
2018-03-06T11:04:28.202258Z 0 [Warning] InnoDB: New log files created, LSN=45790
2018-03-06T11:04:28.291271Z 0 [Warning] InnoDB: Creating foreign key constraint system tables.
2018-03-06T11:04:28.360238Z 0 [Warning] No existing UUID has been found, so we assume that this is the first time that this server has been started. Generating a new UUID: 238f3d44-212e-11e8-a946-000c298da433.
2018-03-06T11:04:28.365955Z 0 [Warning] Gtid table is not ready to be used. Table 'mysql.gtid_executed' cannot be opened.
2018-03-06T11:04:28.371758Z 1 [Note] A temporary password is generated for root@localhost: 9gidWnDuEo_:
4)拷贝MySQL启动脚本;
[root@strong mysql]# cp support-files/mysql.server /etc/init.d/mysql.server5)修改Root密码;
[root@strong mysql]# service mysql.server start
Starting MySQL.Logging to '/usr/local/mysql/data/strong.mysql.com.err'.
..... SUCCESS!
[root@strong mysql]# ./bin/mysql -uroot -p
Enter password:
Welcome to the MySQL monitor.  Commands end with ; or g.
Your MySQL connection id is 5
Server version: 5.7.21-ndb-7.5.9-cluster-gpl

Copyright (c) 2000, 2018, Oracle and/or its affiliates. All rights reserved.

Oracle is a registered trademark of Oracle Corporation and/or its
affiliates. Other names may be trademarks of their respective
owners.

Type 'help;' or 'h' for help. Type 'c' to clear the current input statement.

mysql> alter user 'root'@'localhost' identified by 'root';
Query OK, 0 rows affected (0.00 sec)

mysql>
4、安装数据节点,在每个SQL节点都执行如下操作;
将ndbd、ndbmtd拷贝至/usr/local/bin/目录中:
[root@strong u01]# tar zxvf mysql-cluster-gpl-7.5.9-linux-glibc2.12-x86_64.tar.gz
[root@strong u01]# cp mysql-cluster-gpl-7.5.9-linux-glibc2.12-x86_64/bin/ndbd /usr/local/bin/ndbd
[root@strong u01]# cp mysql-cluster-gpl-7.5.9-linux-glibc2.12-x86_64/bin/ndbmtd /usr/local/bin/ndbmtd
[root@strong u01]# ll /usr/local/bin/
total 38280
-rwxr-xr-x. 1 root root 39197765 Mar  6 19:38 ndbd
-rwxr-xr-x. 1 root root        0 Mar  6 19:39 ndbmtd
[root@strong u01]#
5、安装管理节点;
将ndb_mgm、ndb_mgmd拷贝至/usr/local/bin/目录中:
[root@strong local]# scp mysql-cluster-gpl-7.5.9-linux-glibc2.12-x86_64/bin/ndb_mgm* root@10.24.32.180:/usr/local/bin/
The authenticity of host '10.24.32.180 (10.24.32.180)' can't be established.
ECDSA key fingerprint is 5b:97:d1:f5:8b:84:a8:ac:9b:bf:b2:b4:0d:71:92:a5.
Are you sure you want to continue connecting (yes/no)? yes
Warning: Permanently added '10.24.32.180' (ECDSA) to the list of known hosts.
root@10.24.32.180's password:
ndb_mgm                                                                                                             100% 7940KB   7.8MB/s   00:00
ndb_mgmd                                                                                                            100%   17MB  17.3MB/s   00:00
[root@strong local]#
6、配置数据节点和SQL节点;
每个数据节点和SQL节点都需要一个my.cnf配置文件,该文件包括
- 连接串ndb-connectstring:告诉节点到哪里查找到管理节点信息;
- 存储引擎信息:ndbcluster。
配置信息:
[root@strong ~]# vi /etc/my.cnf
[mysqld]

ndbcluster #run NDB storage engine

[mysql_cluster]

ndb-connectstring=10.24.32.180  #location of management server
7、配置管理节点;
创建目录,放置配置文件:
[root@strong local]# mkdir mysql
[root@strong local]# cd mysql/
[root@strong mysql]# mkdir mysql-cluster
[root@strong mysql-cluster]# vi config.ini
[ndbd default]

#Opitions affecting ndbd processes on all nodes:

NoOfReplicas=1  #Number of replicas


[ndb_mgmd]

HostName=10.24.32.180              #Hostname or IP address of MGM node
DataDir=/var/lib/mysql-cluster     #Dir for MGM node log files

[ndbd]

HostName=10.24.32.183
NodeId=2
DataDir=/u01

[ndbd]

HostName=10.24.32.184
NodeId=3
DataDir=/u01

[mysqld]

HostName=10.24.32.181

[mysqld]

HostName=10.24.32.182
8、启动Cluster;
Cluster需要各个节点都进行启动后才可以运行,节点的启动顺序为管理节点——>数据节点——>SQL节点。
启动管理节点:
[root@strong mysql-cluster]# ndb_mgmd -f ./config.ini
MySQL Cluster Management Server mysql-5.7.21 ndb-7.5.9
[root@strong mysql-cluster]# ps aux |grep ndb_mgmd
root      8155  2.5  0.6 504480  3380 ?        Ssl  20:48   0:00 ndb_mgmd -f ./config.ini
root      8166 13.0  0.1 112632   968 pts/0    S+   20:48   0:00 grep --color=auto ndb_mgmd
[root@strong mysql-cluster]#
启动数据节点:
[root@strong local]# ndbd
2018-03-06 20:51:40 [ndbd] INFO     -- Angel connected to '10.24.32.180:1186'
2018-03-06 20:51:40 [ndbd] INFO     -- Angel allocated nodeid: 2
启动SQL节点:
[root@strong ~]# service mysql.server start
Starting MySQL........................................................................................................................................... SUCCESS!
9、节点全部成功启动后,在管理节点查看集群状态;
[root@strong mysql-cluster]# ndb_mgm
-- NDB Cluster -- Management Client --
ndb_mgm> show
Connected to Management Server at: localhost:1186
Cluster Configuration
---------------------
[ndbd(NDB)]	2 node(s)
id=2	@10.24.32.183  (mysql-5.7.21 ndb-7.5.9, Nodegroup: 0, *)
id=3	@10.24.32.184  (mysql-5.7.21 ndb-7.5.9, Nodegroup: 1)

[ndb_mgmd(MGM)]	1 node(s)
id=1	@10.24.32.180  (mysql-5.7.21 ndb-7.5.9)

[mysqld(API)]	2 node(s)
id=4	@10.24.32.181  (mysql-5.7.21 ndb-7.5.9)
id=5	@10.24.32.182  (mysql-5.7.21 ndb-7.5.9)

ndb_mgm>
ndb_mgm是ndb_mgmd(MySQL Cluster Server)的客户端管理工具,通过它可以方便的检查Cluster的状态、启动备份、关闭Cluster等功能。
通过上面的状态信息,可以看到:
1)集群的管理服务端口是1186;
Connected to Management Server at: localhost:1186
2)集群的数据节点有2个;
[ndbd(NDB)]	2 node(s)
id=2	@10.24.32.183  (mysql-5.7.21 ndb-7.5.9, Nodegroup: 0, *)
id=3	@10.24.32.184  (mysql-5.7.21 ndb-7.5.9, Nodegroup: 1)
3)管理节点有一个;
[ndb_mgmd(MGM)]	1 node(s)
id=1	@10.24.32.180  (mysql-5.7.21 ndb-7.5.9)
4)SQL节点有2个,且处于连接状态;
[mysqld(API)]	2 node(s)
id=4	@10.24.32.181  (mysql-5.7.21 ndb-7.5.9)
id=5	@10.24.32.182  (mysql-5.7.21 ndb-7.5.9)
10、测试Cluster;
使用Cluster,则表的存储引擎必须为NDB,其他类型存储引擎的数据不会保存到数据节点中,对于CLuster的一个重要功能就是防止单点故障,下面将分别进行测试:
1)NDB存储引擎测试
--在任一SQL节点(本例用10.24.32.181)的test库创建测试表t_cluster,设置存储引擎为NDB:
mysql> create table t_cluster(id int,name varchar(100),cdate datetime default now()) engine=NDB;
Query OK, 0 rows affected (0.42 sec)

mysql> insert into t_cluster(id,name) values(1,'Alen'),(2,'Cluster Test');
Query OK, 2 rows affected (0.10 sec)
Records: 2  Duplicates: 0  Warnings: 0

mysql> select *from t_cluster;
+------+--------------+---------------------+
| id   | name         | cdate               |
+------+--------------+---------------------+
|    1 | Alen         | 2018-03-06 23:07:50 |
|    2 | Cluster Test | 2018-03-06 23:07:50 |
+------+--------------+---------------------+
2 rows in set (0.03 sec)

mysql>
--在另一SQL节点(本例用10.24.32.182)的test库查询表t_cluster,结果如下:
mysql> select *from t_cluster;
+------+--------------+---------------------+
| id   | name         | cdate               |
+------+--------------+---------------------+
|    1 | Alen         | 2018-03-06 23:07:50 |
|    2 | Cluster Test | 2018-03-06 23:07:50 |
+------+--------------+---------------------+
2 rows in set (0.02 sec)

mysql>
--如上,两个SQL节点查询到的数据是一致的。
--在SQL节点10.24.32.181将表t_cluster的存储引擎改为MyISAM,再次插入测试:
mysql> alter table t_cluster engine=myisam;
Query OK, 2 rows affected (0.66 sec)
Records: 2  Duplicates: 0  Warnings: 0

mysql> insert into t_cluster(id,name) values(3,'MyISAM Test');
Query OK, 1 row affected (0.03 sec)

mysql> select *from t_cluster;
+------+--------------+---------------------+
| id   | name         | cdate               |
+------+--------------+---------------------+
|    2 | Cluster Test | 2018-03-06 23:07:50 |
|    1 | Alen         | 2018-03-06 23:07:50 |
|    3 | MyISAM Test  | 2018-03-06 23:15:02 |
+------+--------------+---------------------+
3 rows in set (0.00 sec)

mysql>
--在SQL节点10.24.32.182再次查询表t_cluster,可以发现,表无法查询,结果如下:
mysql> select *from t_cluster;
ERROR 1412 (HY000): Table definition has changed, please retry transaction
mysql>
--在SQL节点10.24.32.181将表t_cluster的存储引擎改为NDB:
mysql> alter table t_cluster engine=ndb;
Query OK, 3 rows affected (0.32 sec)
Records: 3  Duplicates: 0  Warnings: 0

mysql>
--在SQL节点10.24.32.182再次查询,结果如下:
mysql> select *from t_cluster;
+------+--------------+---------------------+
| id   | name         | cdate               |
+------+--------------+---------------------+
|    3 | MyISAM Test  | 2018-03-06 23:15:02 |
|    1 | Alen         | 2018-03-06 23:07:50 |
|    2 | Cluster Test | 2018-03-06 23:07:50 |
+------+--------------+---------------------+
3 rows in set (0.01 sec)

mysql>
--显然,表t_cluster的数据再次同步到了数据节点,所有SQL节点又都可以正常查询数据。
2)单点故障测试
对于任一种节点,都存在单点故障的可能性,在Cluster的设置过程中,应该尽量对每一类节点设置冗余,以防止单点故障发生时造成的应用中断;对于管理节点,一般不需要特殊的设置,只需要将管理工具和配置文件放在多台主机上即可。
SQL节点发生单点故障
--将SQL节点10.24.32.181的MySQL服务停止:
[root@strong mysql]# mysqladmin -uroot -p shutdown
Enter password:
--查看CLuster的状态,可以发现SQL节点10.24.32.181已经断开,另一SQL节点10.24.32.182仍然正常连接:
[root@strong mysql-cluster]# ndb_mgm
-- NDB Cluster -- Management Client --
ndb_mgm> show
Connected to Management Server at: localhost:1186
Cluster Configuration
---------------------
[ndbd(NDB)]	2 node(s)
id=2	@10.24.32.183  (mysql-5.7.21 ndb-7.5.9, Nodegroup: 0, *)
id=3	@10.24.32.184  (mysql-5.7.21 ndb-7.5.9, Nodegroup: 1)

[ndb_mgmd(MGM)]	1 node(s)
id=1	@10.24.32.180  (mysql-5.7.21 ndb-7.5.9)

[mysqld(API)]	2 node(s)
id=4 (not connected, accepting connect from 10.24.32.181)
id=5	@10.24.32.182  (mysql-5.7.21 ndb-7.5.9)

ndb_mgm>
--从节点10.24.32.182查看t_cluster表,结果如下,显然,SQL节点的单点故障并没有引起数据的查询故障,对于应用来说,需要改变的就是将以前对故障节点的访问改为对非故障节点的访问:
mysql> select *from t_cluster;
+------+--------------+---------------------+
| id   | name         | cdate               |
+------+--------------+---------------------+
|    2 | Cluster Test | 2018-03-06 23:07:50 |
|    3 | MyISAM Test  | 2018-03-06 23:15:02 |
|    1 | Alen         | 2018-03-06 23:07:50 |
+------+--------------+---------------------+
3 rows in set (0.00 sec)
数据节点的单点故障
在该测试环境中,数据节点有两个,那么它们对数据的存储是互相镜像还是一份数据分成几块呢?这个答案的关键在于配置文件中[ndbd default]组中的noofreplicas参数,如果该值为1,表示只有一份数据,但是分成n块分别存储在n个数据节点上;如果等于2,则表示数据被分成n/2块,每块数据都有两个备份,这样即使有任一个节点发生故障,只要它的备份节点正常,系统就可以正常运行。
--管理节点10.24.32.180的[ndbd default]组中的noofreplicas参数为1,将数据节点10.24.32.183的NDB进程停止:
[root@strong u01]# ps -ef |grep ndbd
root      8253     1  0 20:51 ?        00:00:01 ndbd
root      8254  8253  3 20:51 ?        00:03:36 ndbd
root      8515  8336  0 22:48 pts/1    00:00:00 grep --color=auto ndbd
[root@strong u01]# kill 8254 8253
--查看集群状态:
ndb_mgm> show
Cluster Configuration
---------------------
[ndbd(NDB)]	2 node(s)
id=2 (not connected, accepting connect from 10.24.32.183)
id=3 (not connected, accepting connect from 10.24.32.184)

[ndb_mgmd(MGM)]	1 node(s)
id=1	@10.24.32.180  (mysql-5.7.21 ndb-7.5.9)

[mysqld(API)]	2 node(s)
id=4 (not connected, accepting connect from 10.24.32.181)
id=5 (not connected, accepting connect from 10.24.32.182)
--在任一SQL节点(10.24.32.181)查询表t_cluster,结果如下:
mysql> select *from t_cluster;
ERROR 1296 (HY000): Got error 4009 'Cluster Failure' from NDBCLUSTER
mysql>
--将noofreplicas参数改为2,按照前面的步骤重启集群:
NoOfReplicas=2
--停止数据节点10.24.32.183的NDB进程:
[root@strong ~]# ps aux |grep ndbd
root      1322  0.0  0.0  28584   128 ?        Ss   01:22   0:00 ndbd --initial
root      1323  1.8 56.6 1136400 281004 ?      Sl   01:22   0:04 ndbd --initial
root      1382  0.0  0.1 112632   964 pts/0    S+   01:26   0:00 grep --color=auto ndbd
[root@strong ~]# kill 1323
[root@strong ~]# ps aux |grep ndbd
root      1386  0.0  0.1 112632   964 pts/0    R+   01:26   0:00 grep --color=auto ndbd
[root@strong ~]#
--查看集群状态:
ndb_mgm> show
Cluster Configuration
---------------------
[ndbd(NDB)]	2 node(s)
id=2 (not connected, accepting connect from 10.24.32.183)
id=3	@10.24.32.184  (mysql-5.7.21 ndb-7.5.9, Nodegroup: 0, *)

[ndb_mgmd(MGM)]	1 node(s)
id=1	@10.24.32.180  (mysql-5.7.21 ndb-7.5.9)

[mysqld(API)]	2 node(s)
id=4	@10.24.32.181  (mysql-5.7.21 ndb-7.5.9)
id=5	@10.24.32.182  (mysql-5.7.21 ndb-7.5.9)

ndb_mgm>
--再次从任一SQL节点10.24.32.181查询,结果如下:
mysql> select *from t_cluster;
+------+--------------+---------------------+
| id   | name         | cdate               |
+------+--------------+---------------------+
|    1 | Alen         | 2018-03-07 01:40:04 |
|    3 | MyISAM Test  | 2018-03-07 01:40:19 |
|    2 | Cluster Test | 2018-03-07 01:40:04 |
+------+--------------+---------------------+
3 rows in set (0.01 sec)
11、Cluster的关闭;
[root@strong mysql-cluster]# ndb_mgm
-- NDB Cluster -- Management Client --
ndb_mgm> shutdown
Connected to Management Server at: localhost:1186
Node 2: Cluster shutdown initiated
Node 3: Cluster shutdown initiated
Node 3: Node shutdown completed.
3 NDB Cluster node(s) have shutdown.
Disconnecting to allow management server to shutdown.
Node 2: Node shutdown completed.
ndb_mgm>
注意:集群关闭后,SQL节点不会关闭,需手工关闭;