记一次智能语音软件的开发-终于为孩子找到了个靠谱的口语老师
“再穷不能穷教育,再苦不能苦孩子”,作为娃的爸妈,不仅仅要努力工作保证物质支持,更要关注娃的学习状况,而且时刻都怕娃“输在了起跑线上”,可是,现在孩子们的起跑线也太多了点,英语、各种艺术特长,甚至跳绳,忙的不亦乐乎。然而家长也不是全才啊,这不,我的姐姐最近就开始发愁女儿的英语口语问题了,自己发音不准确,报班又不知道哪家靠谱,眼看着孩子就要落后于小伙伴了,了解到这个情况后,我拿出英语课本,想到自己每次都是60飘过的英语成绩,又放了回去,拿起了我的武器——代码。

近些年自然语言处理已经成熟地应用在很多领域,智能语音测评的使用成本早已是大众所能承受。根据给娃纠正读音的需求,我最终选择调用靠谱的大厂,有道智云的API来开发个简易语音评测程序,或者称之为——智能口语老师!
调用API接口的准备工作
首先,是需要在有道智云的个人页面上创建实例、创建应用、绑定应用和实例,获取到应用的id和密钥。具体个人注册的过程和应用创建过程详见文章分享一次批量文件翻译的开发过程

开发过程详细介绍
下面介绍具体的代码开发过程。
首先研究官方文档给出的API输入输出规范。该API采用https方式通信,简单来说,就是将预先录制好的声音文件编码处理,签名后提交给API,解析API返回的json即可得到评分结果。
接口地址:
https接口: https://openapi.youdao.com/iseap
API输入所需参数如下表:
| 字段名 | 类型 | 含义 | 必填 | 备注 |
|---|---|---|---|---|
| q | text | 要评测的音频文件的Base64编码字符串 | True | 必须是Base64编码 |
| text | text | 要评测的音频文件对应的文本 | True | have a good day |
| langType | text | 源语言 | True | 支持语言 |
| appKey | text | 应用ID | True | 可在 应用管理 查看 |
| salt | text | UUID | True | UUID |
| curtime | text | 时间戳(秒) | True | TimeStamp |
| sign | text | 签名,通过sha256(应用ID+input+salt+curtime+应用密钥)生成;input的生成规则见表下的备注 | True | sha256(应用ID+input+salt+curtime+应用密钥) |
| signType | text | 签名类型 | True | v2 |
| format | text | 语音文件的格式,wav | true | wav |
| rate | text | 采样率,推荐 16000 采用率 | true | 16000 |
| channel | text | 声道数, 仅支持单声道,请填写固定值1 | true | 1 |
| type | text | 上传类型, 仅支持base64上传,请填写固定值1 | true | 1 |
其中签名sign生成方法如下:
signType=v2; sign=sha256(应用ID+input+salt+curtime+应用密钥)。
这里需要注意的是input的计算方式为:input=q前10个字符 + q长度 + q后10个字符(当q长度大于20)或 input=q字符串(当q长度小于等于20)。
接口的输出参数如下:
| 字段 | 含义 |
|---|---|
| errorCode | 识别结果错误码,一定存在。 详细信息可见 错误代码列表 |
| refText | 请求的文本 |
| start | 音频中句子开始时间,单位是秒 |
| end | 音频中句子结束时间,单位是秒 |
| integrity | 句子完整度得分 |
| fluency | 句子流利度得分 |
| pronunciation | 句子准确度得分 |
| speed | 语速,单词/分钟 |
| overall | 句子综合评分 |
| words | 单词评分数组 |
| -word | 单词 |
| -start | 单词开始时间,单位是秒 |
| -end | 单词结束时间,单位是秒 |
| -pronunciation | 单词准确度得分 |
| -phonemes | 音标数组 |
| --phoneme | 音标 |
| --start | 音标开始时间,单位是秒 |
| --end | 音标结束时间,单位是秒 |
| --judge | 判断音素是否错误,true为发音正确,false为发音错误,同时calibration给出提示 |
| --calibration | 如果发音错误,提示用户该发音像什么 |
| --prominence | 重音程度,分数越高,当前音标越可能是重音,分数在[0 100] |
| --stress_ref | 元音重音参考/标准答案,如果为true,说明参考答案认为该元音应该发重音,辅音时无意义 |
| --stress_detect | 在一个单词中,用户该音标发音为重音 |
Demo开发:
这个demo使用python3开发,包括maindow.py,audioandprocess.py,isebynetease.py 三个文件,分别为demo的界面、录音以及其他逻辑处理和智能语音评测接口调用方法的封装。
-
界面部分:
UI 部分大体分为三部分,文章处理区域、录音区域和评分展示区域。
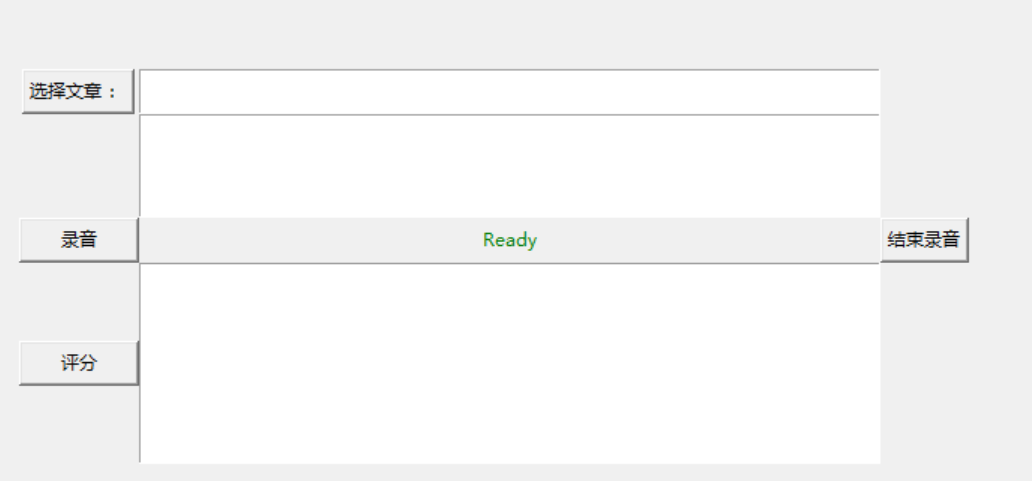
其布局代码如下:
root=tk.Tk()
root.title("youdao ise test")
frm = tk.Frame(root)
frm.grid(padx='50', pady='50')

# 选取文章
btn_get_file_path=tk.Button(frm,text='选择课文 :',command=get_file)
btn_get_file_path.grid(row=0,column=0)

text1=tk.Text(frm,width='70', height='2')
text1.grid(row=0,column=1)

# 文章内容展示
text2=tk.Text(frm,width='70', height='5')
text2.grid(row=1,column=1)

# 开始和停止录音
btn_start_rec=tk.Button(frm,text='录音',command=start_rec,width=10)
btn_start_rec.grid(row=2,column=0)

lb_Status = tk.Label(frm, text='Ready', anchor='w', fg='green')
lb_Status.grid(row=2,column=1)

btn_stop_rec=tk.Button(frm,text="结束录音",command=stop_rec)
btn_stop_rec.grid(row=2,column=2)

# 打分按钮和结果展示
btn_score=tk.Button(frm,text="评分",command=start_score,width=10)
btn_score.grid(row=3,column=0)

text3=tk.Text(frm,width='70', height='10')
text3.grid(row=3,column=1)

root.mainloop()
其中启动按钮btn_score的绑定事件start_score()来收集带所有的文本文件,启动合成,并打印运行结果:
def start_score(): result=au_model.get_score(file_dict) for r in result: text3.insert(tk.END,r) -
audioandprocess.py
这里主要实现了文件处理、录音和处理接口返回的功能。首先定义一个Audio_model
class Audio_model():
    def __init__(self, audio_path,is_recording):
        self.current_file=''				# 当前录音对应的原文路径
        self.is_recording=is_recording		# 录音状态标识
        self.audio_chunk_size=1600			# 以下均为录音必要参数
        self.audio_channels=1
        self.audio_format=pyaudio.paInt16
        self.audio_rate=16000
record_and_save()方法进行录音并保存到项目的record路径中,录音文件名与原文的文件名相同,便于对应。
    def record_and_save(self):
        self.is_recording = True
        file_name=self.get_file_name(self.current_file)
        self.audio_file_name='./record/'+file_name+'.wav'
        threading.Thread(target=self.record,args=(self.audio_file_name,)).start()
get_score()方法实现了调用isebynetease.py中封装的工具并解析返回值的功能:
def get_score(self,dict): result=[] #self.is_recording=False for path in dict: file_content=self.get_content(path) file_name=self.get_file_name(path) audio_path='./record/'+file_name+'.wav' print(file_content,audio_path) score_result=connect(audio_path,file_content) #处理结果,添加进结果集 result.append( score_result) return result -
isebynetease.py
isebynetease.py中是和请求有道智云API直接相关的一些方法,最核心的是connect()方法,整合了API所要求的各个参数,并调用执行请求的方法do_request(),而后根据UI的展示需求,处理API的返回结果并拼接字符串。
def connect(audio_file_path,audio_text):
    recordname=audio_file_path.split("/")[-1]
    audio_file_path = audio_file_path
    lang_type = 'en' # 当前仅支持英文
    extension = audio_file_path[audio_file_path.rindex('.')+1:]
    if extension != 'wav':
        print('不支持的音频类型')
        sys.exit(1)
    wav_info = wave.open(audio_file_path, 'rb')
    sample_rate = wav_info.getframerate()
    nchannels = wav_info.getnchannels()
    wav_info.close()
    with open(audio_file_path, 'rb') as file_wav:
        q = base64.b64encode(file_wav.read()).decode('utf-8')

    data = {}
    data['text'] = audio_text
    curtime = str(int(time.time()))
    data['curtime'] = curtime
    salt = str(uuid.uuid1())
    signStr = APP_KEY + truncate(q) + salt + curtime + APP_SECRET
    sign = encrypt(signStr)
    data['appKey'] = APP_KEY
    data['q'] = q
    data['salt'] = salt
    data['sign'] = sign
    data['signType'] = "v2"
    data['langType'] = lang_type
    data['rate'] = sample_rate
    data['format'] = 'wav'
    data['channel'] = nchannels
    data['type'] = 1

    # 处理返回值
    response = do_request(data)
    j = json.loads(str(response.content, encoding="utf-8"))
    print(j)
    # 句子完整度
    contextIntegrity="句子完整度:"+str( round(j["integrity"], 2))+"  "
    pronunciation="发音准确度:"+str(round(j["pronunciation"],2))+"  "
    fluency="流利度:"+str(round(j["fluency"],2))+"  "
    speed="语速:" +str(round(j["speed"],2))+" "
    recordAndResult=recordname+" "+contextIntegrity+pronunciation+fluency+speed+"
"

    return recordAndResult
效果展示
展示一下本人纯正的”chinenglish“ 录音后程序的运行情况(得分多少不重要,重要的是它客观的评价方式 :P )
首先介绍一下操作方法:
1)点击“选择文章”,选择需要评测的文章;
2)点击“录音”,“结束录音”按钮,进行语音录制;
3)如需对多篇文章进行评测,重复1)、2)步骤即可
4)点击“评分“,进行智能语音评测,并展示评分结果,同时将详细评分结果,存储在本代码路径的result目录下。
效果展示
界面部分:展示了 句子完整度、发音准确度的、流利度的得分,以及语速:
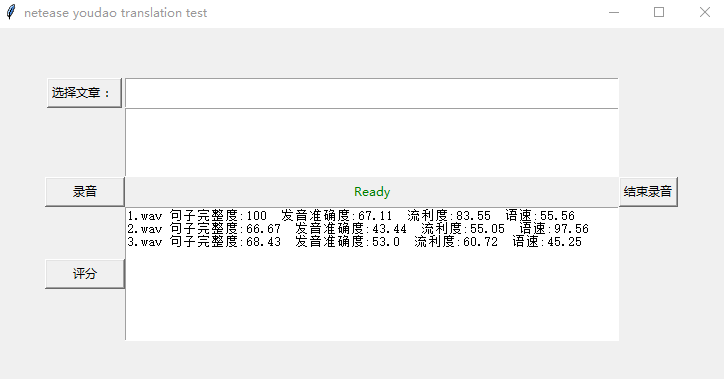
文档部分:分别对每个语音进行了测评,并将返回的详细结果以json的形式存在了result文件夹下。

输出结果展示:
{
    ’integrity‘: 100,//句子完整度
    'refText’: "Are you ok? ",//待评测语音对应的文本
    'pronunciation': 67.108101,//句子发音准确度
    'start': 0.030000,//音频开始时间,秒
    	'words': [{ //单词信息列表
		'pronunciation': 50.640327, //单词准确度分数
		'start': 0.73, //单词开始时间,秒
		'end': 0.76,//单词结束时间,秒
		'word': 'Are', //单词文本
		'phonemes': [{ //音标信息列表
			'stress_ref': False, //元音重音参考(即标准重音),如果为true,说明参考答案认为该元音应该发重音,辅音时无意义
			'pronunciation': 50.640331, //音标准确度评分
			'stress_detect': False,//在一个单词中,用户该音标发音不为重音
			'phoneme': 'ɝ', //音标名称
			'start': 0.73,  //音标开始时间,秒
			'end': 0.76,    //音标结束时间,秒
			'judge': True,  //判断音标是否错误,true为发音正确,false为发音错误,同时calibration给出提示
			'calibration': 'ɝ', //判断音标是否错误,true为发音正确,false为发音错误,同时calibration给出提示
			'prominence': 1 //重音程度,当前音标越可能是重音,分数区间[0 100]
		}]
	}, {
		'pronunciation': 76.810608,
		'start': 0.77,
		'end': 1.08,
		'word': 'you',
		'phonemes': [{
			'stress_ref': False,
			'pronunciation': 79.084282,
			'stress_detect': False,
			'phoneme': 'j',
			'start': 0.77,
			'end': 0.86,
			'judge': True,
			'calibration': 'j',
			'prominence': 0.944885
		}, {
			'stress_ref': True,
			'pronunciation': 74.536934,
			'stress_detect': True,
			'phoneme': 'u',
			'start': 0.87,
			'end': 1.08,
			'judge': True,
			'calibration': 'u',
			'prominence': 1
		}]
	}, {
		'pronunciation': 66.129013,
		'start': 1.14,
		'end': 1.8,
		'word': 'ok',
		'phonemes': [{
			'stress_ref': True,
			'pronunciation': 69.046341,
			'stress_detect': True,
			'phoneme': 'o',
			'start': 1.14,
			'end': 1.27,
			'judge': True,
			'calibration': 'o',
			'prominence': 1
		}, {
			'stress_ref': False,
			'pronunciation': 65.357841,
			'stress_detect': False,
			'phoneme': 'k',
			'start': 1.28,
			'end': 1.42,
			'judge': True,
			'calibration': 'k',
			'prominence': 0.838557
		}, {
			'stress_ref': True,
			'pronunciation': 63.982838,
			'stress_detect': True,
			'phoneme': 'e',
			'start': 1.43,
			'end': 1.8,
			'judge': True,
			'calibration': 'e',
			'prominence': 0.956448
		}]
	}],
	'fluency': 83.554047, //句子流利度
	'overall': 83.885124,//句子综合评分
	'errorCode': '0', //识别结果错误码,一定存在
	'end': 1.8,//句子结束时间,秒
	'speed': 55.555557 // 句子语速(单词/分钟)
}
总结
有道智云的智能语音评测API文档清晰,调用过程全程无坑,开发体验非常友好,评分结果客观公正,很具有参考价值,以至于我都想和小侄女一起学习进步去了!