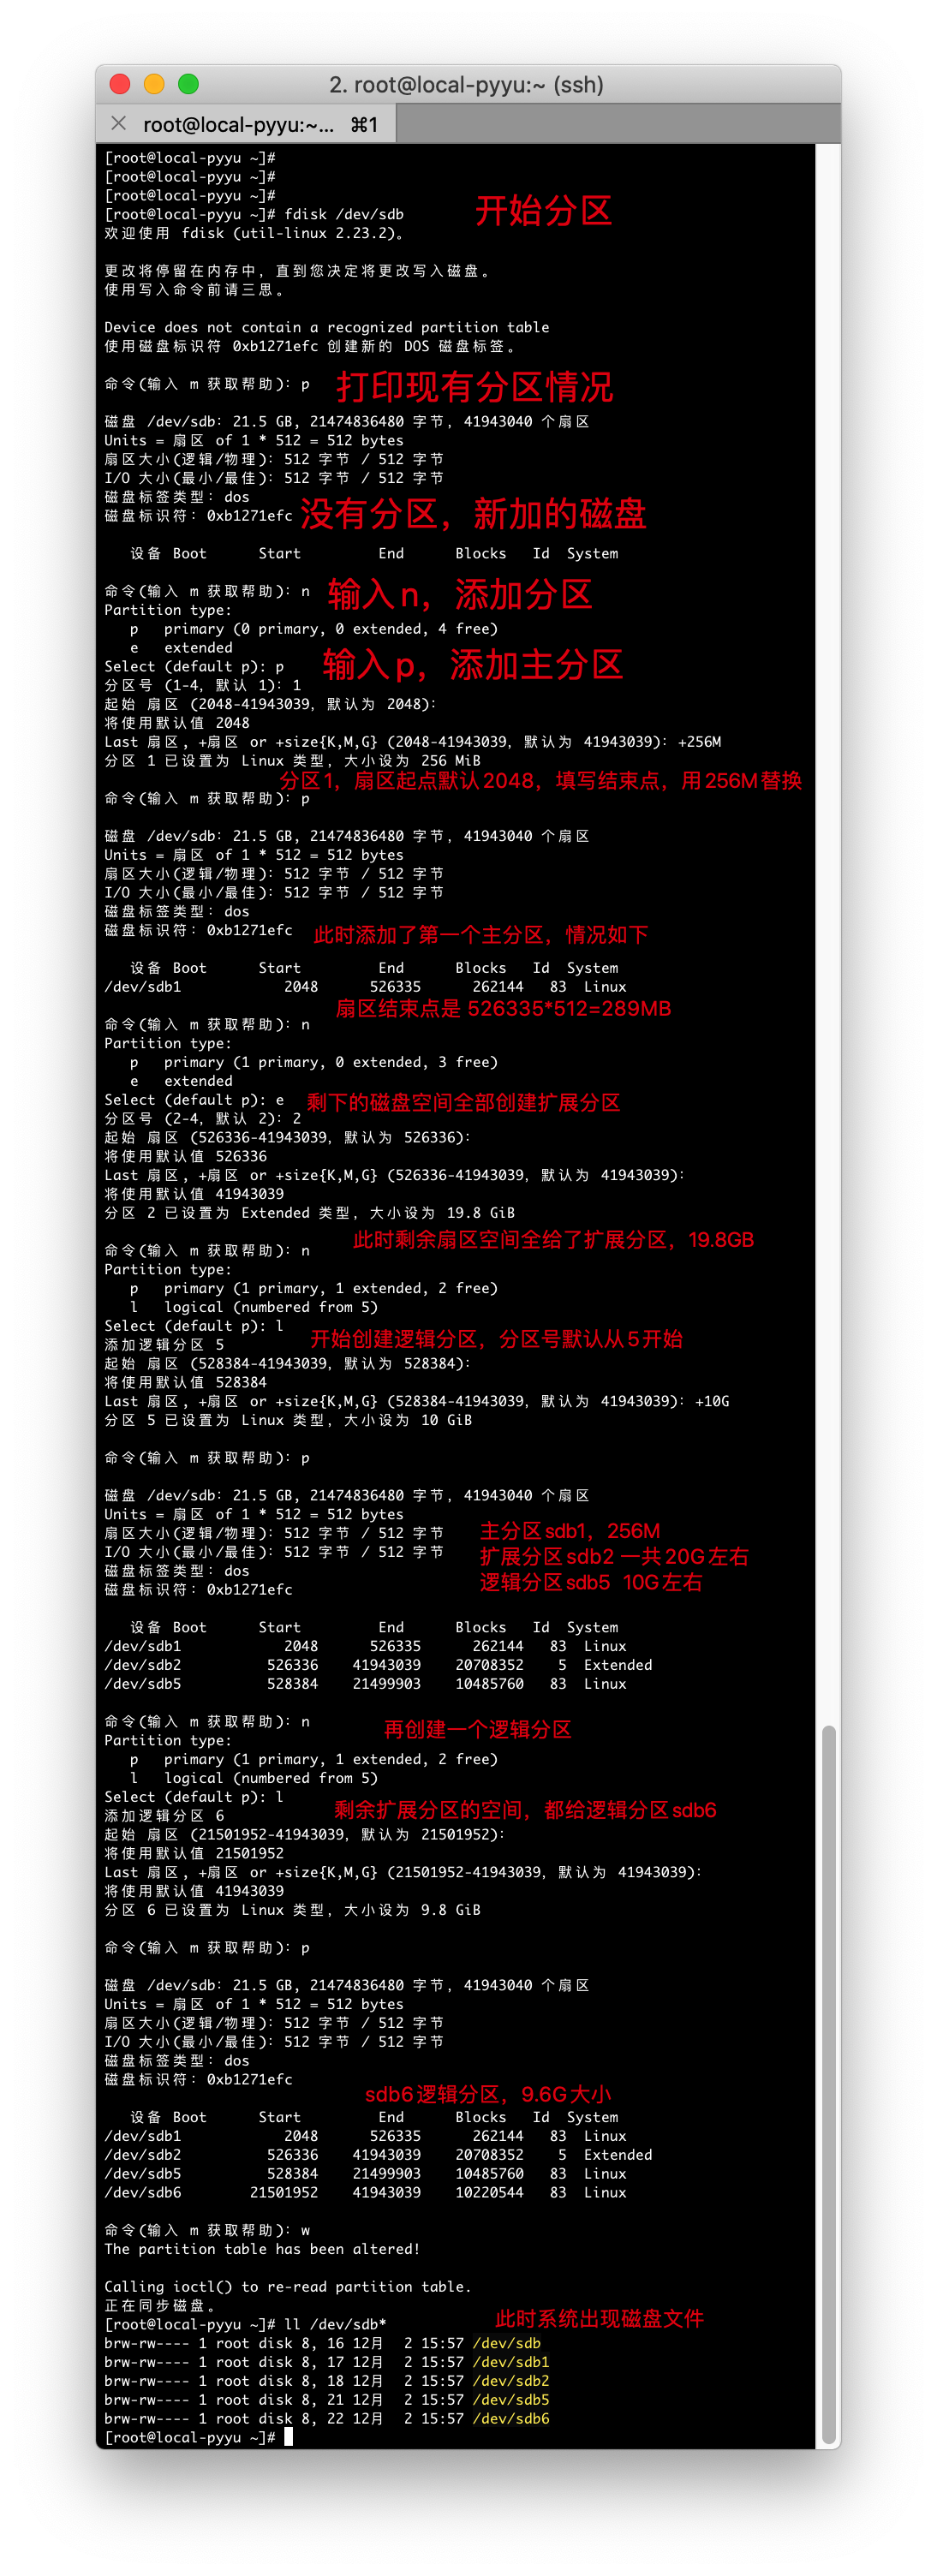
1.用vmware添加一块10G的硬盘,且永久挂载到/data01中,写出详细的步骤
partprobe # centos5 系列重读分区
partprobe /dev/sdb

partx -a /dev/sdb # 之后系列重读

# fdisk 只能用于2T以下磁盘分区
# parted 用于2T以上磁盘分区

[root@luffycity ~]# fdisk /dev/sda
欢迎使用 fdisk (util-linux 2.23.2)。

更改将停留在内存中,直到您决定将更改写入磁盘。
使用写入命令前请三思。


命令(输入 m 获取帮助):m
命令操作
   a   toggle a bootable flag
   b   edit bsd disklabel
   c   toggle the dos compatibility flag
   d   delete a partition
   g   create a new empty GPT partition table
   G   create an IRIX (SGI) partition table
   l   list known partition types
   m   print this menu
   n   add a new partition
   o   create a new empty DOS partition table
   p   print the partition table
   q   quit without saving changes
   s   create a new empty Sun disklabel
   t   change a partition's system id
   u   change display/entry units
   v   verify the partition table
   w   write table to disk and exit
   x   extra functionality (experts only)

命令(输入 m 获取帮助):

                n:创建新分区
                d:删除已有分区
                t:修改分区类型
                l:查看所有已经ID
                w:保存并退出
                q:不保存并退出
                m:查看帮助信息
                p:显示现有分区信息
[root@01 ~]# mkfs.xfs /dev/sdc5
[root@01 ~]# mount /dev/sdc5 /mnt/
[root@01 ~]#
[root@01 ~]# df -h
Filesystem      Size  Used Avail Use% Mounted on
devtmpfs        476M     0  476M   0% /dev
tmpfs           487M     0  487M   0% /dev/shm
tmpfs           487M  7.7M  479M   2% /run
tmpfs           487M     0  487M   0% /sys/fs/cgroup
/dev/sda3        20G  2.2G   17G  12% /
/dev/sda1       197M  110M   88M  56% /boot
tmpfs            98M     0   98M   0% /run/user/0
/dev/sdc5       5.0G   33M  5.0G   1% /mnt
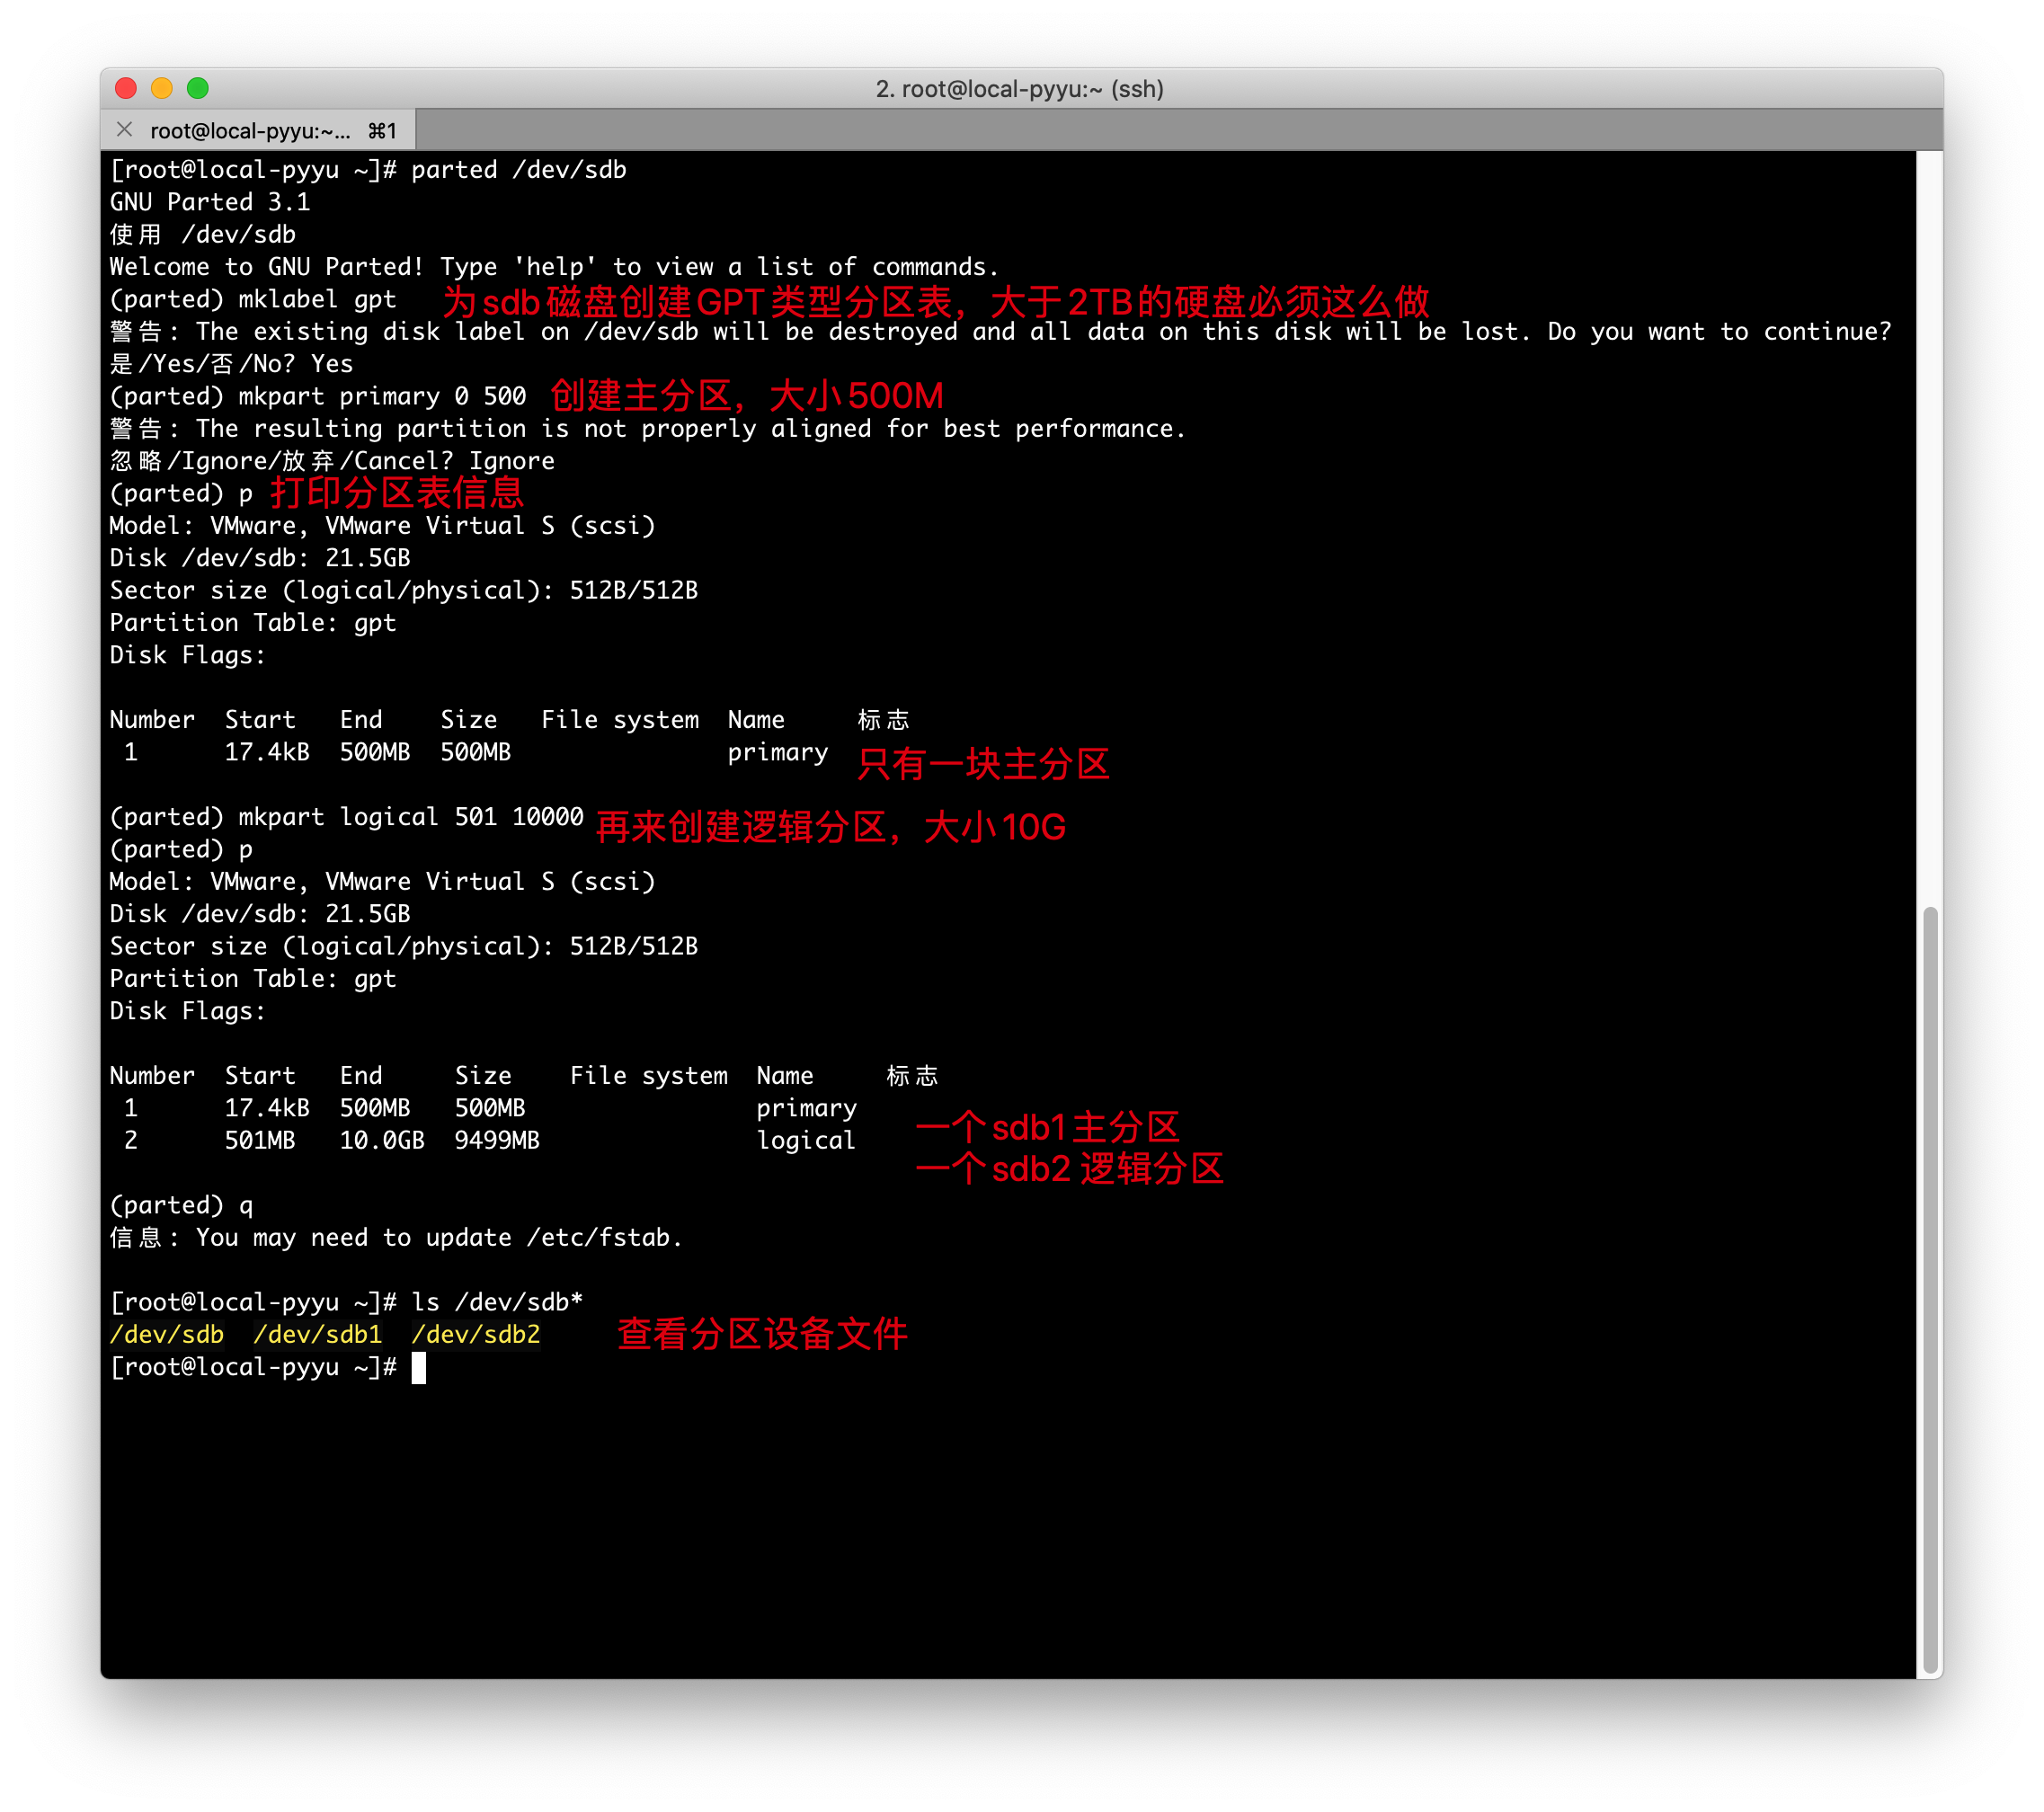
[root@01 ~]# mkfs.xfs /dev/sdb2
[root@01 ~]# mount /dev/sdb2 /mnt/
[root@01 ~]#
[root@01 ~]# df -h
Filesystem      Size  Used Avail Use% Mounted on
devtmpfs        476M     0  476M   0% /dev
tmpfs           487M     0  487M   0% /dev/shm
tmpfs           487M  7.7M  479M   2% /run
tmpfs           487M     0  487M   0% /sys/fs/cgroup
/dev/sda3        20G  2.2G   17G  12% /
/dev/sda1       197M  110M   88M  56% /boot
tmpfs            98M     0   98M   0% /run/user/0
/dev/sdb2       8.9G   33M  8.9G   1% /mnt
2.用自己语言描述raid0和raid1的区别
RAID 0:
将两个或以上相同信号,容量的硬盘组合,磁盘阵列的总容量是多个硬盘的总和,数据依次写
入物理磁盘,理想状态下,硬盘读写性能会翻倍。但只要坏一块磁盘,所有数据都会损坏
优点:速度快
缺点:冗余差

RAID 1:
RAID 1 技术,是将两块以上硬盘绑定,数据写入时,同时写入多个硬盘,因此即使有硬盘故障,也有数据备份。
优点:冗余性好
缺点:太浪费资源了
3.sed删除文件的空白和注释行
[root@01 ~]# sed -e '/^$/d' -e '/^#.*/d' 1.txt
1rootasdasdasdasd1
111asdasdasdasd
w4
asdasd
[root@01 ~]# cat 1.txt
1rootasdasdasdasd1
111asdasdasdasd
w4
#w5


asdasd
# asdads
4.使用awk删除文件chaoge.txt空白行
[root@01 ~]# awk '!/^$/{print $0}' 1.txt
1rootasdasdasdasd1
111asdasdasdasd
w4
#w5
asdasd
# asdads
5.把命令echo "I am oldboy" 的结果写入"黑洞文件中",且命令的标准错误输出,也当做标准输出处理
[root@01 ~]# echo "I am Machine" >>/dev/null 2>&1
6.利用{}符号备份/etc/hosts文件
[root@01 ~]# cp /etc/hosts{,.bak}
[root@01 ~]# ll /etc/host
host.conf    hostname     hosts        hosts.allow  hosts.bak    hosts.deny
7.过滤掉文件chaoge.txt的注释和空白行
[root@01 ~]# grep -Ev '(^$|^#)' 1.txt
1rootasdasdasdasd1
111asdasdasdasd
w4
asdasd
-bash: ech: command not found
I am Machine
8.找出除了小写字母以外的字符,文本如下chaoge.txt I am oldboy teacher I teach linux. I like python. My qq is 877348180. My name is chaoge. My website is http://pythonav.cn
[root@01 ~]# grep -o '[^a-z]' chaoge.txt
9.使用sed输出文件chaoge.txt的2-5行内容
[root@01 ~]# cat chaoge.txt
I am oldboy teacher I teach linux.
I like python.
My qq is 877348180.
My name is chaoge.
My website is http://pythonav.cn
[root@01 ~]# sed -n '2,5p' chaoge.txt
I like python.
My qq is 877348180.
My name is chaoge.
My website is http://pythonav.cn
10.使用sed删除含有game字符的行,chaoge.txt
[root@01 ~]# cat chaoge.txt
I am oldboy teacher I teach linux.
I like python.
My qq is 877348180.
My name is chaoge.
My website is http://pythonav.cn
I like playing computer games.
I will develop a computer game.
[root@01 ~]# sed '/game/d' chaoge.txt
I am oldboy teacher I teach linux.
I like python.
My qq is 877348180.
My name is chaoge.
My website is http://pythonav.cn
[root@01 ~]# sed '/<game>/d' chaoge.txt   # 精确匹配
I am oldboy teacher I teach linux.
I like python.
My qq is 877348180.
My name is chaoge.
My website is http://pythonav.cn
I like playing computer games.
11.使用sed替换文件chaoge.txt中,替换所有My为His,同时换掉QQ号为8888888 My name is chaoge. I teach linux. I like play computer game. My qq is 877348180. My website is http://pythonav.cn.
[root@01 ~]# sed 's/I/His/g' chaoge.txt | sed 's/877348180/8888888/g'
His am oldboy teacher His teach linux.
His like python.
My qq is 8888888.
My name is chaoge.
My website is http://pythonav.cn
His like playing computer games.
His will develop a computer game.
12.用sed取出ip地址
[root@01 ~]# ifconfig ens33 | sed -nE '2s/.*inet.([0-9.]*).*netmask.*/1/gp'
192.168.207.128
13.用awk显示/etc/passwd文件的第一列,倒数第二列,以冒号分割。
[root@01 ~]# awk -F ':' '{print $1,$(NF-1)}' /etc/passwd
root /root
bin /bin
daemon /sbin
adm /var/adm
lp /var/spool/lpd
sync /sbin
14.用awk取出ip地址
[root@01 ~]# ifconfig ens33 |awk 'NR==2{print $2}'
192.168.207.128
15.用awk找出/etc/passwd文件中禁止登录的用户
[root@01 ~]# awk -F ':' '$(NF)~//sbin/nologin/{print $1}' /etc/passwd
bin
daemon
adm
lp
mail
operator
games
ftp
nobody
systemd-network
dbus
polkitd
tss
abrt
sshd
postfix
chrony
nginx