最近整改了一个线上服务,功能自测完毕后,需要进行性能的压力测试,同事推荐了siege这个工具,先熟悉一下相关的东西,后面有时间再好好研究它的源码实现。本文仅仅简单介绍一下这个工具的使用方法。
1、下载与安装
下载地址: http://download.joedog.org/siege/ 可根据需要下载版本
$ wget http://download.joedog.org/siege/siege-latest.tar.gz
$ tar zxf siege-latest.tar.gz 解压安装
$ cd siege-4.0.2/ 进入安装路径下
$ ./configure 配置安装路径(默认路径)
$ sudo make 编译
$ sudo make install 编译安装
2、查看siege安装路径
$ which siege
/usr/local/bin/siege
3、查看siege版本
$ siege -V
SIEGE 4.0.2
4、常用参数
-C 或 --config:在屏幕上打印显示出当前的配置,配置是包括在他的配置文件$HOME/.siegerc中,可以编辑里面的参数,这样每次siege 都会按照它运行-v:运行时能看到详细的运行信息
-c n 或 --concurrent=n:模拟有n个用户在同时访问,n不要设得太大,因为越大,siege 消耗本地机器的资源越多
-i 或 --internet:随机访问urls.txt中的url列表项,以此模拟真实的访问情况(随机性),当urls.txt存在时有效
-d n 或 --delay=n:hit每个url之间的延迟,在0-n之间
-r n 或 --reps=n:重复运行测试n次,不能与 -t同时存在
-t n 或 --time=n:持续运行siege ‘n’秒(如10S),分钟(10M),小时(10H)
-l:运行结束,将统计数据保存到日志文件中siege .log,一般位于/usr/local/var/siege .log中,也可在.siegerc中自定义
-R SIEGERC 或 --rc=SIEGERC:指定用特定的siege 配置文件来运行,默认的为$HOME/.siegerc
-f FILE 或 --file=FILE:指定用特定的urls文件运行siege ,默认为urls.txt,位于siege 安装目录下的etc/urls.txt
-u URL 或 --url=URL:测试指定的一个URL,对它进行”siege “,此选项会忽略有关urls文件的设定
-H 或 --header:指定http请求头部的一些内容
-A 或 --user-agent:指定http请求中user-agent字段内容
-T 或 --content-type:指定http请求中的content-type字段内容
5、常用命令举例
上面说了一大堆,其实掌握-b, -c, -t, -r, -f这几个就足够了
(1)200个并发对http://www.google.com发送请求100次
siege -c 200 -r 100 http://www.google.com
(2)在urls.txt中列出所有的网址
siege -c 200 -r 100 -f urls.txt
(3)随机选取urls.txt中列出所有的网址
siege -c 200 -r 100 -f urls.txt -i
(4)delay=0,更准确的压力测试,而不是功能测试
siege -c 200 -r 100 -f urls.txt -i -b
(5)指定http请求头 文档类型
siege -H "Content-Type:application/json" -c 200 -r 100 -f urls.txt -i -b
6、结果说明
horstxu@horstxu-Lenovo-G400:~/Downloads/siege-3.0.8$ siege http://www.[某个网站].com -c10 -t5s -b
** SIEGE 3.0.8
** Preparing 10 concurrent users for battle.
The server is now under siege...
HTTP/1.1 200   0.14 secs:    1917 bytes ==> GET  /
HTTP/1.1 200   0.15 secs:    1917 bytes ==> GET  /
……………………
HTTP/1.1 200   0.16 secs:    1917 bytes ==> GET  /
Lifting the server siege...      done.

Transactions:          325 hits
Availability:       100.00 %
Elapsed time:         4.89 secs
Data transferred:         0.59 MB
Response time:         0.15 secs
Transaction rate:        66.46 trans/sec
Throughput:         0.12 MB/sec
Concurrency:         9.85
Successful transactions:         325
Failed transactions:            0
Longest transaction:         0.21
Shortest transaction:         0.11
上面省略号省略了一些冗余的输出,并且我们屏蔽网站域名免得打广告。在上面的测试中,我们设置了10个并发用户,测试5秒时间,并且每个请求之间没有时延,也就是收到回复后马上发出下一个。测试的结果是,4.89秒内完成了325次请求,共传输0.59MB的数据,平均响应时间0.15秒,平均每秒66.46次请求,拓扑量0.12MB每秒,并发数平均9.85。
7、关于POST请求的一个坑
上游需要通过POST往服务发送json的请求,在网上查了很多资料基本都是千篇一律的:
siege -c 1 -r 1 -H "Content-Type:application/json"
经过实际测试,这是有问题的。
发送请求为:
siege -c 1 -r 1 -H "Content-Type:application/json" 127.0.0.1:7940/XXXXXX/get_distance POST {"aoi_id":"17826672289218563804","path_list":[{"p1":{"x":12131122.6,"y":3223344.33},"p2":{"x":12841122,"y":3113344}}],"skip_flag":0,"debug_flag":"111111"}
从log里面看到通过rpc接收到的请求里面为空,感到很纳闷,遂tcpdump抓包,导出之后看一下:

可以看到发送的竟然不是POST请求,而是GET请求,那TM服务肯定无法解析了。
后面发现用下面的方法可以成功发送POST请求:
siege -c 1 -r 1 '127.0.0.1:7940/XXXXXX/get_distance POST <./postfile.json'
就是把之前的json串存到文件里面去,注意后缀名一定要为.json
再次抓包:
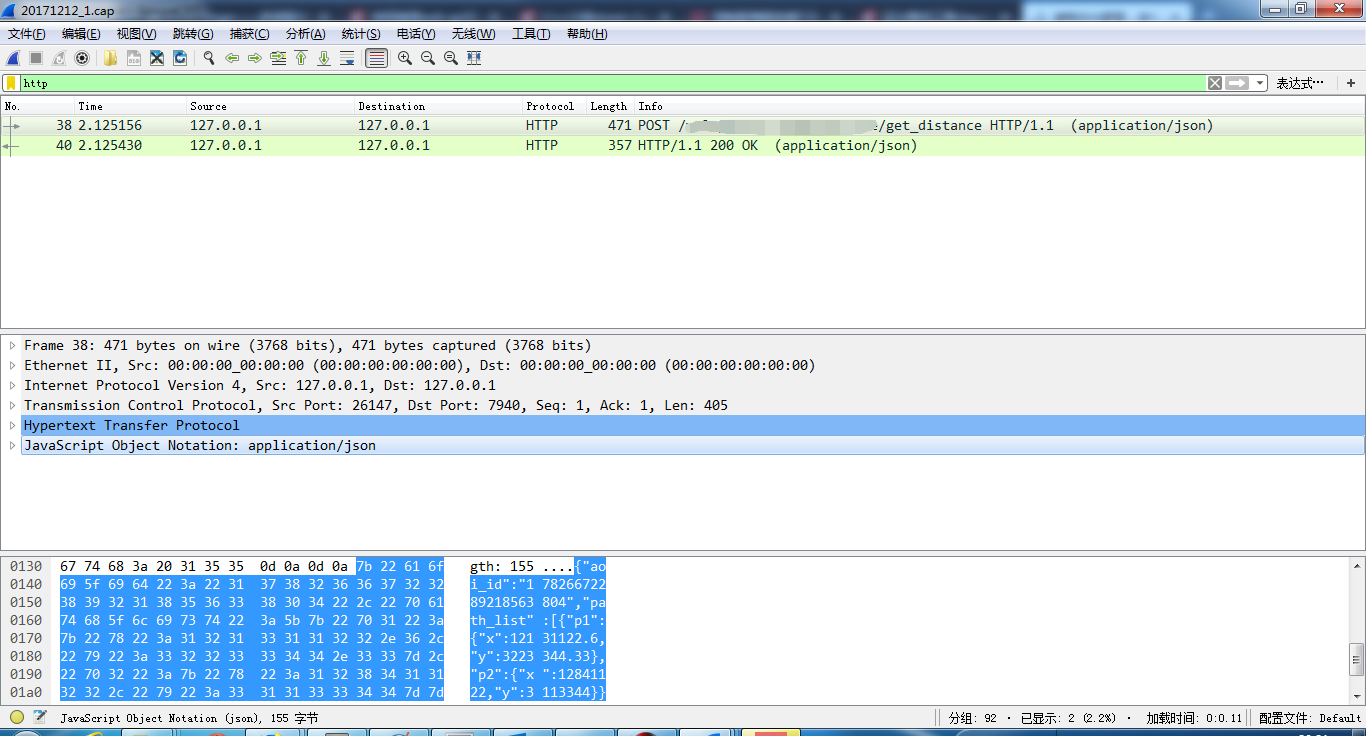
可以看到请求正确了
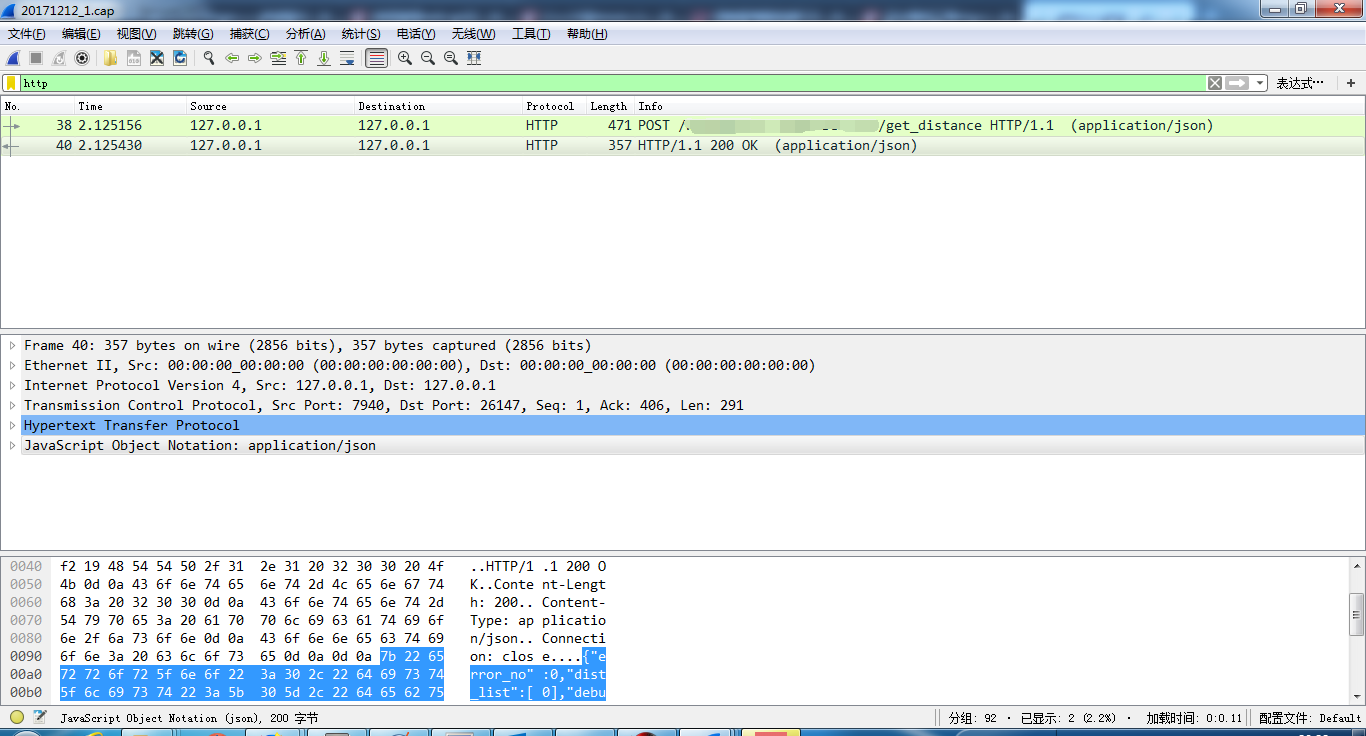
回复也自然正常了
本文参考自:
http://www.jianshu.com/p/19b921511775
https://buzheng.org/usage-of-siege.html
https://xstarcd.github.io/wiki/shell/siege.html
http://blog.csdn.net/xuriwuyun/article/details/12711927
http://www.cnblogs.com/xuning/p/4060166.html