问:尼玛Android 4.1Jelly Bean都发布了,你还bb2.3,坑爹呢,这是?
答:这个真不好意思了,屌丝的特点就是后知后觉。
问:那有何用?
答:可以很不负责任的说,从2.2以后launcher 拖拽流程基本没变化。
问:基本?那还是有变化,到底还是坑爹。
答:“好吧,你赢了”。
-------------------------------------------------------------------------------------------------------------我是风格线--------
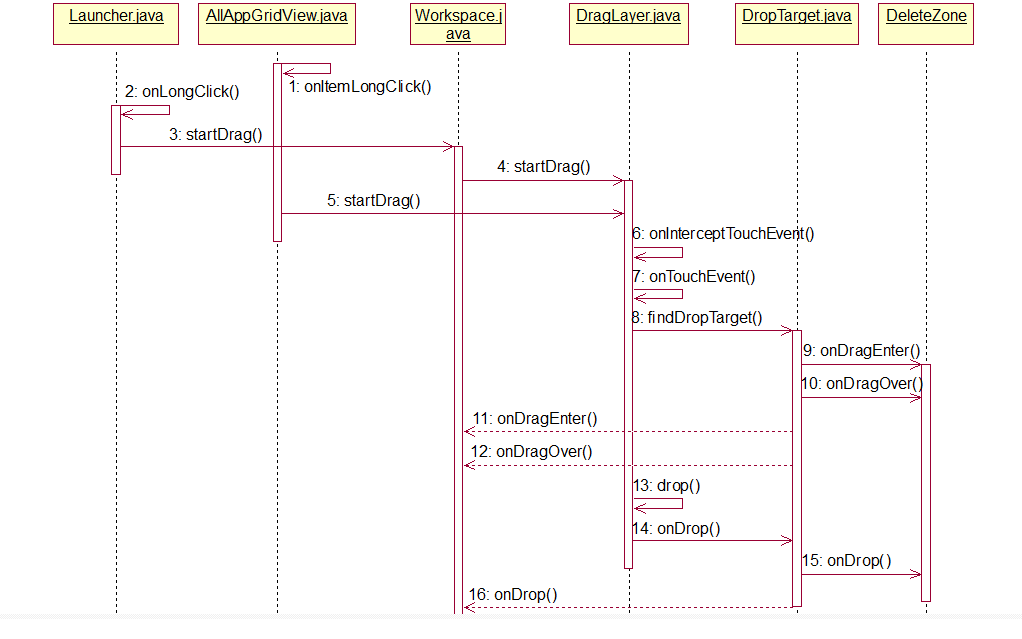
回归正题,要是做launcher的话,那拖拽事件处理、响应是必须得撸清楚的:
先来一张Launcher拖拽的时序图,以便对整个流程有个大概的把握(看不明白也没关系,跳过看下面先,回头再看就so easy了):
下面分步骤详细说明:
一,事件产生
拖拽事件的产生基于用户长按操作,分两种情况:
- 长按桌面(workspace视图)上的子视图(应用图标,文件夹,widget)事件响应是launcher.java
 public boolean onLongClick(View v)
    {
      ...........
            else
            {
                if (!(cellInfo.cell instanceof Folder))
                {
                    // 用户长按某一组件时调用
                    mWorkspace.startDrag(cellInfo);
                }
            }
        }
        return true;
    }
F2跳转之:
   void startDrag(CellLayout.CellInfo cellInfo)
    {
        View child = cellInfo.cell;

        // Make sure the drag was started by a long press as opposed to a long click.
        // Note that Search takes focus when clicked rather than entering touch mode
      ..........
        mDragger.startDrag(child, this, child.getTag(), DragController.DRAG_ACTION_MOVE);
        invalidate();
        clearVacantCache();
    }
- 长按应用主菜单(AllAppGridView视图)上的子视图(应用图标)事件响应是AllAppGridView.java
public boolean onItemLongClick(AdapterView<?> parent, View view,
			int position, long id)
	{
		if (!view.isInTouchMode())
		{
			return false;
		}
		ApplicationInfo app = (ApplicationInfo) parent
				.getItemAtPosition(position);
		app = new ApplicationInfo(app);
               //用户长按应用主菜单应用图标时调用
		mDragger.startDrag(view, this, app, DragController.DRAG_ACTION_COPY);
	}
该步骤的事件产生最终都定位mDragger.startDrag方法,顺着它往下摸就行了。
二,mDragger为何物?
mDragger是DragController实例,我们F3可以看到DragController其实就是一个接口,里面有几个很眼熟的抽象方法
F4一下可以知道该接口的唯一子类是DragLayer.java,必须进去一探究竟,尼玛这玩意竟然继承了frameLayout,脑子里有东西闪过,soga,原来是这样:
<com.android.launcher2.DragLayer
    xmlns:android="http://schemas.android.com/apk/res/android"
    xmlns:launcher="http://schemas.android.com/apk/res/com.android.launcher"

    android:id="@+id/drag_layer"
    android:layout_width="match_parent"
    android:layout_height="match_parent">

    <!-- Keep these behind the workspace so that they are not visible when
         we go into AllApps -->
    <include
...........
上面的代码就是launcher的主布局文件。DragLayer作为整个launcher的RootView负责所有拖拽事件的统一分发处理。因为launcher上能看到的组件都布局在它之上
为啥它是frameLayout,我就不罗嗦了。
当用户长按某一launcher组件时,DragLayer.startDrag会扯开嗓子通知那些相关组件做好接受拖拽事件的准备,并顺便悄悄的隐藏被拖拽图标的原始view。
三,既然已经跟到frameLayout视图,那么接下来应该是顺着触屏时序处理来看比较直观。
 public boolean onInterceptTouchEvent(MotionEvent ev)
    {
      ..........
            case MotionEvent.ACTION_UP:
                if (mShouldDrop && drop(x, y))
                {
                    mShouldDrop = false;
                }
                endDrag();
                break;
        }

        return mDragging;
    }
onInterceptTouchEvent作为触屏事件的节奏“打断者”在这里并没啥作为,只是在up时调用endDrag,用来在合适的时候显示刚才隐藏的view。
老大不管事,那自然小弟抗大梁了。看看onTouchEvent是如何有条不紊的处理这些拖拽事件的。
 public boolean onTouchEvent(MotionEvent ev)
    {
         .........
        switch (action)
        {
        case MotionEvent.ACTION_DOWN:

            // 初始化mScrollState状态。
                mScrollState = SCROLL_OUTSIDE_ZONE;
            }
            break;
        case MotionEvent.ACTION_MOVE:
            // 不断更新当前icon的位置。
            rect.union(left - 1, top - 1, left + width + 1, top + height + 1);
            final int[] coordinates = mDropCoordinates;
            //调用findDropTarget来寻找落脚点。比如是deleteZone区域,就触发相关的事件响应。
            DropTarget dropTarget = findDropTarget((int) x, (int) y, coordinates);
           ........
                    dropTarget.onDragOver(mDragSource, coordinates[0], coordinates[1],
                    mLastDropTarget.onDragExit(mDragSource, coordinates[0], coordinates[1],
                    dropTarget.onDragEnter(mDragSource, coordinates[0], coordinates[1],
                    mLastDropTarget.onDragExit(mDragSource, coordinates[0], coordinates[1],
           ........
            if (!inDragRegion && x < SCROLL_ZONE)
            {
                if (mScrollState == SCROLL_OUTSIDE_ZONE)
                {
                    mScrollState = SCROLL_WAITING_IN_ZONE;
                    mScrollRunnable.setDirection(SCROLL_LEFT);
            //拖着图标往左边换屏幕。
                    postDelayed(mScrollRunnable, SCROLL_DELAY);
                }
            }
            else if (!inDragRegion && x > getWidth() - SCROLL_ZONE)
            {
                if (mScrollState == SCROLL_OUTSIDE_ZONE)
                {
                    mScrollState = SCROLL_WAITING_IN_ZONE;
                    mScrollRunnable.setDirection(SCROLL_RIGHT);
           //拖着图标往右边换屏幕。
	            postDelayed(mScrollRunnable, SCROLL_DELAY);
               }
           }
           .......
        case MotionEvent.ACTION_UP:
            removeCallbacks(mScrollRunnable);
            if (mShouldDrop)
             {
          //秋后算总账了,目标view是否接受该source view,还需drop(x,y)作最后定夺。
                drop(x, y);
                mShouldDrop = false;
            }
            endDrag();
            break;
        case MotionEvent.ACTION_CANCEL:
            endDrag();
        }
        return true;
    }
在Action_move事件里要特别注意一下findDropTarget方法的实现,该事件会不断调用dropTarget的那几个抽象方法,只要是实现了该接口的view(userFolder,DeleteZone,workspace)都会根据特定的条件调用相应的重载方法,从而作出像文件夹开合,deleteZone变色等响应。
Action_up事件中咱们很熟练的F3,进了drop方法(太重要了,它决定了该拖拽事件最终的结果,是目标view接受了它还是拒绝都在这里都到裁决)。但代码其实很简短:
 private boolean drop(float x, float y)
    {
        invalidate();
        final int[] coordinates = mDropCoordinates;
        //如果上面findDropTarget是寻找落脚点,这里就是准备托付终身了。
        DropTarget dropTarget = findDropTarget((int) x, (int) y, coordinates);
        if (dropTarget != null)
        {
        	if(shouldAccept == false && dropTarget.toString() == "ActionButton")
        	{
        		return false;
        	}
            dropTarget.onDragExit(mDragSource, coordinates[0], coordinates[1],
                    (int) mTouchOffsetX, (int) mTouchOffsetY, mDragInfo);
            //如果这里的acceptDrop返回ture,那就意味着得到了男方父母的首肯,终于找到依附的view了。
            if (dropTarget.acceptDrop(mDragSource, coordinates[0], coordinates[1],
                    (int) mTouchOffsetX, (int) mTouchOffsetY, mDragInfo)) {
                dropTarget.onDrop(mDragSource, coordinates[0], coordinates[1],
                        (int) mTouchOffsetX, (int) mTouchOffsetY, mDragInfo);
                mDragSource.onDropCompleted((View) dropTarget, true);
                return true;
            }
            else
            {
                mDragSource.onDropCompleted((View) dropTarget, false);
                return true;
            }
        }
        return false;
    }
其实去年已经看这块了,怎奈人搓且奇懒无比,今天总算做个了结。