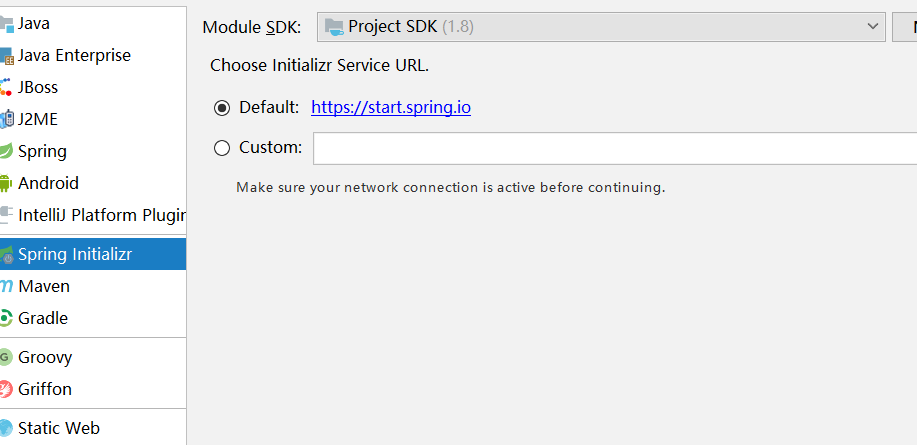
1使用idea创建springboot项目如下图所示 并选择web模块
2,登录springboot官网 http://projects.spring.io/spring-boot/ 引入相关依赖包如图所示我们这里是基于1.5.8

3.引入springboot核心包,开始我们的helloworld之旅,pom文件如图所示
<?xml version="1.0" encoding="UTF-8"?>
<project xmlns="http://maven.apache.org/POM/4.0.0" xmlns:xsi="http://www.w3.org/2001/XMLSchema-instance"
    xsi:schemaLocation="http://maven.apache.org/POM/4.0.0 http://maven.apache.org/xsd/maven-4.0.0.xsd">
    <modelVersion>4.0.0</modelVersion>

    <groupId>cm.test.cn</groupId>
    <artifactId>springboot-test</artifactId>
    <version>0.0.1-SNAPSHOT</version>
    <packaging>jar</packaging>

    <name>springboot-test</name>
    <description>Demo project for Spring Boot</description>

    <parent>
        <groupId>org.springframework.boot</groupId>
        <artifactId>spring-boot-starter-parent</artifactId>
        <version>1.5.8.RELEASE</version>
        <relativePath/> <!-- lookup parent from repository -->
    </parent>

    <properties>
        <project.build.sourceEncoding>UTF-8</project.build.sourceEncoding>
        <project.reporting.outputEncoding>UTF-8</project.reporting.outputEncoding>
        <java.version>1.8</java.version>
    </properties>

    <dependencies>
         <!--引入springboot-starter核心Spring Boot starter,包括自动配置支持,日志和YAML-->
        <dependency>
            <groupId>org.springframework.boot</groupId>
            <artifactId>spring-boot-starter</artifactId>
        </dependency>

        <!--对web应用支持-->
        <dependency>
            <groupId>org.springframework.boot</groupId>
            <artifactId>spring-boot-starter-web</artifactId>
        </dependency>
         <!--测试使用-->
        <dependency>
            <groupId>org.springframework.boot</groupId>
            <artifactId>spring-boot-starter-test</artifactId>
            <scope>test</scope>
        </dependency>
    </dependencies>

      <!--maven插件-->
    <build>
        <plugins>
            <plugin>
                <groupId>org.springframework.boot</groupId>
                <artifactId>spring-boot-maven-plugin</artifactId>
            </plugin>
        </plugins>
    </build>


</project>
4、编写启动类(注意启动类一般放在包的最外包)因为启动类只会扫描本报子包,同级包中的信息不然会报错
package cm.test.cn;

import org.springframework.boot.SpringApplication;
import org.springframework.boot.autoconfigure.SpringBootApplication;

@SpringBootApplication
public class SpringbootTestApplication {

    public static void main(String[] args) {

        SpringApplication.run(SpringbootTestApplication.class, args);
    }
}
5、编写controller
package cm.test.cn.controller;

import org.springframework.boot.SpringApplication;
import org.springframework.boot.autoconfigure.EnableAutoConfiguration;
import org.springframework.stereotype.Controller;
import org.springframework.web.bind.annotation.RequestMapping;
import org.springframework.web.bind.annotation.ResponseBody;
import org.springframework.web.bind.annotation.RestController;

@RestController
@EnableAutoConfiguration
public class SampleController {
    @RequestMapping("/hello")
    public String home() {

        return "Hello World!";
    }

}
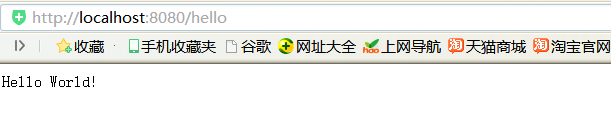
此时我们启动,这个启动类并在浏览器窗口访问如下图所示一个简单的hello,world就完成了,很简单吧!
项目已上传码云:https://gitee.com/wuhongpu/springboot-test.git