一 单文件组件介绍
    /*
    * 在vue中 把.vue的文件称为 单文件组件 webpack等构建工具
    *
    * 很多项目中使用
    * Vue.components('组件名',{})
    * new Vue({})
    * 用在中小规模的项目中 会很好 但是大型的项目 就不友好了
    *
    * 有哪些缺点
    * 1. 全局定义 每个名字都不能重复
    * 2. 字符串模板【还好的是es6提供了模板字符串】遇见特殊的符号时 要用 反斜杠来转义 很繁琐
    * 3. 不支持css
    * 4. 没有构建步骤
    *
    *
    * 以后的模块化开发 包括了 template style script
    * */
二 如何安装Vue-Cli3脚手架
① 安装node.js
https://nodejs.org/en/download/
保证Node.js 是8.9或者更高的版本
在终端 node -v 保证已经安装

② 安装 淘宝镜像源
npm  install -g cnpm --registry=https://registry.npm.taobao.org

以后的npm可以使用cnpm来代替
③ 安装Vue Cli3脚手架
cnpm install -g @vue/cli
④ 检查版本是否正确
vue --version
三 快速原型开发
使用 vue serve 和 vue build命令对单个 *.vue 文件进行快速原型开发,不过这需要先额外安装一个全局的扩展:
cnpm install -g @vue/cli-service-global
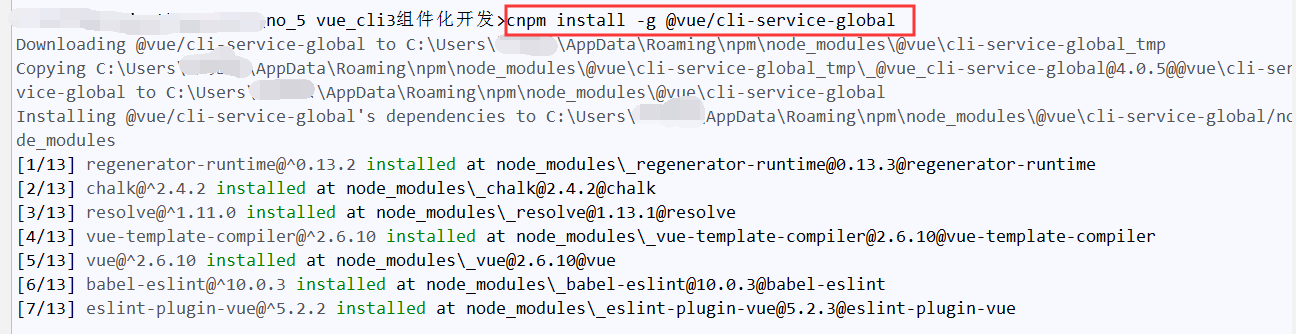
vue serve 的缺点就是它需要安装全局依赖,这使得它在不同机器上的一致性不能得到保证。因此这只适用于快速原型开发。
开始测试
1 npm init

新建一个App.vue文件
<template>
    <div><h3>{{msg}}</h3></div>
</template>

<script>
    export default {
        data(){
            return{
                msg:'单文件测试'
            }
        }
    }
</script>

<style scoped>
    h3{
        color: red;
    }
</style>
然后在这个App.vue文件所在的目录下运行
vue serve
四 vue-cli3生成项目
创建一个项目
vue create 项目名

回车
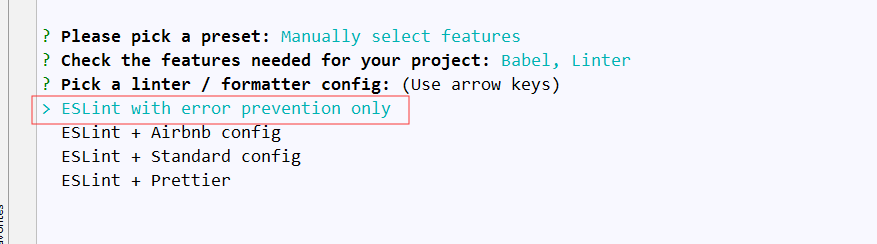
在回车

在回车


接下来就是考验网速的时候了 我们耐心等待 当出现下面的图 就ok啦

输入上面的命令
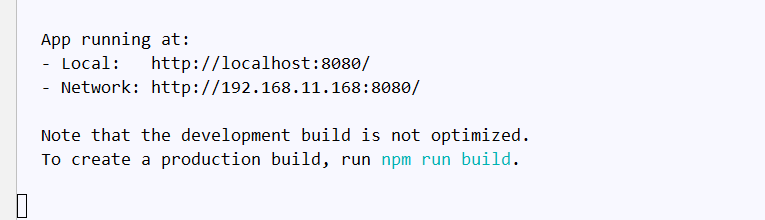
点击网址 看效果

恭喜你第一个 vue项目启动
五 购物车项目搭建
组件化开发
1 我们首先在 components 建一个 car.vue 的文件
2.这个文件在主入口的文件 App.vue 的文件中导入 挂载和使用
<template>
   <div>
        <MyCart :cart="cartList" :title="title"></MyCart>             ❤ 使用 ❤
    </div>

</template>

<script>
    import MyCart from './components/car.vue'                         ❤ 导入 ❤

    export default {
        name: 'app',
        data() {
            return {
                title:'购物车',
                cartList: [
                    {id: 1, title: 'Vue实战开发', price: 188,active:true,count:1},
                    {id: 2, title: 'python实战开发', price: 189,active:true,count:1}          # 构造假的数据
                ]

            }
        },
        components: {
            MyCart                    ❤ 挂载 ❤
        }
    }
</script>

<style>

</style>
3. car.vue 的操作
<template>
    <div>
        <h2>{{title}}</h2>
        <table border="1">
            <tr>
                <th>#</th>
                <th>课程</th>
                <th>单价</th>
                <th>数量</th>
                <th>总价</th>
            </tr>
            <tr v-for="c in cart" :key="c.id">
                <td><input type="checkbox" v-model="c.active"></td>
                <td>{{c.title}}</td>
                <td>{{c.price}}</td>
                <td>
                    <button>-</button>
                    {{c.count}}
                     <button>+</button>
                </td>
                <td>¥{{c.price*c.count}}</td>

            </tr>
        </table>
    </div>
</template>

<script>
    export default {
        name: 'cart',
        props: ['title', 'cart']                     <!--1.props导入父组件的数据-->
    }
</script>

<style scoped>

</style>
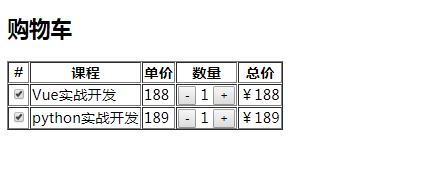
六 购物车项目操作
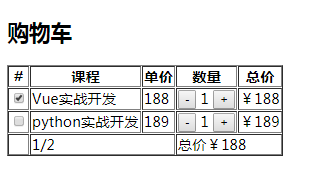
上图 我们要做勾选一个课程 就能得到价钱 还有数量的加减
1. 先写数量
<td>
      <button @click="substract(index)">-</button>
             {{c.count}}
      <button @click="add(index)">+</button>
</td>
methods: {
            remove(i){
                if(window.confirm('确定要删除吗')){
                    this.cart.splice(i)
                }
            },
            substract(i) {
                let count = this.cart[i].count;
                count > 1 ? this.cart[i].count -= 1 :this.remove(i);         # 三元运算
            },
            add(i) {
                this.cart[i].count++;
            },
        },
总代码----在上面的代码基础上修改 car.vue
<template>
    <div>
        <h2>{{title}}</h2>
        <table border="1">
            <tr>
                <th>#</th>
                <th>课程</th>
                <th>单价</th>
                <th>数量</th>
                <th>总价</th>
            </tr>
            <tr v-for="(c,index) in cart" :key="c.id">

                <td><input type="checkbox" v-model="c.active"></td>
                <td>{{c.title}}</td>
                <td>{{c.price}}</td>
                <td>
                    <button @click="substract(index)">-</button>
                    {{c.count}}
                    <button @click="add(index)">+</button>
                </td>
                <td>¥{{c.price * c.count}}</td>
            </tr>
            <tr>
                <td></td>
                <!--<td colspan="2">{{ '1/2' }}</td>-->
                <!--用计算属性得到-->
                <td colspan="2">{{activeCount}}/{{ count }}</td>
                <td colspan="2">总价¥{{ totalPrice }}</td>
            </tr>
        </table>
    </div>
</template>

<script>
    export default {
        name: 'cart',
        props: ['title', 'cart'],
        methods: {
            remove(i){
                if(window.confirm('确定要删除吗')){
                    this.cart.splice(i)
                }
            },
            substract(i) {
                let count = this.cart[i].count;
                count > 1 ? this.cart[i].count -= 1 :this.remove(i);
            },
            add(i) {
                this.cart[i].count++;
            },
        },
        computed: {
            count() {
                return this.cart.length
            },
            activeCount() {
                return this.cart.filter(v => v.active).length
            },
            totalPrice() {
                let sum = 0;
                this.cart.forEach(c => {
                    if (c.active) {
                        sum += c.price * c.count
                    }
                });
                return sum

            }


        }
    }
</script>

<style scoped>

</style>
七 Mock模拟数据
Mock有他自己的官方网站 但是我们不用 我们在vue里用一个配置文件 vue.config.js
module.exports = {
    devServer: {
     // 后期因为报错会加个配置
        // mock模拟数据
        before(app, server) {
            // 接口
            app.get('/api/carList', (req, res) => {
                res.json({
                    result: [
                        {id: 1, title: 'Vue实战开发', price: 188, active: true, count: 1},
                        {id: 2, title: 'python实战开发', price: 189, active: true, count: 1}        数据
                    ]
                })
            })
        }
    }
};
在 App.vue中注销之前的数据

我们启动项目之后 访问 http://localhost:8080/ 是没有任何反应的 但是我们的数据是有了的 http://localhost:8080/api/carList 来获取
我们需要安装一个东西
npm i axios -s
在main.js中需要配置
import axios from 'axios'


Vue.prototype.$http = axios;
这样我们就可以启动啦
在回App.vue中
<script>
    import MyCart from './components/car.vue'

    export default {
        name: 'app',

        data() {
            return {
                cartList: [],              之前的数据删掉了  现在创建一个空的列表
                title: '购物车',
            }
        },
        created(){
            this.$http.get('/api/carList')      两种方式实现 模拟数据
            .then(res=>{
                this.cartList = res.data.result;
            }).catch(err=>{
                console.log(err)
            })
        },
//        async created() {
//
//            try {
//                const res = await this.$http.get('/api/carList');
//                this.cartList = res.data.result;
////                console.log('this.carList',this.carList)
//            } catch (error){
//                console.log(error)
//            }
//
//
//        },
        components: {
            MyCart
        }
    }
</script>
八 Vue中使用第三方组件(element-ui)
* 通用组件----基础组件,大部分UI都是这种组件,比如表单 布局 弹窗等
* 业务组件----与需求挂钩,会被复用,比如抽奖 摇一摇等
* 页面组件----每个页面都是一个组件,不会复用
使用第三方组件
比如 vue 最流行的element,就是典型的通用组件,执行 npm install element-ui 安装
import Vue from 'vue'
import ElementUI from 'element-ui'
import 'element-ui/lib/theme-chalk/index.css'
import App from './App.vue'

Vue.use(ElementUI);

new Vue({
  el:'#app',
  render: h => h(App),
});
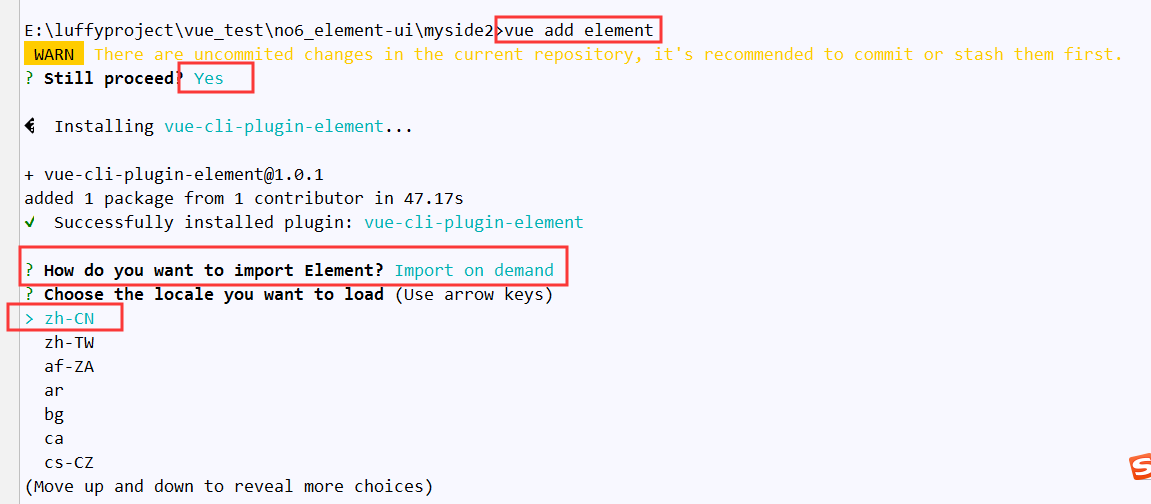
在使用 vue-cli 中可以使用 vue add element 安装