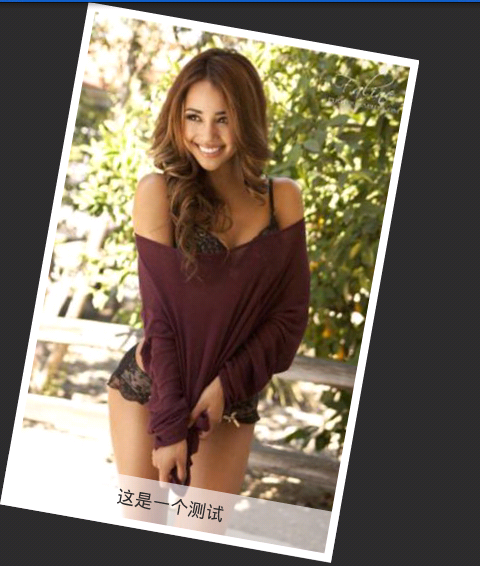
先看看图片的效果,左边是原图,右边是旋转之后的图;

之所以把这个写出来是因为在一个项目中需要用到这样的效果,我试过用FrameLayout布局如上的画面,然后旋转FrameLayout,随之而来也就存在了一些问题——锯齿!
在网上搜索之后,有两种方法,一是利用Paint,二是利用Canvas;
(1)、paint.setAntiAlias(true);
paint.setFlags(Paint.ANTI_ALIAS_FLAG);
(2)、DrawFilter pfdf = new PaintFlagsDrawFilter(0, Paint.ANTI_ALIAS_FLAG|Paint.FILTER_BITMAP_FLAG);
canvas.setDrawFilter(pfdf);
而如果利用paint,或者canvas,需要从哪获取paint/canvas,这也是一个问题;
在实现的过程中,尝试过自定义FrameLayout下面的单个View{ImageView,TextView},但都以失败告终,失败的主要问题在于右图下边的文字描述无法和相片边框相对齐,而且用Matrix旋转背景之后背景大小改变,位置也不在最下边,所以就采用了单独实现一个View的方法,主要原因还是因为自身对Canvas绘图及Paint画笔不是很熟悉,所以导致的效率不高;
public class RotateTextImageView extends View {
    PaintFlagsDrawFilter pfdf;
    Paint paint;
    Matrix matrix;
    Bitmap bitmap;
    int index = -1;
    private int oriHeight;
    private int oriWidth;
    private int newHeight;
    private int newWidth;
    private int angle = 5;
    protected Path path = new Path();
    private float[] f = new float[8];
    private int shawHeight = 20;
    private int borderSize = 8;
    Bitmap oriBitmap;
    private String text = "";

    public RotateTextImageView(Context context, AttributeSet attrs, int defStyle) {
        super(context, attrs, defStyle);
        initCanvasInfo();
    }

    public RotateTextImageView(Context context, AttributeSet attrs) {
        super(context, attrs);
        initCanvasInfo();
    }

    public RotateTextImageView(Context context) {
        super(context);
        initCanvasInfo();
    }

    /**
     * 初始化Paint
     */
    protected void initCanvasInfo() {
        pfdf = new PaintFlagsDrawFilter(0, Paint.ANTI_ALIAS_FLAG
                | Paint.FILTER_BITMAP_FLAG);
        paint = new Paint();
        paint.setAntiAlias(true);
        matrix = new Matrix();
        matrix.setRotate(5);
    }

    @Override
    protected void onDraw(Canvas canvas) {
        super.onDraw(canvas);
        paint.reset();
        // 消除锯齿
        paint.setAntiAlias(true);
        paint.setFlags(Paint.ANTI_ALIAS_FLAG);
        canvas.setDrawFilter(pfdf);
        canvas.drawBitmap(bitmap, 0, 0, paint);
        newHeight = bitmap.getHeight();
        newWidth = bitmap.getWidth();
        calculatePoints();
        // 添加阴影
        path.reset();
        path.moveTo(f[0], f[1]);
        path.lineTo(f[2], f[3]);
        path.lineTo(f[4], f[5]);
        path.lineTo(f[6], f[7]);
        path.close();
        paint.setStyle(Paint.Style.FILL_AND_STROKE);
        paint.setColor(Color.parseColor("#96ffffff"));
        canvas.drawPath(path, paint);
        // 添加字符
        if (text != null && !text.equals("")) {
            path.reset();
            paint.setTextSize(18);
            float width = paint.measureText(text);
            path.moveTo((f[0] + f[2]) / 2, (f[1] + f[3]) / 2);
            path.lineTo((f[4] + f[6]) / 2, (f[5] + f[7]) / 2);
            paint.setColor(Color.parseColor("#2b2b2b"));
            canvas.drawTextOnPath(text, path, (oriWidth - width) / 2, 3, paint);
        }
        layout(0, 0, newWidth, newHeight);
    }

    /**
     * 计算坐标值
     */
    private void calculatePoints() {
        double a = angle * Math.PI / 180;
        BigDecimal height = new BigDecimal(oriHeight);
        BigDecimal width = new BigDecimal(oriWidth);
        BigDecimal cos = new BigDecimal(Math.cos(a));
        BigDecimal tan = new BigDecimal(Math.tan(a));
        f[0] = 0;
        f[1] = height.multiply(cos).floatValue();
        f[2] = tan.multiply(new BigDecimal(shawHeight)).floatValue();
        f[3] = (new BigDecimal(f[1])).subtract(new BigDecimal(shawHeight))
                .floatValue();
        f[4] = width.multiply(cos).add(new BigDecimal(f[2])).floatValue();
        f[5] = new BigDecimal(newHeight - shawHeight).floatValue();
        f[6] = width.multiply(cos).floatValue();
        f[7] = new BigDecimal(newHeight).floatValue();
    }

    /**
     * 设置图片
     *
     * @param bmp
     */
    public void setBitmap(Bitmap bmp) {
        oriBitmap = bmp;
        matrix.reset();
        matrix.setRotate(angle);
        Bitmap bitmapF = addFrame(bmp);
        oriHeight = bitmapF.getHeight();
        oriWidth = bitmapF.getWidth();
        bitmap = Bitmap.createBitmap(bitmapF, 0, 0, bitmapF.getWidth(),
                bitmapF.getHeight(), matrix, true);
        postInvalidate();
    }

    /**
     * 旋转角度
     *
     * @param angle
     */
    public void setAngle(int angle) {
        this.angle = angle;
        setBitmap(oriBitmap);
    }

    /**
     * 设置底部阴影高度
     *
     * @param shawHeight
     */
    public void setShawHeight(int shawHeight) {
        this.shawHeight = shawHeight;
        postInvalidate();
    }

    /**
     * 生成添加了白色边缘的图
     *
     * @param bmp
     * @return
     */
    protected Bitmap addFrame(Bitmap bmp) {
        Bitmap bmpWithBorder = Bitmap.createBitmap(bmp.getWidth() + borderSize
                * 2, bmp.getHeight() + borderSize * 2, bmp.getConfig());
        Canvas canvas = new Canvas(bmpWithBorder);
        canvas.drawColor(Color.WHITE);
        canvas.drawBitmap(bmp, borderSize, borderSize, null);
        return bmpWithBorder;
    }

    /**
     * 设置字符串
     *
     * @param text
     */
    public void setText(String text) {
        this.text = text;
        postInvalidate();
    }

    /**
     * 获取字体高度
     */
    protected int getFontHeight() {
        FontMetrics fm = paint.getFontMetrics();
        return (int) Math.ceil(fm.descent - fm.top) + 2;
    }
}
代码解释:其实没有什么难的东西,只是一些数学运算,代码中每一个方法都有对应的功能注释。浮点型数组代表阴影层四个坐标点的八个坐标值,分别是左下、左上、右上、右下四个点,阴影层坐标计算也比较简单,但有点繁琐,就是把原图旋转之后再根据几何知识进行求解坐标!
每次重新设置角度,设置图片,都需要重新绘制图形-->postInvalidate();
View的使用
一、xml配置文件
    <com.livingstone.RotateTextImageView
        android:id="@+id/myview"
        android:layout_width="wrap_content"
        android:layout_height="wrap_content"
        android:minHeight="250dip"
        android:minWidth="200dip"
        android:paddingLeft="5dip" />
二、设置文字说明及角度、图片
        RotateTextImageView myView = (RotateTextImageView) findViewById(R.id.myview);
        myView.setShawHeight(50);
        Bitmap bmp = BitmapFactory.decodeResource(getResources(),R.drawable.test1);
        myView.setBitmap(bmp);
        myView.setAngle(10);
        myView.setText("这是一个测试");
Ex:获取字体宽度的两种方法
<1>.通过paint获取字体的Rect
Rect rect=newRect();
paint.getTextBounds("你好",0,1, rect);
Log.v("a:","height:"+rect.height()+""+rect.width());
<2>.通过paint直接获取字体宽度
intwidth=(int)paint.measureText("你好",0,1);
Log.v("",""+width);