这是一个相当高级的功能。 您可能可以跳过它。
如果您只是在遵循教程-用户指南,则可以跳过本节。
如果您已经知道需要修改生成的OpenAPI模式,请继续阅读。
在某些情况下,您可能需要修改生成的OpenAPI模式。
在本节中,您将看到如何。
正常的过程
正常(默认)过程如下。
甲 FastAPI 应用(例如)具有 .openapi() 被预期返回的OpenAPI模式方法。
由于应用程序创建对象,一个部分 路径运行 的 /openapi.json (或者你设置你的 openapi_url )被注册。
它只是返回带有应用程序 .openapi() 方法 结果的JSON响应 。
默认情况下,该方法的 .openapi() 作用是检查属性 .openapi_schema 以查看其是否包含内容并返回它们。
如果不是,它将使用处的实用程序功能生成它们 fastapi.openapi.utils.get_openapi 。
该函数 get_openapi() 接收作为参数:
title:文档中显示的OpenAPI标题。version:您的API版本,例如2.5.0。openapi_version:使用的OpenAPI规范的版本。 默认情况下,最新的:3.0.2。description:您的API的描述。routes:路由列表,它们是每个已注册 路径操作 。 它们取自app.routes。openapi_prefix:要在您的OpenAPI中使用的URL前缀。
重写默认
使用以上信息,您可以使用相同的实用程序功能来生成OpenAPI架构并覆盖所需的每个部分。
例如,让我们添加 ReDoc的OpenAPI扩展以包括自定义徽标 。
普通 FastAPI
首先, 照常 编写所有 FastAPI 应用程序:
from fastapi import FastAPI
from fastapi.openapi.utils import get_openapi

app = FastAPI()


@app.get("/items/")
async def read_items():
    return [{"name": "Foo"}]


def custom_openapi():
    if app.openapi_schema:
        return app.openapi_schema
    openapi_schema = get_openapi(
        title="Custom title",
        version="2.5.0",
        description="This is a very custom OpenAPI schema",
        routes=app.routes,
    )
    openapi_schema["info"]["x-logo"] = {
        "url": "https://fastapi.tiangolo.com/img/logo-margin/logo-teal.png"
    }
    app.openapi_schema = openapi_schema
    return app.openapi_schema


app.openapi = custom_openapi
生成的OpenAPI模式
然后,使用相同的实用程序函数在 custom_openapi() 函数 内部生成OpenAPI架构 :
from fastapi import FastAPI
from fastapi.openapi.utils import get_openapi

app = FastAPI()


@app.get("/items/")
async def read_items():
    return [{"name": "Foo"}]


def custom_openapi():
    if app.openapi_schema:
        return app.openapi_schema
    openapi_schema = get_openapi(
        title="Custom title",
        version="2.5.0",
        description="This is a very custom OpenAPI schema",
        routes=app.routes,
    )
    openapi_schema["info"]["x-logo"] = {
        "url": "https://fastapi.tiangolo.com/img/logo-margin/logo-teal.png"
    }
    app.openapi_schema = openapi_schema
    return app.openapi_schema


app.openapi = custom_openapi
修改OpenAPI架构
现在,您可以添加ReDoc扩展,向 OpenAPI模式中 x-logo 的 info “对象” 添加自定义 :
from fastapi import FastAPI
from fastapi.openapi.utils import get_openapi

app = FastAPI()


@app.get("/items/")
async def read_items():
    return [{"name": "Foo"}]


def custom_openapi():
    if app.openapi_schema:
        return app.openapi_schema
    openapi_schema = get_openapi(
        title="Custom title",
        version="2.5.0",
        description="This is a very custom OpenAPI schema",
        routes=app.routes,
    )
    openapi_schema["info"]["x-logo"] = {
        "url": "https://fastapi.tiangolo.com/img/logo-margin/logo-teal.png"
    }
    app.openapi_schema = openapi_schema
    return app.openapi_schema


app.openapi = custom_openapi
缓存OpenAPI架构
您可以将该属性 .openapi_schema 用作“缓存”,以存储生成的模式。
这样,您的应用程序不必在用户每次打开API文档时都生成架构。
它只会生成一次,然后相同的缓存模式将用于下一个请求。
from fastapi import FastAPI
from fastapi.openapi.utils import get_openapi

app = FastAPI()


@app.get("/items/")
async def read_items():
    return [{"name": "Foo"}]


def custom_openapi():
    if app.openapi_schema:
        return app.openapi_schema
    openapi_schema = get_openapi(
        title="Custom title",
        version="2.5.0",
        description="This is a very custom OpenAPI schema",
        routes=app.routes,
    )
    openapi_schema["info"]["x-logo"] = {
        "url": "https://fastapi.tiangolo.com/img/logo-margin/logo-teal.png"
    }
    app.openapi_schema = openapi_schema
    return app.openapi_schema


app.openapi = custom_openapi
覆盖的方法
现在,您可以用 .openapi() 新功能 替换该 方法。
from fastapi import FastAPI
from fastapi.openapi.utils import get_openapi

app = FastAPI()


@app.get("/items/")
async def read_items():
    return [{"name": "Foo"}]


def custom_openapi():
    if app.openapi_schema:
        return app.openapi_schema
    openapi_schema = get_openapi(
        title="Custom title",
        version="2.5.0",
        description="This is a very custom OpenAPI schema",
        routes=app.routes,
    )
    openapi_schema["info"]["x-logo"] = {
        "url": "https://fastapi.tiangolo.com/img/logo-margin/logo-teal.png"
    }
    app.openapi_schema = openapi_schema
    return app.openapi_schema


app.openapi = custom_openapi
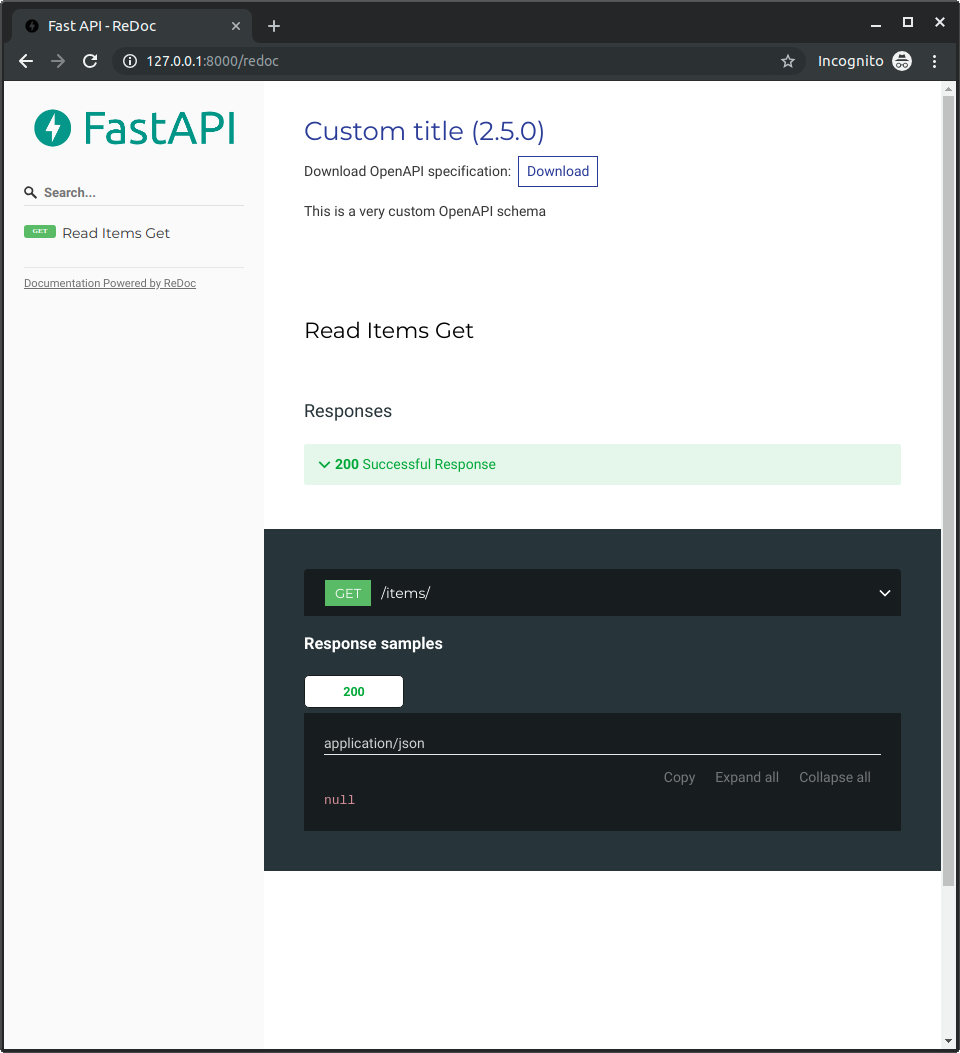
检查它
转到 http://127.0.0.1:8000/redoc之后, 您将看到您正在使用自定义徽标(在本示例中为 FastAPI 的徽标):
用于文档的自托管JavaScript和 CSS
API文档使用 Swagger UI 和 ReDoc ,每个 文档 都需要一些JavaScript和CSS文件。
默认情况下,这些文件从 CDN提供 。
但是可以对其进行自定义,可以设置特定的CDN,也可以自己提供文件。
例如,如果您需要您的应用程序即使在脱机,无法打开Internet访问或在本地网络中仍能正常工作的情况下,这很有用。
在这里,您将看到如何在同一FastAPI应用程序中自行提供这些文件,以及如何配置文档以使用它们。
项目文件结构
假设您的项目文件结构如下所示:
.
├── app
│   ├── __init__.py
│   ├── main.py
现在创建一个目录来存储那些静态文件。
您的新文件结构可能如下所示:
.
├── app
│   ├── __init__.py
│   ├── main.py
└── static/
下载文件
下载文档所需的静态文件,并将其放在该 static/ 目录中。
您可能可以右键单击每个链接,然后选择类似于的选项 Save link as... 。
Swagger UI 使用以下文件:
swagger-ui-bundle.jsswagger-ui.css
而 ReDoc 使用文件:
redoc.standalone.js
之后,您的文件结构可能如下所示:
.
├── app
│   ├── __init__.py
│   ├── main.py
└── static
    ├── redoc.standalone.js
    ├── swagger-ui-bundle.js
    └── swagger-ui.css
安装 aiofiles
现在您需要安装 aiofiles :
pip install aiofiles
服务于静态文件
- 导入
StaticFiles。 StaticFiles()在特定路径中 “挂载” 实例。
from fastapi import FastAPI
from fastapi.openapi.docs import (
    get_redoc_html,
    get_swagger_ui_html,
    get_swagger_ui_oauth2_redirect_html,
)
from fastapi.staticfiles import StaticFiles

app = FastAPI(docs_url=None, redoc_url=None)

app.mount("/static", StaticFiles(directory="static"), name="static")


@app.get("/docs", include_in_schema=False)
async def custom_swagger_ui_html():
    return get_swagger_ui_html(
        openapi_url=app.openapi_url,
        title=app.title + " - Swagger UI",
        oauth2_redirect_url=app.swagger_ui_oauth2_redirect_url,
        swagger_js_url="/static/swagger-ui-bundle.js",
        swagger_css_url="/static/swagger-ui.css",
    )


@app.get(app.swagger_ui_oauth2_redirect_url, include_in_schema=False)
async def swagger_ui_redirect():
    return get_swagger_ui_oauth2_redirect_html()


@app.get("/redoc", include_in_schema=False)
async def redoc_html():
    return get_redoc_html(
        openapi_url=app.openapi_url,
        title=app.title + " - ReDoc",
        redoc_js_url="/static/redoc.standalone.js",
    )


@app.get("/users/{username}")
async def read_user(username: str):
    return {"message": f"Hello {username}"}
测试静态文件
启动您的应用程序,然后转到 http://127.0.0.1:8000/static/redoc.standalone.js 。
您应该看到 ReDoc的 JavaScript文件非常长 。
它可以从以下内容开始:
/*!
 * ReDoc - OpenAPI/Swagger-generated API Reference Documentation
 * -------------------------------------------------------------
 *   Version: "2.0.0-rc.18"
 *   Repo: https://github.com/Redocly/redoc
 */
!function(e,t){"object"==typeof exports&&"object"==typeof m

...
这确认您能够从您的应用程序提供静态文件,并且已将文档的静态文件放置在正确的位置。
现在,我们可以配置应用程序以将这些静态文件用于文档。
禁用自动文档
第一步是禁用自动文档,因为默认情况下会使用CDN。
要禁用它们,请 None 在创建 FastAPI 应用程序 时 将其URL设置为 :
from fastapi import FastAPI
from fastapi.openapi.docs import (
    get_redoc_html,
    get_swagger_ui_html,
    get_swagger_ui_oauth2_redirect_html,
)
from fastapi.staticfiles import StaticFiles

app = FastAPI(docs_url=None, redoc_url=None)

app.mount("/static", StaticFiles(directory="static"), name="static")


@app.get("/docs", include_in_schema=False)
async def custom_swagger_ui_html():
    return get_swagger_ui_html(
        openapi_url=app.openapi_url,
        title=app.title + " - Swagger UI",
        oauth2_redirect_url=app.swagger_ui_oauth2_redirect_url,
        swagger_js_url="/static/swagger-ui-bundle.js",
        swagger_css_url="/static/swagger-ui.css",
    )


@app.get(app.swagger_ui_oauth2_redirect_url, include_in_schema=False)
async def swagger_ui_redirect():
    return get_swagger_ui_oauth2_redirect_html()


@app.get("/redoc", include_in_schema=False)
async def redoc_html():
    return get_redoc_html(
        openapi_url=app.openapi_url,
        title=app.title + " - ReDoc",
        redoc_js_url="/static/redoc.standalone.js",
    )


@app.get("/users/{username}")
async def read_user(username: str):
    return {"message": f"Hello {username}"}
包括自定义文档
现在,您可以 为自定义文档 创建 路径操作 。
您可以重复使用FastAPI的内部函数来为文档创建HTML页面,并将所需的参数传递给它们:
openapi_url:文档HTML页面可在其中获取API的OpenAPI架构的URL。 您可以在此处使用属性app.openapi_url。title:您的API的标题。oauth2_redirect_url:您可以app.swagger_ui_oauth2_redirect_url在此处使用默认值。swagger_js_url:Swagger UI文档的HTML可以从中获取 JavaScript 文件 的URL 。 这是您自己的应用程序现在正在提供的应用程序。swagger_css_url:Swagger UI文档的HTML可以从中获取 CSS 文件 的URL 。 这是您自己的应用程序现在正在提供的应用程序。
对于ReDoc同样如此...
from fastapi import FastAPI
from fastapi.openapi.docs import (
    get_redoc_html,
    get_swagger_ui_html,
    get_swagger_ui_oauth2_redirect_html,
)
from fastapi.staticfiles import StaticFiles

app = FastAPI(docs_url=None, redoc_url=None)

app.mount("/static", StaticFiles(directory="static"), name="static")


@app.get("/docs", include_in_schema=False)
async def custom_swagger_ui_html():
    return get_swagger_ui_html(
        openapi_url=app.openapi_url,
        title=app.title + " - Swagger UI",
        oauth2_redirect_url=app.swagger_ui_oauth2_redirect_url,
        swagger_js_url="/static/swagger-ui-bundle.js",
        swagger_css_url="/static/swagger-ui.css",
    )


@app.get(app.swagger_ui_oauth2_redirect_url, include_in_schema=False)
async def swagger_ui_redirect():
    return get_swagger_ui_oauth2_redirect_html()


@app.get("/redoc", include_in_schema=False)
async def redoc_html():
    return get_redoc_html(
        openapi_url=app.openapi_url,
        title=app.title + " - ReDoc",
        redoc_js_url="/static/redoc.standalone.js",
    )


@app.get("/users/{username}")
async def read_user(username: str):
    return {"message": f"Hello {username}"}
小费
该 路径运行 的 swagger_ui_redirect 是当你使用了OAuth2一个帮手。
如果您将API与OAuth2提供程序集成,则将能够进行身份验证,并使用获取的凭据返回API文档。 并使用真正的OAuth2身份验证与其进行交互。
Swagger UI将在后台为您处理它,但是它需要此“重定向”帮助程序。
创建一个 路径操作 来测试它
现在,为了能够测试一切正常,创建一个 path操作 :
from fastapi import FastAPI
from fastapi.openapi.docs import (
    get_redoc_html,
    get_swagger_ui_html,
    get_swagger_ui_oauth2_redirect_html,
)
from fastapi.staticfiles import StaticFiles

app = FastAPI(docs_url=None, redoc_url=None)

app.mount("/static", StaticFiles(directory="static"), name="static")


@app.get("/docs", include_in_schema=False)
async def custom_swagger_ui_html():
    return get_swagger_ui_html(
        openapi_url=app.openapi_url,
        title=app.title + " - Swagger UI",
        oauth2_redirect_url=app.swagger_ui_oauth2_redirect_url,
        swagger_js_url="/static/swagger-ui-bundle.js",
        swagger_css_url="/static/swagger-ui.css",
    )


@app.get(app.swagger_ui_oauth2_redirect_url, include_in_schema=False)
async def swagger_ui_redirect():
    return get_swagger_ui_oauth2_redirect_html()


@app.get("/redoc", include_in_schema=False)
async def redoc_html():
    return get_redoc_html(
        openapi_url=app.openapi_url,
        title=app.title + " - ReDoc",
        redoc_js_url="/static/redoc.standalone.js",
    )


@app.get("/users/{username}")
async def read_user(username: str):
    return {"message": f"Hello {username}"}
测试
现在,您应该可以断开WiFi了,转到 http://127.0.0.1:8000/docs 上的文档 ,然后重新加载页面。
即使没有Internet,您也可以查看API的文档并与之交互。
转:https://www.pythonf.cn/read/56964