1.导入驱动包:
a.找到oracle安装目录下的jdbc/lib中的文件classes12.jar;
b.右击你创建的JAVA工程,找到Build path,选择Add External Archives,找到你要导入的包classes12.jar,点击打开就可以引入,引入后在工程下面的ReferencedeLibraries下便能显示这个包。
2.代码测试:
|
1
2
3
4
5
6
7
8
9
10
11
12
13
14
15
16
17
18
19
20
21
22
23
24
25
26
27
28
29
30
31
32
33
34
35
36
37
38
39
40
41
42
43
44
45
46
47
48
49
50
51
52
53
54
55
56
57
58
59
60
61
62
63
64
|
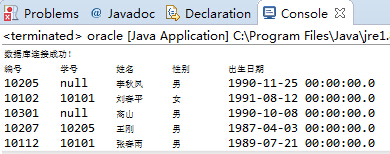
import java.sql.*;public class oracle{ String driver = "oracle.jdbc.OracleDriver"; String url="jdbc:oracle:thin:@localhost:1521:orcl";//@主机名:监听端口:数据库实例名称,Attention notes:the port is generally 1521 String name = "system";//登录名 String pwd = "orcl";//登陆密码 private static Statement sql = null; private static ResultSet rs = null; private static Connection con = null; public Connection getCon() { try { Class.forName(driver); //注册oracle数据库驱动 } catch (ClassNotFoundException e1) { System.out.println("驱动加载失败!"); e1.printStackTrace(); } try { con = DriverManager.getConnection(url, name, pwd);//获取连接字符串 } catch (SQLException e) { System.out.println("驱动或数据库连接失败!"); e.printStackTrace(); } return con; } public static void main(String[] args) { try { oracle db = new oracle(); Connection con = db.getCon(); if (con != null) { System.out.println("数据库连接成功!"); } else { System.out.println("数据库连接失败!"); } sql = con.createStatement(); rs = sql.executeQuery("select * from students"); System.out.println("编号 学号 姓名 性别 出生日期"); while (rs.next()) { System.out.println(rs.getInt(1)+" "+rs.getString(2)+" "+rs.getString(3)+" "+rs.getString(4)+" "+rs.getString(5)); } } catch(Exception e) { e.printStackTrace(); } }} |
3.测试结果: