今天LZ带给大家的是装饰者模式,提起这个设计模式,LZ心里一阵激动,这是LZ学习JAVA以来接触的第一个设计模式,也许也是各位接触的第一个设计模式。记得当初老师在讲IO的时候就提到过它:“是你还有你,一切拜托你。”没错,这就是装饰者模式最简洁的定义了。下面LZ引出标准的定义(出自百度百科):装饰模式是在不必改变原类文件和使用继承的情况下,动态的扩展一个对象的功能。它是通过创建一个包装对象,也就是装饰来包裹真实的对象。
ex:工厂制作上衣,白上衣是30,蓝上衣40,红上衣50,另外还有往衣服上绣的图案,花图案需10元,草图案需5元。现在工厂需要计算出成本价,要求设计出这个实现代码。
我们初看这题有什么思路,难道要设计出5个类吗?这显然不行,如果工厂老板突然让加一个新的图案,岂不是“类爆炸”!这个时候,我们可能想到了用另一种实现方式,把CLothes做为基类,然后设置whiteClothes,
blueClothes ,redClothes 为三个布尔类型变量,在基类里设置cost方法,然后图案设置为子类继承它,各自重写cost方法。这样就把原本的五个类缩小成了三个。
//白上衣是30,蓝上衣40,红上衣50,另外还有往衣服上绣的图案,花图案需10元,草图案需5元
public class Clothes {
private int cost;
private boolean whiteClothes = false;
private boolean blueClothes = false;
private boolean redClothes = false;
public int cost(){
if(whiteClothes){
cost += 30;
}
if(blueClothes){
cost += 40;
}
if(redClothes){
cost += 50;
}
return cost;
}
public int getCost() {
return cost;
}
public void setCost(int cost) {
this.cost = cost;
}
public boolean isWhiteClothes() {
return whiteClothes;
}
public void setWhiteClothes(boolean whiteClothes) {
this.whiteClothes = whiteClothes;
}
public boolean isBlueClothes() {
return blueClothes;
}
public void setBlueClothes(boolean blueClothes) {
this.blueClothes = blueClothes;
}
public boolean isRedClothes() {
return redClothes;
}
public void setRedClothes(boolean redClothes) {
this.redClothes = redClothes;
}
}
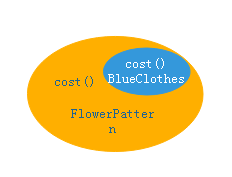
class FlowerPattern extends Clothes{
public int cost(){
return 10+super.cost();
}
}
class GrassPattern extends Clothes{
public int cost(){
return 5+super.cost();
}
}
测试方法
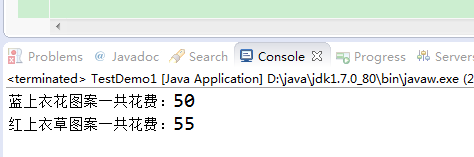
public class TestDemo1 {
    public static void main(String[] args) {
        FlowerPattern flowerPattern = new FlowerPattern();
        flowerPattern.setBlueClothes(true);
        System.out.println("蓝上衣花图案一共花费:"+flowerPattern.cost());
        GrassPattern grassPattern = new GrassPattern();
        grassPattern.setRedClothes(true);
        System.out.println("红上衣草图案一共花费:"+grassPattern.cost());
    }
}
这种写法,相信看过LZ前两篇文章的人一眼就看出了问题,我们虽然写出了实现,但是由于类之间过于耦合,导致不利于维护,当我们添加一个新的颜色的上衣时,需要更改Clothes代码,这就违反了我们的设计原则:类应该对扩展开发,对修改关闭,也就是我们常说的开闭原则。在这里,LZ带着大家一起认识装饰者模式,我们以上衣为主体,以图案来“装饰”上衣。比方说,如果商家要蓝上衣花草图案,那么,我们要做的是:
①拿一个蓝色上衣对象
②以花图案对象装饰它
③以草图案对象装饰它
④调用cost()方法,并依赖委托将调料的价钱加上去
下面我们画个图更加详细了解如何以装饰者构造衣服订单
①以BlueClothes对象开始,别忘了它继承自clothes,且有一个用来计算上衣价钱的cost()方法

②建立一个花图案对象,并用它将BlueClothes对象包(wrap)起来。FlowerPattern对象是一个装饰者,它的类型"反映"了它所装饰的对象(本例中,就是Clothes)。所谓的"反映",指的是两者类型一致。所以FlowerPattern也有一个cost()方法。通过多态,也可以把FlowerPattern所包裹的任何clothes当成是clothes(因为FlowerPattern是clothes的子类)
③接下来还要建立草图案GrassPattern装饰者,并用它将FlowerPattern对象包起来。别忘了,BlueClothes继承自Clothes,且有一个cost()方法,用来计算衣服价钱

④这样,计算总价钱通过调用最外圈装饰者(GrassPattern)的cost()就可以办得到。GrassPatternd cost()方法会先委托它装饰的对象(也就是FlowerPattern)计算出价钱,然后再加上上衣的价钱。
现在,LZ来总结一下我们目前所指的的一切:
=。=装饰者和被装饰者对象有相同的基类。
=。=我们可以用一个或多个装饰者包装一个对象。
=。=既然装饰者和被装饰对象有相同的基类,所以在任何需要原始对象(被包装的)的场合,可以用装饰过的对象代替它。
=。=装饰者可以在所委托被装饰者的行为之前与/或之后,加上自己的行为,以达到特定的目的,
=。=对象可以在任何时候被装饰,所以可以在运行时动态地、不限量地用你喜欢的装饰者来装饰对象
接下来我们先来看看装饰者模式的说明:装饰者模式动态地将责任附加到对象上。若要扩展功能,装饰者提供了比继承更有弹性的替代方案。
下面我们来看下类图:
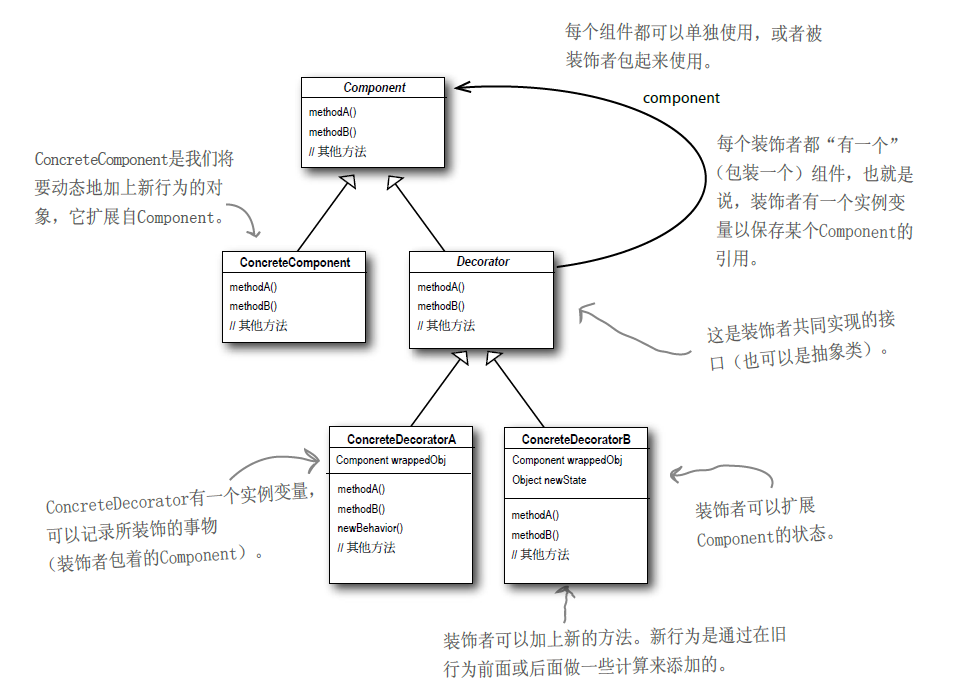
到这里,大家可能会有些混淆:这里使用的是继承不是组合?。其实,这么做的重点在于,装饰者和被装饰者必须是一样的类型,也就是有共同的基类,这是相当关键的地方。在这里我们利用继承达到“类型匹配”,而不是利用继承获得“行为”。那么这个行为又来自哪里?当我们将装饰者与组件组合时,就是再加入新的行为,所得到的新行为,并不是继承自超累,而是由组合对象得来的。
分支
这里,为了防止各位看不懂图的结构,我们先切出一个分支来描述一下这张图,当然如果各位已经看懂,也可以直接跳过这段分支,直接看下面LZ对一开始那个问题的分析。
1,Component接口可以是接口也可以是抽象类,甚至是一个普通的父类(这个强烈不推荐,普通的类作为继承体系的超级父类不易于维护)。
2,装饰器的抽象父类Decorator并不是必须的。
那么我们将上述标准的装饰器模式,用我们熟悉的JAVA代码给诠释一下。首先是待装饰的接口Component。
public interface Component {

    void method();

}
接下来便是我们的一个具体的接口实现类,也就是俗称的原始对象,或者说待装饰对象。
public class ConcreteComponent implements Component{

    public void method() {
        System.out.println("原来的方法");
    }

}
下面便是我们的抽象装饰器父类,它主要是为装饰器定义了我们需要装饰的目标是什么,并对Component进行了基础的装饰。
public abstract class Decorator implements Component{

    protected Component component;

    public Decorator(Component component) {
        super();
        this.component = component;
    }

    public void method() {
        component.method();
    }

}
再来便是我们具体的装饰器A和装饰器B。
public class ConcreteDecoratorA extends Decorator{

    public ConcreteDecoratorA(Component component) {
        super(component);
    }

    public void methodA(){
        System.out.println("被装饰器A扩展的功能");
    }

    public void method(){
        System.out.println("针对该方法加一层A包装");
        super.method();
        System.out.println("A包装结束");
    }
}
public class ConcreteDecoratorB extends Decorator{

    public ConcreteDecoratorB(Component component) {
        super(component);
    }

    public void methodB(){
        System.out.println("被装饰器B扩展的功能");
    }

    public void method(){
        System.out.println("针对该方法加一层B包装");
        super.method();
        System.out.println("B包装结束");
    }
}
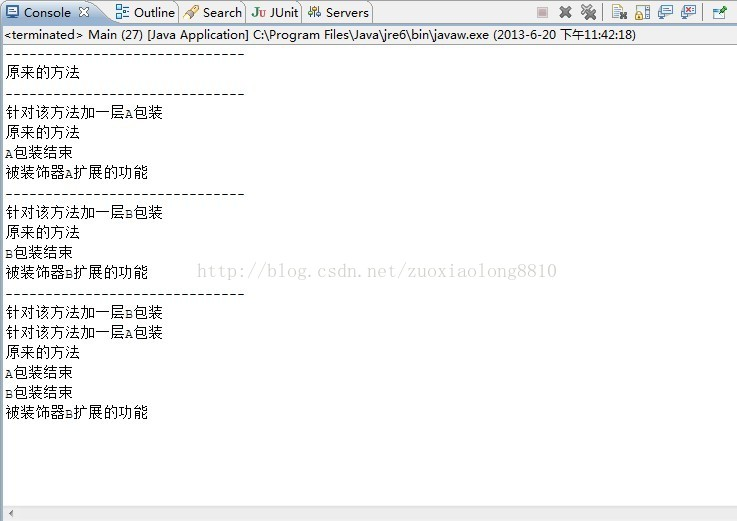
下面给出我们的测试类。我们针对多种情况进行包装。
public class Main {

    public static void main(String[] args) {
        Component component =new ConcreteComponent();//原来的对象
        System.out.println("------------------------------");
        component.method();//原来的方法
        ConcreteDecoratorA concreteDecoratorA = new ConcreteDecoratorA(component);//装饰成A
        System.out.println("------------------------------");
        concreteDecoratorA.method();//原来的方法
        concreteDecoratorA.methodA();//装饰成A以后新增的方法
        ConcreteDecoratorB concreteDecoratorB = new ConcreteDecoratorB(component);//装饰成B
        System.out.println("------------------------------");
        concreteDecoratorB.method();//原来的方法
        concreteDecoratorB.methodB();//装饰成B以后新增的方法
        concreteDecoratorB = new ConcreteDecoratorB(concreteDecoratorA);//装饰成A以后再装饰成B
        System.out.println("------------------------------");
        concreteDecoratorB.method();//原来的方法
        concreteDecoratorB.methodB();//装饰成B以后新增的方法
    }
}
从这个例子中,各位应该对装饰者模式的结构有了一定的了解,那么接下来我们解决之前的那个问题。
分支结束
接下来我们开始看最开始的问题代码:
先从clothes下手,这里我们加一个description 用来描述的更详细一下:
public abstract class Clothes {
    String description = "unknown Clothes";

    public String getDescription(){
        return description;
    }

    public abstract double cost();
}
接下来是装饰者类,我们成为图案Pattern类,也继承自Clothes
 abstract class Pattern extends Clothes{
    public abstract String getDescription();
}
有了两个基类,我们为实现一些衣服,这里我们为了描述清楚,每个都写构造方法:
class WhiteClothes extends Clothes{
     public WhiteClothes(){
         description = "WhiteClothes";
     }
    @Override
    public double cost() {

        return 30;
    }

 }

class BlueClothes extends Clothes{
     public BlueClothes(){
         description = "BlueClothes";
     }
    @Override
    public double cost() {

        return 40;
    }

}

class RedClothes extends Clothes{
     public RedClothes(){
         description = "RedClothes";
     }
    @Override
    public double cost() {

        return 50;
    }

}
接下来我们开始写图案代码,也就是具体装饰者类,为了能够跟上思路,LZ标了注释
class FlowerPattern extends Pattern{//花图案是一个装饰者,让它扩展自Pattern,而Pattern又扩展自Clothes
    //我们为了能让FlowerPattern能够引用clothes,用一个实例变量记录衣服,也就是被装饰者,然后在构造器中将其记录在实例变量里
    private Clothes clothes;
    public FlowerPattern(Clothes clothes){
        this.clothes = clothes;
    }
    @Override
    public String getDescription() {

        return clothes.getDescription() + ",FlowerPattern";//这里我们把图案也描述出来
    }

    @Override
    public double cost() {

        return 10+clothes.cost();//我们把调用委托给被装饰对象,以计算价钱,然后再加上FlowerPattern的价钱,得到最终结果
    }

}
同理,我们写出草图案的具体实现:
class GrassPattern extends Pattern{//草图案是一个装饰者,让它扩展自Pattern,而Pattern又扩展自Clothes
    //我们为了能让FlowerPattern能够引用clothes,用一个实例变量记录衣服,也就是被装饰者,然后在构造器中将其记录在实例变量里
    private Clothes clothes;
    public GrassPattern(Clothes clothes){
        this.clothes = clothes;
    }
    @Override
    public String getDescription() {

        return clothes.getDescription() + ",GrassPattern";//这里我们把图案也描述出来
    }

    @Override
    public double cost() {

        return 5+clothes.cost();//我们把调用委托给被装饰对象,以计算价钱,然后再加上GrassPattern的价钱,得到最终结果
    }

}
最后,测试一下:
public class TestDemo2 {
    public static void main(String[] args) {
        Clothes clothes = new BlueClothes();
        clothes = new FlowerPattern(clothes);
        clothes = new GrassPattern(clothes);
        System.out.println(clothes.getDescription()+"$"+clothes.cost());
    }
}

看到这里,LZ相信大家一定有些熟悉,记得我们在学习IO的时候曾学过包装流,
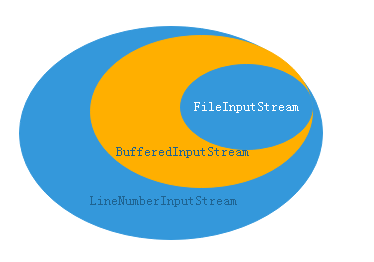
其中FileInputStream是被装饰的“组件”。
BufferedInputStream是一个具体的“装饰者”,它加入两种行为:利用缓冲输入来改进性能利用一个readLine()方法(用来一次读取一行文本输入数据)来增强接口。
LineNumberInputStream也是一个具体的“装饰者”。它加上了计算行数的能力

这里也引出了装饰者模式的一个缺点,常常造成设计中有大量的小类,数量实在太多,可能会造成使用此API程序员的困扰。但是如果我们已经了解了装饰者的工作原理,以后当使用别人的大量装饰者的API时,就可以很容易辨别出他们的装饰者类是如何组织的,以方便用包装方式去的想要的行为。
装饰者模式就到此结束了,感谢大家的收看。
下期预告,单例模式。