一,fail-fast简介
在JDK的Collection中我们时常会看到类似于这样的话:
|
ArrayList |
注意,迭代器的快速失败行为无法得到保证,因为一般来说,不可能对是否出现不同步并发修改做出任何硬性保证。快速失败迭代器会尽最大努力抛出 ConcurrentModificationException。因此,为提高这类迭代器的正确性而编写一个依赖于此异常的程序是错误的做法:迭代器的快速失败行为应该仅用于检测 bug。 |
|
HashMap |
注意,迭代器的快速失败行为不能得到保证,一般来说,存在非同步的并发修改时,不可能作出任何坚决的保证。快速失败迭代器尽最大努力抛出 ConcurrentModificationException。因此,编写依赖于此异常的程序的做法是错误的,正确做法是:迭代器的快速失败行为应该仅用于检测程序错误。 |
在这两段话中反复地提到"快速失败"。那么何为"快速失败"机制呢?
fail-fast 机制是java集合(Collection)中的一种错误机制。当多个线程对同一个集合的内容进行操作时,就可能会产生fail-fast事件。
二,fail-fast示例
单线程中:
public static void main(String[] args) {
    ArrayList<Integer> list = new ArrayList<Integer>();
    list.add(2);
    Iterator<Integer> iterator = list.iterator();
    while(iterator.hasNext()){
        //报错地方
        Integer integer = iterator.next();
        if(integer == 2)
            list.remove(integer);
    }
}
运行结果:

多线程中:
public class Fail_Fast {
    private static List<Integer> list = new ArrayList<Integer>();
    //线程1,iterator遍历集合
    private static class thread1 extends Thread{
        public void run() {
            Iterator<Integer> iterator = list.iterator();
            while(iterator.hasNext()){
                //报错地方
                int i = iterator.next();
                System.out.println("Thread1 遍历:" + i);
                try {
                    Thread.sleep(100);
                } catch (InterruptedException e) {
                    e.printStackTrace();
                }
            }
        }
    }
    //线程2,满足条件时候修改集合结构
    private static class thread2 extends Thread{
        public void run(){
            int i = 0;
            while(i < 10){
                System.out.println("Thread2 run:" + i);
                if(i == 4)
                    list.remove(i);//删除一个元素。
                i++;
            }
        }
    }

    public static void main(String[] args) {
        for(int i = 0 ; i < 10;i++){
            list.add(i);
        }
        new thread1().start();
        new thread2().start();
    }
}
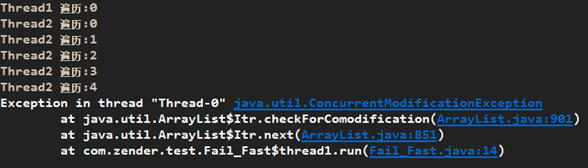
运行结果:

初步知道fail-fast产生的原因就在于程序在对 collection 进行迭代时,某个线程对该 collection 在结构上对其做了修改,这时迭代器就会抛出ConcurrentModificationException 异常信息,从而产生 fail-fast。
三,ConcurrentModificationException异常出现的原因
ConcurrentModificationException 异常指的是:当方法检测到对象的并发修改,但不允许这种修改时就抛出该异常。同时需要注意的是,该异常不会始终指出对象已经由不同线程并发修改,如果单线程违反了规则,同样也有可能会抛出改异常。
现在来看看ArrayList中迭代器的源代码:

首先看ArrayList的iterator()方法的具体实现,查看源码发现在ArrayList的源码中并没有iterator()这个方法,那么很显然这个方法应该是其父类或者实现的接口中的方法,我们在其父类AbstractList中找到了iterator()方法的具体实现,下面是其实现代码:
private class Itr implements Iterator<E> {
    int cursor;       // 表示下一个要访问的元素的索引
    int lastRet = -1; // 表示上一个访问的元素的索引
    int expectedModCount = modCount; //表示对ArrayList修改次数的期望值,它的初始值为modCount。

    public boolean hasNext() {
        return cursor != size;
    }

    @SuppressWarnings("unchecked")
    public E next() {
        checkForComodification();
        int i = cursor;
        if (i >= size)
            throw new NoSuchElementException();
        Object[] elementData = ArrayList.this.elementData;
        if (i >= elementData.length)
            throw new ConcurrentModificationException();
        cursor = i + 1;
        return (E) elementData[lastRet = i];
    }

    public void remove() {
        if (lastRet < 0)
            throw new IllegalStateException();
        checkForComodification();

        try {
            ArrayList.this.remove(lastRet);
            cursor = lastRet;
            lastRet = -1;
            expectedModCount = modCount;
        } catch (IndexOutOfBoundsException ex) {
            throw new ConcurrentModificationException();
        }
    }
}
从上面的源代码我们可以看出,迭代器在调用next()、remove()方法时都是调用checkForComodification()方法,该方法主要就是检测modCount == expectedModCount 是否相等,若不等则抛出ConcurrentModificationException 异常,从而产生fail-fast机制。
expectedModCount 是在Itr中定义的:int expectedModCount = ArrayList.this.modCount;所以他的值是不可能会修改的。
注意这个modCount变量,modCount是AbstractList类中的一个成员变量,该值表示对List的修改次数:

查看ArrayList的源码:
public boolean add(E e) {
    ensureCapacityInternal(size + 1);
    elementData[size++] = e;
    return true;
}
// 将e添加到ArrayList的指定位置
public void add(int index, E element) {
    //判断下标是否数组越界
    rangeCheckForAdd(index);

    ensureCapacityInternal(size + 1);
    System.arraycopy(elementData, index, elementData, index + 1,
                     size - index);
    elementData[index] = element;
    size++;
}
private void ensureCapacityInternal(int minCapacity) {
    //判断元素数组是否为空数组
    if (elementData == DEFAULTCAPACITY_EMPTY_ELEMENTDATA) {
        // 取较大值
        minCapacity = Math.max(DEFAULT_CAPACITY, minCapacity);
    }
    ensureExplicitCapacity(minCapacity);
}
private void ensureExplicitCapacity(int minCapacity) {
    //修改次数+1
    modCount++;

    if (minCapacity - elementData.length > 0)
        grow(minCapacity);
}
public E remove(int index) {
    // 检查索引是否合法
    rangeCheck(index);
    // 修改次数+1
    modCount++;
    E oldValue = elementData(index);
    // 需要移动的元素的个数
    int numMoved = size - index - 1;
    if (numMoved > 0)
        //复制数组
        System.arraycopy(elementData, index+1, elementData, index,
                         numMoved);
    // 赋值为空,有利于进行GC(垃圾回收),避免内存泄漏(否则实际上数组中依然有该引用,gc无法进行垃圾回收)
    elementData[--size] = null;
    // 返回旧值
    return oldValue;
}
//该方法能够擦除list中值为null的元素!
public boolean remove(Object o) {
    if (o == null) {
        for (int index = 0; index < size; index++)
            if (elementData[index] == null) {
                fastRemove(index);
                return true;
            }
    } else {
        for (int index = 0; index < size; index++)
            if (o.equals(elementData[index])) {
                fastRemove(index);
                return true;
            }
    }
    return false;
}
private void fastRemove(int index) {
    // 修改次数+1
    modCount++;
    // 需要移动的元素的个数
    int numMoved = size - index - 1;
    if (numMoved > 0)
        //复制数组
        System.arraycopy(elementData, index+1, elementData, index,
                         numMoved);
    // 赋值为空,有利于进行GC(垃圾回收),避免内存泄漏(否则实际上数组中依然有该引用,gc无法进行垃圾回收)
    elementData[--size] = null;
}
//清空数组,把每一个值设为null,方便垃圾回收(不同于reset,数组默认大小有改变的话不会重置)
public void clear() {
    modCount++;
    for (int i = 0; i < size; i++) elementData[i] = null;
    size = 0;
}
从上面的源代码我们可以看出,ArrayList中无论add、remove、clear方法只要是涉及了改变ArrayList元素的个数的方法都会导致modCount的改变。这里可以初步判断由于expectedModCount 得值与modCount的改变不同步,导致两者之间不等从而产生fail-fast机制。
如何证明:
回到我们前面单线程的代码上:
public static void main(String[] args) {
    ArrayList<Integer> list = new ArrayList<Integer>();
    list.add(2);
    Iterator<Integer> iterator = list.iterator();
    while(iterator.hasNext()){
        //报错地方
        Integer integer = iterator.next();
        if(integer == 2)
            list.remove(integer);
    }
}
第一步:第一次while循环
调用list.iterator()返回一个Iterator之后,通过Iterator的hashNext()方法判断是否还有元素未被访问,看一下hasNext()方法:
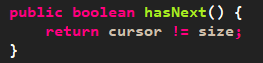
如果下一个访问的元素下标不等于ArrayList的大小,就表示有元素需要访问,如果下一个访问元素的下标等于ArrayList的大小,则肯定到达末尾了。
再通过iterator.next()方法获取到下标为0的元素,我们看一下next()方法的具体实现:
@SuppressWarnings("unchecked")
public E next() {
    checkForComodification();
    int i = cursor;
    //当下标大于等于List的实际长度时,抛出NoSuchElementException
    if (i >= size)
        throw new NoSuchElementException();
    Object[] elementData = ArrayList.this.elementData;
    //当下标大于等于elementData数组长度时,抛出ConcurrentModificationException
    if (i >= elementData.length)
        throw new ConcurrentModificationException();
    cursor = i + 1;
    return (E) elementData[lastRet = i];
}
checkForComodification()方法判断modCount==?expectedModCount,显然这时候相等,然后对cursor的值进行加1操作(初始时,cursor为0),返回具体的元素。注意此时,modCount=0,expectedModCount=0。
接着往下看,程序中判断当前元素的值是否为2,若为2,则调用list.remove()方法来删除该元素。remove()方法源码如下:
//该方法能够擦除list中值为null的元素!
public boolean remove(Object o) {
    if (o == null) {
        for (int index = 0; index < size; index++)
            if (elementData[index] == null) {
                fastRemove(index);
                return true;
            }
    } else {
        for (int index = 0; index < size; index++)
            if (o.equals(elementData[index])) {
                fastRemove(index);
                return true;
            }
    }
    return false;
}
private void fastRemove(int index) {
    // 修改次数+1
    modCount++;
    // 需要移动的元素的个数
    int numMoved = size - index - 1;
    if (numMoved > 0)
        //复制数组
        System.arraycopy(elementData, index+1, elementData, index,
                         numMoved);
    // 赋值为空,有利于进行GC(垃圾回收),避免内存泄漏(否则实际上数组中依然有该引用,gc无法进行垃圾回收)
    elementData[--size] = null;
}
通过remove方法删除元素最终是调用的fastRemove()方法,在fastRemove()方法中,首先对modCount进行加1操作(表示对集合修改了一次),然后接下来就是删除元素的操作,最后将size进行减1操作,并将引用置为null以方便垃圾收集器进行回收工作。
注意此时各个变量的值:
|
Iterator |
其expectedModCount为0,cursor的值为1。 |
|
list |
modCount为1(修改了一次),size为0(删除了一个为2的元素)。 |
第二步:第二次while循环
调用hasNext()方法判断,由于此时cursor=1,而size=0,那么返回true,所以继续执行while循环,然后继续调用iterator的next()方法:
在next()方法中会调用checkForComodification()方法,用于判断modCount==?expectedModCount,如果不等于,则抛出ConcurrentModificationException异常。方法如下:

很显然,此时modCount=1,而expectedModCount=0,因此程序就抛出了ConcurrentModificationException异常。到这里,想必大家应该明白为何上述代码会抛出ConcurrentModificationException异常了。关键点就在于:调用list.remove()方法导致modCount和expectedModCount的值不一致。
四,如何避免fail-fast错误
1,在单线程环境下避免
其实在Itr类中给出了一个remove()方法:
public void remove() {
    if (lastRet < 0)
        throw new IllegalStateException();
    checkForComodification();

    try {
        ArrayList.this.remove(lastRet);
        cursor = lastRet;
        lastRet = -1;
        //关键
        expectedModCount = modCount;
    } catch (IndexOutOfBoundsException ex) {
        throw new ConcurrentModificationException();
    }
}
在这个方法中,删除元素实际上调用的就是list.remove()方法,但是它多了一个操:expectedModCount = modCount;
因此,在迭代器中如果要删除元素的话,需要调用Itr类的remove方法。更改后的代码如下:
public static void main(String[] args) {
    ArrayList<Integer> list = new ArrayList<Integer>();
    list.add(1);
    list.add(2);
    Iterator<Integer> iterator = list.iterator();
    while(iterator.hasNext()){
        Integer integer = iterator.next();
        if(integer == 2)
            iterator.remove();
    }
}
2,在多线程环境下避免
上面的解决办法在单线程环境下适用,但是在多线程下可就不好使,例如:
public class Fail_Fast {
    private static List<Integer> list = new ArrayList<Integer>();
    //线程1,iterator遍历集合
    private static class thread1 extends Thread{
        public void run() {
            Iterator<Integer> iterator = list.iterator();
            while(iterator.hasNext()){
                int i = iterator.next();
                System.out.println("Thread1 遍历:" + i);
                try {
                    Thread.sleep(100);
                } catch (InterruptedException e) {
                    e.printStackTrace();
                }
            }
        }
    }
    //线程2,满足条件时候修改集合结构
    private static class thread2 extends Thread{
        public void run(){
            Iterator<Integer> iterator = list.iterator();
            while(iterator.hasNext()){
                int i = iterator.next();
                System.out.println("Thread2 遍历:" + i);
                if(i == 2){
                    iterator.remove();
                }
            }
        }
    }

    public static void main(String[] args) {
        for(int i = 0 ; i < 5;i++){
            list.add(i);
        }
        new thread1().start();
        new thread2().start();
    }
}
运行结果:
多线程中一般有2种解决办法:
1)在使用iterator迭代的时候使用synchronized或者直接使用Collections.synchronizedList()。
2)使用并发容器CopyOnWriteArrayList代替ArrayList和Vector。
什么是CopyOnWriteArrayList
CopyOnWriteArrayList是ArrayList 的一个线程安全的变体,其中所有可变操作(add、set 等等)都是通过对底层数组进行一次新的复制来实现的。 该类产生的开销比较大。
但是在两种情况下,它非常适合使用:
1、在不能或不想进行同步遍历,但又需要从并发线程中排除冲突时。
2、当遍历操作的数量大大超过可变操作的数量时。遇到这两种情况使用CopyOnWriteArrayList来替代ArrayList再适合不过了。
那么为什么CopyOnWriterArrayList可以替代ArrayList呢?
1、CopyOnWriterArrayList的无论是从数据结构、定义都和ArrayList一样。它和ArrayList一样,同样是实现List接口,底层使用数组实现。在方法上也包含add、remove、clear、iterator等方法。
2、CopyOnWriterArrayList根本就不会产生ConcurrentModificationException异常,也就是它使用迭代器完全不会产生fail-fast机制。请看内部的迭代器的实现:
public Iterator<E> iterator() {
    return new COWIterator<E>(getArray(), 0);
}

static final class COWIterator<E> implements ListIterator<E> {
    /** 省略此处代码 */
    @SuppressWarnings("unchecked")
    public E next() {
        if (! hasNext())
            throw new NoSuchElementException();
        return (E) snapshot[cursor++];
    }
    /** 省略此处代码 */
}
CopyOnWriteArrayList的add()方法:
public boolean add(E e) {
    final ReentrantLock lock = this.lock;
    lock.lock();
    try {
        Object[] elements = getArray();
        int len = elements.length;
        //不同点
        Object[] newElements = Arrays.copyOf(elements, len + 1);
        newElements[len] = e;
        setArray(newElements);
        return true;
    } finally {
        lock.unlock();
    }
}

这三句代码使得CopyOnWriterArrayList不会抛ConcurrentModificationException异常。首先copy原来的array,再在copy数组上进行add操作,这样做就完全不会影响COWIterator中的array了。
CopyOnWriterArrayList所代表的核心概念就是:任何对array在结构上有所改变的操作(add、remove、clear等),CopyOnWriterArrayList都会copy现有的数据,再在copy的数据上修改,这样就不会影响COWIterator中的数据了,修改完成之后改变原有数据的引用即可。同时这样造成的代价就是产生大量的对象,同时数组的copy也是相当有损耗的。