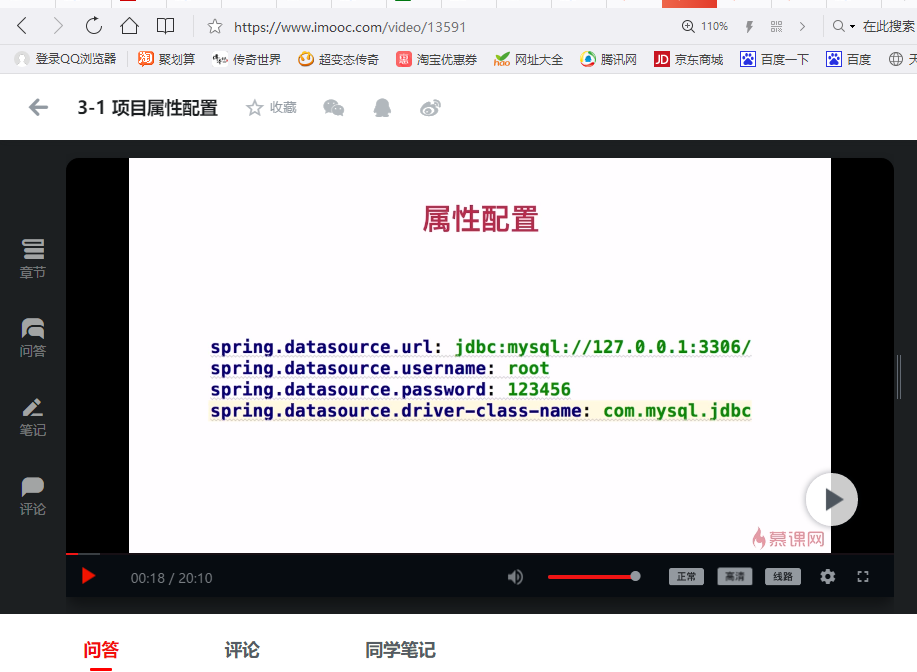
数据库的配置
删掉static和templates这两个目录


application.properties
server.port=8081
server.context-path=/girl


application.yml
server:
  port: 8082
  context-path: /girl


package com.imooc.girl;

import org.springframework.beans.factory.annotation.Value;
import org.springframework.web.bind.annotation.RequestMapping;
import org.springframework.web.bind.annotation.RequestMethod;
import org.springframework.web.bind.annotation.RestController;

/**
 * Created by zhongzh
 * 2018-05-20 08:33
 */
@RestController
public class HelloController {

    @Value("${cupSize}")
    private String cupSize;//通过一个注解把配置文件里面的内容给它注到cupSize这个属性变量里面来了

    @RequestMapping(value = "/hello",method = RequestMethod.GET)
    public String say(){

        //return "Hello Spring Boot!";
        return cupSize;
    }

}
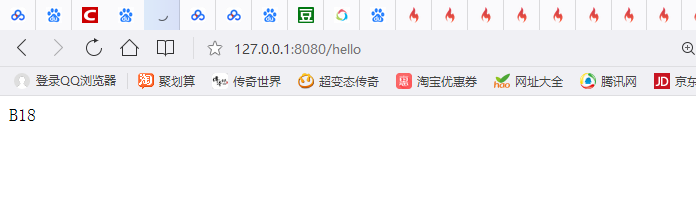
server:
  port: 8080
cupSize: B
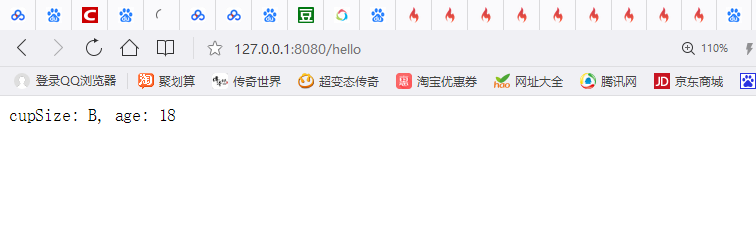
server:
  port: 8080
cupSize: B
age: 18
package com.imooc.girl;

import org.springframework.beans.factory.annotation.Value;
import org.springframework.web.bind.annotation.RequestMapping;
import org.springframework.web.bind.annotation.RequestMethod;
import org.springframework.web.bind.annotation.RestController;

/**
 * Created by zhongzh
 * 2018-05-20 08:33
 */
@RestController
public class HelloController {

    @Value("${cupSize}")
    private String cupSize;//通过一个注解把配置文件里面的内容给它注到cupSize这个属性变量里面来了

    @Value("${age}")
    private Integer age;

    @RequestMapping(value = "/hello",method = RequestMethod.GET)
    public String say(){

        //return "Hello Spring Boot!";
        return cupSize + age;
    }

}
package com.imooc.girl;

import org.springframework.beans.factory.annotation.Value;
import org.springframework.web.bind.annotation.RequestMapping;
import org.springframework.web.bind.annotation.RequestMethod;
import org.springframework.web.bind.annotation.RestController;

/**
 * Created by zhongzh
 * 2018-05-20 08:33
 */
@RestController
public class HelloController {

    @Value("${cupSize}")
    private String cupSize;//通过一个注解把配置文件里面的内容给它注到cupSize这个属性变量里面来了

    @Value("${age}")
    private Integer age;

    @Value("${content}")
    private String content;

    @RequestMapping(value = "/hello",method = RequestMethod.GET)
    public String say(){

        //return "Hello Spring Boot!";
        //return cupSize + age;
        return content;
    }

}
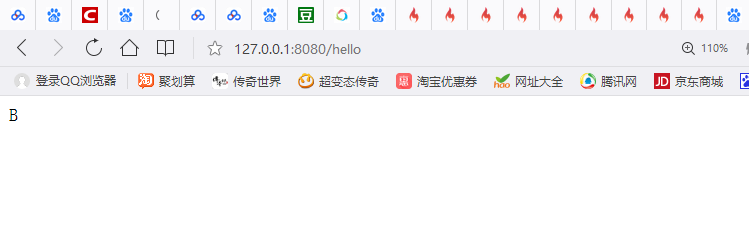
server:
  port: 8080
cupSize: B
age: 18
content: "cupSize: ${cupSize}, age: ${age}"
这样就不用每一次都写一个@Value的注解了。@ConfigurationProperties这个全新的注解它就可以把对应的girl这个前缀下面这些属性给它映射过来
。

application.yml
server:
  port: 8080
girl:
  cupSize: B
  age: 18
GirlProperties.java
package com.imooc.girl;

import org.springframework.boot.context.properties.ConfigurationProperties;
import org.springframework.stereotype.Component;

/**
 * Created by zhongzh
 * 2018-05-21 16:36
 */
@Component//你要注入配置还需要加另外一个注解
@ConfigurationProperties(prefix = "girl")//获取前缀是girl的配置
public class GirlProperties {
    private String cupSize;

    private Integer age;

    public String getCupSize() {
        return cupSize;
    }

    public void setCupSize(String cupSize) {
        this.cupSize = cupSize;
    }

    public void setAge(Integer age) {
        this.age = age;
    }

    public Integer getAge() {
        return age;
    }


}
HelloController.java
package com.imooc.girl;

import org.springframework.beans.factory.annotation.Autowired;
import org.springframework.beans.factory.annotation.Value;
import org.springframework.web.bind.annotation.RequestMapping;
import org.springframework.web.bind.annotation.RequestMethod;
import org.springframework.web.bind.annotation.RestController;

/**
 * Created by zhongzh
 * 2018-05-20 08:33
 */
@RestController
public class HelloController {

    @Autowired
    private GirlProperties girlProperties;
    /*
    @Value("${cupSize}")
    private String cupSize;//通过一个注解把配置文件里面的内容给它注到cupSize这个属性变量里面来了

    @Value("${age}")
    private Integer age;

    @Value("${content}")
    private String content;
*/
    @RequestMapping(value = "/hello",method = RequestMethod.GET)
    public String say(){

        //return "Hello Spring Boot!";
        //return cupSize + age;
        //return content;
        return girlProperties.getCupSize();
    }

}
这就是如何把配置给写到一个类里面去。这是一种比较推荐的方式,分组。把配置作为一个分组。在家里的时候喜欢B,出门的时候喜欢F。开发环境用的是B,生产环境用的是F。
解决开发环境和生产环境不同的配置的问题。作为一名优秀的工程师,不应该把时间花在频繁的改配置上。

application.yml
spring:
  profiles:
    active: dev
application-dev.xml
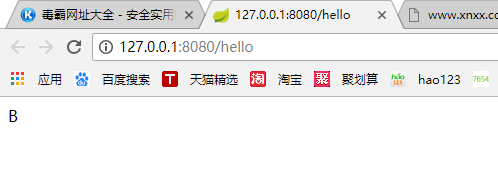
server:
  port: 8080
girl:
  cupSize: B
  age: 18
application-prod.xml
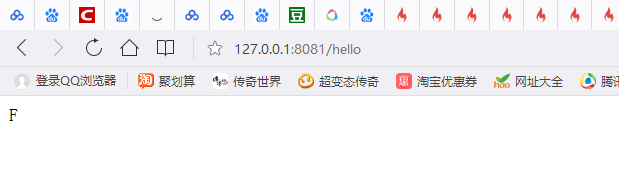
server:
  port: 8081
girl:
  cupSize: F
  age: 18
application.xml
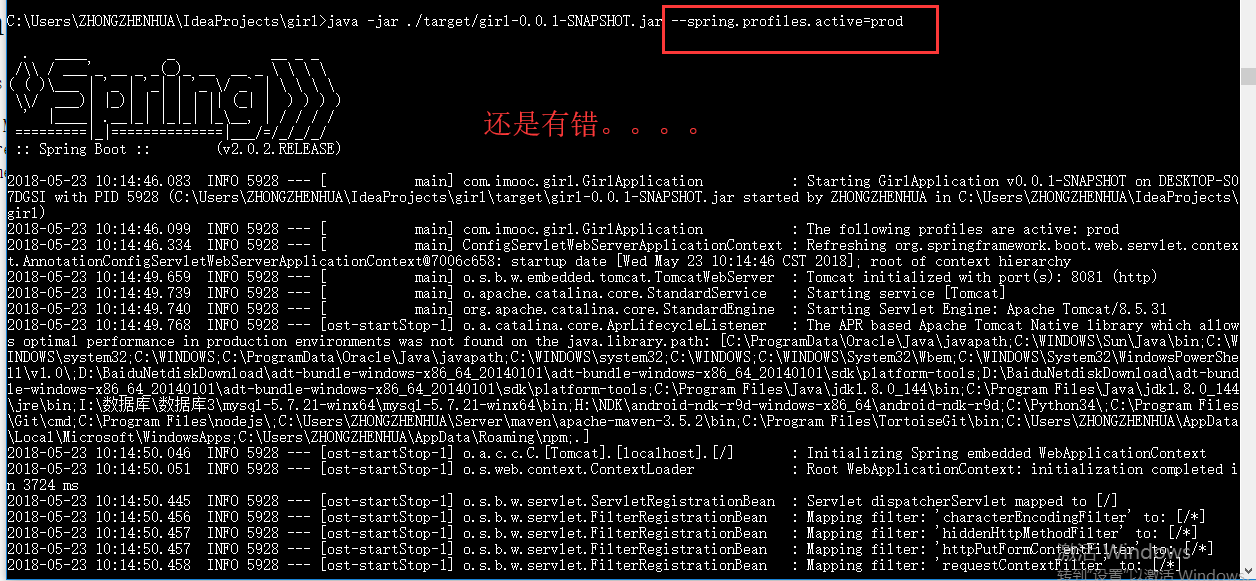
spring:
  profiles:
    active: prod
之前讲过一种java -jar的启动方式。首先编译一下。


https://docs.spring.io/spring-boot/docs/2.0.2.RELEASE/reference/html/configuration-metadata.html#configuration-metadata-annotation-processor
    <dependencies>
        <dependency>
            <groupId>org.springframework.boot</groupId>
            <artifactId>spring-boot-starter-web</artifactId>
        </dependency>

        <dependency>
            <groupId>org.springframework.boot</groupId>
            <artifactId>spring-boot-starter-test</artifactId>
            <scope>test</scope>
        </dependency>
        <dependency>
            <groupId>org.springframework.boot</groupId>
            <artifactId>spring-boot-configuration-processor</artifactId>
            <optional>true</optional>
        </dependency>
        <!--
        <dependency>
            <groupId></groupId>
            <artifactId></artifactId>
        </dependency>
-->

    </dependencies>
然后更新一下项目就行


@Value这个注解实现配置内容的注入。随着配置文件的增多建议大家一定要对配置文件做一个分组。这就要使用到下面两个注解@Component和@ConfigurationProperties来注入我们的配置。如何面对多环境来使用不同的配置文件。
