SSM(Spring+SpringMvc+Mybatis)项目环境搭建:
1、项目环境:
- jdk-1.8
- tomcat-9.0
- mysql-5.1.44
- spring 5.1.6
- mybatis 3.5.1
- maven 3.5.4
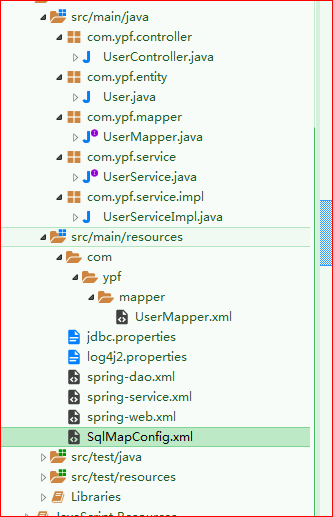
2、项目目录结构:
3、pom.xml中引入的依赖:
<!-- web层依赖 -->
      <dependency>
          <groupId>org.springframework</groupId>
          <artifactId>spring-webmvc</artifactId>
          <version>5.1.6.RELEASE</version>
      </dependency>
      <!-- spring与数据库相关依赖 -->
      <dependency>
          <groupId>org.springframework</groupId>
          <artifactId>spring-jdbc</artifactId>
          <version>5.1.6.RELEASE</version>
      </dependency>
      <!-- 引入Mybatis依赖 -->
      <dependency>
          <groupId>org.mybatis</groupId>
          <artifactId>mybatis</artifactId>
          <version>3.5.1</version>
      </dependency>
      <!-- 引入mybatis与spring相关的依赖 -->
      <dependency>
          <groupId>org.mybatis</groupId>
          <artifactId>mybatis-spring</artifactId>
          <version>2.0.1</version>
      </dependency>
      <!-- 数据库连接驱动 -->
      <dependency>
          <groupId>mysql</groupId>
          <artifactId>mysql-connector-java</artifactId>
          <version>5.1.32</version>
      </dependency>
      <!-- 数据库连接池选用druid连接池 -->
      <dependency>
          <groupId>com.alibaba</groupId>
          <artifactId>druid</artifactId>
          <version>1.1.10</version>
      </dependency>
      <!-- springAop相关依赖 -->
      <dependency>
          <groupId>org.springframework</groupId>
          <artifactId>spring-aspects</artifactId>
          <version>5.1.6.RELEASE</version>
      </dependency>
      <!-- jsp页面相关依赖 -->
      <dependency>
          <groupId>jstl</groupId>
          <artifactId>jstl</artifactId>
          <version>1.2</version>
      </dependency>
4、web.xml配置:
 <display-name>SSM</display-name>
  <welcome-file-list>
    <welcome-file>index.jsp</welcome-file>
  </welcome-file-list>
 <!--   配置Spring监听器 -->
  <listener>
          <listener-class>org.springframework.web.context.ContextLoaderListener</listener-class>
  </listener>
  <context-param>
          <param-name>contextConfigLocation</param-name>
          <param-value>classpath:spring-*.xml</param-value>
  </context-param>
  <!-- springmvc前端控制器 -->
  <servlet>
          <servlet-name>springmvc</servlet-name>
          <servlet-class>org.springframework.web.servlet.DispatcherServlet</servlet-class>
         <init-param>
             <param-name>contextConfigLocation</param-name>
             <param-value>classpath:spring-web.xml</param-value>
         </init-param>
  </servlet>
  <servlet-mapping>
      <servlet-name>springmvc</servlet-name>
      <url-pattern>/</url-pattern>
  </servlet-mapping>
5、spring-dao.xml配置文件
<?xml version="1.0" encoding="UTF-8"?>
<beans xmlns="http://www.springframework.org/schema/beans"
    xmlns:xsi="http://www.w3.org/2001/XMLSchema-instance"
    xmlns:context="http://www.springframework.org/schema/context"
    xmlns:jdbc="http://www.springframework.org/schema/jdbc"
    xmlns:jee="http://www.springframework.org/schema/jee"
    xmlns:tx="http://www.springframework.org/schema/tx"
    xmlns:aop="http://www.springframework.org/schema/aop"
    xmlns:mvc="http://www.springframework.org/schema/mvc"
    xmlns:util="http://www.springframework.org/schema/util"
    xmlns:jpa="http://www.springframework.org/schema/data/jpa"
    xsi:schemaLocation="
        http://www.springframework.org/schema/beans http://www.springframework.org/schema/beans/spring-beans-3.2.xsd
        http://www.springframework.org/schema/context http://www.springframework.org/schema/context/spring-context-3.2.xsd
        http://www.springframework.org/schema/jdbc http://www.springframework.org/schema/jdbc/spring-jdbc-3.2.xsd
        http://www.springframework.org/schema/jee http://www.springframework.org/schema/jee/spring-jee-3.2.xsd
        http://www.springframework.org/schema/tx http://www.springframework.org/schema/tx/spring-tx-3.2.xsd
        http://www.springframework.org/schema/data/jpa http://www.springframework.org/schema/data/jpa/spring-jpa-1.3.xsd
        http://www.springframework.org/schema/aop http://www.springframework.org/schema/aop/spring-aop-3.2.xsd
        http://www.springframework.org/schema/mvc http://www.springframework.org/schema/mvc/spring-mvc-3.2.xsd
        http://www.springframework.org/schema/util http://www.springframework.org/schema/util/spring-util-3.2.xsd">
        <!-- <context:component-scan base-package="com.ypf.mapper"></context:component-scan> -->
        <!-- 加载外部数据资源文件 -->
        <context:property-placeholder location="classpath:jdbc.properties"/>

        <!-- 配置数据源 -->
        <bean id="dataSource" class="com.alibaba.druid.pool.DruidDataSource">
              <property name="driverClassName" value="${jdbc.driverClassName}" />
              <property name="url" value="${jdbc.url}" />
              <property name="username" value="${jdbc.username}" />
              <property name="password" value="${jdbc.password}" />
        </bean>
        <!-- 配置SqlSessionFactory -->
        <bean id="sqlSessionFactory" class="org.mybatis.spring.SqlSessionFactoryBean">
            <property name="dataSource" ref="dataSource"></property>
            <!-- 引入mybatis核心配置文件、如果核心配置文件里没有配置,也可不引入 -->
            <property name="configLocation" value="classpath:SqlMapConfig.xml"></property>
        <!--可只扫描mapper接口,然后指定mapper.xml文件的位置如下-->
            <!-- <property name="mapperLocations" value="classpath:*Mapper.xml"></property> -->
        </bean>

        <!-- 配置mapper扫描 -->
        <bean class="org.mybatis.spring.mapper.MapperScannerConfigurer">
        <!--扫描Mapper接口所在的包,如果同时想扫描到mapper.xml文件,则把mapper.xml文件与mapper接口放在统一包下,并且名称相同,或者按我的目录结构,在resources下创建与mapper接口所在包相同的名称-->
            <property name="basePackage" value="com.ypf.mapper" />
              <property name="sqlSessionFactoryBeanName" value="sqlSessionFactory" />
        </bean>

</beans>
6、jdbc属性文件
#mysql版本8.0以上:driverClassName是:com.mysql.cj.jdbc.Driver
jdbc.driverClassName=com.mysql.jdbc.Driver
jdbc.url=jdbc:mysql://localhost:3306/test?characterEncoding=utf-8
jdbc.username=root
jdbc.password=root
7、spring-service.xml配置(文件头与spring-dao一致,就不重复了)
<!-- 扫描service包下的注解  -->
        <context:component-scan base-package="com.ypf.service.*"></context:component-scan>
        <!-- 配置事务管理器 -->
        <bean id="transactionManager" class="org.springframework.jdbc.datasource.DataSourceTransactionManager">
            <property name="dataSource" ref="dataSource"></property>
        </bean>
        <!-- 配置通知(增强) -->
        <tx:advice id="txAdvice" transaction-manager="transactionManager">
            <!-- 传播行为 -->
            <tx:attributes>
                <!-- 有事务用当前的事务,没有事务开启一个新的事务 -->
                <tx:method name="save*" propagation="REQUIRED"/>
                <tx:method name="insert*" propagation="REQUIRED"/>
                <tx:method name="add*" propagation="REQUIRED"/>
                <tx:method name="create*" propagation="REQUIRED"/>
                <tx:method name="delete*" propagation="REQUIRED"/>
                <tx:method name="update*" propagation="REQUIRED"/>
                <!-- 以这些方法开头的查询方法,以只读方式打开 -->
                <tx:method name="find*" propagation="SUPPORTS" read-only="true"/>
                <tx:method name="select*" propagation="SUPPORTS" read-only="true"/>
                <tx:method name="get*" propagation="SUPPORTS" read-only="true"/>
                <tx:method name="query*" propagation="SUPPORTS" read-only="true"/>
            </tx:attributes>
        </tx:advice>
        <aop:config>
            <!-- 将通知应用到切面,即service层 -->
            <aop:advisor advice-ref="txAdvice" pointcut="execution(* com.ypf.service.*.*(..))"/>
        </aop:config>
8、spring-web.xml配置
<!-- 扫描controller包下的注解,如果扫描到文件中带有@Service,@Component,@Repository,@Controller等这些注解的类,则把这些类注册为bean  -->
        <context:component-scan base-package="com.ypf.controller"></context:component-scan>

        <!-- 配置注解驱动 -->
        <mvc:annotation-driven/>

        <!-- 配置视图解析器 -->
        <bean class="org.springframework.web.servlet.view.InternalResourceViewResolver">
                <property name="prefix" value="/WEB-INF/jsp/"/>
                <property name="suffix" value=".jsp"/>
        </bean>
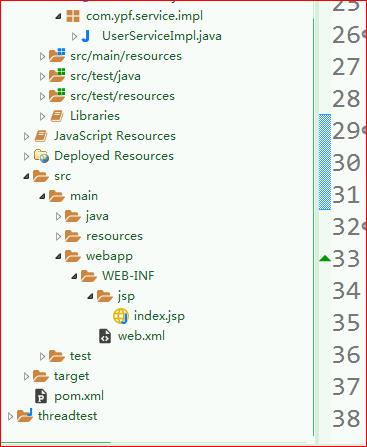
9、jsp页面位置对应视图解析器prefix的位置:
10、数据库中表结构:
DROP TABLE IF EXISTS `users`;
CREATE TABLE `users`  (
  `username` char(10) CHARACTER SET latin1 COLLATE latin1_swedish_ci NOT NULL DEFAULT '',
  `password` varchar(20) CHARACTER SET latin1 COLLATE latin1_swedish_ci NOT NULL,
  `usertype` varchar(10) CHARACTER SET latin1 COLLATE latin1_swedish_ci NULL DEFAULT NULL,
  `id` int(10) NOT NULL AUTO_INCREMENT,
  PRIMARY KEY (`id`) USING BTREE
) ENGINE = InnoDB AUTO_INCREMENT = 14 CHARACTER SET = latin1 COLLATE = latin1_swedish_ci ROW_FORMAT = Compact;
11、Controller层代码:
import java.util.List;

import org.springframework.beans.factory.annotation.Autowired;
import org.springframework.stereotype.Controller;
import org.springframework.ui.Model;
import org.springframework.web.bind.annotation.RequestMapping;

import com.ypf.entity.User;
import com.ypf.service.UserService;

@Controller
public class UserController {

    @Autowired
    private UserService userserviceimpl;

    @RequestMapping("/index")
    public String find(Model model) {
        List<User> query = userserviceimpl.query();
        model.addAttribute("user", query);
        return "index";
    }
}
12、Service层及其实现类
service层接口
import java.util.List;

import com.ypf.entity.User;

public interface UserService {
    /**
      * 查询所有用户
     * @return
     */
    public List<User> query();
}
service层实现类
import java.util.List;


import org.springframework.beans.factory.annotation.Autowired;
import org.springframework.stereotype.Service;

import com.ypf.entity.User;
import com.ypf.mapper.UserMapper;
import com.ypf.service.UserService;
@Service
public class UserServiceImpl implements UserService{

    @Autowired
    private UserMapper usermapper;

    @Override
    public List<User> query() {

        return usermapper.query();
    }

}
13、Mapper层(Dao层)接口及其Mapper.xml映射文件
UserMapper层接口
import java.util.List;

import com.ypf.entity.User;

public interface UserMapper {
    /**
      * 查询所有用户
     * @return
     */
    public List<User> query();
}
UserMapper.xml文件
<?xml version="1.0" encoding="UTF-8"?>
<!DOCTYPE mapper PUBLIC "-//ibatis.apache.org//DTD Mapper 3.0//EN"
 "http://ibatis.apache.org/dtd/ibatis-3-mapper.dtd">
<!--命名空间-->
 <mapper namespace="com.ypf.mapper.UserMapper">
    <!--id属性与Mapper接口中方法名一致-->
     <select id="query"  resultType="com.ypf.entity.User">
     select * from users
     </select>

 </mapper>
14、User实体类


public class User {
    private Integer id;
    private String username;
    private String password;
    private String usertype;
    public Integer getId() {
        return id;
    }
    public void setId(Integer id) {
        this.id = id;
    }
    public String getUsername() {
        return username;
    }
    public void setUsername(String username) {
        this.username = username;
    }
    public String getPassword() {
        return password;
    }
    public void setPassword(String password) {
        this.password = password;
    }
    public String getUsertype() {
        return usertype;
    }
    public void setUsertype(String usertype) {
        this.usertype = usertype;
    }
    @Override
    public String toString() {
        return "User [id=" + id + ", username=" + username + ", password=" + password + ", usertype=" + usertype + "]";
    }

}
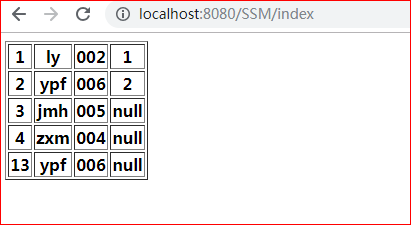
15、效果展示