为什么标题会是自定义view(一)呢?因为自定义view其实内容很多,变化也很多,所以我会慢慢更新博客,争取多写的有关的东西,同时,如果我以后学到了新的有关于自定义view的东西,我也会及时写出来。
同时,我在我的github上也上传了一些我写的自定义view,github地址:https://github.com/jiushi555/CustomView。
首先第一个问题,怎么进行自定义view,其实没有那么复杂,很简单,继承需要继承的View或是ViewGroup,重写其中的方法就可以了。那么我们需要重写哪几个方法呢?
我要现在来简单(只是简单)的了解一下view工作工程中使用的几个函数:
-
onMeasure:对应的是view绘制过程中的测量工作,同时也可以为控件制定一些默认的大小,尺寸。
- onLayout:对应的是view绘制工程中的布局工作,即制定view在父控件或是屏幕中的位置。
- onDraw:对应的是view绘制中的绘制过程,这里是实现自定义控件中的主要内容。同时为了避免内存为题所造成的OOM和ANR,在onDraw方法中劲量不要实现过于复杂的逻辑运算和耗时操作,同时在该方法中劲量不要实例化对象,因为onDraw方法在view绘制过程中可能会频繁调用,这样会不停的实例化对象。
上面的view工作过程,只是针对于view,不针对viewgrounp。
一、假如(这里只是假如),在我们继承view自定义控件的时候,设置宽高属性时使用了wrap_content的时候,我们要知道为其制定一个默认值,因为如果不指定默认值,在没有背景的时候会显示宽高都为0,有背景的时候,宽高都为match_parent。(具体原因也是view工作工程中的内容,这里不赘述),指定的方式也很简单,就是重写onMeasure就可以了。
protected void onMeasure(int widthMeasureSpec, int heightMeasureSpec) {
        super.onMeasure(widthMeasureSpec, heightMeasureSpec);
        int widthSpecMode = MeasureSpec.getMode(widthMeasureSpec);
        int widthSpecSize = MeasureSpec.getSize(widthMeasureSpec);
        int heightSpecMode = MeasureSpec.getMode(heightMeasureSpec);
        int heightSpectSize = MeasureSpec.getSize(heightMeasureSpec);
        if (widthSpecMode == MeasureSpec.AT_MOST && heightSpectSize == MeasureSpec.AT_MOST) {
            setMeasuredDimension(250, 250);
        } else if (widthSpecMode == MeasureSpec.AT_MOST) {
            setMeasuredDimension(250, heightSpectSize);
        } else if (heightSpecMode == MeasureSpec.AT_MOST) {
            setMeasuredDimension(widthSpecSize, 250);
        }
    }
上面的代码中就是指定默认宽高值为250,AT_MOST就是指定为wrap_content。
二、接下来就是实现自定义view了,其实我们要明白,无论多么复杂的自定义view都是由一个个view组合起来的,在进行自定义view的过程中,我们则一步步绘制那些view,在组合起来就可以了。比如说:
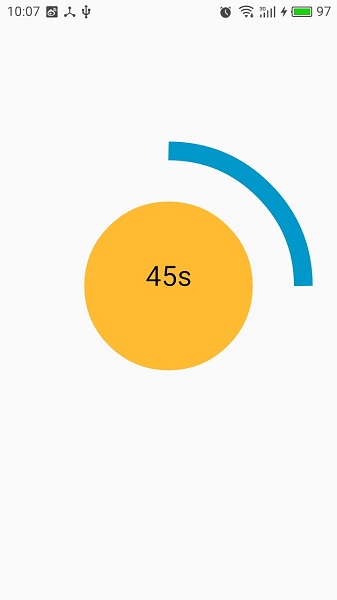
上面这幅图是我做的一个自定义view,实现了类似于一个倒计时的样子,我们分析上面的view是怎么组成的,中间一个圆形,外面的环形,和中间的数字。这样分析来是不是很简单,我们只要在onDraw方法中一步步绘制出来就好了。
protected void onDraw(Canvas canvas) {
        super.onDraw(canvas);

        //绘制圆形
        canvas.drawCircle(mCircleXY, mCircleXY, mRadius, mPaint1);
        //消除锯齿
        canvas.setDrawFilter(new PaintFlagsDrawFilter(0, Paint.ANTI_ALIAS_FLAG
                | Paint.FILTER_BITMAP_FLAG));

        mArcRectF = new RectF(
                (float) 0.1 * mLength,
                (float) 0.1 * mLength,
                (float) 0.9 * mLength,
                (float) 0.9 * mLength);
        //绘制环形
        canvas.drawArc(mArcRectF, 270, 360 - getAngle(), false, mPaint2);
        //绘制中间的文字
        canvas.drawText(mTimeValue, mCircleXY, mCircleXY, mPaint3);
        if (TIME > 0) {
            TIME--;
            //每秒刷新一次,实现倒计时效果
            postInvalidateDelayed(1000);
        }

    }
其中getAngle,是一个获取环形角度的函数,每次onDraw的时候会让TIME在大于0的时候自减,getAngle函数如下:
private int getAngle() {
        int angle;
        angle = 6 * TIME;
        mTimeValue = String.valueOf(TIME) + "s";
        return angle;
    }
整个view的代码如下;
public class CircleView extends View {
    private float mCircleXY, mLength, mRadius;
    private Paint mPaint1 = new Paint();
    private Paint mPaint2 = new Paint();
    private Paint mPaint3 = new Paint();
    private WindowManager mWM;
    private RectF mArcRectF;
    private int TIME = 60;
    private String mTimeValue = "60" + "s";
    private TypedArray ta;
    private int mArcWidth, mCircleColor, mArcColor, mTextSize, mTextColor;

    public CircleView(Context context) {
        super(context);
        ta = context.obtainStyledAttributes(R.styleable.CircleView);

        mPaint1.setStyle(Paint.Style.FILL);
        mPaint2.setStyle(Paint.Style.STROKE);
        mPaint3.setTextAlign(Paint.Align.CENTER);

        setValues();
    }

    public CircleView(Context context, AttributeSet attributeSet) {
        super(context, attributeSet);
        ta = context.obtainStyledAttributes(attributeSet, R.styleable.CircleView);

        mPaint1.setStyle(Paint.Style.FILL);
        mPaint2.setStyle(Paint.Style.STROKE);
        mPaint3.setTextAlign(Paint.Align.CENTER);

        setValues();
    }

    /**
     * 获取自定义属性并设置默认值
     */
    private void setValues() {
        mWM = (WindowManager) getContext()
                .getSystemService(Context.WINDOW_SERVICE);
        mLength = mWM.getDefaultDisplay().getWidth();
        mCircleXY = mLength / 2;
        mRadius = (float) (mLength * 0.5 / 2);
        if (ta.getDimension(R.styleable.CircleView_ArcWidth, 0) == 0) {
            mPaint2.setStrokeWidth(25);
        } else {
            mPaint2.setStrokeWidth(ta.getDimension(R.styleable.CircleView_ArcWidth, 0));
        }
        if (ta.getInt(R.styleable.CircleView_CircleColor, 0) == 0) {
            mPaint1.setColor(Color.YELLOW);
        } else {
            mPaint1.setColor(ta.getInt(R.styleable.CircleView_CircleColor, 0));
        }
        if (ta.getInt(R.styleable.CircleView_ArcColor, 0) == 0) {
            mPaint2.setColor(Color.BLUE);
        } else {
            mPaint2.setColor(ta.getInt(R.styleable.CircleView_ArcColor, 0));
        }
        if (ta.getDimension(R.styleable.CircleView_TextSize, 0) == 0) {
            mPaint3.setTextSize(25);
        } else {
            mPaint3.setTextSize(ta.getDimension(R.styleable.CircleView_TextSize, 0));
        }
        if (ta.getInt(R.styleable.CircleView_TextColor, 0) == 0) {
            mPaint3.setColor(Color.BLACK);
        } else {
            mPaint3.setColor(ta.getInt(R.styleable.CircleView_TextColor, 0));
        }
    }

    @Override
    protected void onDraw(Canvas canvas) {
        super.onDraw(canvas);

        //绘制圆形
        canvas.drawCircle(mCircleXY, mCircleXY, mRadius, mPaint1);
        //消除锯齿
        canvas.setDrawFilter(new PaintFlagsDrawFilter(0, Paint.ANTI_ALIAS_FLAG
                | Paint.FILTER_BITMAP_FLAG));

        mArcRectF = new RectF(
                (float) 0.1 * mLength,
                (float) 0.1 * mLength,
                (float) 0.9 * mLength,
                (float) 0.9 * mLength);
        //绘制环形
        canvas.drawArc(mArcRectF, 270, 360 - getAngle(), false, mPaint2);
        //绘制中间的文字
        canvas.drawText(mTimeValue, mCircleXY, mCircleXY, mPaint3);
        if (TIME > 0) {
            TIME--;
            //每秒刷新一次,实现倒计时效果
            postInvalidateDelayed(1000);
        }

    }

    /**
     * 获取环形角度
     *
     * @return
     */
    private int getAngle() {
        int angle;
        angle = 6 * TIME;
        mTimeValue = String.valueOf(TIME) + "s";
        return angle;
    }
}
三、实现自定义属性:
我们如何实现自定义属性,在xml布局文件中直接使用呢?
1、编辑attrs.xml,如果没有该文件,在values目录中新建即可。编辑内容如下:
<?xml version="1.0" encoding="utf-8"?>
<resources>
    <declare-styleable name="CircleView">
        <attr name="ArcWidth" format="dimension">

        </attr>
        <attr name="ArcColor" format="color|reference">

        </attr>
        <attr name="CircleColor" format="color|reference">

        </attr>
        <attr name="TextSize" format="dimension">

        </attr>
        <attr name="TextColor" format="color|reference">

        </attr>
    </declare-styleable>
</resources>
上面的代码中,<declare-styeable>表示编辑的集合,且命名为CircleView,改名字会在调用属性值得时候使用。<attr>表示每个自定义属性的名字和参数格式。
2、实现上面的属性
实现的过程需要在继承view的时候实现,代码如下;
ta = context.obtainStyledAttributes(attributeSet, R.styleable.CircleView);
上面是获取自定义属性的集合,其中R.styeable.CircleView就是我们在<declare-styeable>制定的名称,现在要让自定义中属性的值实现在view中:
mWM = (WindowManager) getContext()
                .getSystemService(Context.WINDOW_SERVICE);
        mLength = mWM.getDefaultDisplay().getWidth();
        mCircleXY = mLength / 2;
        mRadius = (float) (mLength * 0.5 / 2);
        if (ta.getDimension(R.styleable.CircleView_ArcWidth, 0) == 0) {
            mPaint2.setStrokeWidth(25);
        } else {
            mPaint2.setStrokeWidth(ta.getDimension(R.styleable.CircleView_ArcWidth, 0));
        }
        if (ta.getInt(R.styleable.CircleView_CircleColor, 0) == 0) {
            mPaint1.setColor(Color.YELLOW);
        } else {
            mPaint1.setColor(ta.getInt(R.styleable.CircleView_CircleColor, 0));
        }
        if (ta.getInt(R.styleable.CircleView_ArcColor, 0) == 0) {
            mPaint2.setColor(Color.BLUE);
        } else {
            mPaint2.setColor(ta.getInt(R.styleable.CircleView_ArcColor, 0));
        }
        if (ta.getDimension(R.styleable.CircleView_TextSize, 0) == 0) {
            mPaint3.setTextSize(25);
        } else {
            mPaint3.setTextSize(ta.getDimension(R.styleable.CircleView_TextSize, 0));
        }
        if (ta.getInt(R.styleable.CircleView_TextColor, 0) == 0) {
            mPaint3.setColor(Color.BLACK);
        } else {
            mPaint3.setColor(ta.getInt(R.styleable.CircleView_TextColor, 0));
        }
3、在xml布局文件中,为自定义属性赋值:
<?xml version="1.0" encoding="utf-8"?>
<LinearLayout xmlns:android="http://schemas.android.com/apk/res/android"
    xmlns:custom="http://schemas.android.com/apk/res-auto"
    android:layout_width="match_parent"
    android:layout_height="match_parent">

    <xml.org.customcircleview.CircleView
        android:layout_width="match_parent"
        android:layout_height="match_parent"
        android:layout_marginTop="100dp"
        custom:ArcWidth="20dp"
        custom:CircleColor="@android:color/holo_orange_light"
        custom:ArcColor="@android:color/holo_blue_dark"
        custom:TextColor="@android:color/black"
        custom:TextSize="30sp"/>


</LinearLayout>
上面的代码中,首先要加入:xmlns:custom="http://schemas.android.com/apk/res-auto",他是命名空间,表示调用自定义属性使用custom:就可以,和上面的
xmlns:android="http://schemas.android.com/apk/res/android"一样,这句表示使用android自带的属性使用android:就可以了。
 以上就是自定义控件的基本步骤,其中涉及到view的工作过程的知识,说实话,我个人感觉更复杂,这里就没有做更深入的讲解,以后有时间,会写博客专门简绍。同时这个博客只是
针对view没有实现继承viewgrounp的自定义控件实现,同时,自定义控件中还涉及到通过坐标系变换实现更复杂的绘制过程,画笔的多样化,这些东西都没有涉及,所以说自定义view
是一个很复杂、庞杂的内容,以后有时间会慢慢更新。
 这是整个项目的地址:https://github.com/jiushi555/CustomView/tree/master/CircleView
不是闷骚的程序员算不上程序员。我的微信公众号“那点鼻事”,在这里周一到周五每天一篇文章,与技术无关,只哈牛逼。
