 版权声明:署名,允许他人基于本文进行创作,且必须基于与原先许可协议相同的许可协议分发本文 (Creative Commons)
开始接触SpringMVC,都是新的开始,我就简单的说一下springMVC入门的案例:
1.首先创建maven管理的项目(这个就不用多说了,相信大家都是老手了)
2.引进依赖,由于我是需要什么依赖就引进什么依赖,所以我就没有将给定义好,我先列出比较实用的几个:
<dependencies>
<dependency>
<groupId>junit</groupId>
<artifactId>junit</artifactId>
<version>4.11</version>
<scope>test</scope>
</dependency>
<dependency>
<groupId>org.springframework</groupId>
<artifactId>spring-context</artifactId>
<version>5.1.5.RELEASE</version>
</dependency>
<dependency>
<groupId>org.springframework</groupId>
<artifactId>spring-web</artifactId>
<version>5.0.5.RELEASE</version>
</dependency>
<dependency>
<groupId>org.springframework</groupId>
<artifactId>spring-webmvc</artifactId>
<version>5.0.5.RELEASE</version>
</dependency>
<dependency>
<groupId>javax.servlet</groupId>
<artifactId>servlet-api</artifactId>
<version>2.5</version>
</dependency>
<dependency>
<groupId>javax.servlet</groupId>
<artifactId>jsp-api</artifactId>
<version>2.0</version>
<scope>provided</scope>
</dependency>
</dependencies>
- 1
- 2
- 3
- 4
- 5
- 6
- 7
- 8
- 9
- 10
- 11
- 12
- 13
- 14
- 15
- 16
- 17
- 18
- 19
- 20
- 21
- 22
- 23
- 24
- 25
- 26
- 27
- 28
- 29
- 30
- 31
- 32
- 33
- 34
- 35
- 36
- 37
- 38
- 39
- 40
- 41
3.创建好springMVC.xml的配置配置文件,由于我这里是刚刚开始,就只配置了注解扫描、视图解析器和springMVC的框架支持:
<!--开启注解扫描-->
<context:component-scan base-package="cn.com.controller"/>
<!--试图解析器 跳转到指定页面-->
<?xml version="1.0" encoding="UTF-8"?>
<beans xmlns="http://www.springframework.org/schema/beans"
xmlns:xsi="http://www.w3.org/2001/XMLSchema-instance"
xmlns:mvc="http://www.springframework.org/schema/mvc"
xmlns:context="http://www.springframework.org/schema/context"
xsi:schemaLocation="http://www.springframework.org/schema/beans http://www.springframework.org/schema/beans/spring-beans.xsd
http://www.springframework.org/schema/mvc http://www.springframework.org/schema/mvc/spring-mvc-3.2.xsd
http://www.springframework.org/schema/context http://www.springframework.org/schema/context/spring-context-3.2.xsd ">
<!--开启注解扫描-->
<context:component-scan base-package="cn.com.controller"/>
<!--试图解析器 跳转到指定页面-->
<bean id="internalResourceViewResolver" class="org.springframework.web.servlet.view.InternalResourceViewResolver">
<!--在那个位置-->
<property name="prefix" value="/WEB-INF/pages/"/>
<!--后缀名-->
<property name="suffix" value=".jsp"/>
</bean>
<!--开启springMVC框架支持-->
<mvc:annotation-driven/>
</beans>
- 1
- 2
- 3
- 4
- 5
- 6
- 7
- 8
- 9
- 10
- 11
- 12
- 13
- 14
- 15
- 16
- 17
- 18
- 19
- 20
- 21
- 22
- 23
- 24
- 25
- 26
- 27
- 28
如果需要头文件我一般是去网上搜的比较全的或者官网去copy:(这里给大家推荐一个 ps:应该是一个大佬的:https://blog.csdn.net/qq_33204709/article/details/81136484)
4.配置web.xml:
因为我是用注解开发的所以就必须配置web.xml;
<!DOCTYPE web-app PUBLIC
"-//Sun Microsystems, Inc.//DTD Web Application 2.3//EN"
"http://java.sun.com/dtd/web-app_2_3.dtd" >
<web-app>
<display-name>Archetype Created Web Application</display-name>
<!--配置servlet 前端控制器-->
<servlet>
<servlet-name>dispatcherServlet</servlet-name>
<servlet-class>org.springframework.web.servlet.DispatcherServlet</servlet-class>
<!--初始化参数-->
<init-param>
<param-name>contextConfigLocation</param-name>
<param-value>classpath:springmvc.xml</param-value>
</init-param>
<!--启动服务器就可以创建DispatcherServlet服务对象-->
<load-on-startup>1</load-on-startup>
</servlet>
<!--过滤全部-->
<servlet-mapping>
<servlet-name>dispatcherServlet</servlet-name>
<url-pattern>/</url-pattern>
</servlet-mapping>
</web-app>
- 1
- 2
- 3
- 4
- 5
- 6
- 7
- 8
- 9
- 10
- 11
- 12
- 13
- 14
- 15
- 16
- 17
- 18
- 19
- 20
- 21
- 22
- 23
- 24
- 25
- 26
- 27
- 28
5.创建一个类,类中使用@Controller来控制被注解扫描的类;
当请求映射的时候采用 @RequestMapping(path =""),因为使用上面配置了跳转的页面.
@Controller
public class helloController {
//请求映射  hello就是public的映射
@RequestMapping(path ="/hello")
public String sayHello(){
    System.out.println("hello springMVC");
    return "success";
}

}
- 1
- 2
- 3
- 4
- 5
- 6
- 7
- 8
- 9
- 10
- 11
6.创建两个jsp页面:
<%@ page contentType="text/html;charset=UTF-8" language="java" %>
<html>
<head>
    <title>Title</title>
</head>
<body>
    <h3>hello springMVC</h3>
    <a href="hello">入门springMVC</a>
</body>
</html>
- 1
- 2
- 3
- 4
- 5
- 6
- 7
- 8
- 9
- 10
这是一个链接页面,如果不出意外的话,这个将会触发控制类,控制类接受到到通过过滤,就会请求到一个新的页面
<%@ page contentType="text/html;charset=UTF-8" language="java" %>
<html>
<head>
    <title>Title</title>
</head>
<body>
    <h1>加载成功</h1>
</body>
</html>
- 1
- 2
- 3
- 4
- 5
- 6
- 7
- 8
- 9
效果
总结流程:
1.启动服务器,加载一些配置文件
1.1 DispatcherServlet创建这个对象
1.2 加载springmvc.xml
1.3 HelloController 创建成对象
2.发送请求 后台处理
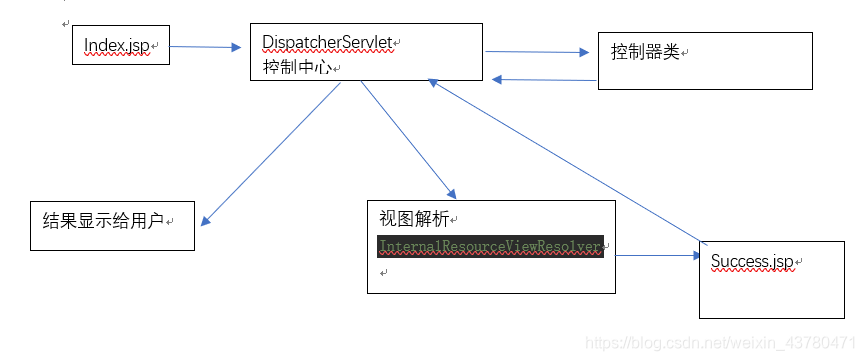 逻辑就是这样!
                                </div>
            <link href="https://csdnimg.cn/release/phoenix/mdeditor/markdown_views-e44c3c0e64.css" rel="stylesheet">
                </div>