一个web工程项目通常会有三个功能块,1、UI,2、Service,3、Dao,那么使用Maven创建web工程项目,就可以将工程分成多个模块开发
一、拆分原理
将三层的内容分别独立为一个项目,进一步将耦合性降低
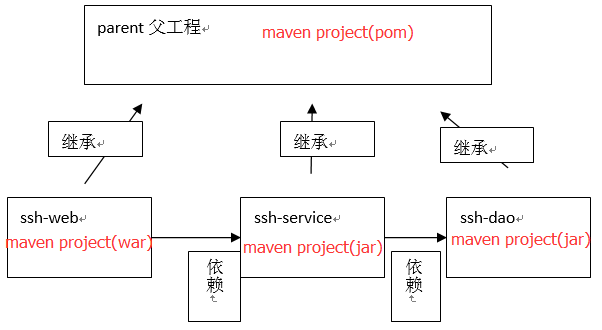
创建parent父工程来管理其下三个子模块并让其子模块继承:继承是为了消除重复,如果将dao、service、web分开创建独立的工程则每个工程的pom.xml文件中的内容存在重复,比如:设置编译版本、锁定spring的版本的等,可以将这些重复的配置提取出来在父工程的pom.xml中定义
web层调用service层的代码其实很简单,因为service是一个完整的项目,那么在web层想要使用别的项目中的方法,只需要通过maven添加依赖(pom.xml文件编写对应的坐标),ssh-web依赖ssh-service,ssh-service依赖ssh-dao。
二、Maven整合SSH(分模块)
Ⅰ、创建maven-parent父模块

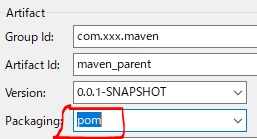 使用pom打包方式,为了使用maven的分模块开发功能
父工程结构:

父工程本身不写代码,它里面有一个pom.xml文件,这个文件可以将多个子模块中通用的jar所对应的坐标,集中在父工程中配置,将来的子模块就可以不需要在pom.xml中配置通用jar的坐标
Ⅱ、创建maven_dao

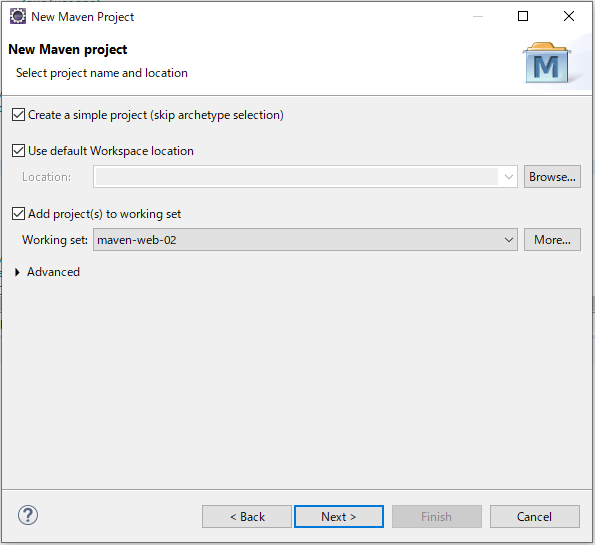
点击next

点击next
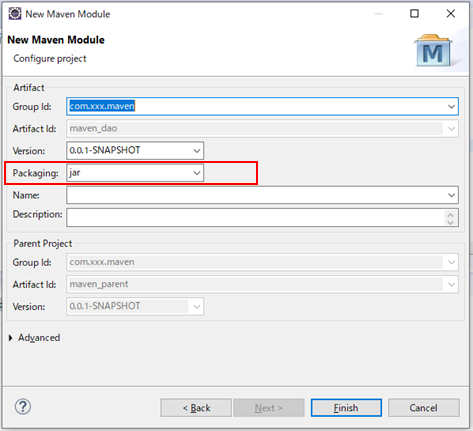
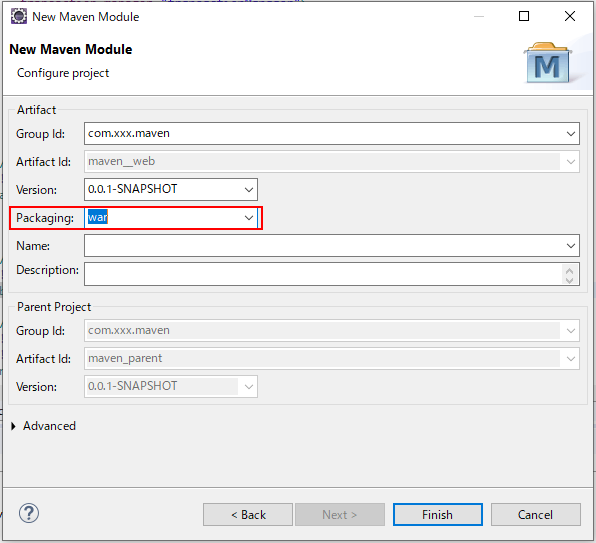
注意:打包方式为jar
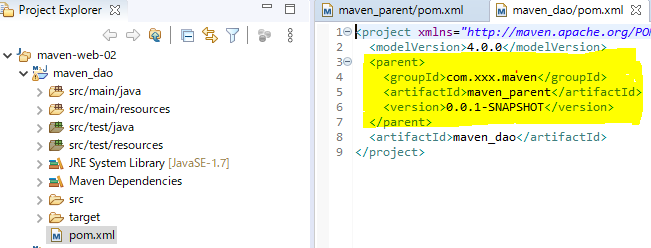
点击Finish,查看父工程中多出一个maven_dao的文件夹,并且父工程中的pom.xml文件中多出
    <modules>
        <module>maven_dao</module>
    </modules>

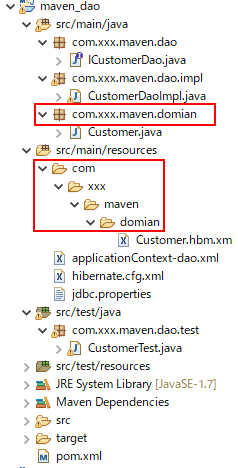
maven_dao的结构,和pom.xml内容
①、创建dao的接口、接口实现类和持久化类(class文件和映射文件)
注意:持久化类的java文件所在的包和xml文件所在的包名要一致,这样在以后打包时,就会把相同包名的文件放在一起
hibernate.cfg.xml配置:sessionFactory基本配置
<?xml version="1.0" encoding="UTF-8"?>
<!DOCTYPE hibernate-configuration PUBLIC
    "-//Hibernate/Hibernate Configuration DTD 3.0//EN"
    "http://www.hibernate.org/dtd/hibernate-configuration-3.0.dtd">
<hibernate-configuration>
    <session-factory>
        <!-- 配置Hibernate的方言 -->
        <property name="hibernate.dialect">org.hibernate.dialect.SQLServer2008Dialect</property>
        <!-- 控制台打印sql语句 -->
        <property name="hibernate.show_sql">true</property>
        <!-- 控制台打印sql语句 格式化-->
        <property name="hibernate.format_sql">false</property>
        <!-- 自动创建|更新|验证数据库表结构 -->
        <property name="hibernate.hbm2ddl.auto">update</property>
        <!-- 懒加载 -->
        <property name="hibernate.enable_lazy_load_no_trans">true</property>
        <!-- 实体类的验证 -->
        <property name="javax.persistence.validation.mode">none</property>
    </session-factory>
</hibernate-configuration>
配置数据库连接信息jdbc.properties
jdbc.driverClass=com.microsoft.sqlserver.jdbc.SQLServerDriver
jdbc.url=jdbc:sqlserver://localhost:1433;databaseName=HibernateDB;
jdbc.username=sa
jdbc.password=AAA@111
配置applicationContent_dao.xml:数据源(数据库连接信息)、sessionFactory(数据源注入,加载hibernate.cfg.xml,加载映射文件)、数据访问层(dao层)
<?xml version="1.0" encoding="UTF-8"?>
<beans xmlns="http://www.springframework.org/schema/beans"
    xmlns:xsi="http://www.w3.org/2001/XMLSchema-instance"
    xmlns:context="http://www.springframework.org/schema/context"
    xmlns:aop="http://www.springframework.org/schema/aop"
    xmlns:tx="http://www.springframework.org/schema/tx"
    xsi:schemaLocation="http://www.springframework.org/schema/beans
    http://www.springframework.org/schema/beans/spring-beans.xsd
    http://www.springframework.org/schema/context
    http://www.springframework.org/schema/context/spring-context.xsd
    http://www.springframework.org/schema/aop
    http://www.springframework.org/schema/aop/spring-aop.xsd
    http://www.springframework.org/schema/tx
    http://www.springframework.org/schema/tx/spring-tx.xsd">

    <!-- 引入数据库连接属性文件 -->
    <context:property-placeholder location="classpath:jdbc.properties" />

    <!-- 配置C3P0连接池 -->
    <bean id="dataSource" class="com.mchange.v2.c3p0.ComboPooledDataSource">
        <property name="driverClass" value="${jdbc.driverClass}" />
        <property name="jdbcUrl" value="${jdbc.url}" />
        <property name="user" value="${jdbc.username}" />
        <property name="password" value="${jdbc.password}" />
    </bean>

    <bean id="sessionFactory" class="org.springframework.orm.hibernate5.LocalSessionFactoryBean">
        <!-- 加载hibernate配置文件 -->
        <property name="configLocations" value="classpath:hibernate.cfg.xml" />

        <!-- 注入连接池 -->
        <property name="dataSource" ref="dataSource" />

        <!-- 配置映射 private String[] mappingResources;对应<list>标签 -->
        <property name="mappingLocations" value="classpath:com/xxx/maven/domain/*.hbm.xml"/>

    </bean>

    <bean id="customerDao" class="com.xxx.maven.dao.impl.CustomerDaoImpl" scope="prototype">
        <property name="sessionFactory" ref="sessionFactory"></property>
    </bean>
</beans>
②、编写测试
    @Test
    public void tt() {
    ApplicationContext applicationContext = new ClassPathXmlApplicationContext(
        "classpath:applicationContext-dao.xml");
    ICustomerDao dao = (ICustomerDao) applicationContext.getBean("customerDao");
    System.out.println(dao.findAll().size());
    }
Ⅲ、创建Service模块
与dao层的创建一样
Service结构
依赖dao层
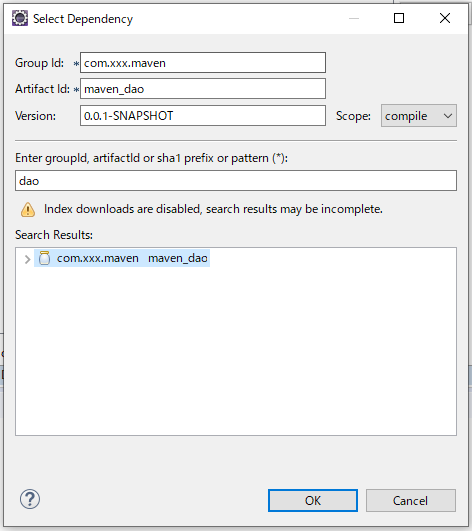
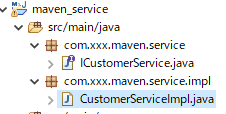
创建Service接口、Service接口实现类
配置applicationContext-service.xml:事务管理,通知,切面,业务
<?xml version="1.0" encoding="UTF-8"?>
<beans xmlns="http://www.springframework.org/schema/beans"
    xmlns:xsi="http://www.w3.org/2001/XMLSchema-instance"
    xmlns:context="http://www.springframework.org/schema/context"
    xmlns:aop="http://www.springframework.org/schema/aop"
    xmlns:tx="http://www.springframework.org/schema/tx"
    xsi:schemaLocation="http://www.springframework.org/schema/beans
    http://www.springframework.org/schema/beans/spring-beans.xsd
    http://www.springframework.org/schema/context
    http://www.springframework.org/schema/context/spring-context.xsd
    http://www.springframework.org/schema/aop
    http://www.springframework.org/schema/aop/spring-aop.xsd
    http://www.springframework.org/schema/tx
    http://www.springframework.org/schema/tx/spring-tx.xsd">

    <!-- 事务 -->
    <!-- hiberntae事务管理器,也需要将sessionFactory加进来,从hibernate中得代码就可以看出来,事务也是由sessionFactory获取来的 -->
    <bean id="transactionManager"
        class="org.springframework.orm.hibernate5.HibernateTransactionManager">
        <property name="sessionFactory" ref="sessionFactory" />
    </bean>
    <!-- 通知 -->
    <tx:advice id="txAdvice"
        transaction-manager="transactionManager">
        <tx:attributes>
            <tx:method name="save*" propagation="REQUIRED" />
            <tx:method name="insert*" propagation="REQUIRED" />
            <tx:method name="update*" propagation="REQUIRED" />
            <tx:method name="delete*" propagation="REQUIRED" />

            <tx:method name="get*" read-only="true" />
            <tx:method name="*" propagation="REQUIRED" />
        </tx:attributes>
    </tx:advice>
    <!-- 切面 -->
    <aop:config>
        <aop:pointcut id="pointcut"
            expression="execution(* com.xxx.maven.service.impl.*.*(..))" />
        <aop:advisor advice-ref="txAdvice" pointcut-ref="pointcut" />
    </aop:config>
    <!-- 业务 -->
    <bean id="customerService" class="com.xxx.maven.service.impl.CustomerServiceImpl">
        <property name="customerDao" ref="customerDao"></property>
    </bean>
    <!-- 测试使用 -->
    <import resource="classpath:applicationContext-dao.xml"/>
</beans>
编写测试代码
    @Test
    public void tt() {
    ApplicationContext applicationContext = new ClassPathXmlApplicationContext(
        "classpath:applicationContext-service.xml");
    ICustomerService service = (ICustomerService) applicationContext.getBean("customerService");
    System.out.println(service.findAll().size());
    }
注意:以上配置(import)只是测试使用,项目运行时要删掉此配置
Ⅳ、创建web模块
与DAO、Service创建方式一样,打包方式不同,web打包为war
解决违反Maven项目目录约定(webapp目录中没有WEB-INF和web.xml)

创建index.jsp测试web层
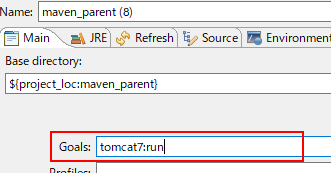
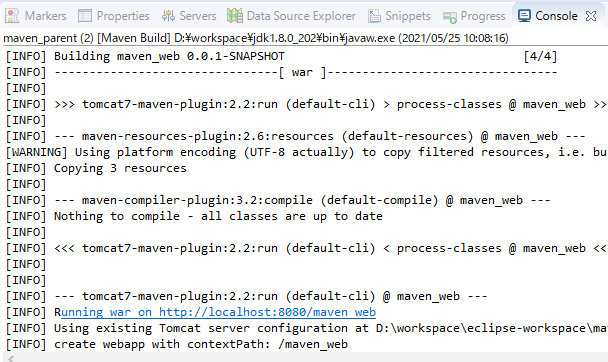
右击maven_parent => Run As => Maven build...
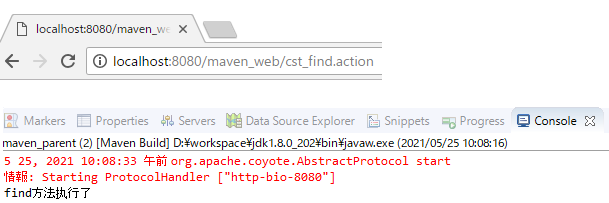
没有错误log,浏览器地址栏输入:http://localhost:8080/maven_web
创建Action
public class CustomerAction extends ActionSupport implements ModelDriven<Customer> {
    private Customer customer=new Customer();
    @Override
    public Customer getModel() {
    return customer;
    }

    // 属性注入
    private CustomerService customerService;

    public void setCustomerService(CustomerService customerService) {
        this.customerService = customerService;
    }

    public String find() {
    System.out.println("find方法执行了");
    customerService.findAll();
    return NONE;
    }

}
配置applicationContext-action.xml(管理Action)
<?xml version="1.0" encoding="UTF-8"?>
<beans xmlns="http://www.springframework.org/schema/beans"
    xmlns:xsi="http://www.w3.org/2001/XMLSchema-instance"
    xmlns:context="http://www.springframework.org/schema/context"
    xmlns:aop="http://www.springframework.org/schema/aop"
    xmlns:tx="http://www.springframework.org/schema/tx"
    xsi:schemaLocation="
        http://www.springframework.org/schema/beans
        http://www.springframework.org/schema/beans/spring-beans.xsd
        http://www.springframework.org/schema/context
        http://www.springframework.org/schema/context/spring-context.xsd
        http://www.springframework.org/schema/tx
        http://www.springframework.org/schema/tx/spring-tx.xsd
        http://www.springframework.org/schema/aop
        http://www.springframework.org/schema/aop/spring-aop.xsd
        ">

    <bean id="customerAction" class="com.xxx.maven.web.action.CustomerAction" scope="prototype">
        <property name="customerService" ref="customerService"></property>
    </bean>
</beans>
配置struts.xml(action访问方式)
<?xml version="1.0" encoding="UTF-8"?>
<!DOCTYPE struts PUBLIC
    "-//Apache Software Foundation//DTD Struts Configuration 2.3//EN"
    "http://struts.apache.org/dtds/struts-2.3.dtd">
<struts>
    <package name="default" namespace="/" extends="struts-default">
        <action name="cst_*" class="customerAction" method="{1}"></action>
    </package>
</struts>
配置web.xml(spring配置文件的加载的监听器、struts2核心过滤器)
<?xml version="1.0" encoding="UTF-8"?>
<web-app xmlns:xsi="http://www.w3.org/2001/XMLSchema-instance"
xmlns="http://java.sun.com/xml/ns/javaee"
xsi:schemaLocation="http://java.sun.com/xml/ns/javaee http://java.sun.com/xml/ns/javaee/web-app_2_5.xsd" version="2.5">
  <display-name>maven_web</display-name>

      <listener>
        <listener-class>org.springframework.web.context.ContextLoaderListener</listener-class>
    </listener>
    <context-param>
        <param-name>contextConfigLocation</param-name>
        <param-value>classpath*:applicationContext-*.xml</param-value>
    </context-param>


    <filter>
        <filter-name>struts2</filter-name>
        <filter-class>org.apache.struts2.dispatcher.ng.filter.StrutsPrepareAndExecuteFilter</filter-class>
    </filter>

    <filter-mapping>
        <filter-name>struts2</filter-name>
        <url-pattern>/*</url-pattern>
    </filter-mapping>

  <welcome-file-list>
    <welcome-file>index.jsp</welcome-file>
  </welcome-file-list>
</web-app>
访问action