本文章会将安装FTP服务器的步骤以及一些遇到的问题来记录下
因为项目中要与第三方对接数据,需要用到FTP服务器以提供他们每天上传数据,因为之前在本地的VMware虚拟机上部署过一次,这次则在天翼云上部署。
首先,我们执行安装命令:yum install -y vsftpd

执行后会自动下载,然后安装,如下:
Loaded plugins: fastestmirror, security
Determining fastest mirrors
 * base: mirrors.163.com
 * extras: mirrors.163.com
 * updates: mirrors.163.com
base                                                                                                                                                                                                                  | 3.7 kB     00:00
extras                                                                                                                                                                                                                | 3.4 kB     00:00
extras/primary_db                                                                                                                                                                                                     |  26 kB     00:00
updates                                                                                                                                                                                                               | 3.4 kB     00:00
updates/primary_db                                                                                                                                                                                                    | 1.9 MB     00:00
Setting up Install Process
Resolving Dependencies
--> Running transaction check
---> Package vsftpd.x86_64 0:2.2.2-24.el6 will be installed
--> Finished Dependency Resolution

Dependencies Resolved

=============================================================================================================================================================================================================================================
 Package                                                 Arch                                                    Version                                                         Repository                                             Size
=============================================================================================================================================================================================================================================
Installing:
 vsftpd                                                  x86_64                                                  2.2.2-24.el6                                                    base                                                  156 k

Transaction Summary
=============================================================================================================================================================================================================================================
Install       1 Package(s)

Total download size: 156 k
Installed size: 340 k
Downloading Packages:
vsftpd-2.2.2-24.el6.x86_64.rpm                                                                                                                                                                                        | 156 kB     00:00
Running rpm_check_debug
Running Transaction Test
Transaction Test Succeeded
Running Transaction
  Installing : vsftpd-2.2.2-24.el6.x86_64                                                                                                                                                                                                1/1
  Verifying  : vsftpd-2.2.2-24.el6.x86_64                                                                                                                                                                                                1/1

Installed:
  vsftpd.x86_64 0:2.2.2-24.el6

Complete!
以上就代表安装成功了!
安装成功后我们进入FTP文件夹查看是否有问题,FTP在Linux上名称为 vsftpd ,默认安装在 /etc/vsftpd 目录下;
执行: 命令,进入FTP文件夹中查看文件,会看有四个文件,如下:
-rw------- 1 root root  125 Mar 22  2017 ftpusers  黑名单文件,此文件里的用户不允许访问 FTP 服务器
-rw------- 1 root root  361 Mar 22  2017 user_list  白名单文件,是允许访问 FTP 服务器的用户列表
-rw------- 1 root root 4599 Mar 22  2017 vsftpd.conf  核心配置文件
-rwxr--r-- 1 root root  338 Mar 22  2017 vsftpd_conf_migrate.sh  FTP服务
安装完成之后先不要着急配置,我们先给Linux系统添加一个用户,一个登录FTP服务器的用户;
执行  命令,创建一个 ftpuser 的用户,
执行 命令,修改此用户的密码。
这里需要限制FTP登录的人数,我们进入 vsftpd 目录下的 user_list 中修改,如下:
# vsftpd userlist
# If userlist_deny=NO, only allow users in this file
# If userlist_deny=YES (default), never allow users in this file, and
# do not even prompt for a password.
# Note that the default vsftpd pam config also checks /etc/vsftpd/ftpusers
# for users that are denied.
root
ftpuser
user_list 里面的内容是能够登录FTP的用户列表,若是不想让其他用户登录,则删除该文件内的其他用户名,仅保留我们刚才创建的一个用户(root为系统管理员,若是不需要也可以删除)。
完成以上步骤我们接下来要配置 vsftpd.conf 这个核心文件,下面是该文件里的内容:
# Example config file /etc/vsftpd/vsftpd.conf
#
# The default compiled in settings are fairly paranoid. This sample file
# loosens things up a bit, to make the ftp daemon more usable.
# Please see vsftpd.conf.5 for all compiled in defaults.
#
# READ THIS: This example file is NOT an exhaustive list of vsftpd options.
# Please read the vsftpd.conf.5 manual page to get a full idea of vsftpd's
# capabilities.
#
# Allow anonymous FTP? (Beware - allowed by default if you comment this out).
anonymous_enable=YES
#
# Uncomment this to allow local users to log in.
local_enable=YES
#
# Uncomment this to enable any form of FTP write command.
write_enable=YES
#
# Default umask for local users is 077. You may wish to change this to 022,
# if your users expect that (022 is used by most other ftpd's)
local_umask=022
#
# Uncomment this to allow the anonymous FTP user to upload files. This only
# has an effect if the above global write enable is activated. Also, you will
# obviously need to create a directory writable by the FTP user.
#anon_upload_enable=YES
#
# Uncomment this if you want the anonymous FTP user to be able to create
# new directories.
#anon_mkdir_write_enable=YES
#
# Activate directory messages - messages given to remote users when they
# go into a certain directory.
dirmessage_enable=YES
#
# The target log file can be vsftpd_log_file or xferlog_file.
# This depends on setting xferlog_std_format parameter
xferlog_enable=YES
#
# Make sure PORT transfer connections originate from port 20 (ftp-data).
connect_from_port_20=YES
#
# If you want, you can arrange for uploaded anonymous files to be owned by
# a different user. Note! Using "root" for uploaded files is not
# recommended!
#chown_uploads=YES
#chown_username=whoever
#
# The name of log file when xferlog_enable=YES and xferlog_std_format=YES
# WARNING - changing this filename affects /etc/logrotate.d/vsftpd.log
#xferlog_file=/var/log/xferlog
#
# Switches between logging into vsftpd_log_file and xferlog_file files.
# NO writes to vsftpd_log_file, YES to xferlog_file
xferlog_std_format=YES
#
# You may change the default value for timing out an idle session.
#idle_session_timeout=600
#
# You may change the default value for timing out a data connection.
#data_connection_timeout=120
#
# It is recommended that you define on your system a unique user which the
# ftp server can use as a totally isolated and unprivileged user.
#nopriv_user=ftpsecure
#
# Enable this and the server will recognise asynchronous ABOR requests. Not
# recommended for security (the code is non-trivial). Not enabling it,
此配置我们仅需要修改一个地方,就是匿名用户登录的时候将其禁止,然后指定FTP根目录就行了,其他的也可以自行查找网上的一些方式来配置。
修改: 改为 NO,禁止匿名用户访问。
新增: 指定用户访问主目录(FTP文件存放目录)。
但是目前没有这个文件夹,所以我们需要创建这个文件夹,命令:
然后更改目录访问用户,命令:
需要注意的是:当是从阿里云或者天翼云上部署FTP的时候,当部署完毕之后一定要开放你的端口规则,不然你是无法访问默认端口的(也就是你无法访问FTP服务器,默认端口为21,20)!!!

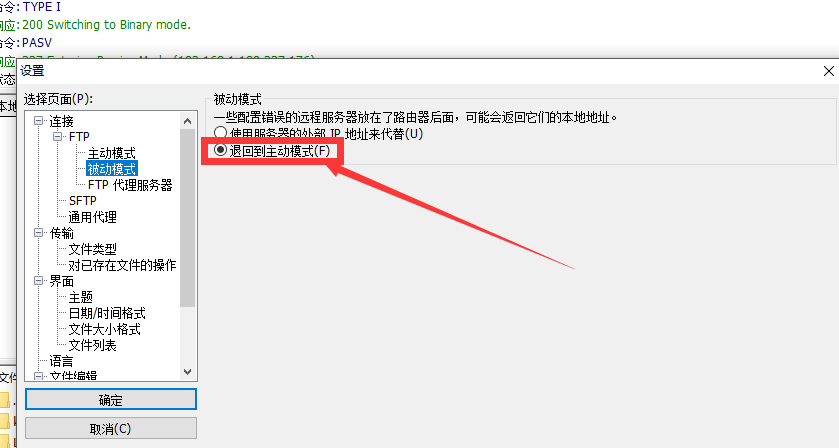
使用filezilla连接试试,我出现了如下问题:

这是FTP的主动模式和被动模式造成的,所以我选择了一个很简单的方式来解决:如下
登录成功了,然后又出现了一个新的问题:
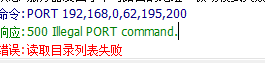
在防火墙内开放 21 端口即可,如下:
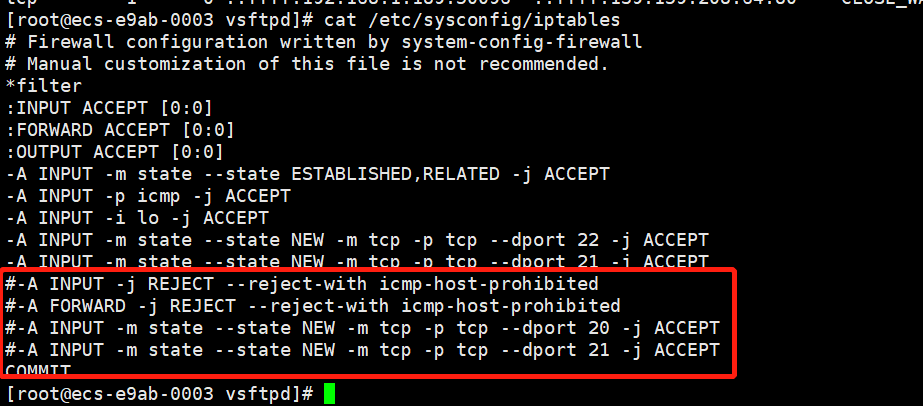
再访问,就好了:
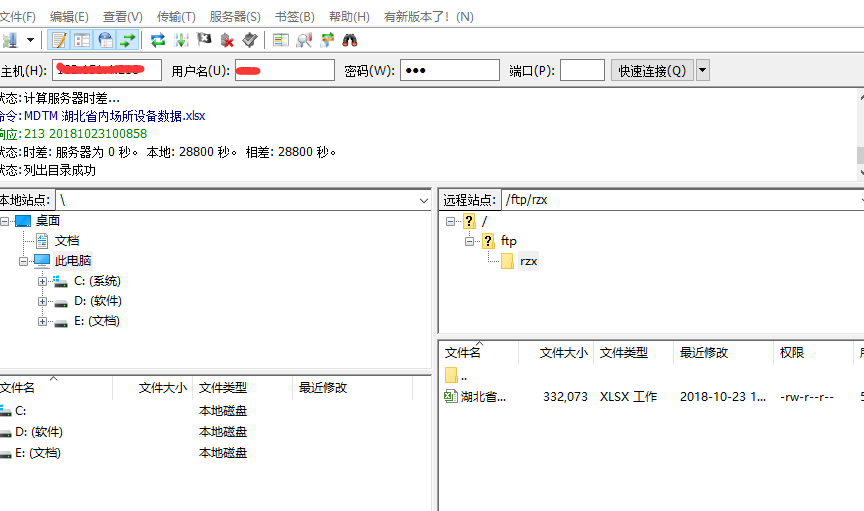
FTP就部署完成了,其实部署过程中很多坎坷,所以一定要多思考,路漫漫其修远兮!