-------------------------------Spring整合Hibernate-------------------------------
一、为什么要整合Hibernate?
1、使用Spring的IOC功能管理SessionFactory对象
LocalSessionFactoryBean
2、使用Spring管理Session对象
HibernateTemplate
3、使用Spring的功能实现声明式的事务管理
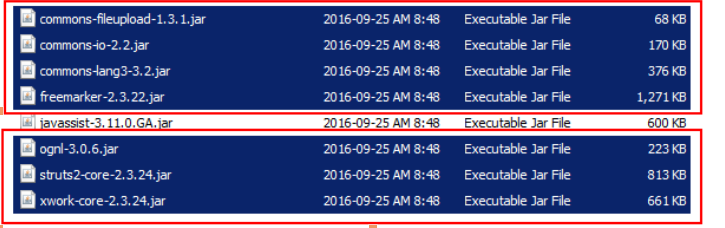
二、引入Spring和Hibernate公共的JAR文件(共计28个)
Spring-orm是Spring和hibernate整合的核心JAR文件


以股票案例为例--添加股票:
1.搭建分层 在entity中定义一个名称为Stock的类,并封装属性。 同时定义了名称Stock.hbm.xml
Stock:

Stock.hbm.xml:

定义接口IStockDao,并自定义add方法
public interface IStockDao {
 //添加账户
 public int addStock(Stock stock);

}
定义接口实现类StockDaoImpl,并重写add(),在该类中植入sessionFactory,通过调用getCurrentSession()中的save方法获取到stock

业务逻辑层Service。定义接口IStockService
public interface IStockService {

	// 添加股票
	public int addStock(Stock stock);

}
接口的实现类,StockServiceImpl实现接口,重写方法,并返回到dao的add方法
public class StockServiceImpl implements IStockService{
    //植入dao

	private IStockDao stockDao;

    //添加股票
	public int addStock(Stock stock) {
		return stockDao.addStock(stock);
	}
applicationContext.xml大配置:※※※※※※※
注:在大配置中,首先需要配置C3P0数据源,打通与Oracle的连接,其次是事务管理器,以及SessionFactory的配置,并植入DataSource数据源,各种hibernate属性并关联小配置。最后就是配置DAO以及Service
<?xml version="1.0" encoding="UTF-8"?>
<beans xmlns="http://www.springframework.org/schema/beans"
    xmlns:xsi="http://www.w3.org/2001/XMLSchema-instance"
    xmlns:context="http://www.springframework.org/schema/context"
    xmlns:aop="http://www.springframework.org/schema/aop"
    xmlns:tx="http://www.springframework.org/schema/tx"
    xsi:schemaLocation="
        http://www.springframework.org/schema/beans http://www.springframework.org/schema/beans/spring-beans.xsd
        http://www.springframework.org/schema/context http://www.springframework.org/schema/context/spring-context.xsd
        http://www.springframework.org/schema/aop http://www.springframework.org/schema/aop/spring-aop.xsd
        http://www.springframework.org/schema/tx http://www.springframework.org/schema/tx/spring-tx.xsd">

  <!-- sessionFactory 的配置-->
  <bean id="sessionFactory" class="org.springframework.orm.hibernate3.LocalSessionFactoryBean">
  <!-- 数据源 -->
  <property name="dataSource" ref="dataSource"></property>
  <!-- 各种hibernate属性 -->
  <property name="hibernateProperties">
  <props>
  <prop key="hibernate.dialect">org.hibernate.dialect.Oracle10gDialect</prop>
  <prop key="hibernate.show_sql">true</prop>
  <prop key="hibernate.format_sql">true</prop>
  <prop key="hibernate.current_session_context_class">org.springframework.orm.hibernate3.SpringSessionContext</prop>
  </props>
  </property>

  <!-- 引入小配置 -->
  <property name="mappingLocations" value="classpath:cn/happy/entity/Stock.hbm.xml"></property>
  </bean>

   <!-- c3p0数据源 -->
   <bean id="dataSource" class="com.mchange.v2.c3p0.ComboPooledDataSource">
      <property name="driverClass" value="oracle.jdbc.OracleDriver"></property>
      <property name="jdbcUrl" value="jdbc:oracle:thin:@localhost:1521:orcl"></property>
      <property name="user" value="wj"></property>
      <property name="password" value="9090"></property>
   </bean>


  <!-- StockDAO -->
  <bean id="stockDao" class="cn.happy.daoImpl.StockDaoImpl">
  <property name="sessionFactory" ref="sessionFactory"></property>
  </bean>

  <!-- StockService -->
  <bean id="service" class="cn.happy.serviceImpl.StockServiceImpl">

  <property name="stockDao" ref="stockDao"></property>
  </bean>

  <!-- 事务管理器 -->
  <bean id="mytx" class="org.springframework.orm.hibernate3.HibernateTransactionManager">
  <property name="sessionFactory" ref="sessionFactory"></property>
  </bean>


 <!--Aspectj AOP配置事务 -->

 <tx:advice id="txAdvice" transaction-manager="mytx">
 <tx:attributes>
 <tx:method name="add*" isolation="DEFAULT" propagation="REQUIRED"/>
 </tx:attributes>
 </tx:advice>

 <aop:config>
 <aop:pointcut expression="execution(* *..service .*.*(..))" id="pointcut"/>
 <aop:advisor advice-ref="txAdvice" pointcut-ref="pointcut"/>
 </aop:config>

</beans>
测试类:
public class Test01 {
@Test
public void addTest(){
	ApplicationContext ctx=new ClassPathXmlApplicationContext("applicationContext.xml");

	IStockService service=(IStockService)ctx.getBean("service");

	Stock stock=new Stock();
	stock.setSname("逗比");
	stock.setCount(22);

	service.addStock(stock);
	System.out.println("ok!!!");
}
实现效果:

-------------------------------Spring整合Struts-------------------------------
1、引入JAR文件:
在Struts2中 :struts2-spring-plugin-2.3.24.jar
作用: 获取容器,读取Spring容器创建的各个bean
在Spring中: spring-web-4.2.0.RELEASE.jar
作用:在ServletContext初始化的时候自动注入Spring容器
2、创建Action类StockAction并继承ActionSupport

3、编写struts.xml

大配置:applicationContext.xml。需要在Action中注入Service

4、Web.xml的配置:[核心点]---需指定配置文件的位置和监听器。
监听器作用是在整个网站运行的时候,获取到ServletContext(application)初始化的时候,自动
注入Spring容器!
<?xml version="1.0" encoding="UTF-8"?>
<web-app version="2.5"
	xmlns="http://java.sun.com/xml/ns/javaee"
	xmlns:xsi="http://www.w3.org/2001/XMLSchema-instance"
	xsi:schemaLocation="http://java.sun.com/xml/ns/javaee
	http://java.sun.com/xml/ns/javaee/web-app_2_5.xsd">
  <display-name></display-name>
  <welcome-file-list>
    <welcome-file>index.jsp</welcome-file>
  </welcome-file-list>

   <!-- 指定配置文件的位置和名称 -->
   <context-param>
   <param-name>contextConfigLocation</param-name>
   <param-value>classpath:applicationContext.xml</param-value>
   </context-param>

   <!-- 监听器  作用是在整个网站运行的时候,获取到ServletContext(application)初始化的时候,自动
    注入Spring容器-->

    <listener>
    <listener-class>org.springframework.web.context.ContextLoaderListener</listener-class>
    </listener>

  <filter>
  <filter-name>struts</filter-name>
  <filter-class>org.apache.struts2.dispatcher.ng.filter.StrutsPrepareAndExecuteFilter</filter-class>
  </filter>

 <filter-mapping>
 <filter-name>struts</filter-name>
 <url-pattern>/*</url-pattern>
 </filter-mapping>
</web-app>
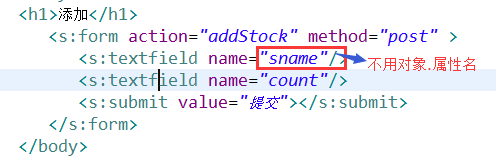
5、准备简单的表单页面
实现效果:


