用例spring_cloud_demo 项目地址:传送门
使用微服务架构的分布式系统,微服务之间通过网络通信。我们通过服务提供者与服务消费者来描述微服务间的调用关系。
服务提供者:服务的被调用方,提供调用接口的一方
服务消费者:服务的调用方,依赖于其他服务的一方
我们以电商系统中常见的用户下单为例,用户向订单微服务发起一个购买的请求。在进行保存订单之前需要调用商品微服务查询当前商品库存,单价等信息。在这种场景下,订单微服务就是一个服务消费者,商品微服务就是一个服务提供者

注意:后续学习的过程中都以下列项目例子进行学习;
一、数据库表
用户表
CREATE TABLE `tb_user` (
`id` int(11) NOT NULL AUTO_INCREMENT,
`username` varchar(40) DEFAULT NULL COMMENT '用户名',
`password` varchar(40) DEFAULT NULL COMMENT '密码',
`age` int(3) DEFAULT NULL COMMENT '年龄',
`balance` decimal(10,2) DEFAULT NULL COMMENT '余额',
`address` varchar(80) DEFAULT NULL COMMENT '地址',
PRIMARY KEY (`id`)
) ENGINE=InnoDB DEFAULT CHARSET=utf8
商品表
CREATE TABLE `tb_product` (
`id` int(11) NOT NULL AUTO_INCREMENT,
`product_name` varchar(40) DEFAULT NULL COMMENT '名称',
`status` int(2) DEFAULT NULL COMMENT '状态',
`price` decimal(10,2) DEFAULT NULL COMMENT '单价',
`product_desc` varchar(255) DEFAULT NULL COMMENT '描述',
`caption` varchar(255) DEFAULT NULL COMMENT '标题',
`inventory` int(11) DEFAULT NULL COMMENT '库存',
PRIMARY KEY (`id`)
) ENGINE=InnoDB AUTO_INCREMENT=2 DEFAULT CHARSET=utf8
订单表
CREATE TABLE `tb_order` (
`id` int(11) NOT NULL AUTO_INCREMENT,
`user_id` int(11) DEFAULT NULL COMMENT '用户id',
`product_id` int(11) DEFAULT NULL COMMENT '商品id',
`number` int(11) DEFAULT NULL COMMENT '数量',
`price` decimal(10,2) DEFAULT NULL COMMENT '单价',
`amount` decimal(10,2) DEFAULT NULL COMMENT '总额',
`product_name` varchar(40) DEFAULT NULL COMMENT '商品名',
`username` varchar(40) DEFAULT NULL COMMENT '用户名',
PRIMARY KEY (`id`)
) ENGINE=InnoDB DEFAULT CHARSET=utf8
二、 项目搭建环境
1、创建父工程spring_cloud_demo
在IDEA中创建父工程spring_cloud_demo 并引入坐标,pom文件如下:
?xml version="1.0" encoding="UTF-8"?> <project xmlns="http://maven.apache.org/POM/4.0.0" xmlns:xsi="http://www.w3.org/2001/XMLSchema-instance" xsi:schemaLocation="http://maven.apache.org/POM/4.0.0 http://maven.apache.org/xsd/maven-4.0.0.xsd"> <modelVersion>4.0.0</modelVersion> <groupId>cn.hzp</groupId> <artifactId>spring_cloud_demo</artifactId> <packaging>pom</packaging> <version>1.0-SNAPSHOT</version> <modules> <module>product_service</module> </modules> <parent> <groupId>org.springframework.boot</groupId> <artifactId>spring-boot-starter-parent</artifactId> <version>2.1.6.RELEASE</version> </parent> <properties> <project.build.sourceEncoding>UTF-8</project.build.sourceEncoding> <project.reporting.outputEncoding>UTF-8</project.reporting.outputEncoding> <java.version>1.8</java.version> </properties> <dependencies> <dependency> <groupId>org.springframework.boot</groupId> <artifactId>spring-boot-starter-web</artifactId> </dependency> <dependency> <groupId>org.springframework.boot</groupId> <artifactId>spring-boot-starter-logging</artifactId> </dependency> <dependency> <groupId>org.springframework.boot</groupId> <artifactId>spring-boot-starter-test</artifactId> <scope>test</scope> </dependency> <!--省略代码中 类的get set的方法--> <dependency> <groupId>org.projectlombok</groupId> <artifactId>lombok</artifactId> <version>1.18.4</version> <scope>provided</scope> </dependency> </dependencies> <dependencyManagement> <dependencies> <dependency> <groupId>org.springframework.cloud</groupId> <artifactId>spring-cloud-dependencies</artifactId> <version>Greenwich.RELEASE</version> <type>pom</type> <scope>import</scope> </dependency> </dependencies> </dependencyManagement> <repositories> <repository> <id>spring-snapshots</id> <name>Spring Snapshots</name> <url>http://repo.spring.io/libs-snapshot-local</url> <snapshots> <enabled>true</enabled> </snapshots> </repository> <repository> <id>spring-milestones</id> <name>Spring Milestones</name> <url>http://repo.spring.io/libs-milestone-local</url> <snapshots> <enabled>false</enabled> </snapshots> </repository> <repository> <id>spring-releases</id> <name>Spring Releases</name> <url>http://repo.spring.io/libs-release-local</url> <snapshots> <enabled>false</enabled> </snapshots> </repository> </repositories> <pluginRepositories> <pluginRepository> <id>spring-snapshots</id> <name>Spring Snapshots</name> <url>http://repo.spring.io/libs-snapshot-local</url> <snapshots> <enabled>true</enabled> </snapshots> </pluginRepository> <pluginRepository> <id>spring-milestones</id> <name>Spring Milestones</name> <url>http://repo.spring.io/libs-milestone-local</url> <snapshots> <enabled>false</enabled> </snapshots> </pluginRepository> </pluginRepositories> <build> <plugins> <plugin> <groupId>org.springframework.boot</groupId> <artifactId>spring-boot-maven-plugin</artifactId> </plugin> </plugins> </build> </project>
2、创建微服务工程子模块
-
创建订单微服务模块 order_service

-
创建商品微服务模块 product_service

子项目依赖坐标:
<dependencies> <dependency> <groupId>mysql</groupId> <artifactId>mysql-connector-java</artifactId> <version>5.1.32</version> </dependency> <dependency> <groupId>org.springframework.boot</groupId> <artifactId>spring-boot-starter-data-jpa</artifactId> </dependency> </dependencies>
编写实体类
product_service模块
package cn.hzp.product.domain; import lombok.Data; import javax.persistence.Entity; import javax.persistence.Id; import javax.persistence.Table; import java.math.BigDecimal; /** * 商品实体类-product_service模块 */ @Data @Entity @Table(name="tb_product") public class Product { @Id private Long id; private String productName; private Integer status; private BigDecimal price; private String productDesc; private String caption; private Integer inventory; }
order_service模块
package cn.hzp.order.domain; import lombok.Data; import java.math.BigDecimal; /** * 商品实体类-order_service模块 */ @Data public class Product { private Long id; private String productName; private Integer status; private BigDecimal price; private String productDesc; private String caption; private Integer inventory; }
这里使用了 lombok简化实体类的开发
Lombok能以简单的注解形式来简化java代码,提高开发人员的开发效率
编写dao接口
在product_service模块中创建 ProductDao 接口
package cn.hzp.product.dao; import cn.hzp.product.domain.Product; import org.springframework.data.jpa.repository.JpaRepository; import org.springframework.data.jpa.repository.JpaSpecificationExecutor; /** * 接口继承 * 使用spring的jpa功能生成增删改查的接口 */ public interface ProductDao extends JpaRepository<Product,Long>, JpaSpecificationExecutor<Product> { }
编写service层
在product_service模块中创建 ProductService
package cn.hzp.product.service; import cn.hzp.product.domain.Product; public interface ProductService { /** * 根据id查询 */ Product findById(Long id); /** * 保存 */ void save(Product product); /** * 更新 */ void update(Product product); /** * 删除 */ void delete(Long id); }
在product_service模块中创建ProductServiceImpl 实现类
package cn.hzp.product.service.cn.hzp.product.service; import cn.hzp.product.dao.ProductDao; import cn.hzp.product.domain.Product; import cn.hzp.product.service.ProductService; import org.springframework.beans.factory.annotation.Autowired; import org.springframework.stereotype.Service; @Service public class ProductServiceImpl implements ProductService { @Autowired private ProductDao productDao; @Override public Product findById(Long id) { return productDao.findById(id).get(); } @Override public void save(Product product) { productDao.save(product); } @Override public void update(Product product) { productDao.save(product); } @Override public void delete(Long id) { productDao.deleteById(id); } }
编写web层
在product_service模块中创建ProductController
package cn.hzp.product.controller; import cn.hzp.product.domain.Product; import cn.hzp.product.service.ProductService; import org.springframework.beans.factory.annotation.Autowired; import org.springframework.beans.factory.annotation.Value; import org.springframework.web.bind.annotation.*; @RestController @RequestMapping("/product") public class ProductController { @Autowired private ProductService productService; @RequestMapping(value = "/{id}",method = RequestMethod.GET) public Product findById(@PathVariable Long id) { Product product = productService.findById(id); return product; } @RequestMapping(value = "",method = RequestMethod.POST) public String save(@RequestBody Product product) { productService.save(product); return "保存成功"; } }
在order_service模块中创建OrderController
package cn.hzp.order.controller;; import cn.hzp.order.domain.Product; import org.springframework.beans.factory.annotation.Autowired; import org.springframework.web.bind.annotation.PathVariable; import org.springframework.web.bind.annotation.RequestMapping; import org.springframework.web.bind.annotation.RequestMethod; import org.springframework.web.bind.annotation.RestController; import org.springframework.web.client.RestTemplate; @RestController @RequestMapping("/order") public class OrderController {//注入restTemplate对象 @Autowired private RestTemplate restTemplate; @RequestMapping(value = "/buy/{id}",method = RequestMethod.GET) public Product findById(@PathVariable Long id) { Product product = restTemplate.getForObject("http://localhost:9001/product/"+id,Product.class); return product; } }
controller中使用的@GetMapping是一个组合注解,相当与@RequestMapping(method="get")。
类似的注解还有@PostMapping,@PutMapping,@DeleteMapping
配置启动类
在product_service模块中创建 ProductApplication 启动类
package cn.hzp.product; import org.springframework.boot.SpringApplication; import org.springframework.boot.autoconfigure.SpringBootApplication; import org.springframework.boot.autoconfigure.domain.EntityScan; @SpringBootApplication @EntityScan("cn.hzp.product.domain") public class ProductApplication { public static void main(String[] args) { SpringApplication.run(ProductApplication.class,args); } }
在order_service模块中创建OrderApplication 启动类
package cn.hzp.order; import org.springframework.boot.SpringApplication; import org.springframework.boot.autoconfigure.SpringBootApplication; import org.springframework.boot.autoconfigure.domain.EntityScan; import org.springframework.context.annotation.Bean; import org.springframework.web.client.RestTemplate; @SpringBootApplication @EntityScan("cn.hzp.order.domain") public class OrderApplication { /** * 使用spring提供的RestTemplate发送http请求到商品服务 * 1.创建RestTemplate对象交给容器管理 * 2.在使用的时候,调用其方法完成操作 (getXX,postxxx) */ @Bean public RestTemplate restTemplate() { return new RestTemplate(); } public static void main(String[] args) { SpringApplication.run(OrderApplication.class,args); } }
配置yml文件
在product_service模块中创建 application.yml配置文件
server:
  port: 9001 #端口
spring:
  application:
    name: service-product #服务名称
  datasource:
    driver-class-name: com.mysql.jdbc.Driver
    url: jdbc:mysql://192.168.126.99:3306/spring_cloud_demo?useUnicode=true&characterEncoding=utf8
    username: root
    password: root
  jpa:
    database: MySQL
    show-sql: true
    open-in-view: true
在order_service模块中创建 application.yml配置文件
server:
  port: 9002 #端口
spring:
  cloud:
    loadbalancer:
      retry:
        enabled: true # 开启Spring Cloud的重试功能
  application:
    name: service-order #服务名称
  datasource:
    driver-class-name: com.mysql.jdbc.Driver
    url: jdbc:mysql://192.168.126.99:3306/spring_cloud_demo?useUnicode=true&characterEncoding=utf8
    username: root
    password: root
  jpa:
    database: MySQL
    show-sql: true
    open-in-view: true
三、服务调用RestTemplate
前文已经编写了两个个基础的微服务,在用户下单时需要调用商品微服务获取商品数据。那应该怎么做呢?总人皆知商品微服务提供了供人调用的HTTP接口。所以可以再下定单的时候使用http请求的相关工具类完成,如常见的HttpClient,OkHttp,当然也可以使用Spring提供的RestTemplate
RestTemplate介绍
Spring框架提供的RestTemplate类可用于在应用中调用rest服务,它简化了与http服务的通信方式,统一了RESTful的标准,封装了http链接, 我们只需要传入url及返回值类型即可。相较于之前常用的HttpClient,RestTemplate是一种更优雅的调用RESTful服务的方式。
RestTemplate默认依赖JDK提供http连接的能力(HttpURLConnection),如果有需要的话也可以通过setRequestFactory方法替换为例如 Apache HttpComponents、Netty或OkHttp等其它HTTP library。
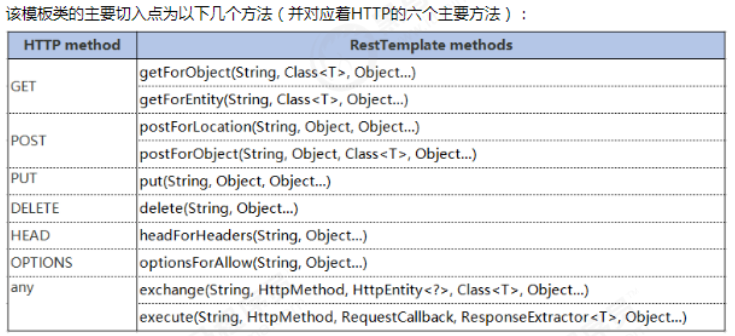
考虑到RestTemplate类是为调用REST服务而设计的,因此它的主要方法与REST的基础紧密相连就不足为奇了,后者是HTTP协议的方法:HEAD、GET、POST、PUT、DELETE和OPTIONS。例如,RestTemplate类具有headForHeaders()、getForObject()、postForObject()、put()和delete()等方法。
RestTemplate方法
通过RestTemplate调用微服务
项目例子中通过订单order_service服务去调用商品product_service服务
@RestController
@RequestMapping("/order")
public class OrderController {//注入restTemplate对象
    @Autowired
    private RestTemplate restTemplate;

    @RequestMapping(value = "/buy/{id}",method = RequestMethod.GET)
    public Product findById(@PathVariable Long id) {
        Product product = restTemplate.getForObject("http://localhost:9001/product/"+id,Product.class);
        return product;
    }

}
至此已经可以通过RestTemplate调用商品微服务的RESTFul API接口。但是我们把提供者的网络地址ip,端口)等硬编码到了代码中,这种做法存在许多问题:
-
应用场景有局限
-
无法动态调整url
那么应该怎么解决呢,就需要通过注册中心