参考这个博主https://blog.csdn.net/qq_34245464/article/details/100769643的博文,
使用VS Code再重新打造一次完美的嵌入式IDE平台。
前言
在我刚开始接触STM32的时候,使用的keil作为IDE,由于在这之前,我使用过VS, 使用过eclipse, 因而在我使用keil之后,实在难以忍受keil编辑器简陋的功能,可以说是极其糟糕的写代码体验
之后,我尝试过各种IDE,使用eclipse + keil,结果发现eclipse对C语言的支持也是鸡肋,使用emBits + gcc,需要和其他人协同的话就比较麻烦,之后发现了platformIO,也是使用gcc作为编译器,不过只支持HAL库,而且还有一个重要的原因,同事都是用的keil,如果我使用gcc,就不能协同工作了
最后,通过使用VS Code + keil的方式,完美解决了写代码的体验问题,以及工程协作问题
其实网上使用VS Code作为编辑器,keil作为编译器的教程很多,不过基本都是需要在VS Code中编辑,然后在keil中编译,下载,调试,本文就要实现编辑,编译,下载,调试,全部使用VS Code
环境
VS Code
keil
python
GNU Arm Embedded Toolchain(arm gcc工具链,这一部分原博主没有讲的很细,只是提了一下)
C/C++(VS Code 插件)
Cortex-Debug(VS Code 插件)
其他VS Code插件(提升体验)
前提
正式写代码之前,首先需要建立好一个工程,这个需要使用keil完成,包括工程配置,文件添加…
编辑
在安装好VS Code插件之后,VS Code编写C代码本身体验就已经很好了,但是,因为我们使用的是keil环境,所以需要配置头文件包含,宏定义等
在工程路径的.vscode文件夹下打开c_cpp_properties.json文件,没有自己新建一个,内容配置如下:
 1 {
 2     "configurations": [
 3         {
 4             "name": "STM32",
 5             "includePath": [
 6                 "D:/Program Files/MDK5/ARM/ARMCC/**",
 7                 "${workspaceFolder}/**",
 8                 ""
 9             ],
10             "browse": {
11                 "limitSymbolsToIncludedHeaders": true,
12                 "databaseFilename": "${workspaceRoot}/.vscode/.browse.c_cpp.db",
13                 "path": [
14                     "D:/Program Files/MDK5/ARM/ARMCC/**",
15                     "${workspaceFolder}/**",
16                     ""
17                 ]
18             },
19             "defines": [
20                 "_DEBUG",
21                 "UNICODE",
22                 "_UNICODE",
23                 "__CC_ARM",
24                 "USE_STDPERIPH_DRIVER",
25                 "STM32F10X_MD"
26             ],
27             "intelliSenseMode": "msvc-x64"
28         }
29     ],
30     "version": 4
31 }
其中,需要在includePath和path中添加头文件路径,${workspaceFolder}/**是工程路径,不用改动,额外需要添加的是keil的头文件路径
然后在defines中添加宏,也就是在keil的Options for Target的C++选项卡中配置的宏
然后就可以体验VS Code强大的代码提示,函数跳转等功能了(甩keil的编辑器一整个时代)
编译、烧录
编译和烧录通过VS Code的Task功能实现,通过Task,使用命令行的方式调用keil进行编译和烧录
keil本身就支持命令行调用,具体可以参考keil的手册,这里就不多说了,但是问题在于,使用命令行调用keil,不管是什么操作,他的输出都不会输出到控制台上!!!(要你这命令行支持有何用)
不过好在,keil支持输出到文件中,那我们就只能利用这个做点骚操作了————一边执行命令,一边读取文件内容并打印到控制台,从而就实现了输出在控制台上,我们就能直接在VS Code中看到编译过程了
为此,我编写了一个Python脚本,实现keil的命令行调用并同时读取文件输出到控制台
 1 #!/usr/bin/python
 2 # -*- coding:UTF-8 -*-
 3
 4 import os
 5 import threading
 6 import sys
 7
 8 runing = True
 9
10 def readfile(logfile):
11     with open(logfile, 'w') as f:
12         pass
13     with open(logfile, 'r') as f:
14         while runing:
15             line = f.readline(1000)
16             if line != '':
17                 line = line.replace('\', '/')
18                 print(line, end = '')
19
20 if __name__ == '__main__':
21     modulePath = os.path.abspath(os.curdir)
22     logfile = modulePath + '/build.log'
23     cmd = '"D:/Program Files/MDK5/UV4/UV4.exe" '
24     for i in range(1, len(sys.argv)):
25         cmd += sys.argv[i] + ' '
26     cmd += '-j0 -o ' + logfile
27     thread = threading.Thread(target=readfile, args=(logfile,))
28     thread.start()
29     code = os.system(cmd)
30     runing = False
31     thread.join()
32     sys.exit(code)
此脚本需要结合VS Code的Task运行,通过配置Task,我们还需要匹配输出中的错误信息(编译错误),实现在keil中,点击错误直接跳转到错误代码处,具体如何配置请参考VS Code的文档,这里给出我的Task
 1 {
 2     // See https://go.microsoft.com/fwlink/?LinkId=733558
 3     // for the documentation about the tasks.json format
 4     "version": "2.0.0",
 5     "tasks": [
 6         {
 7             "label": "build",
 8             "type": "shell",
 9             "command": "py",
10             "args": [
11                 "-3",
12                 "${workspaceFolder}/scripts/build.py",
13                 "-b",
14                 "${config:uvprojxPath}"
15             ],
16             "group": {
17                 "kind": "build",
18                 "isDefault": true
19             },
20             "problemMatcher": [
21                 {
22                     "owner": "c",
23                     "fileLocation": [
24                         "relative",
25                         "${workspaceFolder}/Project"
26                     ],
27                     "pattern": {
28                         "regexp": "^(.*)\((\d+)\):\s+(warning|error):\s+(.*):\s+(.*)$",
29                         "file": 1,
30                         "line": 2,
31                         "severity": 3,
32                         "code": 4,
33                         "message": 5
34                     }
35                 }
36             ]
37         },
38         {
39             "label": "rebuild",
40             "type": "shell",
41             "command": "py",
42             "args": [
43                 "-3",
44                 "${workspaceFolder}/scripts/build.py",
45                 "-r",
46                 "${config:uvprojxPath}"
47             ],
48             "group": "build",
49             "problemMatcher": [
50                 {
51                     "owner": "c",
52                     "fileLocation": [
53                         "relative",
54                         "${workspaceFolder}/Project"
55                     ],
56                     "pattern": {
57                         "regexp": "^(.*)\((\d+)\):\s+(warning|error):\s+(.*):\s+(.*)$",
58                         "file": 1,
59                         "line": 2,
60                         "severity": 3,
61                         "code": 4,
62                         "message": 5
63                     }
64                 }
65             ]
66         },
67         {
68             "label": "download",
69             "type": "shell",
70             "command": "py",
71             "args": [
72                 "-3",
73                 "E:\Work\Store\MyWork\STM32F1\FreeModbus_M3\scripts\build.py",
74                 "-f",
75                 "${config:uvprojxPath}"
76             ],
77             "group": "test"
78         },
79         {
80             "label": "open in keil",
81             "type": "process",
82             "command": "${config:uvPath}",
83             "args": [
84                 "${config:uvprojxPath}"
85             ],
86             "group": "test"
87         }
88     ]
89 }
对于使用ARM Compiler 6编译的工程,build和rebuild中的problemMatcher应该配置为
 1 "problemMatcher": [
 2     {
 3         "owner": "c",
 4         "fileLocation": ["relative", "${workspaceFolder}/MDK-ARM"],
 5         "pattern": {
 6             "regexp": "^(.*)\((\d+)\):\s+(warning|error):\s+(.*)$",
 7             "file": 1,
 8             "line": 2,
 9             "severity": 3,
10             "message": 4,
11         }
12     }
13 ]
文件中的config:uvPath和config:uvprojxPath分别为keil的UV4.exe文件路径和工程路径(.uvprojx),可以直接修改为具体路径,或者在VS Code的setting.json中增加对应的项
至此,我们已经完美实现了在VS Code中编辑,编译,下载了
编译输出:

有错误时输出:
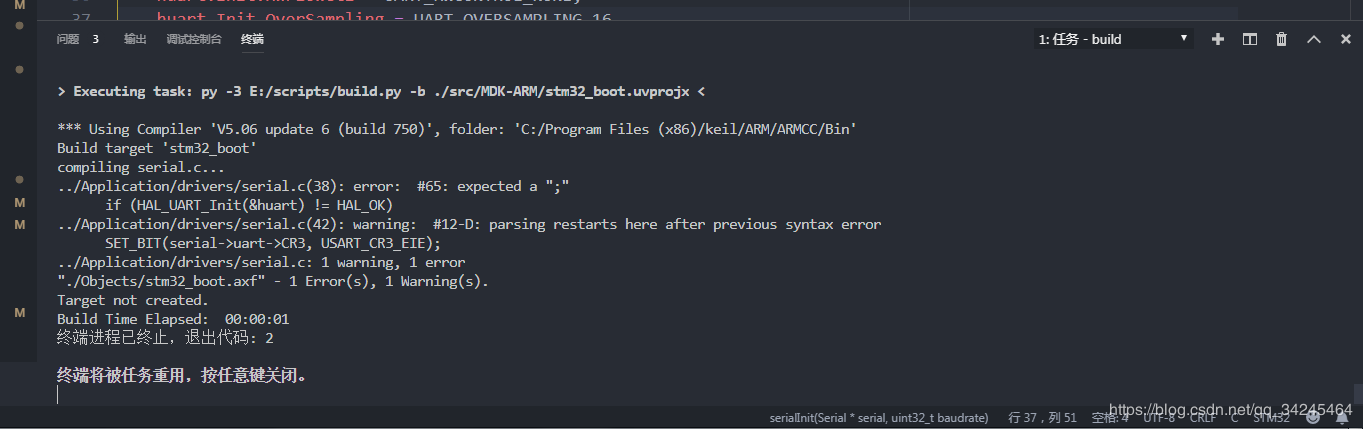
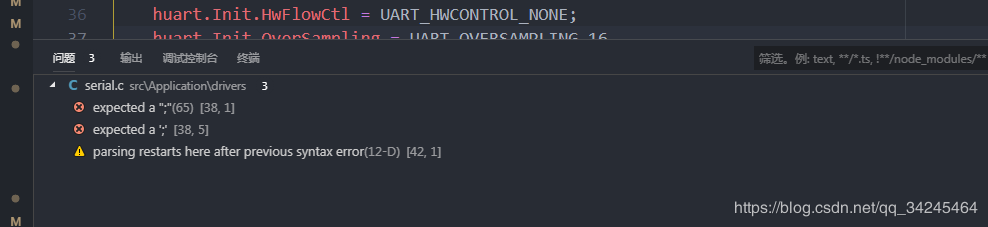
错误匹配:
调试
调试需要使用到Cortex-Debug插件,以及arm gcc工具链,这部分可以参考Cortex-Debug的文档,说的比较详细
首先安装Cortex-Debug插件和arm gcc工具链,然后配置好环境路径,如果使用Jlink调试,需要下载Jlink套件,安转好之后,找到JLinkGDBServerCL.exe这个程序,在VS Code的设置中添加"cortex-debug.JLinkGDBServerPath": "C:/Program Files (x86)/SEGGER/JLink/JLinkGDBServerCL.exe",后面的路径是你自己的路径。
这里补充一下arm gcc工具链的配置:
如果使用STLink调试,需要下载stutil工具,在GitHub上搜索即可找到,同样配置好路径即可。
以上步骤弄好之后,可以直接点击VS Code的调试按钮,此时会新建luanch.json文件,这个文件就是VS Code的调试配置文件,可参考我的文件进行配置
 1 {
 2     // 使用 IntelliSense 了解相关属性。
 3     // 悬停以查看现有属性的描述。
 4     // 欲了解更多信息,请访问: https://go.microsoft.com/fwlink/?linkid=830387
 5     "version": "0.2.0",
 6     "configurations": [
 7
 8         {
 9             "name": "Cortex Debug(JLINK)",
10             "cwd": "${workspaceRoot}",
11             "executable": "${workspaceRoot}/Project/Objects/Demo.axf",
12             "request": "attach",
13             "type": "cortex-debug",
14             "servertype": "jlink",
15             "device": "STM32F103C8",
16             "svdFile": "D:\Program Files\ARM\Packs\Keil\STM32F1xx_DFP\2.3.0\SVD\STM32F103xx.svd",
17             "interface": "swd",
18             "ipAddress": null,
19             "serialNumber": null
20         },
21         {
22             "name": "Cortex Debug(ST-LINK)",
23             "cwd": "${workspaceRoot}",
24             "executable": "${workspaceRoot}/Project/Objects/Demo.axf",
25             "request": "attach",
26             "type": "cortex-debug",
27             "servertype": "stutil",
28             "svdFile": "D:\Program Files\ARM\Packs\Keil\STM32F1xx_DFP\2.3.0\SVD\STM32F103xx.svd",
29             "device": "STM32F103C8",
30             "v1": false
31         }
32     ]
33 }
注意其中几个需要修改的地方,executable修改为你的工程生成的目标文件,也就是工程的.axf文件,svdFile用于对MCU外设的监控,该文件可以在keil的安装路径中找到,可以参考我的路径去找
配置完成后,再次点击调试按钮即可进行调试
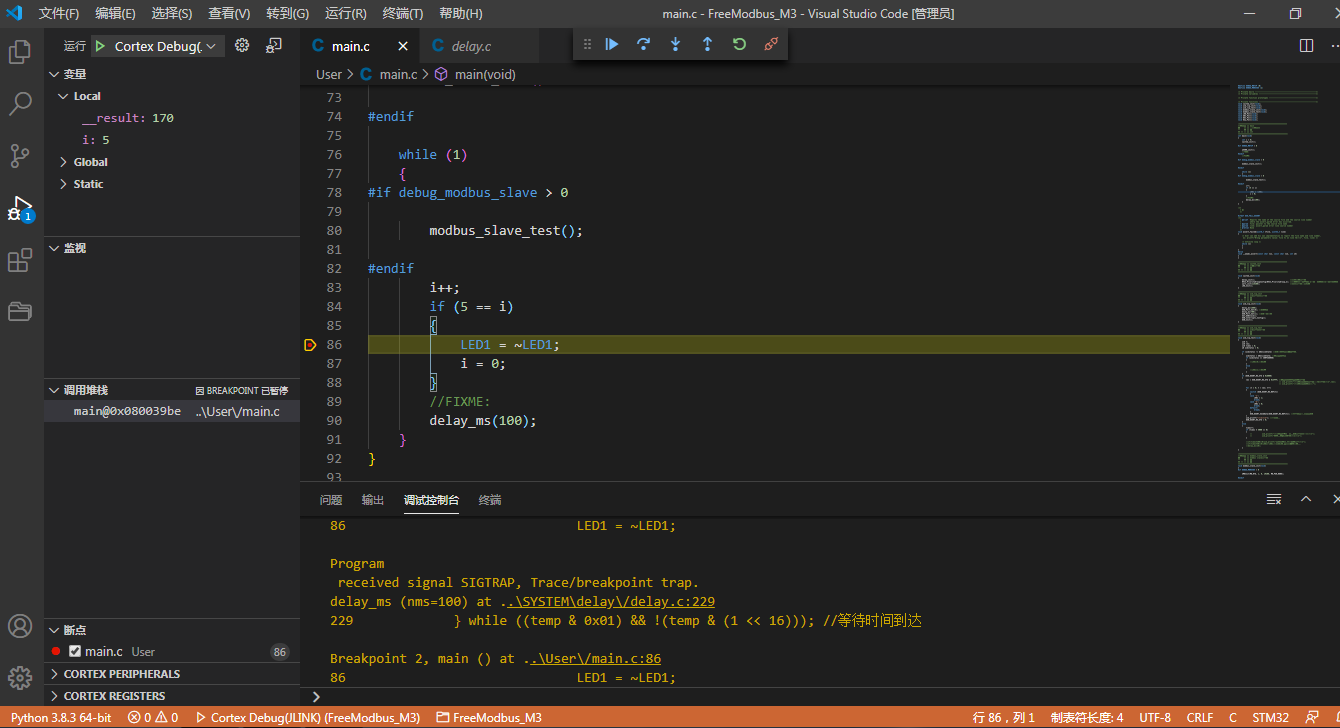
相比keil自己的调试功能,VS Code还支持条件断点,可以设置命中条件,次数等,可以极大的方便调试
总结
通过以上的配置,我们基本上,除了建立工程和往工程中添加文件,其他完全不需要打开keil,所以也无妨说一句,再见,智障keil!